This command line tool can be used to modify .x files or textures by specifying a script file and/or set of command line arguments. Each script is comprised of a series of script commands. The given script must specify at least one load command and one save command.
Compatibility Chart
| Direct3D 9 | Direct3D 9 EX | Direct3D 10 | 64-bit Native Mode | Windows XP | Windows Vista |
|---|---|---|---|---|---|
|
Yes |
No |
No |
No |
Yes |
Yes |
| Executable: | (SDK root)\Utilities\Bin\x86 or x64 |
| dxops [-f scriptfile] [-s "expression"] [-log filename] [-?] [-m] |
|---|
Where:
| Options | Description |
|---|---|
| -f scriptfile | A script file containing a series of script commands. |
| -s "script commands" | A string that contains a series of script commands. |
| -? | Shows help message. |
| -log filename | Name and location of the log file. If the file already exists, it will be overwritten. |
| -m path | Specifies a search path. When loading files, DXOps will search the relative path and also the path(s) specified with this command. Use -m multiple times to specify multiple paths. |
As a minimum, you must use at least the -f or -s switch option. If -f and -s are used together, they will be executed in the order they are specified. See example below.
Here are some sample usages of DXOps. For information on the script commands used in these examples, refer to DirectX Ops Script Commands.
Assume you have a file called tiger.x in the current directory, and you want to generate (or update) its vertex data (normals, tangents, and adjacency). You could do that from the command line like this:
dxops.exe -s "load tiger.x;" -f "script1.txt" -s "save new_tiger.x"
-s "load tiger.x;" loads the tiger mesh for modification.
-f "script1.txt" executes the script that will generate the normals, tangent frames, and adjacency data for the mesh. The AddVData commands add the fields to the tiger mesh's vertex declaraction (normals, tangents, and adjacency) and the Gen* commands fill those data fields.
Where script1.txt is:
AddVData type:FLOAT3 usage:NORMAL usageIdx:0;
GenNormals;
AddVData type:FLOAT3 usage:TANGENT usageIdx:0;
AddVData type:FLOAT3 usage:BINORMAL usageIdx:0;
GenTangentframes;
GenAdjacency;
-s "save new_tiger.x;" saves the newly modified tiger mesh to a file called new_tiger.x.
In this example we will be loading meshes from a folder and printing their data to a log file. Assume that you have .x files stored a folder called C:\myGameData\. From the command line:
dxops -m "C:\myGameData\" -log "modelData.txt" -s "load 'myModels\*.x'; meshes;"
The load command will first search myModels\ (relative to the current working directory) for *.x files, and if it does not find any then it will look in C:\myGameData\ for .x files. The -m option is used as a secondary directory for DXOps to search if it does not find the specified file. The -log option tells DXOps to write the data out to modelData.txt.
Almost all of the DXOps Script Commands have a name parameter that can take a string with .NET Framework Regular Expressions. In this example you will learn how to use these regular expressions to do a simple script on many different files with similar names.
Say you are developing a racing game and have a series of x files, one for each car, and each file follows the naming convention car_<name of car>.x. You wish to generate normals for each car. Using regular expressions you can run a script like this:
load car_1.x;
load car_2.x;
gennormals car_.*;
This will generate vertex normals for car_1 and car_2. The load command can optionally use DOS wildcards when specifying the file(s) to load, and gennormals uses .NET Framework Regular Expressions.
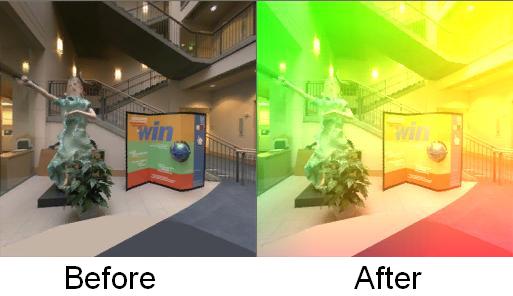
The shade script command can be used as a powerful tool for processing textures. It works very similarly to pixel and vertex shaders in that it will execute an algorithm defined in the High-Level Shader Language (HLSL).
Here is an example of how to use the shade script command to add a color blend effect to a cube map. It uses the LobbyCube.dds texture found in (SDK Root)\Samples\Media\Lobby.
From the command line:
dxops -f "shadeScript.txt"
Where shadeScript.txt is:
load 'LobbyCube.dds';
shade 'texShader.psh';
save 'LobbyShaded.dds';
Where texShader.psh is:
textureCUBE TargetTex;
samplerCUBE Target = sampler_state  //note that naming the sampler 'Target' will cause
{                                   //the shade command to initialize the sampler with
    Texture = (TargetTex);          //the destination texture.
    MinFilter = Linear;
    MagFilter = Linear;
};

float4 main(float3 UVW : TEXCOORD0, float3 PixelSize : TEXCOORD1) : COLOR
{
	float3 normUVW = (1.0f+UVW)*0.5;
	float4 color = float4(0,0,0,1);

	if(PixelSize.x == 0)
	{
		if(UVW.x > 0) //+
		{
			color.g = normUVW.y;//up
			color.r = 1.0f-normUVW.z;//right
		}
		else //-
		{
			color.g = normUVW.y;//up
			color.r = normUVW.z;//right
		}
	}

	if(PixelSize.y == 0)
	{

		if(UVW.y > 0) //+
		{
			color.g = 1.0f-normUVW.z;//up
			color.r = normUVW.x;//right
		}
		else //-
		{
			color.g = normUVW.z;//up
			color.r = normUVW.x;//right
		}
	}

	if(PixelSize.z == 0)
	{
		if(UVW.z > 0) //+
		{
			color.g = normUVW.y;//up
			color.r = normUVW.x;//right
		}
		else //-
		{
			color.g = normUVW.y;//up
			color.r = 1.0f-normUVW.x;//right
		}
	}
	return texCUBE(Target, UVW) + color;
}
After running this shader, the positive X of the cube map should look like this:

Note DDS cube map textures are viewable using the DirectX Texture Editor (dxtex.exe)