Some kinds of sounds inherently require run-time control to function correctly. For example, the sound of a car engine needs to have its volume and pitch adjusted according to gear and engine speed. Runtime parameter controls (RPCs) give the content creator control over how audio elements respond to changing conditions. The designer creates these controls and transfers them to the programmer for use in the title.
These controls are also known as sliders, because they mimic the function of slider controls on an audio mixing board.
To create and define an RPC, complete the following steps:
When you begin a new Microsoft Cross-Platform Audio Creation Tool (XACT) project, there are no RPCs available. You must create each that you want to use. You may create as many RPCs as you require. You do not need to create any RPCs if you do not need them.
To create a new RPC
Right-click the RPC Presets item in the XACT project tree.
Select the New RPC Preset option that is presented.
Figure 1. Creating a new runtime parameter control using the menu bar
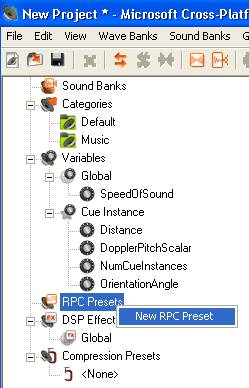
The new item has the default name RPC Preset.
Select the new RPC.
Press F2 and enter a more descriptive name for the RPC or if you prefer, change the Name property of the variable in the properties frame of the authoring tool.
When the RPC is selected in the project tree, its properties are displayed in the property frame, and can be changed. The following table describes the properties of an RPC as they appear in the property frame.
| Property Name | Description |
|---|---|
| Name | The given name of the RPC Preset. You can rename the RPC Preset by changing this selection, or by selecting the name displayed in the project tree frame. |
| Notes | Comments about the object. This information is visible to the author only and is not stored in generated banks. |
| NumberofAttachedSounds | Display only. The count of sounds currently attached to this RPC. |
| AttachedSounds | A list of all the sounds attached to the RPC. The Sound level below this property displays the properties of the sound currently selected in the drop-down list box. |
Once you have created an RPC preset, you need to define the variables that control it and how the levels will change to correspond to changes in those variables.
Creating a new RPC preset or double-clicking an existing preset in the project tree opens the RPC Settings dialog box; the example shown in Figure 2 already has data in it.
Figure 2. An RPC Settings dialog box showing preset data
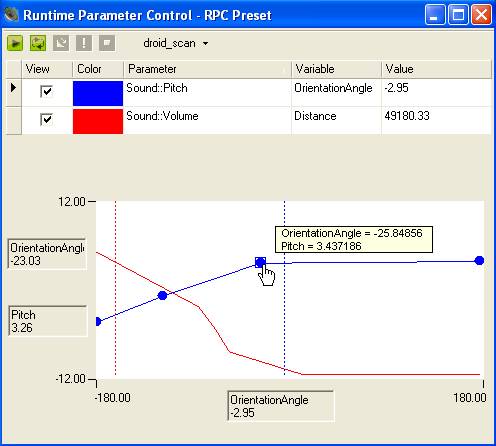
An RPC initially has a single curve, by default set to control Sound::Volume, the master volume control for the cue, according to the implicit variable Distance. The curve is a simple identity curve, which performs no effective action. You should change the settings of this curve to match your requirements, and define your own levels for the curve.
The curve settings portion of the dialog box allows you to change the following settings:
Selecting this checkbox makes the graph line for this parameter visible.
Clicking this allows you to select the color used to display the graph line for this parameter.
Specifies the output parameter to be changed by the variable.
The left side of the double-colon (::) in the parameter name refers to the track that the parameter controls, which may be a number between 1 and 255. Alternatively, this could specify Sound, which acts as a master parameter that applies to the sound.
For each track, or the master, parameters can be one of those shown in the following table.
| Parameter | Description |
|---|---|
| Volume | A changeable volume output level. |
| Pitch | A changeable pitch output level. |
| Reverb Send Level | A changeable amount of reverb sent by a reverb DSP attached to the sound. See XACT DSP Presets. |
Note These are the only parameters currently supported. Others, such as Equalizer Frequency and Filter Resonance, may be made available in future.
Specifies the variable that controls the output parameter. The drop-down list offers the variables you have created, as well as the implicit variables that the XACT automatically provides. To specify attack or release envelopes, use the corresponding implicit variables.
Shows the current value of the variable. You may edit this value to see how it will affect the output values. The vertical dashed line shown in the drawing region of the RPC dialog box represents the value.
If the View checkbox is selected in the curve settings, the curve is displayed in the drawing region of the RPC dialog box. Initially, only two points are defined on the curve, one at each end. To define any curve other than a simple straight-line ramp, you must add curve points that you can use to define a more complex shape.
To add curve points
Position the mouse to the place on the curve where you wish to add a point.
Right-click to display the options, then select Add.
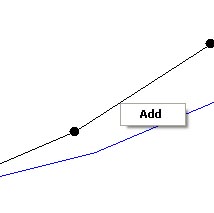
This creates a new point on the curve.
Click-and-drag the new point to any new position to change the curve.
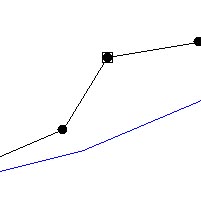
You can place curve points in absolutely arbitrary position, and there is no rule that says a curve has to constantly move up or down. You might also find it necessary to delete a curve point.
To delete curve points
Right-click the curve point to delete and then click Delete.
An RPC may be as complex as you require, with several levels being controlled by different variables, each with their own curve. For example, you can specify that the volume and pitch of the first track changes according to a variable you have defined called EngineRPM, while the master volume of the cue is controlled by the implicit variable Distance.
To add a new curve
Position the mouse in the region that displays the list of curve settings and right-click.
Figure 3. Adding a new curve by right-clicking the mouse.

Select the option Add new curve.
A new line of curve settings will appear in the list, and a new identity curve will be displayed in the drawing area.
Note You can also add a new curve by clicking in the curve settings and then pressing INSERT.
You can delete any curve that you no longer need.
To delete a curve
Position the mouse over the curve setting you wish to delete and right-click (this will also select the curve).
Select the option Delete selected curve.
The curve will be deleted.
Note You can also delete a curve by selecting it with the mouse and then pressing DELETE.
An RPC can apply (be "attached") to multiple sounds. Likewise, any sound can be attached to multiple RPCs. Depending on what associations you wish to make between RPCs and sounds, you may attach an RPC to multiple sounds, or sounds to multiple RPCs:
To attach an RPC to sounds
To attach a sound to RPCs
Once you have attached an RPC curve to one or more sounds, you may audition a sound using the RPC curve, and modify the RPC variable value to hear how the sound parameter is affected as the value changes.
To audition a sound associated with an RPC
Click the drop-down box at the top of the RPC dialog.
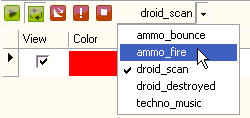
The list that drops down displays all of the sounds associated with the selected RPC.
From the list, click on the sound you wish to audition.
If you want the sound to repeat continuously, click the Repeat Playback button at the top of the RPC dialog so that it is enabled.
Figure 4. The Repeat Playback button

Click the Play button at the top of the RPC dialog.
Figure 5. The Play button

For more information on the auditioning toolbar and how to audition sounds, waves, and cues, see Auditioning with XACT for Windows
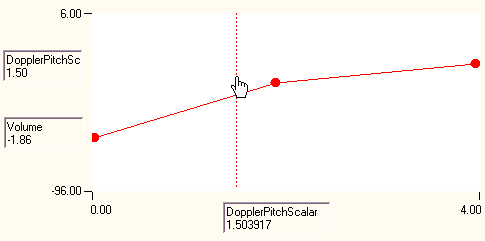
In the drawing region of the RPC dialog, a vertical dashed line is displayed for each curve, using the same color as the curve itself, in the drawing region of the RPC window. This dashed line represents the value of the variable associated with the RPC curve. You can modify this variable value to see what the RPC output value is for any given variable value, and if a sound is currently being auditioned, listen to the curves effects on the sound as you modify the value.
To modify variable values and test output values
You may optionally begin this step by auditioning a sound, following the instructions in the previous section.
Position the mouse on the vertical dashed line corresponding to the RPC curve whose variable value you want to modify.
Left-click and drag the line along the curve.
- OR -
Left-click the value in the column marked "Value" for the RPC curve whose variable value you want to modify.
Type the new value of the variable or drag the slider to increase or decrease the variable value.

If you are auditioning a sound, the sound's selected parameter will change as the value of the variable changes, allowing you to hear how the variable effects sound parameters.
If an RPC is no longer used, you may delete it.
To delete an RPC
Right-click the name of the RPC in the project tree, and then select Delete.
Note You can also select the RPC and then press the DELETE key.