A sound bank is a collection of instructions about how and when to play sounds. The programmer invokes sounds by their cues, and does not need to know anything about the sound or sounds that a cue uses.
This section steps through the process of building a sound bank using the Microsoft Cross-Platform Audio Creation Tool (XACT), which includes specifying the tracks that compose a sound, the events that compose tracks, and how to build cues from the sounds you define. For more information on the elements of sound banks, see XACT Concepts.
To build an XACT sound bank, complete the following steps:
When you begin a new XACT project, there are no sound banks available. You must create each one you wish to use. You may create as many sound banks as you require.
To create a sound bank
Navigate to the Sound Banks menu and click New Sound Bank.
The new sound bank is listed under the Sound Banks branch of the project tree, and the properties for the sound bank are shown in the property frame.
Figure 1. Creating a new sound bank using the menu toolbar
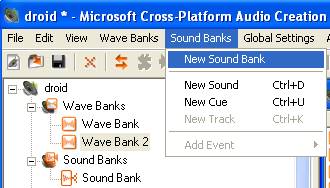
This new sound bank has the default name "Sound Bank".
Select the new sound bank.
Press F2 and enter a more descriptive name for the sound bank. You can also rename the sound bank by changing the Name property of the sound bank in the properties frame.
Double-click the sound bank in the project tree to open the Sound Bank window.
Figure 2. Sound Bank window (with data assigned)
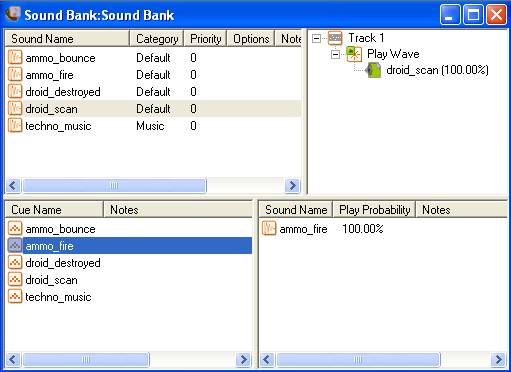
The Sound Bank window is divided into two halves, upper and lower, for sounds and cues, respectively. Each of these is further divided in half, right and left, to display the data associated with each (tracks that compose the sound and sounds associated to cues).
The upper left area is the sounds frame where the sounds defined in the sound bank are displayed. The upper right area is the tracks frame where the tracks that compose the selected sound are displayed. The lower left area is the cues frame where the cues defined in the sound bank are displayed. The lower right area is the associations frame where the sounds associated with the selected cue are displayed.
When the sound bank is selected in the project tree, its properties are displayed in the property frame, and may be changed. The following table describes the properties of a sound bank as they appear in the property frame.
| Property Name | Description |
|---|---|
| BuildSoundBankHeader | XACT can optionally build a C/C++ header that contains indices for all the sounds in the sound bank. |
| SoundBankHeaderFile | Name of the generated sound bank header file. |
| SoundBankHeaderPath | Location where the generated sound bank header file should be placed. |
| Name | The default name of a wave bank is Wave Bank. You can rename the wave bank by changing this selection, or by selecting the name displayed in the project tree frame. |
| Notes | Comments from the designer. |
| IncludeCueNames | Specifies whether the sound bank (.xsb) file produced by the build process is to include the text name strings that identify the cues. This value defaults to True, which indicates that the names will be stored. If this value is set to False, the file size will be smaller, and the programmer must refer to each cue by its index. |
| WindowsBuildName | File name for the Windows version of the sound bank. |
| WindowsBuildPath | Location of the Windows version of the sound bank. |
| XboxBuildName | File name for the Xbox version of the sound bank. |
| XboxBuildPath | Location of the Xbox version of the sound bank. |
Once you have created a sound bank, it is empty and ready to construct sounds and associate them with cues. You may create as many sounds and cues in a sound bank as you need.
Before creating any sounds, however, you should first build your wave banks that will hold the wave files your sounds will use. Otherwise, the wave files your sounds need to reference will not be available when they need to be played.
To create a sound
Open the sound bank by double-clicking the sound bank in the project tree.
If the sound bank is already open, select the sound bank window by clicking on its title bar.
On the Sound Banks menu, click New Sound. You can also create a new sound by pressing CTRL+D.
Figure 3. Creating a new sound bank using the menu toolbar
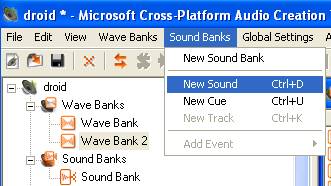
This creates a sound with the default name "New Sound".
Select the new sound.
Press F2 and enter a more descriptive name for the sound. You can also rename a sound by changing the Name property of the sound in the properties frame.
Once you have followed this procedure, you'll have a sound, but it will have no content. The next step is to construct the sound, and its behavior, from a wave or multiple waves.
The properties of a sound are displayed in three sections, for attach properties, mixer properties, and more general properties of the sound.
| Property Name | Description |
|---|---|
| NumberOfAttachedRPCs | Number of RPCs that the sound is using. |
| AttachedRPCs | List of all the RPCs that the sound is using. |
| NumberOfAttachedDSPPresetss | Number of DSP presets that the sound is using. |
| AttachedDSPPresets | List of all the DSP presets that the sound is using. |
| Volume | The overall volume for this sound in dB. The permissible range is from −96 dB to 6 dB. The baseline setting is 0. |
| Pitch | The overall pitch for this sound in semitones. The permissible range is from −12 to 12. The baseline setting is 0. |
| Name | The default name of a wave bank is Wave Bank. You can rename the wave bank by changing this selection, or by selecting the name displayed in the project tree. |
| Notes | Comments from the designer. |
| Category | The name of the category to which this sound is assigned. The default is "Default" (see categories). |
| Priority | Used to determine playback behavior when the XACT engine is using all allocated voices. The range of permissible values is 0 to 255. |
A sound is composed of one or more tracks. Each track can contain a single "Play Wave" event, as well as any number of other events (such as markers and level settings). Each track of a sound plays only a single wave at any given time. For more complex sounds, you can create multiple tracks, each with its own "Play Wave" event (and again, each with as many other non-"Play Wave" events as you wish).
Because the Audio Console Application limits the number of concurrent streams coming from the hard drive to 50, no more than 50 tracks should be added to a sound.
To create a track
On the Sound Banks menu, click New Track. You can also create a new track by pressing CTRL+K.
Figure 4. Creating a new track using the menu toolbar
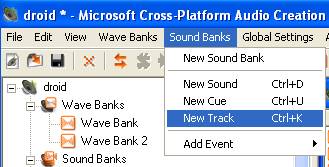
This creates an empty track with the default name "Track N".
At this point, you have a track that is empty. You must now add events to the track, which will define what the track does. Each track may contain a single "Play Wave" event, and this will typically be the basis of all other events that are assigned to the track.
To add an event to the track
Right-click the track's entry in the tracks frame of the Sound Bank window.
Figure 5. Adding a new event to the track
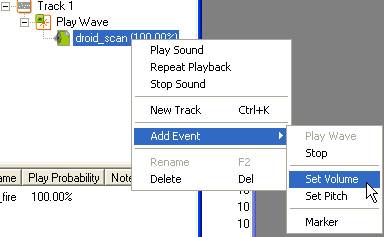
The events that are available, along with their properties, are described in XACT Events.
A "Play Wave" event may be created this way. To associate a wave file with the event, simply drag and drop a wave from a wave bank onto the "Play Wave" event.
Note You may associate multiple waves to a single "Play Wave" event. Doing so introduces variations to the event. See the XACT Sound and Wave Variations section for more information.
In addition to the steps listed above, XACT provides two alternatives to using the menu to create "Play Wave" events.
To create a "Play Wave" event
Open the wave bank where the wave you wish to play resides.
Drag the icon for the wave file from the Wave Bank window to the track in the tracks frame of the Sound Bank window.
This creates a "Play Wave" event that will play the dragged wave when the track is executed.
XACT also provides a drag-and-drop shortcut to create a track that contains a "Play Wave" event.
To create a track with a "Play Wave" event
Open the wave bank where the wave you wish to play resides.
Drag the icon for the wave file from the Wave Bank window to an empty space in the tracks frame of the Sound Bank window.
This creates a track with a "Play Wave" event that will play the dragged wave. The track has the default name "Track N".
The cues are what the developer will invoke to play the sound.
To create a cue
On the Sound Banks menu, click New Cue. You can also create a new cue by pressing CTRL+U.
Figure 6. Creating a new cue using the menu toolbar
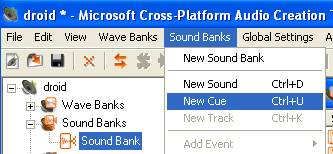
This creates an empty cue with the default name "New Cue".
Select the new cue.
Press F2 and enter a more descriptive name for the cue. You can also rename a cue by changing the Name property of the cue in the properties frame.
To assign a sound to a cue
Select the sound in the sound frame (upper left).
Drag the selection to the associations frame (lower right).
XACT also provides some drag-and-drop shortcuts that combine creation and assignment of cues:
The following properties are available by default on a cue.
| Cue Property | Description | ||||||||||||||||||||||||||||
|---|---|---|---|---|---|---|---|---|---|---|---|---|---|---|---|---|---|---|---|---|---|---|---|---|---|---|---|---|---|
| Name | The name of the cue. | ||||||||||||||||||||||||||||
| Comment | Comments about the cue. (Visible to the author only; not stored in generated banks.) | ||||||||||||||||||||||||||||
| IsInteractive | Enables the Interactive Audio features. For information on this feature, see the XACT Interactive Audio section. | ||||||||||||||||||||||||||||
| Variable |
The variable that will determine which sound from this interactive audio cue will be playing at any given time.
|
||||||||||||||||||||||||||||
| LimitInstances | Whether XACT should limit the number of instances of the cue that can be playing at any given time. | ||||||||||||||||||||||||||||
| MaximumInstances | The maximum number of instances to allow for the cue. | ||||||||||||||||||||||||||||
| BehaviorAtMax | How to handle cue play requests when the maximum number of cue instances has been reached. | ||||||||||||||||||||||||||||
| InstanceToReplace | Determines which playing cue instance should be replaced by the new cue instance. | ||||||||||||||||||||||||||||
| HowToReplace | How the new cue instance should replace the old (stopping) cue instance. | ||||||||||||||||||||||||||||
| FadeOutDuration | Duration to fade out the old (stopping) instance. | ||||||||||||||||||||||||||||
| FadeInDuration | Duration to fade in the new instance. | ||||||||||||||||||||||||||||
| PlayListType | How to determine which variation to select to play. | ||||||||||||||||||||||||||||
| Variations |
The list of variations available on the cue.
|
For cues that are interactive (see the Cue Properties section above), an Edit Transitions menu item is made available in the cue context menu. Right-click on the cue and select Edit Transitions to open the Interactive Audio window.
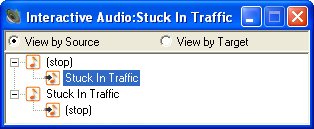
You may choose to view elements by source or by target, with source being the default. Selecting an item in the tree reveals a new set of properties in the property pane. These are the transition properties of the selected cue.
| Transition Property | Description | Possible Values |
|---|---|---|
| TransitionSource | When in the currently playing sound to begin the transition. |
Immediate— Stop this sound at any point and start transition. |
| SourceMarkerMin | The minimum value of the marker range. |
0 to 4,294,967,295 |
| SourceMarkerMax | The maximum value of the marker range. |
0 to 4,294,967,295 |
| FadeOutDuration | The duration, in milliseconds, to fade out the source sound. |
0 to 65.535 |
| TransitionDestination | When in the destination sound to begin playing. |
Beginning— Start the destination sound from the beginning (timestamp 0.0). AlignedTime— Jump to the same time in the destination that we were at in the source (effectively allow for smooth crossfading between several potential mixes). AlignedMarker— Jump to the same instance of a marker that shares the same value as the marker we left the source sound at. FirstAlignedMarker— Jump to the first instance of a marker that shares the same value as the marker we left the source sound at. If there is no matching marker, start from the beginning. FirstMarkerInRange— Start playing at the first marker encountered in the destination sound in the specified range. If none is found, start from beginning. RandomMarkerInRange— Start playing at a randomly chosen marker within the specified range. If none is found, start from beginning. |
| DestinationMarkerMin | The minimum value of the marker range. |
0 to 4,294,967,295 |
| DestinationMarkerMax | The maximum value of the marker range. |
0 to 4,294,967,295 |
| FadeInDuration | The duration, in milliseconds, to fade in the destination sound. |
0 to 65.535 |
| TransitionType | How to get from the source to the destination. |
DirectWithoutTransition— Play destination directly after source. CrossfadeWithoutTransition— Crossfade destination after source. |
| TransitionSound | The sound to play between the source and destination. |
<none> or the name of the sound to play. If a sound is selected, its Sound Properties are also displayed. |
| CrossfadeType | How the destination should replace the source sound. |
Linear— Crossfade should be linear. Logarithmic— Crossfade should be logarithmic. EqualPower— Crossfade should be equal power. |
For more information on transitions, see the XACT Interactive Audio section.
XACT Audio Authoring, XACT Events, XACT Overviews, XACT Reference