Configuring the Windows Sound Mixer
The Microsoft® Windows® audio mixer must be correctly set up for Microsoft® DirectPlay® Voice to function properly. This article contains the following sections, which describe how to set up the sound mixer to support a DirectPlay Voice session.
On Microsoft® Windows XP and Microsoft® Windows Millennium Edition (Windows Me) systems, the Sound and Audio Devices Control Panel application has a Voice tab. You can use this tab to select playback and recording devices for DirectPlay Voice. If you have multiple sound cards on your system, you can select a different sound card for DirectPlay Voice transmissions than the sound card you use for normal audio.
To set up your sound system for DirectPlay Voice playback, you might have to configure the Windows audio playback mixer. You can launch the playback mixer in several ways, including:
- Double-click the speaker icon in the status area of the taskbar.
- Launch the Voice Test Wizard and click the Volume button below the Playback box on the microphone or speaker test pages.
- Launch the Sound and Audio Devices Control Panel application, select the Audio Devices tab, and click the playback section's Volume button.
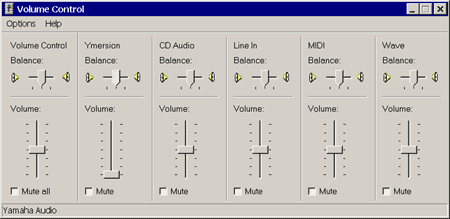
The following screen shot shows the Windows 2000 playback mixer.

To configure the playback mixer
- From the Options menu, choose Properties.
- In the Properties dialog box that appears, click Playback.
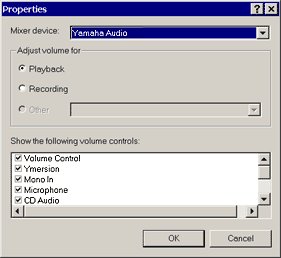
- At the bottom of the dialog box, make sure all available output lines are selected, as shown.
- Click OK to display the playback mixer again.
The following screen shot shows the mixer's Properties dialog box.

The microphone has separate playback and recording lines. You must disable microphone playback line or your microphone input will be routed to your speakers and DirectPlay Voice will not be able to record your input.
To disable the microphone playback line
- Click OK on the Properties dialog box to display the playback mixer again.
- Make sure that the microphone section's Mute check box is selected.
- If the microphone section has a check box labeled Select, clear the check box.
You may also need to manually configure the recording mixer. There are three ways to launch the recording mixer.
- Launch the Sound and Audio Devices Control Panel application, select the Audio Devices tab, and click the playback section's Volume button.
- Launch the Voice Test Wizard and click the Volume button below the Recording box on either the microphone or speaker test pages.
- Launch the playback mixer, choose the Properties command on the Options menu, select the Recording radio button, and click OK.
To configure the recording settings
- From the Options menu, choose Properties.
- Select Recording. The check boxes at the bottom of the dialog box will show all the available audio input sources for your selected devices.
- Make sure that all sources are selected, and click OK.
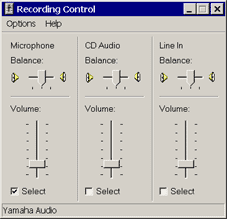
The recording mixer will then display a volume control for the microphone and all other selected sources.
- Make sure that the microphone's Select check box is selected, and all other Select boxes are clear. In particular, do not select CD Audio. If CD Audio is selected and your user is listening to a CD while playing the game, DirectPlay Voice will transmit the output from the CD.
The following screen shot shows the Windows 2000 recording mixer.

Many sound cards have an option called "Microphone Boost" or "Mic Boost." This feature boosts the input volume so that weak input devices can produce stronger input. If you determine that the input level from a system is too low for your voice session, you can enable microphone boost.
To enable microphone boost
- Display the recording mixer, as described in the previous section.
- Enable the Advanced buttons on the mixer by choosing the Advanced command from the Options menu.
- Click the microphone line's Advanced button to display the microphone's Advanced Controls dialog box.
- Select the Microphone Boost check box.
If microphone boost makes your input too loud, you can use the same procedure to disable microphone boost. If your sound card does not support microphone boost, one or more of the following will be true.
- The Advanced command on the recording mixer's Options menu will be unavailable.
- The Advanced button in the recording mixer's microphone section will be unavailable.
- The Microphone Boost check box on the Advanced Control dialog box will be unavailable.
If you set the DVSOUNDCONFIG_AUTOSELECT flag in the dwFlags member of the DVSOUNDDEVICECONFIG structure, DirectPlay Voice will attempt to configure the recording portion of the audio mixer for you. However, the attempt might fail. For example, DirectPlay Voice always chooses microphone 0 as the input source. If your user's system has more than one microphone, autoselection works only if the user has the microphone connected to the microphone 0 input. To use another microphone channel, the user must configure the mixer manually.
Note To ensure that your application works on all systems, you should allow your users to disable autoselection if necessary and configure the mixer manually.


