 You can use a dialog editor to create a .DLG file and then refer to that file from your resource script file with a line like this:
This section explains the third step in writing Phone Book: arrange for interaction with the user via dialog boxes. This process requires several steps:
1.Write the dialog classes.
2.Write dialog class member functions.
3.Create a resource script file.
4.Add dialog templates to the resource script file.
·To write the dialog classes:
1.Add the following declaration for class CFindDialog to your VIEW.H file (if you want your file to match Listing 2 in this chapter, put CFindDialog between the existing declarations for classes CTheApp and CMainWindow):
// CFindDialog
// This dialog is a one line entry field for getting a search
// string to use as a find filter for the database
//
class CFindDialog : public CModalDialog
{
private:
CString m_szFindName;
public:
CFindDialog( CWnd* pParentWnd = NULL )
: CModalDialog( "Find", pParentWnd )
{ }
virtual void OnOK();
CString& GetFindString() { return m_szFindName; }
};
2.Add the following declaration for class CEditDialog to your VIEW.H file (after class CFindDialog):
// CEditDialog
// Used to add or edit a Person object.
//
class CEditDialog : public CModalDialog
{
private:
CPerson* m_pData;
public:
CEditDialog( CPerson* person, CWnd* pParentWnd = NULL )
: CModalDialog( "EditPerson", pParentWnd )
{ m_pData = person; }
virtual BOOL OnInitDialog();
virtual void OnOK();
CPerson* GetData()
{ return m_pData; }
};
The first kind of dialog box is used to ask the user for the name of a person to search for in the database. This dialog box has an OK button, a Cancel button, and an editable text field for entering a single string. You saw the declaration for class CFindDialog above.
The second kind of dialog box is used to display data about a person to the user and to allow the user to edit a person's data. This dialog has an OK button, a Cancel button, three editable text fields, one static text item to display the data's modification date and time, and four static text fields used to label the editable fields. You saw the declaration for class CEditDialog above.
You'll add other declarations to VIEW.H later.
·To write dialog class member functions:
1.Add the following member function definition for class CFindDialog to your VIEW.CPP file.
// CFindDialog::OnOK
// When the user presses OK get the data entered and store it in this
// object. Then end the dialog.
//
void CFindDialog::OnOK()
{
GetDlgItemText( IDC_DATA,
m_szFindName.GetBuffer( SIZESTRING ), SIZESTRING );
m_szFindName.ReleaseBuffer();
EndDialog( IDOK );
}
2.Add the following member function definitions for class CEditDialog to your VIEW.CPP file:
// CEditDialog::OnInitDialog
// Fill in the fields with the data placed in this object
// when it was created.
//
BOOL CEditDialog::OnInitDialog()
{
SetDlgItemText( IDC_LASTNAME, m_pData -> GetLastName() );
SetDlgItemText( IDC_FIRSTNAME, m_pData -> GetFirstName() );
SetDlgItemText( IDC_PHONE, m_pData -> GetPhoneNumber() );
SetDlgItemText( IDC_MOD, m_pData -> GetModTime().Format("%m/%d/%y %H:%M" ) );
SendDlgItemMessage( IDC_LASTNAME, EM_SETSEL );
return TRUE;
}
// CEditDialog::OnOK
// When OK is pressed set the data to what the user has entered.
//
void CEditDialog::OnOK()
{
char szTmp[SIZESTRING];
GetDlgItemText( IDC_LASTNAME, szTmp, sizeof ( szTmp ) );
m_pData -> SetLastName( szTmp );
GetDlgItemText( IDC_FIRSTNAME, szTmp, sizeof ( szTmp ) );
m_pData -> SetFirstName( szTmp );
GetDlgItemText( IDC_PHONE, szTmp, sizeof ( szTmp ) );
m_pData -> SetPhoneNumber( szTmp );
EndDialog( IDOK );
}
You'll add other items to VIEW.CPP later.
·To create a resource script file:
1.Create a file called PHBOOK.RC and add the following lines (if you choose to copy the HELLO.RC and HELLO.DLG files, you can modify the HELLO.RC file to reflect these contents):
#include <windows.h>
#include <afxres.h>
#include "resource.h"
These lines specify the files to include for building the program.
Listing 2 on pages 245-6 in Chapter 6 defines the resources for Phone Book. You can use the resource files supplied on the distribution disks (PHBOOK.RC, PHBOOK.ICO, and PHBOOK.DLG) or you can use tools to prepare your own resource script file, icon resource file, and dialog resource file. Icon and dialog editing tools are available as part of the Windows Software Development Kit (SDK) or from other sources.
If you choose to write your own .RC file, you will add an icon resource, a menu resource template, an accelerator resource template, and six dialog resources to your PHBOOK.RC file.
As you add resources to PHBOOK.RC, you can also add resource ID declarations to a RESOURCE.H file. You can copy this file from the Hello directory and modify it or create your own file from scratch. To see the full contents of this file when it is complete, see Listing 2 in Chapter 6.
Note:
The ID numbers used in Listing 2 and throughout Phone Book begin at 101. This is arbitrary, but if you use different numbers you'll need to change them in the code you add as well.
2.Add the following icon resource entry to PHBOOK.RC after the #include lines:
AFX_IDI_STD_FRAME ICON phbook.ico
This line specifies the name of a file containing the program's icon resource.
3.Copy the menu resource template from Listing 2 on page 245 in Chapter 6 into your PHBOOK.RC file.
The template you copy is named “MainMenu.” It specifies Phone Book's menus.
4.Copy the accelerator resource template from Listing 2 on page 246 in Chapter 6 into your PHBOOK.RC file.
The accelerator template you copy is named “MainAccelTable.” It specifies the shortcut keys the user can press in Phone Book.
·To add dialog templates to PHBOOK.RC:
 You can use a dialog editor to create a .DLG file and then refer to that file from your resource script file with a line like this:
rcinclude phbook.dlg
The dialogs must have the following dialog template names:
“AboutBox”
Name of the dialog template for an About dialog box
“Find”
Name of the dialog template for a Search dialog box
“EditPerson”
Name of the dialog template for a dialog box in which you edit the information for a person
“NoData”
Name of the dialog template for a Help dialog box, first of three
“NoName”
Name of the dialog template for a Help dialog box, second of three
“Enter”
Name of the dialog template for a Help dialog box, third of three
 Alternatively, you can type resource template specifications into PHBOOK.RC as follows.
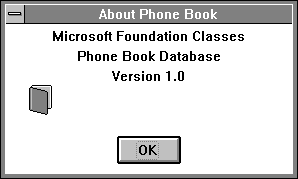
The About Box dialog template specifies a dialog window caption, text that appears in the dialog, and an OK push button.
ABOUTBOX DIALOG 22, 17, 144, 75
STYLE DS_MODALFRAME | WS_CAPTION | WS_SYSMENU
CAPTION "About Phone Book"
BEGIN
CTEXT "Microsoft Foundation Classes", -1, 0, 2, 144, 8
CTEXT "Phone Book Database", -1, 0, 12, 144, 8
CTEXT "Version 1.0", -1, 0, 22, 144, 8
DEFPUSHBUTTON "OK", IDOK, 56, 56, 32, 14, WS_GROUP
ICON AFX_IDI_STD_FRAME, -1, 10, 30, 16, 16
END
Figure 5.1 shows the About dialog box.
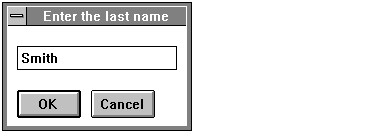
The Find dialog template specifies a window caption, an editable text field for entering a string, and two push buttons labeled “OK” and “Cancel”.
FIND DIALOG 22, 17, 90, 50
STYLE DS_MODALFRAME | WS_CAPTION | WS_SYSMENU
CAPTION "Enter the last name"
BEGIN
EDITTEXT IDC_DATA, 5, 10, 80, 12, ES_AUTOHSCROLL
DEFPUSHBUTTON "OK", IDOK, 5, 32, 32, 14, WS_GROUP
PUSHBUTTON "CANCEL", IDCANCEL, 42, 32, 32, 14, WS_GROUP
END
Figure 5.2 shows the Find dialog box.
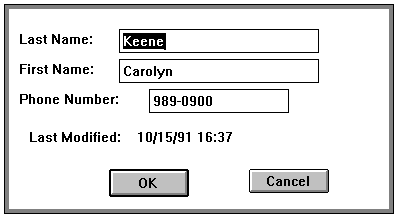
The EditPerson dialog template specifies a window caption, three editable text fields for entering or correcting person data, two push buttons, and five static text strings to label the editable fields and to display the last modification date and time for the person being edited.
EDITPERSON DIALOG 40, 20, 190, 100
STYLE WS_POPUP | WS_DLGFRAME
BEGIN
EDITTEXT IDC_LASTNAME, 55, 10, 100, 12
EDITTEXT IDC_FIRSTNAME, 55, 25, 100, 12
EDITTEXT IDC_PHONE, 70, 40, 70, 12
DEFPUSHBUTTON "OK", IDOK, 50, 80, 40, 14
PUSHBUTTON "Cancel", IDCANCEL, 120, 80, 40, 12
LTEXT "Last Name:", IDC_STATICLASTNAME, 5, 11, 41, 12,
NOT "First Name:", IDC_STATICFIRSTNAME, 5, 26,
41, 12, NOT WS_GROUP
LTEXT "Phone Number:", IDC_STATICPHONE, 5, 41, 52, 14,
NOT WS_GROUP
LTEXT "Last Modified:", IDC_STATICMOD, 10, 60, 50, 14,
NOT WS_GROUP
LTEXT "", IDC_MOD, 64, 60, 110, 10, NOT WS_GROUP
END
Figure 5.3 shows the Edit dialog box.
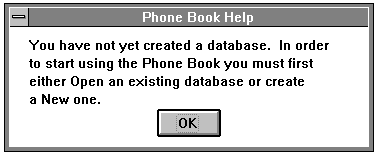
The “NoData” dialog template specifies a window caption, one push button, and four lines of static Help text. This dialog template is used when the user has not yet created a database and requests help.
NODATA DIALOG 22, 17, 180, 60
STYLE DS_MODALFRAME | WS_CAPTION | WS_SYSMENU
CAPTION "Phone Book Help"
BEGIN
LTEXT "You have not yet created a database. In order",
-1, 10,5, 180, 8
LTEXT "to start using the Phone Book you must first",
-1, 10,14, 180, 8
LTEXT "either Open an existing database or create",
-1, 10, 23,180, 8
LTEXT "a New one.", -1, 10, 32, 180, 8
DEFPUSHBUTTON "OK", IDOK, 74, 41, 32, 14, WS_GROUP
END
Figure 5.4 shows the “No Database” Help dialog box.
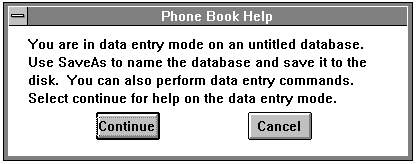
The NoName dialog template specifies a window caption, two push buttons, and four lines of static Help text. This template is used when the user has an open database and needs instructions for entering data and saving the database.
NONAME DIALOG 22, 17, 200, 65
STYLE DS_MODALFRAME | WS_CAPTION | WS_SYSMENU
CAPTION "Phone Book Help"
BEGIN
LTEXT "You are in data entry mode on an untitled
database.", -1, 10, 5, 180, 8
LTEXT "Use SaveAs to name the database and save it to
the ", -1,10, 14, 180, 8
LTEXT "disk. You can also perform data entry
commands.", -1,10, 23, 180, 8
LTEXT "Select continue for help on the data entry
mode.", -1,10, 32, 180, 8
DEFPUSHBUTTON "Continue", IDOK, 44, 43, 32, 14, WS_GROUP
PUSHBUTTON "Cancel", IDCANCEL, 120, 43, 32, 14, WS_GROUP
END
Figure 5.5 shows the “No Name” Help dialog box.
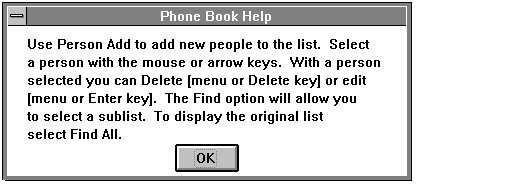
The Enter dialog template specifies a window caption, one push button, and six lines of static Help text. This template is used when the user needs more information about working with a database. It can be reached by way of the Continue button in the second help dialog.
ENTER DIALOG 22, 17, 200, 75
STYLE DS_MODALFRAME | WS_CAPTION | WS_SYSMENU
CAPTION "Phone Book Help"
BEGIN
LTEXT "Use Person Add to add new people to the list.
Select", -1, 10, 5, 180, 8
LTEXT "a person with the mouse or arrow keys. With a
person", -1, 10, 14, 180, 8
LTEXT "selected you can Delete [menu or Delete key] or
edit", -1, 10, 23, 180, 8
LTEXT "[menu or Enter key]. The Find option will allow
you", -1, 10, 32, 180, 8
LTEXT "to select a sublist. To display the original
list", -1,10, 41, 180, 8
LTEXT "select Find All.", -1, 10, 50, 180, 8
DEFPUSHBUTTON "OK", IDOK, 84, 59, 32, 14, WS_GROUP
END
Figure 5.6 shows the “Enter Data” dialog box.
The coding you added is for six dialog resource templates. The resource compiler creates dialog resources from these templates. The first template is for the About dialog box; it's identical to the template in HELLO.RC. The next two templates are for the Find and Edit dialog boxes. The last three templates are for the Help dialogs.
The resource script file is discussed again in “Prepare Supporting Files” on page 242 in Chapter 6. To continue the tutorial, see “Determine What Messages Will be Handled” on page 197 in Chapter 6. For more information about the code you added previously, see “Discussion: Dialog Boxes” on the next page.