 |
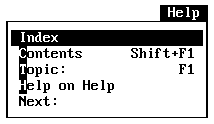
Index | Displays a list of indexes for the online reference |
| Contents | Displays a table of contents for subjects covered by the online reference | |
| Topic | Displays information about the item or keyword on which the cursor is positioned | |
| Help on Help | Explains how to use the help system | |
| Next | Displays the next piece of information in the help system on the topic you looked at |
·Keyboard
To choose a command:
1.Press the ALT key to activate the menu bar.
2.Press the highlighted character in the menu name (such as F for File), or use the RIGHT and LEFT ARROW keys to select a menu. Press ENTER.
3.Press the highlighted character in the command name (such as S for Save in the File menu), or use the UP and DOWN ARROW keys to highlight the command and then press ENTER.
·Mouse
To choose a command:
1.Open the menu by clicking the menu name.
2.Click the command.
If you open a menu and then decide you don't want to issue a command, there are three ways to close the menu:
 Press the ESC key.
 Click the mouse outside the menu.
 Press ALT twice.
Some menu items are followed by the names of keys or key combinations. You can press these “shortcut keys” to execute these commands immediately, instead of selecting them from a menu.
The reference bar at the bottom of the screen also displays commonly used shortcut keys. You can click any of these buttons to execute the indicated command. Many other shortcut keys have been assigned than are listed on menus. Assignments are also redefinable. See the Key Assignments option in the Options menu.
When a menu command is gray (rather than black), it is currently unavailable for use. For example, when PWB is first run and no programs have been assembled or linked, the Next Error and Previous Error commands in the Search menu are both disabled and are therefore shaded gray.
A command followed by an ellipsis (...) needs more information before the command is executed. You enter this information in a dialog box that appears when you select the command. (A command not followed by an ellipsis executes immediately.) Figure 3.2 shows the dialog box opened by the Find command from the Search menu.

Dialog boxes can contain any or all of the items in the following list. Press ALT and the item's highlighted letter, or the TAB or SHIFT+TAB keys to move among items in a dialog box. You can set dialog items from the keyboard or with the mouse.
| Item | Description |
| Option Buttons (·) | Offer a list of choices; only one option can be chosen. Use the ARROW keys to move between the choices. In Figure 3.2, three option buttons set the direction of the search (Forward, Backward, Find All). |
| Check Box [X] | A yes/no switch. If the box is empty, the option is turned off. If it contains the letter X, the feature is on. Press the SPACEBAR or use the UP and DOWN ARROW keys to turn a check box on or off. |
| Text Box [..........] | Accepts text that you type. In Figure 3.2, Find Text requires you to type the text to search for. |
| List Boxes | Certain dialog boxes display lists of information (such as the contents of the current disk directory) within a list box. If the number of items exceeds the list box space, press the ARROW keys, PGUP/PGDN, or click the scroll bar to move around the list. |
| Command Buttons < OK > | Confirm the settings you have entered and which are now enclosed by angle brackets. The OK button uses the current settings. The Cancel button exits the dialog box and does not change the current settings. If one of the command buttons is highlighted, press ENTER to execute that command. Clicking a command button also executes the command. If a button contains an ellipsis, it indicates that another dialog box will appear when the command is selected. |
Dialog boxes usually contain shortcut keys. Shortcut keys are identified by highlighted letters.