Encoding Signed Data
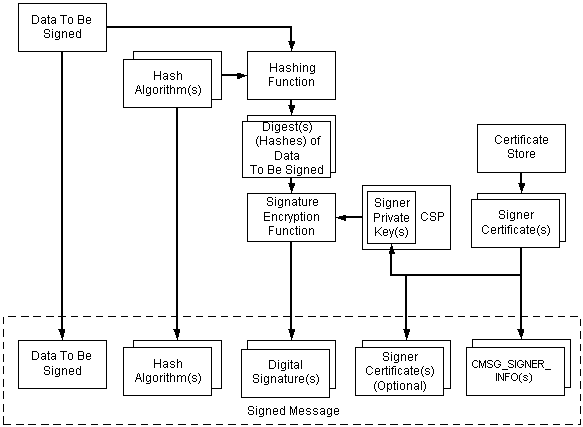
The general tasks required to encode a signed message are depicted in the following illustration and are described in the list that follows it. There can be multiple signers, hashing algorithms, and certificates. Also, while the illustration shows only certificates, certificate revocation lists (CRL) can be used as well. They would fit into the illustration wherever certificates are shown.

The sequence of events for encoding signed data, as depicted in the previous illustration, is as follows:
-
The data is created (if necessary) and a pointer to it is retrieved.
-
A certificate store is opened that contains the signer's certificate.
-
The private key from the certificate is retrieved. There are two properties that must be set on the certificate before using it. One is used to tie a certificate to a particular CSP and, within that CSP, to a particular private key. The other is used to indicate which hashing algorithm is to be used when a digest operation is called for. These need only be set once.
-
From the certificate property, the hash algorithm is determined.
-
A hash (digest) of the data is created by sending the data through the hashing function.
-
The signature is created by using the private key, obtained through the property on the certificate, to encrypt the hash.
-
The following data is included in the finished, signed message:
-
The original data to be signed
-
The hash algorithms
-
The signatures
-
The signer info structures, which includes the signerID (certificate issuer and serial number)
-
The signer's certificates (optional)
The tasks just illustrated and listed describe the simplest case. A more complex case is when authenticated attributes are included in the message. When the content type is anything but the Data type (a BYTE string), or there is at least one authenticated attribute along with any data type, there are two standard authenticated attributes required: the content (data) type, and the hash of the content. Under these circumstances, the CryptoAPI automatically provides these two required attributes. The low-level message functions hash the authenticated attributes, encrypt the hash with the private key, and provide this as the signature.
Use the low-level message functions to accomplish the tasks just listed, by using the following procedure.
 To encode a signed message using the CryptoAPI
-
Create or retrieve the content.
-
Get a cryptographic provider.
-
Get the signer certificates.
-
Initialize the CMSG_SIGNER_ENCODE_INFO structure.
-
Initialize the CMSG_SIGNED_ENCODE_INFO structure.
-
Call CryptMsgCalculateEncodedLength to get the size of the encoded message blob. Allocate memory for it.
-
Call CryptMsgOpenToEncode, passing in CMSG_SIGNED for dwMsgType, and a pointer to CMSG_SIGNED_ENCODE_INFO for pvMsgEncodeInfo. As a result of this call, you get a handle to the opened message.
-
Call CryptMsgUpdate, passing in the handle retrieved in step 7, and a pointer to the data that is to be signed and encoded. This function can be called as many times as necessary to complete the encoding process.
-
Call CryptMsgGetParam, passing in the handle retrieved in step 7 and the appropriate parameter types to access the desired, encoded data. For example, pass in CMSG_CONTENT_PARAM to get a pointer to the entire PKCS #7 message.
If the result of this encoding is to be used as the inner data for another encoded message, such as an enveloped message, the CMSG_BARE_CONTENT_PARAM parameter must be passed. For example code showing this, see Enveloped Message Example 2.
-
Close the message by calling CryptMsgClose.
The result of this procedure is an encoded message that contains the original data, the encrypted hash of that data (signature), and the signer information. Also, you now have a pointer pointing to the desired, encoded blob.


 To encode a signed message using the CryptoAPI