
Index
|
|
|
|
|
| |||
| |||
Direct3D Retained Mode Interface Overviews
This section contains overviews of the Microsoft® Direct3D® Retained Mode interfaces and includes information on what they do, how to use them, and things to be aware of. For a description of each interface's methods, see the appropriate entry in the Direct3D Retained Mode Reference.
- IDirect3DRMAnimation and IDirect3DRMAnimationSet Interfaces
- IDirect3DRMDevice, IDirect3DRMDevice2, and IDirect3DRMDeviceArray Interfaces
- Direct3DRMFace
- IDirect3DRMFrame, IDirect3DRMFrame2, and IDirect3DRMFrameArray Interfaces
- IDirect3DRMInterpolator Interface
- IDirect3DRMLight and IDirect3DRMLightArray Interfaces
- IDirect3DRMMaterial Interface
- IDirect3DRMMesh, IDirect3DRMMeshBuilder, and IDirect3DRMMeshBuilder2 Interfaces
- Direct3DRMObject
- IDirect3DRMPickedArray and IDirect3DRMPicked2Array Interfaces
- IDirect3DRMProgressiveMesh Interface
- IDirect3DRMShadow Interface
- IDirect3DRMTexture and IDirect3DRMTexture2 Interfaces
- IDirect3DRMUserVisual Interface
- IDirect3DRMViewport and IDirect3DRMViewportArray Interface
- IDirect3DRMVisual and IDirect3DRMVisualArray Interfaces
- IDirect3DRMWrap Interface
IDirect3DRM and IDirect3DRM2 Interfaces
Applications use the methods of the IDirect3DRM interface to create Direct3D Retained Mode objects and to work with system-level variables. For a reference to the methods of this interface, see IDirect3DRM or IDirect3DRM2.
Applications use the methods of the IDirect3DRMDevice and IDirect3DRMDevice2 interfaces to interact with the output device. An IDirect3DRMDevice created from the IDirect3DRM interface works with an IDirect3DDevice Immediate Mode device. An IDirect3DRMDevice2 created from the IDirect3DRM2 interface, or initialized by the IDirect3DRMDevice2::InitFromClipper, IDirect3DRMDevice::InitFromD3D, or IDirect3DRMDevice2::InitFromSurface method, works with an IDirect3DDevice2 Immediate Mode device. The IDirect3DDevice2 device supports the DrawPrimitive interface, as well as executes buffers, and is required for progressive meshes and for alpha blending and sorting of transparent objects.
IDirect3DRM2 supports all the methods in IDirect3DRM. An additional method is included: IDirect3DRM2::CreateProgressiveMesh. The IDirect3DRM2::CreateDeviceFromSurface, IDirect3DRM2::CreateDeviceFromD3D, and IDirect3DRM2::CreateDeviceFromClipper methods all create a DIRECT3DRMDEVICE2 object. The IDirect3DRM2::CreateViewport method creates a viewport on a DIRECT3DRMDEVICE2 object. The IDirect3DRM2::LoadTexture and IDirect3DRM2::LoadTextureFromResource methods load a DIRECT3DRMTEXTURE2 object.
The IDirect3DRM Component Object Model (COM) interface is created by calling the Direct3DRMCreate function. To access the IDirect3DRM2 COM interface, create an IDirect3DRM object with Direct3DRMCreate, then query for IDirect3DRM2 from IDirect3DRM.
The methods of the IDirect3DRM and IDirect3DRM2 interfaces create the following objects:
- Animations and animation sets
- Devices
- Faces
- Frames
- Generic uninitialized objects
- Lights
- Materials
- Meshes and mesh builders
- Shadows
- Textures
- UserVisuals
- Viewports
- Wraps
In addition, the IDirect3DRM2::CreateProgressiveMesh creates a DIRECT3DRMPROGRESSIVEMESH object.
IDirect3DRMAnimation and IDirect3DRMAnimationSet Interfaces
An animation in Retained Mode is defined by a set of keys. A key is a time value associated with a scaling operation, an orientation, or a position. A Direct3DRMAnimation object defines how a transformation is modified according to the time value. The animation can be set to operate on a Direct3DRMFrame object, so it could be used to animate the position, orientation, and scaling of Direct3DRMVisual, Direct3DRMLight, and Direct3DRMViewport objects.
The IDirect3DRMAnimation::AddPositionKey, IDirect3DRMAnimation::AddRotateKey, and IDirect3DRMAnimation::AddScaleKey methods each specify a time value whose units are arbitrary. If an application adds a position key with a time value of 99, for example, a new position key with a time value of 49 would occur exactly halfway between the (zero-based) beginning of the animation and the first position key.
The animation is driven by calling the IDirect3DRMAnimation::SetTime method. This sets the visual object's transformation to the interpolated position, orientation, and scale of the nearby keys in the animation. As with the methods that add animation keys, the time value for IDirect3DRMAnimation::SetTime is an arbitrary value, based on the positions of keys the application has already added.
A Direct3DRMAnimationSet object allows Direct3DRMAnimation objects to be grouped together. This allows all the animations in an animation set to share the same time parameter, simplifying the playback of complex articulated animation sequences. An application can add an animation to an animation set by using the IDirect3DRMAnimationSet::AddAnimation method, and it can remove one by using the IDirect3DRMAnimationSet::DeleteAnimation method. Animation sets are driven by calling the IDirect3DRMAnimationSet::SetTime method.
For related information, see the IDirect3DRMAnimation and IDirect3DRMAnimationSet interfaces.
IDirect3DRMDevice, IDirect3DRMDevice2, and IDirect3DRMDeviceArray Interfaces
All forms of rendered output must be associated with an output device. The device object represents the visual display destination for the renderer.
The renderer's behavior depends on the type of output device that is specified. You can define multiple viewports on a device, allowing different aspects of the scene to be viewed simultaneously. You can also specify any number of devices, allowing multiple destination devices for the same scene.
Retained Mode supports devices that render directly to the screen, to windows, or into application memory.
While an IDirect3DRMDevice interface, when created from the IDirect3DRM interface, works with an IDirect3DDevice Immediate Mode device, an IDirect3DRMDevice2 interface, when created from the IDirect3DRM2 interface or initialized by the IDirect3DRMDevice2::InitFromClipper, IDirect3DRMDevice2::InitFromD3D2, or IDirect3DRMDevice2::InitFromSurface method, works with an IDirect3DDevice2 Immediate Mode device. The IDirect3DDevice2 device supports the DrawPrimitive interface as well as execute buffers, and is required for progressive meshes and for alpha blending and sorting of transparent objects.
The IDirect3DRMDevice2::InitFromClipper and IDirect3DRMDevice2::InitFromSurface methods use the IDirect3DRM2::CreateDevice method to create an IDirect3DRMDevice2 object. The IDirect3DRMDevice2::InitFromD3D2 method uses an IDirect3D2 Immediate Mode object and an IDirect3DDevice2 Immediate Mode device to initialize an IDirect3DDevice2 Retained Mode device.
You can still query back and forth between the IDirect3DRMDevice and IDirect3DRMDevice2 interfaces. The main difference is in how the underlying Immediate Mode device is created.
The IDirect3DRMDevice2 interface contains all the methods found in the IDirect3DRMDevice interface, plus two additional ones that allow you to control transparency—IDirect3DRMDevice2::GetRenderMode and IDirect3DRMDevice2::SetRenderMode—and one additional initialization method: IDirect3DRMDevice2::InitFromSurface.
For related information, see IDirect3DRMDevice and IDirect3DRMDevice2.
This section describes the options available to display Direct3D images to output devices.
Quality
The device allows the scene and its component parts to be rendered with various degrees of realism. The device rendering quality is the maximum quality at which rendering can take place on the rendering surface of that device. Mesh, progressive mesh, and mesh builder objects can also have a specified rendering quality.
A device's or object's quality has three components: shade mode (flat or Gouraud; Phong is not yet implemented and will default to Gouraud shading), lighting type (on or off), and fill mode (point, wireframe or solid).
You can set the quality of a device with IDirect3DRMDevice::SetQuality and IDirect3DRMDevice2::SetQuality methods. By default, the device quality is D3DRMRENDER_FLAT (flat shading, lights on, and solid fill).
You can set the quality of a Direct3DRMProgressiveMesh, Direct3DRMMeshBuilder, or Direct3DRMMeshBuilder2 object with their respective SetQuality methods: IDirect3DRMProgressiveMesh::SetQuality, IDirect3DRMMeshBuilder::SetQuality, and IDirect3DRMMeshBuilder2::SetQuality. By default, the quality of these objects is D3DRMRENDER_GOURAUD (Gouraud shading, lights on, and solid fill).
Direct3D Retained Mode renders an object at the lowest quality setting based on the device and object's current setting for each individual component. For example, if the object's current quality setting is D3DRMRENDER_GOURAUD, and the device is D3DRMRENDER_FLAT then the object will be rendered with flat shading, solid fill, and lights on.
If the object's current quality setting is D3DRMSHADE_GOURAUD|D3DRMLIGHT_OFF|D3DRMFILL_WIREFRAME and the device's quality setting is D3DRMSHADE_FLAT|D3DRMLIGHT_ON|D3DRMFILL_POINT, then the object will be rendered with flat shading, lights off, and point fill mode.
These rules apply to Direct3DRMMeshBuilder objects, Direct3DRMMeshBuilder2 objects, and Direct3DRMProgressiveMesh objects. However, Direct3DRMMesh objects do not follow these rules. Mesh objects ignore the device's quality settings and use the group quality setting (which defaults to D3DRMRENDER_GOURAUD).
Color Models
Retained Mode supports two color models: an RGB model and a monochromatic (or ramp) model. To retrieve the color model, an application can use the IDirect3DRMDevice::GetColorModel method.
The RGB model treats color as a combination of red, green, and blue light, and it supports multiple light sources that can be colored. There is no limit to the number of colors in the scene. You can use this model with 8-, 16-, 24-, and 32-bit displays. If the display depth is less than 24 bits, the limited color resolution can produce banding artifacts. You can avoid these artifacts by using optional dithering.
The monochromatic model also supports multiple light sources, but their color content is ignored. Each source is set to a gray intensity. RGB colors at a vertex are interpreted as brightness levels, which (in Gouraud shading) are interpolated across a face between vertices with different brightnesses. The number of differently colored objects in the scene is limited; after all the system's free palette entries are used up, the system's internal palette manager finds colors that already exist in the palette and that most closely match the intended colors. Like the RGB model, you can use this model with 8-, 16-, 24-, and 32-bit displays. (The monochromatic model supports only 8-bit textures, however.) The advantage of the monochromatic model over the RGB model is simply performance.
It is not possible to change the color model of a Direct3D device. Your application should use the IDirect3D::EnumDevices or IDirect3D::FindDevice method to identify a driver that supports the required color model, then specify this driver in one of the device-creation methods.
Palettes are supported for textures, off-screen surfaces, and overlay surfaces, none of which is required to have the same palette as the primary surface. If a device supports a 4-bit indexed palette (16 colors) and you have 8-bit indexed art (256 colors), Retained Mode will render the art as 4-bit by taking the first 16 entries from your palette and remapping to those. Therefore, you should put your 16 preferred colors at the front of the palette if possible.
Window Management
For correct operation, applications must inform Direct3D when the WM_MOVE, WM_PAINT, and WM_ACTIVATE messages are received from the operating system by using the IDirect3DRMWinDevice::HandlePaint and IDirect3DRMWinDevice::HandleActivate methods.
For related information, see IDirect3DRMWinDevice.
IDirect3DRMFace and IDirect3DRMFaceArray Interfaces
A face represents a single polygon in a mesh. An application can set the color, texture, and material of the face by using the IDirect3DRMFace::SetColor, IDirect3DRMFace::SetColorRGB, IDirect3DRMFace::SetTexture, and IDirect3DRMFace::SetMaterial methods.
Faces are constructed from vertices by using the IDirect3DRMFace::AddVertex and IDirect3DRMFace::AddVertexAndNormalIndexed methods. An application can read the vertices of a face by using the IDirect3DRMFace::GetVertices and IDirect3DRMFace::GetVertex methods.
For related information, see IDirect3DRMFace.
IDirect3DRMFrame, IDirect3DRMFrame2, and IDirect3DRMFrameArray Interfaces
The term frame is derived from an object's physical frame of reference. The frame's role in Retained Mode is similar to a window's role in a windowing system. Objects can be placed in a scene by stating their spatial relationship to a relevant reference frame; they are not simply placed in world space. A frame is used to position objects in a scene, and visuals take their positions and orientation from frames.
A scene in Retained Mode is defined by a frame that has no parent frame; that is, a frame at the top of the hierarchy of frames. This frame is also sometimes called a root frame or master frame. The scene defines the frame of reference for all of the other objects. You can create a scene by calling the IDirect3DRM::CreateFrame method and specifying NULL for the first parameter.
The IDirect3DRMFrame2 interface is an extension of the IDirect3DRMFrame interface. IDirect3DRMFrame2 has methods that enable using materials, bounding boxes, and axes with frames. IDirect3DRMFrame2 also supports ray picking.
By using the IDirect3DRMFrame2::SetAxes method and using the right-handed projection types in the D3DRMPROJECTIONTYPE structure with the IDirect3DRMViewport::SetProjection method, you can enable right-handed projection.
For related information, see IDirect3DRMFrame and IDirect3DRMFrame2.
This section describes frames and how your application can use them.
Hierarchies
The frames in a scene are arranged in a tree structure. Frames can have a parent frame and child frames. Remember, a frame that has no parent frame defines a scene and is called a root frame.
Child frames have positions and orientations relative to their parent frames. If the parent frame moves, the child frames also move.
An application can set the position and orientation of a frame relative to any other frame in the scene, including the root frame if it needs to set an absolute position. You can also remove frames from one parent frame and add them to another at any time by using the IDirect3DRMFrame::AddChild method. To remove a child frame entirely, use the IDirect3DRMFrame::DeleteChild method. To retrieve a frame's child and parent frames, use the IDirect3DRMFrame::GetChildren and IDirect3DRMFrame::GetParent methods.
You can add frames as visuals to other frames, allowing you to use a given hierarchy many times throughout a scene. The new hierarchies are referred to as instances. Be careful to avoid instancing a parent frame into its children because that will degrade performance. Retained Mode does no run-time checking for cyclic hierarchies. You cannot create a cyclic hierarchy by using the methods of the IDirect3DRMFrame interface; instead, this is possible only when you add a frame as a visual.
Transformations
You can think of the position and orientation of a frame relative to its parent frame as a linear transformation. This transformation takes vectors defined relative to the child frame and changes them to equivalent vectors defined relative to the parent.
Transformations can be represented by 4×4 matrices, and coordinates can be represented by four-element row vectors, [x, y, z,1].
If vchild is a coordinate in the child frame, then vparent, the equivalent coordinate in the parent frame, is defined as:

Tchild is the child frame's transformation matrix.
The transformations of all the parent frames above a child frame up to the root frame are concatenated with the transformation of that child to produce a world transformation. This world transformation is then applied to the visuals on the child frame before rendering. Coordinates relative to the child frame are sometimes called model coordinates. After the world transformation is applied, coordinates are called world coordinates.
The transformation of a frame can be modified directly by using the IDirect3DRMFrame::AddTransform, IDirect3DRMFrame::AddScale, IDirect3DRMFrame::AddRotation, and IDirect3DRMFrame::AddTranslation methods. Each of these methods specifies a member of the D3DRMCOMBINETYPE enumerated type, which specifies how the matrix supplied by the application should be combined with the current frame's matrix.
The IDirect3DRMFrame::GetRotation and IDirect3DRMFrame::GetTransform methods allow you to retrieve a frame's rotation axis and transformation matrix. To change the rotation of a frame, use the IDirect3DRMFrame::SetRotation method.
Use the IDirect3DRMFrame::Transform and IDirect3DRMFrame::InverseTransform methods to change between world coordinates and model coordinates.
You can find a more general discussion of transformations in the section devoted to viewports, Transformations. For an overview of the mathematics of transformations, see 3-D Transformations.
Motion
Every frame has an intrinsic rotation and velocity. Frames that are neither rotating nor translating simply have zero values for these attributes. These attributes are used before each scene is rendered to move objects in the scene, and they can also be used to create simple animations.
Callback Functions
Frames support a callback function that you can use to support more complex animations. The application registers a function that the frame calls before the motion attributes are applied. When there are multiple frames in a hierarchy, each with associated callback functions, the parent frames are called before the child frames. For a given hierarchy, rendering does not take place until all of the required callback functions have been invoked.
To add this callback function, use the IDirect3DRMFrame::AddMoveCallback method; to remove it, use the IDirect3DRMFrame::DeleteMoveCallback method.
You can use these callback functions to provide new positions and orientations from a preprogrammed animation sequence or to implement dynamic motion in which the activities of visuals depend upon the positions of other objects in the scene.
IDirect3DRMInterpolator Interface
Interpolators provide a way of storing actions and applying them to objects with automatic calculation of in-between values. For example, you can set a scene's background color to red at time zero and green at time ten, and the interpolator will automatically tint successive scenes to blend from red to green. With an interpolator, you can blend colors, move objects smoothly between positions, morph meshes, and perform many other transformations.
In the Direct3D Retained Mode implementation, interpolators are a generalization of the IDirect3DRMAnimation interface that increases the kinds of object parameters you can animate. While the IDirect3DRMAnimation interface allows animation of an object's position, size and orientation, the IDirect3DRMInterpolator interface further enables animation of colors, meshes, textures, and materials.
Interpolator Keys
The actions stored by the interpolator are called keys. A key is a stored procedure call and has an index associated with it. The interpolator automatically calculates between the key values.
Keys are stored in the interpolator by calling one of the supported interface methods that can be interpolated. The method and the parameter values passed to it make up the key. Methods Supported by the Interpolator supplies a list of supported methods.
Every key stored inside an interpolator has an index value. When the key is recorded, it is stamped with the current interpolator index value. The key's index value never changes once this value is set.
Interpolator Types
Objects can be attached to interpolators of an associated type; for example, a Mesh can be attached to a MeshInterpolator. The interpolator types are:
- FrameInterpolator
- LightInterpolator
- MaterialInterpolator
- MeshInterpolator
- TextureInterpolator
- ViewportInterpolator
Other interpolators can also be attached to an interpolator. When you change the index of an interpolator, it sets the indices of any attached interpolators to the same value.
Note that for MeshInterpolators, you add a SetVertices key to a MeshInterpolator object by calling SetVertices on the MeshInterpolator object's IDirect3DRMMesh interface. The group index used with SetVertices must correspond to a valid group index in the Mesh object or objects that the interpolator is applied to.
Interpolator Example
As an example, if you want to interpolate a frame's position, you will need a FrameInterpolator object with two interfaces, IDirect3DRMInterpolator and IDirect3DRMFrame.
pd3drm->CreateObject(CLSID_CDirect3DRMFrameInterpolator, 0, IID_IDirect3DRMInterpolator, &pInterp);
pInterp->QueryInterface(IID_IDirect3DRMFrame, &pFrameInterp);
To add a position key to the interpolator, set the interpolator's internal index through the IDirect3DRMInterpolator interface, and record the position by calling the IDirect3DRMFrame::SetPosition method on the IDirect3DRMFrame interface. This method is applied to the interpolator rather than to a real frame. The function call and its parameters are stored in the interpolator as a new key with the current index.
pInterp->SetIndex(keytime);
pFrameInterp->SetPosition(NULL, keypos.x, keypos.y, keypos.z);
You can add more keys by repeating the sequence of setting the index with SetIndex followed by one or more object methods. To play actions back through a real frame, attach the frame to the interpolator.
pInterp->AttachObject(pRealFrame);Now call Interpolate to set the position of the pRealFrame parameter using the interpolated position.
pInterp->Interpolate(time, NULL, D3DRMINTERPOLATIONSPLINE | D3DRMINTERPOLATION_OPEN);The interpolator will call the attached frame's SetPosition method, passing it a position it has calculated by interpolating (in this case, using a B-spline) between the nearest SetPosition keys.
Alternatively, you can use the immediate form of Interpolate and pass the object as the second parameter. This overrides any attached objects.
pInterp->Interpolate(time, pRealFrame, D3DRMINTERPOLATIONSPLINE | D3DRMINTERPOLATION_OPEN);You can use the same interpolator to store other keys such as orientation, scale, velocity, and color keys. Each property exists on a parallel timeline, and calling Interpolate assigns the interpolated value for each property to the attached frames.
It is possible to interpolate more than one method. For example, you can store SetGroupColor and SetVertices keys in the same interpolator. It is not possible to interpolate between keys of different methods, so they are stored in parallel execution threads called Key Chains. Also, if you specify two keys from different groups, such as SetGroupColor(0, black) and SetGroupColor(2, white), it does not make sense for the interpolator to generate an in-between action of SetGroupColor(1, gray) because the keys apply to different groups. In this case, the keys are also stored in separate chains.
Methods Supported by the Interpolator
Viewport
- SetFront(value)
- SetBack(value)
- SetField(value)
- SetPlane(left, right, bottom, top)
Frame and Frame2
- SetPosition(reference*, x, y, z)
- SetRotation(reference*, x, y, z, theta)
- SetVelocity(reference*, x, y, z, withRotation*)
- SetOrientation(reference*, dx, dy, dz, ux, uy, uz)
- SetColor(color)
- SetColorRGB(red, green, blue)
- SetSceneBackground(color)
- SetSceneBackgroundRGB(red, green, blue)
- SetSceneFogColor(color)
- SetSceneFogParams(start, end, density)
- SetQuaternion(reference*, quat)
Mesh
- Translate(x, y, z)
- SetVertices(group*, index*, count*, vertices)
- SetGroupColor(group*, color)
- SetGroupColorRGB(group*, red, green, blue)
Light
- SetColor(color)
- SetColorRGB(red, green, blue)
- SetRange(value)
- SetUmbra(value)
- SetPenumbra(value)
- SetConstantAttenuation(value)
- SetLinearAttenuation(value)
- SetQuadraticAttenuation(value)
Texture and Texture2
- SetDecalSize(width, height)
- SetDecalOrigin(x, y)
- SetDecalTransparentColor(color)
Material
- SetPower(value)
- SetSpecular(red, green, blue)
- SetEmissive(red, green, blue)
*—Indicates keys with different values for this parameter are inserted in separate chains
An attempt to set a key of any unsupported method will result in a non-fatal D3DRMERR_BADOBJECT error.
Interpolator Index Span
The interpolator covers a span of index values. This index span is dictated by the following rules:
- The start of the span is the minimum of all key index values and the current index.
- The end of the span is the maximum of all key index values and the current index.
Interpolation Options
Interpolation can be performed with one or more of the following options:
- D3DRMINTERPOLATION_CLOSED
- D3DRMINTERPOLATION_LINEAR
- D3DRMINTERPOLATION_NEAREST
- D3DRMINTERPOLATION_OPEN
- D3DRMINTERPOLATION_SLERPNORMALS
- D3DRMINTERPOLATION_SPLINE
- D3DRMINTERPOLATION_VERTEXCOLOR
If the interpolator is executed CLOSED, the interpolation is cyclic. The keys effectively repeat infinitely with a period equal to the index span. For compatibility with animations, any key with an index equal to the end of the span is ignored.
If the interpolation is OPEN, the first and last keys of each key chain fix the interpolated values outside of the index span.
The NEAREST, LINEAR, and SPLINE options specify how in-betweening is performed on each key chain. If NEAREST is specified the nearest key value is used. LINEAR performs linear interpolation between the 2 nearest keys. SPLINE uses a B-spline blending function on the 4 nearest keys.
The following two options affect only the interpolation of IDirect3DRMMesh::SetVertices:
- VERTEXCOLOR specifies that vertex colors should be interpolated.
- SLERPNORMALS specifies that vertex normals should be spherically interpolated (not currently implemented).
IDirect3DRMLight and IDirect3DRMLightArray Interfaces
Lighting effects are employed to increase the visual fidelity of a scene. The system colors each object based on the object's orientation to the light sources in the scene. The contribution of each light source is combined to determine the color of the object during rendering. All lights have color and intensity that can be varied independently.
An application can attach lights to a frame to represent a light source in a scene. When a light is attached to a frame, it illuminates visual objects in the scene. The frame provides both position and orientation for the light. In other words, the light originates from the origin of the frame it is attached to. An application can move and redirect a light source simply by moving and reorienting the frame the light source is attached to.
Each viewport owns one or more lights. No light can be owned by more than one viewport.
Retained Mode currently provides five types of light sources: ambient, directional, parallel point, point, and spotlight.
For a reference to the methods of the IDirect3DRMLight interface, see IDirect3DRMLight.
This section describes lighting effects available in Direct3D and how your application can use them.
Ambient
An ambient light source illuminates everything in the scene, regardless of the orientation, position, and surface characteristics of the objects in the scene. Because ambient light illuminates a scene with equal strength everywhere, the position and orientation of the frame it is attached to are inconsequential. Multiple ambient light sources are combined within a scene.
Directional
A directional light source has orientation but no position. The light is attached to a frame but appears to illuminate all objects with equal intensity, as if it were at an infinite distance from the objects. The directional source is commonly used to simulate distant light sources, such as the sun. It is the best choice of light to use for maximum rendering speed.
Parallel Point
A parallel point light source illuminates objects with parallel light, but the orientation of the light is taken from the position of the parallel point light source. That is, like a directional light source, a parallel point light source has orientation, but it also has position. For example, two meshes on either side of a parallel point light source are lit on the side that faces the position of the source. The parallel point light source offers similar rendering-speed performance to the directional light source.
Point
A point light source radiates light equally in all directions from its origin. It requires the calculation of a new lighting vector for every facet or normal it illuminates, and for this reason it is computationally more expensive than a parallel point light source. It does, however, produce a more faithful lighting effect and should be chosen where visual fidelity is the deciding concern.
Spotlight
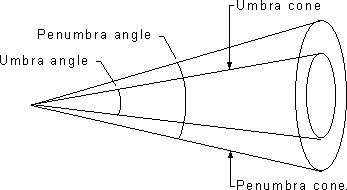
A spotlight emits a cone of light. Only objects within the cone are illuminated. The cone produces light of two degrees of intensity, with a central brightly lit section (the umbra) that acts as a point source, and a surrounding dimly lit section (the penumbra) that merges with the surrounding deep shadow. The angles of these two sections can be individually specified by using the IDirect3DRMLight::GetPenumbra, IDirect3DRMLight::GetUmbra, IDirect3DRMLight::SetPenumbra, and IDirect3DRMLight::SetUmbra methods.
IDirect3DRMMaterial Interface
A material defines how a surface reflects light. A material has two components: an emissive property (whether it emits light) and a specular property, whose brightness is determined by a power setting. The value of the power determines the sharpness of the reflected highlights, with a value of 5 giving a metallic appearance and higher values giving a more plastic appearance.
An application can control the emission of a material by using the IDirect3DRMMaterial::GetEmissive and IDirect3DRMMaterial::SetEmissive methods, the specular component by using the IDirect3DRMMaterial::GetSpecular and IDirect3DRMMaterial::SetSpecular methods, and the power by using the IDirect3DRMMaterial::GetPower and IDirect3DRMMaterial::SetPower methods.
For a reference to the methods of the IDirect3DRMMaterial interface, see IDirect3DRMMaterial.
IDirect3DRMMesh, IDirect3DRMMeshBuilder, and IDirect3DRMMeshBuilder2 Interfaces
A mesh is a visual object that is made up of a set of polygonal faces. A mesh defines a set of vertices and a set of faces (the faces are defined in terms of the vertices and normals of the mesh). Changing a vertex or normal that is used by several faces changes the appearance of all faces sharing it.
The vertices of a mesh define the positions of faces in the mesh, and they can also be used to define 2-D coordinates within a texture map.
You can manipulate meshes in Retained Mode by using three COM interfaces: IDirect3DRMMesh, IDirect3DRMMeshBuilder, and IDirect3DRMMeshBuilder2. IDirect3DRMMesh is very fast, and you should use it when a mesh is subject to frequent changes, such as when morphing. IDirect3DRMMeshBuilder is built on top of the IDirect3DRMMesh interface. Although the IDirect3DRMMeshBuilder interface is a convenient way to perform operations on individual faces and vertices, the system must convert a Direct3DRMMeshBuilder object into a Direct3DRMMesh object before rendering it. For meshes that do not change or that change infrequently, this conversion has a negligible impact on performance.
IDirect3DRMMeshBuilder2 has all the functionality of IDirect3DRMMeshBuilder plus one enhanced and one added method. IDirect3DRMMeshBuilder2::GenerateNormals2 gives you more control over how normals are generated. IDirect3DRMMeshBuilder2::GetFace allows you to access a single face in a mesh.
If an application needs to assign the same characteristics (such as material or texture) to several vertices or faces, it can use the IDirect3DRMMesh interface to combine them in a group. If the application needs to share vertices between two different groups (for example, if neighboring faces in a mesh are different colors), the vertices must be duplicated in both groups. The IDirect3DRMMesh::AddGroup method assigns a group identifier to a collection of faces. This identifier is used to refer to the group in subsequent calls.
The IDirect3DRMMeshBuilder, IDirect3DRMMeshBuilder2, and IDirect3DRMMesh interfaces allow an application to create faces with more than three sides. They also automatically split a mesh into multiple buffers if, for example, the hardware the application is rendering to has a limit of 64K and a mesh is larger than that size. These features set the Direct3DRMMesh and Direct3DRMMeshBuilder API apart from the Direct3D API.
You can add vertices and faces individually to a mesh by using the IDirect3DRMMeshBuilder::AddVertex, IDirect3DRMMeshBuilder::AddFace, and IDirect3DRMMeshBuilder::AddFaces methods or the equivalent IDirect3DRMMeshBuilder2 methods. You can retrieve an individual face with the IDirect3DRMMeshBuilder2::GetFace.
You can define individual color, texture, and material properties for each face in the mesh, or for all faces in the mesh at once, by using the IDirect3DRMMesh::SetGroupColor, IDirect3DRMMesh::SetGroupColorRGB, IDirect3DRMMesh::SetGroupTexture, and IDirect3DRMMesh::SetGroupMaterial methods.
For a mesh to be rendered, you must first add it to a frame by using the IDirect3DRMFrame::AddVisual method. You can add a single mesh to multiple frames to create multiple instances of that mesh.
Your application can use flat, Gouraud, and Phong shade modes, as specified by a call to the IDirect3DRMMesh::SetGroupQuality method. (Phong shading is not yet available, however.) This method uses values from the D3DRMRENDERQUALITY enumerated type. For more information about shade modes, see Polygons.
You can set normals (which should be unit vectors), or normals can be calculated by averaging the face normals of the surrounding faces by using the IDirect3DRMMeshBuilder::GenerateNormals method.
Direct3DRMObject
Direct3DRMObject is the common superclass of all objects in the system. A Direct3DRMObject object has characteristics common to all objects.
Each Direct3DRMObject object is instantiated as a COM object. In addition to the methods of the IUnknown interface, each object has a standard set of methods that are generic to all.
To create an object, the application must first have instantiated a Direct3D Retained Mode object by calling the Direct3DRMCreate function. The application then calls the method of the object's interface that creates an object, and it specifies parameters specific to the object. For example, to create a Direct3DRMAnimation object, the application would call the IDirect3DRM::CreateAnimation method. The creation method then creates a new object, initializes some of the object's attributes from data passed in the parameters (leaving all others with their default values), and returns the object. Applications can then specify the interface for this object to modify and use the object.
Any object can store 32 bits of application-specific data. This data is not interpreted or altered by Retained Mode. The application can read this data by using the IDirect3DRMObject::GetAppData method, and it can write to it by using the IDirect3DRMObject::SetAppData method. Finding this data is simpler if the application keeps a structure for each Direct3DRMFrame object. For example, if calling the IDirect3DRMFrame::GetParent method retrieves a Direct3DRMFrame object, the application can easily retrieve the data by using a pointer to its private structure, possibly avoiding a time-consuming search.
You might also want to assign a name to an object to help you organize an application or as part of your application's user interface. You can use the IDirect3DRMObject::SetName and IDirect3DRMObject::GetName methods to set and retrieve object names.
Another example of possible uses for application-specific data is when an application needs to group the faces within a mesh into subsets (for example, for front and back faces). You could use the application data in the face to note in which of these groups a face should be included.
An application can specify a function to call when an object is destroyed, such as when the application needs to deallocate memory associated with the object. To do this, use the IDirect3DRMObject::AddDestroyCallback method. To remove a function previously registered with this method, use the IDirect3DRMObject::DeleteDestroyCallback method.
The callback function is called only when the object is destroyed—that is, when the object's reference count has reached 0 and the system is about to deallocate the memory for the object. If an application kept additional data about an object (so that its dynamics could be implemented, for example), the application could use this callback function as a way to notify itself that it can dispose of the data.
For related information, see IDirect3DRMObject and IDirect3DRMObjectArray.
IDirect3DRMPickedArray and IDirect3DRMPicked2Array Interfaces
Picking is the process of searching for visuals in a scene, given a 2-D coordinate in a viewport or a vector in a frame.
You can use the IDirect3DRMViewport::Pick method to retrieve an IDirect3DRMPickedArray interface, and then call the IDirect3DRMPickedArray::GetPick method to retrieve an IDirect3DRMFrameArray interface and a visual object. The array of frames is the path through the hierarchy leading to the visual object; that is, a hierarchical list of the visual object's parent frames, with the topmost parent in the hierarchy first in the array.
You can use the IDirect3DRMFrame2::RayPick method to retrieve an IDirect3DRMPicked2Array interface, and then call the IDirect3DRMPicked2Array::GetPick method to retrieve an IDirect3DRMFrameArray interface, a visual object, and information about the object intersected by the ray, including the face and group identifiers, pick position, and horizontal and vertical texture coordinates for the vertex, vertex normal, and color of the object. The array of frames is the path through the hierarchy leading to the visual object.
IDirect3DRMProgressiveMesh Interface
A mesh is a visual object that is made up of a set of polygonal faces. A mesh defines a set of vertices and a set of faces.
A progressive mesh is a mesh that is stored as a base mesh (a coarse version) and a set of records that are used to increasingly refine the mesh. This allows you to set the level of detail rendered for a mesh and also allows progressive download from remote sources.
Using the methods of the IDirect3DRMProgressiveMesh interface, you can set the number of vertices or faces to render and thereby control the render detail. You can also specify a minimum level of detail required for rendering. Normally, a progressive mesh is rendered once the base mesh is available, but with the IDirect3DRMProgressiveMesh::SetMinRenderDetail method you can specify that a greater level of detail is necessary before rendering. You can also build a Direct3DRMMesh object from a particular state of the progressive mesh using the IDirect3DRMProgressiveMesh::CreateMesh method.
You can load a progressive mesh from a file, resource, memory, or URL. Loading can be done synchronously or asynchronously. You can check the status of a download with the IDirect3DRMProgressiveMesh::GetLoadStatus method, and terminate a download with the IDirect3DRMProgressiveMesh::Abort method. If loading is asynchronous, it is up to the application to use events through the IDirect3DRMProgressiveMesh::RegisterEvents and IDirect3DRMProgressiveMesh::GetLoadStatus methods to find out how the load is progressing.
IDirect3DRMShadow Interface
Applications can produce an initialized and usable shadow simply by calling the IDirect3DRM::CreateShadow method. The IDirect3DRMShadow interface exists so that applications which create a shadow by using the IDirect3DRM::CreateObject method can initialize the shadow by calling the IDirect3DRMShadow::Init method.
IDirect3DRMTexture and IDirect3DRMTexture2 Interfaces
A texture is a rectangular array of colored pixels. (The rectangle does not necessarily have to be square, although the system deals most efficiently with square textures.) You can use textures for texture-mapping faces, in which case their dimensions must be powers of two.
Your application can use the IDirect3DRM::CreateTexture method to create a texture from a D3DRMIMAGE structure, or the IDirect3DRM::CreateTextureFromSurface method to create a texture from a DirectDraw surface. The IDirect3DRM::LoadTexture method allows your application to load a texture from a file; the texture should be in Microsoft® Windows® bitmap (.bmp) or Portable Pixmap (.ppm) format. To avoid unnecessary delays when creating textures, hold onto textures you want to use again, instead of creating them each time they're needed. For optimal performance, use a texture surface format that is supported by the device you are using. This will avoid a costly format conversion when the texture is created and any time it changes.
The texture coordinates of each face define the region in the texture that is mapped onto that particular face. Your application can use a wrap to calculate texture coordinates. For more information, see IDirect3DRMWrap Interface.
The IDirect3DRMTexture2 interface is an extension of the IDirect3DRMTexture interface. The IDirect3DRMTexture2::InitFromResource2 method allows resources to be loaded from DLLs and executables other than the currently executing file. In addition, IDirect3DRMTexture2 has two new methods. IDirect3DRMTexture2::InitFromImage creates a texture from an image in memory. This method is equivalent to IDirect3DRM::CreateTexture. IDirect3DRMTexture2::GenerateMIPMap generates a MIP map from a source image.
Textures are loaded from BMP and DIB (device-independent bitmap) files right-side up in IDirect3DRMTexture2::InitFromFile and IDirect3DRMTexture2::InitFromResource2, unlike IDirect3DRMTexture::InitFromFile and IDirect3DRMTexture::InitFromResource where they are loaded inverted.
For a reference to the methods of these interfaces, see IDirect3DRMTexture and IDirect3DRMTexture2.
This section describes the types of textures supported by Direct3D and how your application can use them.
Decals
Textures can also be rendered directly, as visuals. Textures used this way are sometimes known as decals, a term adopted by Retained Mode. A decal is rendered into a viewport-aligned rectangle. The rectangle can optionally be scaled by the depth component of the decal's position. The size of the decal is taken from a rectangle defined relative to the containing frame by using the IDirect3DRMTexture::SetDecalSize method. (An application can retrieve the size of the decal by using the IDirect3DRMTexture::GetDecalSize method.) The decal is then transformed and perspective projection is applied.
Decals have origins that your application can set and retrieve by using the IDirect3DRMTexture::SetDecalOrigin and IDirect3DRMTexture::GetDecalOrigin methods. The origin is an offset from the top-left corner of the decal. The default origin is [0, 0]. The decal's origin is aligned with its frame's position when rendering.
Texture Colors
You can set and retrieve the number of colors that are used to render a texture by using the IDirect3DRMTexture::SetColors and IDirect3DRMTexture::GetColors methods.
If your application uses the RGB color model, you can use 8-bit, 24-bit, and 32-bit textures. If you use the monochromatic (or ramp) color model, however, you can use only 8-bit textures.
Several shades of each color are used when lighting a scene. An application can set and retrieve the number of shades used for each color by calling the IDirect3DRMTexture::SetShades and IDirect3DRMTexture::GetShades methods.
A Direct3DRMTexture object uses a D3DRMIMAGE structure to define the bitmap that the texture will be rendered from. If the application provides the D3DRMIMAGE structure, the texture can easily be animated or altered during rendering.
Mipmaps
A mipmap is a sequence of textures, each of which is a progressively lower resolution, prefiltered representation of the same image. Mipmapping is a computationally low-cost way of improving the quality of rendered textures. Each prefiltered image, or level, in the mipmap is a power of two smaller than the previous level. You can specify mipmaps when filtering textures by calling the IDirect3DRMDevice::SetTextureQuality method.
For more information about mipmaps, see Mipmaps.
Texture Filtering
After a texture has been mapped to a surface, the texture elements (texels) of the texture rarely correspond to individual pixels in the final image. A pixel in the final image can correspond to a large collection of texels or to a small piece of a single texel. You can use texture filtering to specify how to interpolate texel values to pixels.
You can use the IDirect3DRMDevice::SetTextureQuality method and the D3DRMTEXTUREQUALITY enumerated type to specify the texture filtering mode for your application.
Texture Transparency
You can use the IDirect3DRMTexture::SetDecalTransparency method to produce transparent textures. Another method for achieving transparency is to use DirectDraw's support for color keys. Color keys are colors or ranges of colors that can be part of either the source or destination of a blit or overlay operation. You can specify that these colors should always be overwritten or never be overwritten.
For more information about DirectDraw's support for color keys, see Color Keying.
Texture Format Selection Rules
When you use a device-independent source image to create a device-dependent texture surface for rendering, the rules are (in order of precedence):
1. Preserve RGB/palettized nature
2. Preserve alpha channel
3. Preserve bit depth or palette size
4. Preserve RBGA masks
5. Prefer 8-bit palettized or 16-bit RGB
For more information about texture pixel formats, see Texture Map Formats.
For related information, see IDirect3DRMTexture and IDirect3DRMTexture2.
IDirect3DRMUserVisual Interface
User-visual objects are application-defined data that an application can add to a scene and then render, typically by using a customized rendering module. For example, an application could add sound as a user-visual object in a scene, and then render the sound during playback.
You can use the IDirect3DRM::CreateUserVisual method to create a user-visual object and the IDirect3DRMUserVisual::Init method to initialize the object.
IDirect3DRMViewport and IDirect3DRMViewportArray Interface
The viewport defines how the 3-D scene is rendered into a 2-D window. The viewport defines a rectangular area on a device that objects will be rendered into.
For a reference to the methods of this interface, see IDirect3DRMViewport.
This section describes the viewport, its components, and techniques for their use.
Camera
The viewport uses a Direct3DRMFrame object as a camera. The camera frame defines which scene is rendered and the viewing position and direction. The viewport renders only what is visible along the positive z-axis of the camera frame, with the up direction being in the direction of the positive y-axis.
An application can call the IDirect3DRMViewport::SetCamera method to set a camera for a given viewport. This method sets a viewport's position, direction, and orientation to that of the given camera frame. To retrieve the current camera settings, call the IDirect3DRMViewport::GetCamera method.
Viewing Frustum
The viewing frustum is a 3-D volume in a scene positioned relative to the viewport's camera. For perspective viewing, the camera is positioned at the tip of an imaginary pyramid. This pyramid is intersected by two clipping planes, the front clipping plane and the back clipping plane. The volume in the pyramid between the front and back clipping planes is the viewing frustum. Only objects in the viewing frustum are visible.
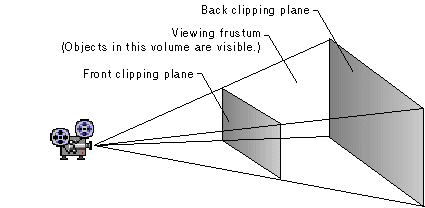
The z-axis of the camera runs from the tip of the pyramid to the center of the back clipping plane. Your application can set and retrieve the positions of the front and back clipping planes by using the IDirect3DRMViewport::SetFront, IDirect3DRMViewport::SetBack, IDirect3DRMViewport::GetFront, and IDirect3DRMViewport::GetBack methods.
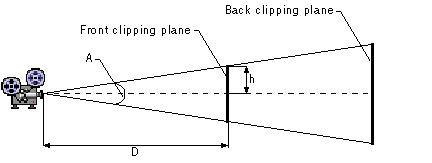
The dimensions of the viewport on the front clipping plane determine the apparent focal length of the camera's lens. (You can also think of this as a way to set the magnification of objects in the frustum.) To set and retrieve proportional dimensions for the viewport on the front clipping plane, use the IDirect3DRMViewport::SetField and IDirect3DRMViewport::GetField methods. To set and retrieve arbitrary dimensions for the viewport on the front clipping plane, use the IDirect3DRMViewport::SetPlane and IDirect3DRMViewport::GetPlane methods.
You can use the following equation to determine the relationship between the height (or width) of the front clipping plane and the viewing angle:

In this formula, the viewing angle is A, the front clipping plane is a distance D from the camera, and the height or width of the front clipping plane is 2h. If the device is not square, and thus the clipping planes are not square, the viewing angle is calculated using half the height or half the width of the front clipping plane, whichever is larger. The scale factors are set to the major axis of the device so you don't get distorted objects. If this is not what you want, you need to set uniform scaling.
The viewing frustum is a pyramid only for perspective viewing. For orthographic viewing, the viewing frustum is cuboid. These viewing types (or projection types) are defined by the D3DRMPROJECTIONTYPE enumerated type and used by the IDirect3DRMViewport::GetProjection and IDirect3DRMViewport::SetProjection methods.
Transformations
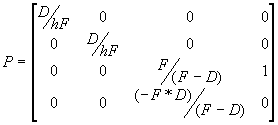
To render objects with 3-D coordinates in a 2-D window, the object must be transformed into the camera's frame. A projection matrix is then used to give a four-element homogeneous coordinate [x y z w], which is used to derive a three-element coordinate [x/w y/w z/w], where [x/w y/w] is the coordinate to be used in the window and z/w is the depth, ranging from 0 at the front clipping plane to 1 at the back clipping plane. The projection matrix is a combination of a perspective transformation followed by a scaling and translation to scale the objects into the window.
The following values are the elements of the projection matrix. In these formulas, h is the half-height of the viewing frustum, F is the distance from the camera, and D is the position in z-coordinates of the front clipping plane:
After projection, the next step is clipping and the conversion of x and y to screen-pixel coordinates within a viewport. Use the D3DVIEWPORT data members for this. The viewport is a rectangular window on the rendering surface.
typedef struct _D3DVIEWPORT {
    DWORD    dwSize;
    DWORD    dwX;
    DWORD    dwY;
    DWORD    dwWidth;
    DWORD    dwHeight;
    D3DVALUE dvScaleX;
    D3DVALUE dvScaleY;
    D3DVALUE dvMaxX;
    D3DVALUE dvMaxY;
    D3DVALUE dvMinZ;
    D3DVALUE dvMaxZ;
} D3DVIEWPORT, *LPD3DVIEWPORT;
The dwX and dwY fields specify the offset in screen pixels to the top left of the viewport on the surface.
The dwWidth and dwHeight fields are the width and height of the viewport in screen pixels.
The dvScaleX and dvScaleY fields are the scaling factors that are applied to the x and y values to yield screen coordinates. You would usually want to map the entire normalized perspective view volume onto the viewport using the following formulas:
  dvScaleX = dwWidth / 2
  dvScaleY = dwHeight / 2
X coordinates, for example, in the range of -1 to 1, will be scaled into the range of -dwWidth / 2 to dwWidth / 2. An offset of dwWidth / 2 is then added. This scaling occurs after clipping.
If the window is not square and you would like to preserve a correct aspect ratio, use the larger of the two window dimensions for both scaling values. You will also need to clip some of the view volume.
The dvMaxX, dvMaxY, dvinZ, and dvMaxZ fields specify the clipping planes: x = dvMaxX, x = —dvMaxX, y = dvMaxy, y = —dvMaxY, z = dvMinZ, z = dvMaxZ. To display all of the view volume, for example, you would set dvMaxX = dvMaxY = dvMaxZ = 1 and dvMinZ = 0. As noted above, if you want to preserve the correct aspect ratio on a nonsquare window, you will need to clip some of the view volume. To do so, use the following equations. These equations also work with square viewports, so use them all the time.
dvMaxX = dwWidth / (2 * dvScaleX)
dvMaxY = dwHeight / (2 * dvScaleY)
An application uses the viewport transformation to ensure that the distance by which the object is moved in world coordinates is scaled by the object's distance from the camera to account for perspective. Note that the result from IDirect3DRMViewport::Transform is a four-element homogeneous vector. This avoids the problems associated with coordinates being scaled by an infinite amount near the camera's position.
For information about transformations for frames, see Transformations. For an overview of the mathematics of transformations, see 3-D Transformations.
Picking
Picking is the process of searching for visuals in the scene given a 2-D coordinate in the viewport's window. An application can use the IDirect3DRMViewport::Pick method to retrieve either the closest object in the scene or a depth-sorted list of objects.
IDirect3DRMVisual and IDirect3DRMVisualArray Interfaces
Visuals are objects that can be rendered in a scene. Visuals are visible only when they are added to a frame in that scene. An application can add a visual to a frame by using the IDirect3DRMFrame::AddVisual method. The frame provides the visual with position and orientation for rendering.
You should use the IDirect3DRMVisualArray interface to work with groups of visual objects; although there is a IDirect3DRMVisual COM interface, it has no methods.
The most common visual types are Direct3DRMMeshBuilder and Direct3DRMTexture objects.
IDirect3DRMWrap Interface
You can use a wrap to calculate texture coordinates for a face or mesh. To create a wrap, the application must specify a type, a reference frame, an origin, a direction vector, and an up vector. The application must also specify a pair of scaling factors and an origin for the texture coordinates.
Your application calls the IDirect3DRM::CreateWrap function to create an IDirect3DRMWrap interface. This interface has two unique methods: IDirect3DRMWrap::Apply, which applies a wrap to the vertices of the object, and IDirect3DRMWrap::ApplyRelative, which transforms the vertices of a wrap as it is applied.
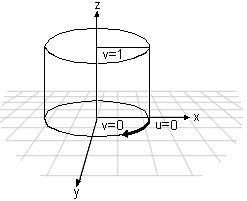
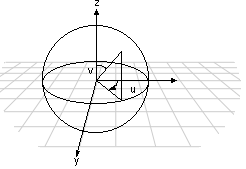
In the examples, the direction vector (the v vector) lies along the z-axis, and the up vector (the u vector) lies along the y-axis, with the origin at [0 0 0].
For a reference to the methods of the IDirect3DRMWrap interface, see IDirect3DRMWrap.
This section describes the wrapping flags and the four wrapping types:
Wrapping Flags
The D3DRMMAPPING type includes the D3DRMMAP_WRAPU and D3DRMMAP_WRAPV flags. These flags determine how the rasterizer interprets texture coordinates. The rasterizer always interpolates the shortest distance between texture coordinates—that is, a line. The path taken by this line, and the valid values for the u- and v-coordinates, varies with the use of the wrapping flags. If either or both flags is set, the line can wrap around the texture edge in the u or v direction, as if the texture had a cylindrical or toroidal topology.
- In flat wrapping mode, in which neither of the wrapping flags is set, the plane specified by the u- and v-coordinates is an infinite tiling of the texture. In this case, values greater than 1.0 are valid for u and v. The shortest line between (0.1, 0.1) and (0.9, 0.9) passes through (0.5, 0.5).
- If either D3DRMMAP_WRAPU or D3DRMMAP_WRAPV is set, the texture is a cylinder with an infinite length and a circumference of 1.0. Texture coordinates greater than 1.0 are valid only in the dimension that is not wrapped. The shortest distance between texture coordinates varies with the wrapping flag; if D3DRMMAP_WRAPU is set, the shortest line between (0.1, 0.1) and (0.9, 0.9) passes through (0, 0.5).
- If both D3DRMMAP_WRAPU and D3DRMMAP_WRAPV are set, the texture is a torus. Because the system is closed, texture coordinates greater that 1.0 are invalid. The shortest line between (0.1, 0.1) and (0.9, 0.9) passes through (0, 0).
Although texture coordinates that are outside the valid range may be truncated to valid values, this behavior is not defined.
Typically, applications set a wrap flag for cylindrical wraps when the intersection of the texture edges does not match the edges of the face; applications do not set a wrap flag when more than half of a texture is applied to a single face.
Flat
The flat wrap conforms to the faces of an object as if the texture were a piece of rubber that was stretched over the object.
The [u v] coordinates are derived from a vector [x y z] by using the following equations:

In these formulas, s is the window-scaling factor and o is the window origin. The application should choose a pair of scaling factors and offsets that map the ranges of x and y to the range from 0 to 1 for u and v.
Cylindrical
The cylindrical wrap treats the texture as if it were a piece of paper that is wrapped around a cylinder so that the left edge is joined to the right edge. The object is then placed in the middle of the cylinder and the texture is deformed inward onto the surface of the object.
For a cylindrical texture map, the effects of the various vectors are shown in the following illustration.
The direction vector specifies the axis of the cylinder, and the up vector specifies the point on the outside of the cylinder where u equals 0. To calculate the texture [u v] coordinates for a vector [x y z], the system uses the following equations:
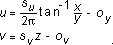
Typically, u would be left unscaled and v would be scaled and translated so that the range of z maps to the range from 0 to 1 for v.
Spherical
For a spherical wrap, the u-coordinate is derived from the angle that the vector [x y 0] makes with the x-axis (as in the cylindrical map) and the v-coordinate from the angle that the vector [x y z] makes with the z-axis. Note that this mapping causes distortion of the texture at the z-axis.
This translates to the following equations:
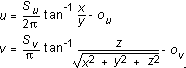
The scaling factors and texture origin will often not be needed here as the unscaled range of u and v is already 0 through 1.
Chrome
A chrome wrap allocates texture coordinates so that the texture appears to be reflected onto the objects. The chrome wrap takes the reference frame position and uses the vertex normals in the mesh to calculate reflected vectors. The texture u- and v-coordinates are then calculated from the intersection of these reflected vectors with an imaginary sphere that surrounds the mesh. This gives the effect of the mesh reflecting whatever is wrapped on the sphere.
© 1998 Microsoft Corporation. All rights reserved. Terms of Use.