

Index
Topic Contents
Previous Topic: Using the ActiveMovie Control in HTML Pages
Next Topic: Control Properties
 |
 | 
|

|
| |||
| |||
Using the ActiveMovie Control in Visual Basic
This article describes how Microsoft® Visual Basic® applications can use the ActiveMovie Control. The ActiveMovie Control is a high-level interface that meets the needs of most multimedia application developers. Additional lower-level interfaces are also available to Visual Basic programmers.
Contents of this article:
- Quick Start: Insert and Use the ActiveMovie Control
- The Visual Basic Ocxvb01 Sample
- Opening and Running DirectShow Source Files
- Managing the User Interface of the ActiveMovie Control
- Monitoring ActiveMovie Control Events
Quick Start: Insert and Use the ActiveMovie Control
This section describes how to insert the ActiveMovie Control and use it in a Visual Basic application. It is a simple example to get you started, and implements only playing and stopping a movie.
Follow these steps to insert the ActiveMovie Control into a Visual Basic form and play a movie:
- Install Internet Explorer to install the ActiveMovie Control.
- Open a project or create a new project in Visual Basic.
- Choose Components from the Projects menu. Choose the Controls tab. If the ActiveMovie Control does not appear in the list of Controls, click the Browse button. In the Add ActiveX Control dialog box that appears, navigate to the directory containing the control (by default, the \Windows\System or \Winnt\System32 directory). Double-click the Amovie.ocx file to add the ActiveMovie Control to the Controls list.
- Add the ActiveMovie Control to the Visual Basic toolbox by selecting the check box next to Microsoft ActiveMovie Control in the Controls list.
- Add the ActiveMovie Control to your form and size the control to the screen size you want for your movie. (Click the control in the Toolbox, and then draw its size on the form.)
- In the Properties list for the ActiveMovie Control, initialize the FileName property to the movie file you want to play. The FileName property should contain the full path. For example:
c:\movies\mymovie.avi- Set the ShowControls and ShowDisplay properties to FALSE.
- Add code to start and stop the movie to two events the ActiveMovie Control supports. For example:
Private Sub ActiveMovie1_Click() ActiveMovie1.Run End Sub Private Sub ActiveMovie1_KeyPress(KeyAscii As Integer) ActiveMovie1.Stop End Sub- Compile the application.
- Run the application. In this example, click anywhere on the movie screen to start the movie. Press any key to stop the movie.
Follow these steps to use the ActiveMovie Control to play a movie controlled by Visual Basic controls:
- Follow steps 1-6 as shown earlier in this section.
- Add Visual Basic controls (such as a CommandButton or ListBox) to your form to play and stop the movie.
- Add code to play and stop the movie. For example:
Private Sub Command1_Click() ActiveMovie1.Run End Sub Private Sub Command2_Click() ActiveMovie1.Stop End Sub- Compile the application.
- Run the application. In this example, Click the Command1 button to start the movie. Click the Command2 button to stop the movie.
The Visual Basic Ocxvb01 Sample
This section describes some of the features of the DirectShow Visual Basic sample application called Ocxvb01 in the VB\OCX directory of the DirectShow samples. The ActiveMovie Control manages most of the details of the display and playback of DirectShow files, while giving the Visual Basic developer control over the image size, playback rate, volume, balance, and position. With the control, the developer can manage a variety of standard user interface controls, such as rewind and fast forward, and a trackbar control to set positions within the media file.
The Visual Basic sample application Ocxvb01 consists of two forms: the main control form frmMain (Ocxvb01.frm) and the display form frmViewer (Viewer.frm).
The frmMain form's menu commands call ActiveMovie Control methods to run, pause, and stop multimedia playback, set and retrieve the control's properties, and enable and disable different parts of the user interface.
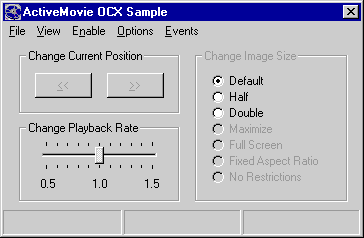
The frmMain form contains two command buttons that change the CurrentPosition property of the IMediaPosition object; you can use these buttons to move forward or backward through the multimedia source file, if the multimedia source type supports this functionality. The frmMain form's trackbar control sets the Playback property; its valid range is 0.5 to 1.5. This value is used as a multiplier; 1.0 is the authored speed, so 0.5 is half the authored speed and 2.0 is twice the authored speed. You can set this property to values outside this range, but the audio portion tends to become incomprehensible.
The main control form also contains option buttons that set the display configuration to half size, full size (default), and double size. The main control form appears as shown in the following illustration.

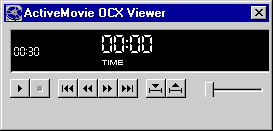
The display form, frmViewer, contains the ActiveMovie Control that is displayed when the DirectShow multimedia source file is active or when the source is playing. The application resizes the display form to correspond to the selected source. The display form, with all ActiveMovie Control user interface elements visible and enabled, appears as shown in the following illustration.

The following sections describe how to use some of the properties, methods, and events.
Opening and Running DirectShow Source Files
To load and play a DirectShow file, set the ActiveMovie Control's FileName property. Depending on your application's requirements, you can play the file from your code by using methods like Run and Stop, or you can let the user interact with the user interface elements offered by the control.
The FileName property specifies the name of the multimedia source file. When you set the FileName property, several other properties are updated to indicate characteristics of that source file.
Once the FileName property contains a valid file name, you can call the control's Run method to play the multimedia file. Or, you can enable the control buttons on the display form and let the user play the file.
The sample application contains an Open command on the File menu that sets the value of the FileName property. It invokes the File Open common dialog box to obtain a file name:
   Private Sub mnu_File_Open_Click()

      CommonDialog1.Filter = "All files (*.*)|*.*|DirectShow files
(*.mpg;*.mpa;*.mpv;*.mov;*.mpeg;*.enc;*.m1v;*.mp2)|*.mpg;*.mpa;*.mpv;*.mov;*.mpeg;*.enc;*.m1v;*.
mp2|Audio files (.wav)|*.wav|Video for Windows files
(.avi)|*.avi"
      CommonDialog1.Flags = 4 'Hide read-only check box
      CommonDialog1.ShowOpen
      ' only set the property if the user selected a filename from the common dialog
      If CommonDialog1.filename <> "" Then
         frmViewer.ActiveMovie1.filename = CommonDialog1.filename
         g_FileOpened = True
         g_FileExtension = Right$(CommonDialog1.filename, Len(CommonDialog1.filename) -
InStr(CommonDialog1.filename, "."))
      Else
         GoTo err_FileOpen
      End If
      Call ResizeViewer
      ...
First, the subroutine prepares the common dialog box to display only movie files. After the common dialog box returns, the subroutine checks to determine if a file name was returned.
If a file name was returned, the subroutine sets the FileName property of the ActiveMovie Control, in addition to some other global variables: gFileOpened to determine whether or not a file has been opened, and gFileExtension to determine the type of the file.
Finally, the subroutine calls the ResizeViewer subroutine to make the dimensions of the viewer form match those of the DirectShow file. The dimensions of the Visual Basic form are expressed in twips, while the dimensions of the multimedia source are expressed in pixels. The ResizeViewer subroutine considers these differences to size the form by using the form's ScaleHeight and ScaleWidth properties:
' Resize form to dimensions of ActiveMovie Control + nonclient region.
    With frmViewer
        .Visible = False
        .Height = .ActiveMovie1.Height + (.Height - .ScaleHeight)
        .Width = .ActiveMovie1.Width + (.Width - .ScaleWidth)
        .Visible = True
    End With
After the file is loaded successfully, you can play it by clicking Play on the control, or by using the Run method. The sample application provides a Run command on its File menu that calls the Run method:
   Private Sub mnu_File_Run_Click()

      If g_FileOpened = True Then
         frmViewer.ActiveMovie1.Run
         frmViewer.ZOrder 0
      End If
Managing the User Interface of the ActiveMovie Control
The display form of the sample application (Viewer.frm) contains the ActiveMovie Control. The following illustration shows the control with the status bar visible and the control bar hidden.

You can use the ActiveMovie Control properties to show or hide and enable or disable user interface elements of the ActiveMovie Control. The sample application includes selected menu commands that enable you to individually control each of the user interface elements. The commands on the View menu enable you to control whether the element is visible. The commands on the Enable menu enable you to control whether the element is enabled.
When the sample application loads a new file, it resets the ActiveMovie Control properties to default values and initializes the values of these selected menu commands. This fragment is from the mnu_File_Open_Click procedure:
   With frmViewer.ActiveMovie1
      .EnablePositionControls = False              'Disable/Enable controls.
      .EnableSelectionControls = False
      .EnableTracker = False
      .ShowPositionControls = False                'Show/don't show controls.
      .ShowSelectionControls = False
      .ShowTracker = True
      mnu_Enable_PositionControls.Checked = False  'Check/uncheck menus to match
      mnu_Enable_SelectionControls.Checked = False 'controls.
      mnu_Enable_Tracker.Checked = False
      mnu_View_Tracker.Checked = True
      mnu_View_PositionControls.Checked = False
      mnu_View_SelectionControls.Checked = False
      ...
   End With
Many of the control elements have two properties associated with them: one to enable them and another to make them visible. To use the position controls, set both the EnablePositionControls and ShowPositionControls properties. The following illustration shows the display controls and all position controls with all elements of the user interface both visible and enabled.
Monitoring ActiveMovie Control Events
The ActiveMovie Control automatically monitors certain events and calls event procedures accordingly. To handle one of these events, you provide only the event handling code. For example, the StateChange event indicates a change in the state of the multimedia source, such as the change from running to stopped, or the change from paused to running. To take some action when this event occurs, the application provides code as part of the control's StateChange event.
To demonstrate these event handlers, the sample application provides trivial code that increments a variable. The variable represents a count of the number of times the event has occurred. The current values for these counter variables are displayed at the bottom of the main form. The following example shows the code for the StateChange event.
   Private Sub ActiveMovie1_StateChange(ByVal oldState As Long, ByVal newState As Long)

      g_cStateChange = g_cStateChange + 1
      UpdateStatusBar
Each event procedure passes some informational parameters too. For the StateChange event, you can determine the previous state, in addition to the control's current state, by examining the oldState and newState parameters.
© 1998 Microsoft Corporation. All rights reserved. Terms of Use.