

Index
Topic Contents
Previous Topic: About the DirectShow Filter Graph Editor
Next Topic: COM Overview
 |
 | 
|

|
| |||
| |||
Using the Filter Graph Editor
This article steps through how to open and use the Filter Graph Editor (GraphEdit) to create filter graphs and to play them back. See About the DirectShow Filter Graph Editor for an introduction to GraphEdit.
Contents of this article:
- Starting GraphEdit
- Creating a New Filter Graph
- Running and Editing a Filter Graph
- Viewing Properties in GraphEdit
Starting GraphEdit
Start GraphEdit in one of the following ways.
- Click Start, and then point to Programs. On the DirectX Media SDK version 5.x submenu, click GraphEdit.
- Open the DXMedia\Tools folder (assuming the default installation directory for the DirectX media SDK) and double-click the Graphedt icon.
- Drag and drop a multimedia file, such as .avi or .mpg, onto the Graphedt icon.
Creating a New Filter Graph
This section discusses ways to create a new filter graph using GraphEdit. It contains the following topics:
- Drag Files Onto GraphEdit
- Use the Open Command
- Use the Render Media File Command
- Manually Build a Filter Graph
Drag Files Onto GraphEdit
If GraphEdit is not running, you can drag a multimedia file, such as .avi or .mpg, onto the Graphedt icon and GraphEdit will run and automatically build the filter graph for the media file.
If GraphEdit is already running, drag a multimedia file into its client area to have it automatically build the filter graph.
Use the Open Command
Choose the Open command from the GraphEdit File menu, or choose the Open button from the GraphEdit toolbar, to open a media file or saved filter graph file (.grf). GraphEdit automatically generates the complete filter graph.
Use the Render Media File Command
You can use the GraphEdit Render Media File command to automatically generate the complete filter graph for a multimedia source.
To generate a complete filter graph for a given source file perform the following steps:
- On the File menu, click Render Media File.
- From the "Select a file to be rendered" dialog box, choose a multimedia source file, such as a .avi, .mpg, or .wav file.
- Click Open.
GraphEdit adds and connects all filters needed to render the source file automatically.
Manually Build a Filter Graph
To create an empty filter graph and manually add filters and connections, perform the following steps. This example assumes you want to play a file from your hard disk.
See About the DirectShow Filter Graph Editor for information about how GraphEdit represents filters, pins, and connections graphically.
- On the File menu, click New to create a new filter graph.
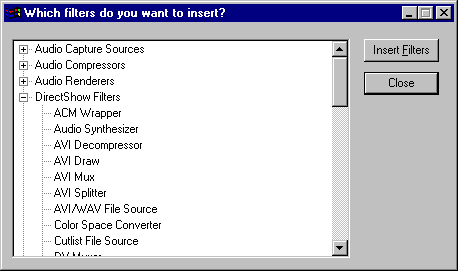
- On the Graph menu, click Insert Filters. GraphEdit displays the "Which filters do you want to insert?" dialog box, which contains a list of filter categories.
- Click the plus symbol (+) immediately to the left of the DirectShow Filters category to see the drop-down list of filters. The plus symbol becomes a minus symbol (–) when the list is expanded, as the following illustration shows. Click the minus symbol to contract the list.

- Select File Source (Async) from the filter list (scrolling if necessary) and click the Insert Filters button. Because the Asynchronous File Source filter requires an input file, GraphEdit displays the "Select an input file for this filter to use" dialog box.
- Select a multimedia file that you have on your hard disk (for this example, assume you chose a file called Jupiter.avi). Click the Open button. GraphEdit inserts a rectangle labeled Jupiter.avi in its client area. This rectangle represents the Asynchronous File Source filter and has a small square attached to its right side, labeled Output, which represents the filter's output pin.
- At this point, you could right-click the Async filter's output pin and choose Render from the resulting shortcut menu to have GraphEdit render the rest of the filter graph for you automatically. Instead, continue by inserting a few more filters manually. From the "Which filters do you want to insert?" dialog box, select the AVI Splitter filter. Like the File Source (Async) filter, this filter is listed in the DirectShow Filters category. Click Insert Filters and GraphEdit inserts the AVI Splitter filter in its client area. This filter has one input pin, shown by a small square attached to the left side of the AVI Splitter filter rectangle.
- Connect the Async File Source filter to the AVI Splitter filter as follows.
- Click the Async filter's Output pin and drag to the AVI Splitter's input pin. GraphEdit creates an arrow representing the connection between the filters, and moves the arrow in response to the dragging operation.
- Release the mouse button when the tip of the arrow head is over the small square representing the AVI Splitter's input pin. The interior of the pin's square turns black when the arrow head is in a valid location. After you've connected these filters, the AVI Splitter filter sprouts one output pin for each stream in the file. If Jupiter.avi contains an audio stream and a video stream, the pins will be labeled Stream 01 and Stream 00.
- At this point, you could right-click each of the AVI Splitter's output pins in turn and choose Render to have GraphEdit render the rest of the filter graph for you automatically. Instead, continue by inserting one more filter manually. From the "Which filters do you want to insert?" dialog box, open the Audio Renderers filter category by clicking on the plus symbol (+) immediately to the left of the Audio Renderers label. Select a default audio renderer (for example, the Default WaveOut Device or Default DirectSound Device if available) and click the Insert Filters button.
- Connect the AVI Splitter's Stream 01 output pin by dragging from that pin and releasing the mouse button when the arrowhead is over the input pin of the audio renderer.
- You could continue to insert filters manually, much in the same way that you have so far. Instead, right-click the AVI Splitter's Stream 00 output pin and choose Render to have GraphEdit build up the rest of the filter graph for you automatically.
Running and Editing a Filter Graph
After you've built a filter graph as outlined in Creating a New Filter Graph, you can play or pause the filter graph. To do so, select Play or Pause from the GraphEdit Graph menu.
Play plays the filter graph. If the graph includes the video renderer filter, any video data (such as a movie), plays in the video renderer window. If the filter graph includes an audio renderer, any sound associated with the movie plays as well. Pause cues up data in the filter graph and displays the first frame of video data, enabling playback to happen quickly if you later select Play. When the filter graph is playing or paused, you can select Stop from the Graph menu to stop playback.
You can also play, pause, or stop the filter graph by choosing the appropriate buttons from the GraphEdit toolbar. See About the GraphEdit Toolbar for more information.
You can edit the filter graph when it is stopped. Select either a filter or connection between filters by clicking the filter or connecting arrow. GraphEdit highlights the object by placing a blue border around it. You can highlight multiple objects at once by clicking outside an object and dragging diagonally to create a selection rectangle. When you release the mouse button, objects contained within the selection rectangle are highlighted. Press the DELETE key to delete a highlighted object or group of objects. Insert new filters by choosing Insert Filters from the Graph menu, and make new connections as outlined in Manually Build a Filter Graph.
You can drag filters in the GraphEdit client area if you want to reposition them. You might want to do this to make the filters fit on one screen without scrolling.
Viewing Properties in GraphEdit
GraphEdit enables you to view the properties of filters, pins, and connections. To view the properties of an object such as a filter, right-click the filter and choose Properties from the resulting shortcut menu. The options provided by a property sheet vary depending on the filter, pin, or connection. Typically, the property sheet for a filter includes tabs for its pins.
© 1998 Microsoft Corporation. All rights reserved. Terms of Use.