| In this topic |
| Microsoft Application Foundation Classes (AFC) | Previous | AFC | Next |
Introduction to AFC
Microsoft® Application Foundation Classes (AFC) is a set of Java class libraries that provide user interface components and graphics effects for use in Java-based applets and applications. AFC is licensed to be redistributed with the Microsoft Win32 VM for Java. AFC can also be redistributed with AFC102.ZIP for browsers that only support JDK 1.0.2. The AFC libraries consist of the following packages:
- The com.ms.fx package (FX package) provides support for basic graphic elements such as colors, glyphs, fonts, curves, text, and textures.
- The com.ms.ui package (UI package) provides an application framework and includes many of the high-level user interface controls used by applications—controls such as menus, dialog boxes, list boxes, scroll bars, push buttons, check boxes, edit boxes, and tree controls.
- The com.ms.ui.event package provides support for the Java 1.1 event model.
- The com.ms.ui.resource package provides support for using Win32 resource files with Java applications.
- The com.ms.util.cab package provides access to cabinet file creation and extraction services.
This article provides an introduction to programming with the AFC UI package. It begins with an overview of the architecture of AFC and a description of the relationship between AFC and the Abstract Window Toolkit (AWT). It then presents a sample program that you can use as a starting point for writing programs that use the AFC class library. The article concludes with a description of how to use some basic AFC user interface controls.
Technical Overview
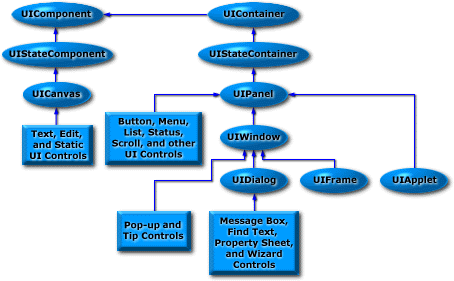
The largest and most important part of AFC is the user interface (UI) package, com.ms.ui. (Often, when people speak of AFC, they are actually referring to the UI package.) This package provides a basic application framework as well as user interface controls. The following diagram shows the class hierarchy of the basic UI package components.

The class hierarchy in the previous diagram is not complete—it doesn't show interface classes that are implemented by many of the AFC classes, and it doesn't show all of the AFC classes (such as layout managers and AWT compatibility classes). The diagram should, however, give you an idea of the basic layout of AFC's class structure.
AFC Component Model
Like AWT, the fundamental elements of AFC are components, containers, and layout managers. Components are the most fundamental of these elements and are usually associated with visual elements—all AFC UI controls are components. Containers are simply components that can contain other components. Layout managers are neither components nor containers; they are objects delegated by containers to calculate the position and size of the various components within the container.
AFC is similar in overall design to AWT—if you're familiar with AWT, you can apply much of what you've learned to working with AFC. AFC does not, however, directly extend the AWT component architecture. Although AFC is based on an architecture that maintains many of the concepts (and method signatures) used by AWT, AFC is designed to support applications that are smaller, run faster, and are more compatible across different Java implementations. The AFC component model is based on the following design features:
- Lightweight base classes
- Windowless components
- Peerless implementation
Lightweight base classes enable UI components to use less data storage—there is no memory wasted on unnecessary fields that are propagated to all of the classes derived from the base classes. This component model allows AFC to support high-capacity containers with a minimum of overhead. For example, consider a table with hundreds of entries that are bound to a database. With AFC, you can create a table entry component that requires only a few bytes of storage. On the other hand, if you create a table entry component by extending the AWT Component class, you'll inherit at least 104 bytes of storage that you probably don't need.
Windowless components yield dramatic increases in performance as well as smaller components. Unlike AWT components, AFC components are not windows and do not have to carry the extra baggage required of components that are windows. Performance is enhanced because AFC does its own window management (such as clipping, moving, and resizing windows) and doesn't have to access native code through peers or other mechanisms.
AFC is implemented without using peer classes—there is no native code required to run AFC on a VM for Java. Because AFC doesn't have to deal with the subtle differences in AWT implementations on different VMs, it can provide a higher degree of cross-platform consistency than AWT.
Note Because AFC components do not extend directly from the AWT Component class, you cannot freely mix AFC and AWT components in a single application. You can, however, use the AFC AWT compatibility classes to include AFC components in an AWT application. You can also use the UIAwtHost class to include AWT components in an AFC application.
AFC Event Model
AFC supports both the JDK 1.02 and the JDK 1.1 event model. AFC applications can use either event model, regardless of the event model supported by the VM used to run the application. There are some differences in the way that AFC and AWT implement event handling—the following list summarizes these differences:
- AFC propagates 1.1-style events up the containment hierarchy regardless of whether there is a listener attached to the event target. AWT does not propagate events when there is a listener attached.
- 1.1-style window messages (windowOpened, windowClosed, and so on) are only generated when AFC applications are running on a 1.1 VM—window messages are not generated when applications are running on a 1.02 VM.
- AFC does not support 1.1-style component events (componentHidden, componentMoved, componentResized, componentShown).
- AFC does not support the JDK 1.1 technique of dispatching events with the dispatchEvent method. In AFC, events must be posted using the JDK 1.02 postEvent method.
Using the 1.02 Event Model
To handle 1.02-style events, you must override the appropriate UIComponent method for the target object or its container. You can override the general-purpose handleEvent method to handle any event or you can override the event-specific methods in the following list to handle specific events.
- action
- gotFocus
- keyDown
- keyUp
- lostFocus
- mouseClicked
- mouseDown
- mouseDrag
- mouseEnter
- mouseExit
- mouseMove
- mouseUp
The 1.02-style event methods use the AWT Event class to represent events.
Using the 1.1 Event Model
To handle 1.1-style events, you must implement the appropriate event listener interface in the target object or one of its containers. The following is a list of AFC event listener interfaces.
- IUIActionListener
- IUIAdjustmentListener
- IUIContainerListener
- IUIFocusListener
- IUIItemListener
- IUIKeyListener
- IUIMouseListener
- IUIMouseMotionListener
- IUITextListener
The 1.1-style event listeners use the AFC UIEvent class to represent events.
Using AFC Components in AWT Applications
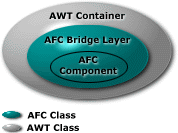
AFC includes a set of classes that enable AFC components to be used as JavaBeans in AWT applications. These classes consist of a bridge layer wrapped around an AFC component. The following illustration shows the relationship between an AFC component, the bridge layer, and an AWT container.

There are corresponding AWT compatibility classes for all AFC UI control classes and several general-purpose classes such as UICanvas and UIPanel. The AWT compatibility classes have the same name as the corresponding AFC classes with the addition of an AwtUI prefix. For example, AwtUIPushButton is the AWT compatibility class for UIPushButton. The AwtUIApplet class is a bit different than the other AWT compatibility classes—it's used to provide a top-level host container for AFC applets.
Note You should only use one layer of AWT compatibility classes to provide a bridge between AWT containers and AFC components. The components contained by an AWT compatibility object must be AFC UI components (extended from IUIComponent).
Using AWT Components in AFC Applications
In addition to the AWT compatibility classes, AFC provides an AWT host control, UIAwtHost, that allows you to include AWT components in an AFC application. The following example shows how to use the host control to include an AWT Button component in a UIPanel object.
// Create an AFC panel and an AWT button
UIPanel p = new UIPanel ();
Button b = new Button ("AWT Button");

// Add button to panel using UIAwtHost bridge
p.add (new UIAwtHost (b));
Note The UIAwtHost bridge cannot be used inside an AFC choice control. If used inside a menu list, the menu list cannot be launched as a pop-up menu.
Events that propagate to the host are retargeted before being propagated up the containment hierarchy—the host becomes the event target for these events. The host control supports event propagation for only one level of containment. Events associated with any component contained by the component being hosted are consumed by the host control and do not propagate further. You can get access to these events by overriding the handleEvent method of the host control.
For example, in the previous sample, the UIPanel object will receive events associated with the AWT Button object. The target (specified in the Event.target field) will be the UIAwtHost object, however, not the Button object. If the Button object is contained by an AWT panel, events associated with the button will be consumed by the host control and will never propagate to the outer UIPanel object.
AFCSkeleton—A Basic AFC Application
AFC-based applications are similar in construction to AWT-based applications. However, because of the way that AFC ties in with AWT, there are some important differences in how you construct applets for the two class libraries. Let's take a look at a basic AFC application. The following is the complete Java source for AFCSkeleton, an AFC application skeleton designed to function as an applet as well as a stand-alone application.
![]() Download AFCSkeleton sample.
Download AFCSkeleton sample.
// AFCSkeleton.java

import java.awt.*;
import com.ms.ui.*;
import com.ms.fx.*;

// AWT applet bridge
public class AFCSkeleton extends AwtUIApplet {
  // Create instance of applet implementation
  public AFCSkeleton ()
  {
    super (new AFCSkeletonImplementation ());
  }

  // Stand-alone application entry point
  public static void main(String args[]) {
    // Create a frame to contain applet
    AFCSkeletonFrame f = new AFCSkeletonFrame ("AFC Skeleton");
    f.setVisible (true);
    f.setSize (320, 200);

    // Create applet implementation, add to frame, init
    AFCSkeletonImplementation applet
      = new AFCSkeletonImplementation ();
    f.add (applet);
    applet.init ();
  }

  // Add pass-through methods for scriptable applet methods here
  public String getInfo () {
    return(((AFCSkeletonImplementation)getUIApplet()).getInfo());
  }
}

// Applet implementation
class AFCSkeletonImplementation extends UIApplet {
  // Applet entry point
  public void init() {
    setBackground (FxColor.cyan);

    // Add additional components here
  }

  public String getInfo () {
    String s = "Info about AFCSkeleton.class\r\n";
    s += "Version: 1.0\r\n";
    return s;
  }
}

// Frame to host applet when run as stand-alone application
class AFCSkeletonFrame extends UIFrame {
  public AFCSkeletonFrame(String str) {super (str);}

  public boolean handleEvent (Event e) {
    switch (e.id) {
    case Event.WINDOW_DESTROY:
      // Frame window closed, exit app
      System.exit (0);
      return true;
    default:
      return super.handleEvent (e);
    }
  }
}
The purpose of AFCSkeleton is to illustrate the basic structure of AFC applets and applications. When you run AFCSkeleton as a stand-alone application, you'll see a framed window with a cyan background. The client area of the window will be set to 320 by 200 pixels. When you run it as an applet in a browser, you'll see a cyan rectangle set to the size specified by the APPLET tag.
Note There are many ways to create Java programs that can be run either as a stand-alone application or an applet. The AFCSkeleton example shown in this article is simplified to illustrate the basic minimum requirements of AFC applications.
AFCSkeleton consists of three classes:
- Class AFCSkeleton is a public class that extends AwtUIApplet. This class provides a bridge to AWT when the program is run as an applet, as well as the main entry point when it is run as a stand-alone application.
- Class AFCSkeletonImplementation is a private class that extends UIApplet. This class contains the actual implementation of the program.
- Class AFCSkeletonFrame is a class that extends UIFrame. This class is used to provide a frame window for the program to use when it is run as a stand-alone application.
The Structure of AFC Applets
Applets written for AFC require at least two classes: an AwtUIApplet bridge class to interface with the applet's host and a UIApplet class to provide the actual implementation of the applet. This may seem like a bit of extra work, but the bridge class is typically only a few lines of rote code. The following example shows the code implementing a basic AFC applet.
import com.ms.ui.*;

// Bridge class
public class MyApplet extends AwtUIApplet
{
  // Constructor
  public MyApplet () { super (new MyAppletImplementation ()); }
}

// Implementation class
class MyAppletImplementation extends UIApplet
{
  // Applet entry point
  public void init()
  {
    // Add your components here
  }
}
The bridge class contains a single method: a constructor that creates an instance of the applet's UIApplet implementation class and passes it to the constructor for AwtUIApplet.
Note If any of the applet's methods are to be scriptable, they must be exposed to the host through the AwtUIApplet bridge class.
The applet implementation class is based on the UIApplet class. It can be constructed similarly to the Applet-based class for AWT applets. The basic applet init, start, stop, and destroy methods should be implemented in this class and not in the AwtUIApplet bridge class.
Running AFCSkeleton as an Applet
The following HTML code will run AFCSkeleton as an applet and set its initial size to 320 by 240 pixels:
<applet
  code=AFCSkeleton.class
  id=AFCSkeleton
  width=320
  height=240 >
</applet>
When AFCSkeleton is run as an applet, the entry point is the AFCSkeletonImplementation.init method:
// Applet entry point
public void init()
{
  setBackground (FxColor.cyan);

  // Add additional components here
}
All that happens in init is a call to the setBackground method to set the background of the UIApplet object to cyan. This is where you add the components that transform AFCSkeleton from an shell to a real program. The init method is also called when AFCSkeleton is run as a stand-alone application, so you can place all of your initialization code in a single routine.
AFCSkeleton has one public method, getInfo, that can be called from a browser using a scripting language such as JavaScript or Microsoft® Visual Basic® Scripting Edition. Scriptable public methods must be exposed in the AwtUIApplet bridge class. Calls to these methods should be passed to the implementation class as shown in the following code fragment that implements the getInfo method in the AwtUIApplet bridge class for AFCSkeleton:
public String getInfo ()
{
  return (((AFCSkeletonImplementation)getUIApplet()).getInfo());
}
The key here is to use the getUIApplet method to get a reference to the UIApplet object containing the implementation of the applet's scriptable methods.
Running AFCSkeleton as a Stand-alone Application
When AFCSkeleton is run as a stand-alone application, the entry point is the main method in the AFCSkeleton class:
// Stand-alone application entry point
public static void main(String args[])
{
  // Create a frame to contain applet
  AFCSkeletonFrame f = new AFCSkeletonFrame ("AFC Skeleton");
  f.setVisible (true);
  f.setSize (320, 200);

  // Create applet implementation, add to frame, init
  AFCSkeletonImplementation applet
    = new AFCSkeletonImplementation ();
  f.add (applet);
  applet.init ();
}
The main method is executed only when the program is run as a stand-alone application. Its purpose is to create a frame (UIFrame) that contains an instance of the program as an applet. At first glance, this seems a bit convoluted, but it's actually quite elegant—the frame exists only to provide a container for the applet. When an applet is run in a browser, the browser provides the container.
After creating an AFCSkeletonImplementation object and adding it to the frame object, main calls the init method to initialize the applet. Using this structure allows you to put all of your initialization code in a single initialization method instead of in two separate locations (one for when the program is run as an applet and one for when it's run as a stand-alone application).
There's one more small piece of the puzzle here, the handleEvent method in AFCSkeletonFrame:
public boolean handleEvent (Event e)
{
  switch (e.id)
  {
  case Event.WINDOW_DESTROY:
    // Frame window closed, exit app
    System.exit (0);
    return true;
  default:
    return super.handleEvent (e);
  }
}
The handleEvent method is an AFC UIComponent method that is overridden to intercept and process events. In the case of AFCSkeletonFrame, you need to trap the WINDOW_DESTROY message that is sent when the user attempts to close the window containing the stand-alone application. When handleEvent receives the WINDOW_DESTROY message, it exits the application. All other messages are passed on to the frame's superclass.
Adding AFC Controls
The next step is to add some AFC controls to the skeleton application. AFCExample1 is an application based on AFCSkeleton, with the addition of two buttons and a status bar.
![]() Download AFCExample1 sample.
Download AFCExample1 sample.
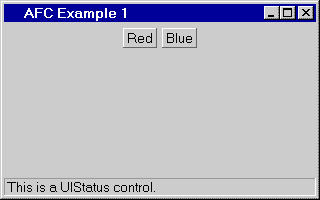
The following is a screen shot of AFCExample1 when it runs as a stand-alone application:

Clicking one of the buttons changes the background color of the application to either red or blue. The text in the status bar changes to indicate the change in background color, as well as whenever the mouse cursor passes over a button.
The controls in AFCExample1 are contained by a UIPanel object that is added to the application by the init method. The following is the source for the init method:
// Applet entry point
public void init()
{
  setBackground (FxColor.lightGray);

  setLayout (new UIBorderLayout ());
  add (new AFCExample1Panel ());
  setValid (true);
}
In addition to adding a UIPanel object, init sets the background color and a layout manager for the application. The last thing init does is call the setValid method to force the layout manager to lay out all of the components contained by the application.
Note Neglecting to call setValid to force a component layout operation is a common mistake—if you don't call setValid, your controls often either fail to appear or are arranged improperly when you run your application.
Using Panels to Contain Controls
Panels are very useful for organizing and arranging controls. AFCExample1 includes a class, AFCExample1Panel, that extends UIPanel to provide a container for all of the controls used in the application. The following code fragment shows the class variables and constructor for the AFCExample1Panel class:
private UIPanel p;
private UIPushButton b1, b2;
private UIStatus s;

// Constructor
public AFCExample1Panel ()
{
  setLayout (new UIBorderLayout ());

  // Create panel to contain buttons
  p = new UIPanel ();

  // Create buttons and add to ButtonPanel
  p.add (b1 = new UIPushButton ("Red", UIPushButton.RAISED));
  p.add (b2 = new UIPushButton ("Blue", UIPushButton.RAISED));
  b1.setBackground (FxColor.lightGray);
  b2.setBackground (FxColor.lightGray);

  // Create status bar control
  s = new UIStatus ("This is a UIStatus control.");
  s.setBackground (FxColor.lightGray);

  // Add button panel and status bar to AFCExample1Panel
  add (p, "Center");
  add (s, "South");
}
The first thing the constructor does is create a UIBorderLayout layout manager and call setLayout to set it as the layout manager for the panel. The AFCExample1Panel container has two components managed by the UIBorderLayout layout manager:
- A UIStatus object that is positioned at the bottom of the AFCExample1Panel container.
- A UIPanel object that contains two buttons and is positioned at the center of the AFCExample1Panel container.
UIBorderLayout is an AFC layout manager that is similar to AWT's BorderLayout layout manager—it positions components along the four edges and at the center of a container. When you add components to a container that uses the UIBorderLayout layout manager, you specify their positions with keywords similar to compass directions: "North" for the top edge of the container, "South" for the bottom edge, "East" for the right edge, "West" for the left edge, and "Center" for the center. The center component receives the space that remains after the edge components have been positioned.
Handling Control Events
In addition to having a constructor, the AFCExample1Panel class overrides two IUIComponent methods to handle events for the components that it contains. The action method is overridden to handle clicks on the two buttons in the application. The following is the source for the overridden action method:
// Action event handler
public boolean action (Event e, Object o)
{
  if (o == b1)
  {
    p.setBackground (FxColor.red);
    p.repaint ();
    s.setName ("Background color changed to red.");
  }
  else if (o == b2)
  {
    p.setBackground (FxColor.blue);
    p.repaint ();
    s.setName ("Background color changed to blue.");
  }
  return true;
}
The action method determines which button has been clicked, and then performs the following actions:
- Calls the UIPanel.setBackground method to change the background color of the panel containing the buttons.
- Calls the UIPanel.repaint method to force a repaint of the panel.
- Calls the UIStatus.setName method to change the text in the status bar.
The second overridden event-handling method is handleEvent. It is overridden to detect when the mouse cursor moves into the area occupied by a UIPushbutton object. Here's the source for handleEvent:
public boolean handleEvent (Event e)
{
  if ((e.id == Event.MOUSE_ENTER)
   && (e.target instanceof UIPushButton))
  {
    s.setName ("UIPushbutton object: MOUSE_ENTER event.");
    return true;
  }
  else
  {
    return super.handleEvent (e);
  }
}
The handleEvent method looks for a MOUSE_ENTER event on a target that is an instance of a UIPushButton object. All other events are passed on to the handleEvent method of the superclass.
Note The event handling implemented in the AFCExample1 sample described in this article is based on the JDK 1.02 event model. (AFC also supports the JDK 1.1 event model, also called the event delegation or Beans model.)