To begin creating animations for your character, select the Animations icon in the tree. This displays the Properties page with the default settings for all animations. You can alter the frame size, the default frame duration, and color palette settings on the Properties page. The animation frame height and width must remain constant throughout the entire character definition (that is, for all of that character's animations). Although you can change the frame size from its default setting (128 x 128 pixels), images displayed in the Editor will be scaled to fit default display size. If you change the default frame setting, you can display the frame's full, non-scaled size by choosing Open Frame Window from the Edit menu.
By default, the Editor uses the first bitmap image you load to set your character's default color palette, and sets the color in the 11th palette position as your transparency color. However, you can change these settings using the buttons in the Palette Information group. Your character's color palette must not remap the standard system colors. The Editor will automatically reserve the system's color palette when displaying images. In addition, make sure all your animation images use the same color palette and transparency color. If they do not, you may see color remapping of your images when you load them into the Editor.
Once you have determined your global animation settings, you can begin creating animations. To create a new animation, choose New Animation from the Edit menu or the New Animation button on the toolbar. This adds a new animation icon in the tree under the Animations icon and assigns the new icon a default name. You can rename your animation by typing in the Animation Name field. Note that animation names within a character definition must be unique. Also, avoid using characters in the name that are not valid characters for filenames.
Every animation is composed of frames. To create a new frame for your animation, choose New Frame from either the Edit menu or the toolbar. This adds a new frame icon to the tree under your animation icon, and displays three tabbed pages. The General page includes controls that enable you to load and adjust an image for your frame. It also includes a display area for the frame's appearance.

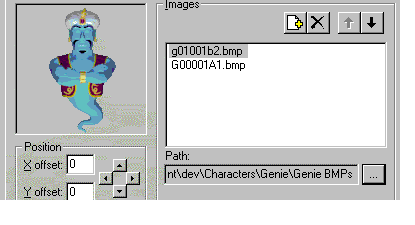
Figure 2: The Frame Image display and controls
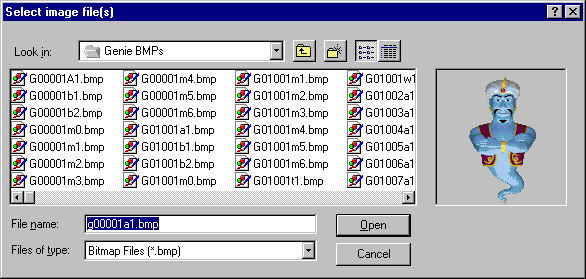
A frame can contain one or more images. To define an image for a frame, click the Add Image File button just above the Images list box. The Select Image Files dialog box displays, which allows you to select a bitmap image file.

Figure 3. The Select Image Files dialog box
Select the file you want to load, choose Open, and the image appears in the frame display on the General page. The Editor accepts images stored as 1-bit (monochrome), 4-bit, or 8-bit Windows bitmap format, or as GIF format.
You can use the four arrow buttons beneath the image in the Position box to adjust the image's appearance within the frame. If the image is larger than your frame's size, only the portion of the image that appears within the frame will display. If you increase the frame size, the image may be scaled to fit within the display area of the Editor.
You can also display a frame by choosing Open Frame Window from the Edit menu. This displays the current frame in a separate window without scaling the images loaded into the frame. This window's initial size is based on your frame's height and width settings. You can resize it smaller, but not larger. The Frame Window reflects the changes you make using the controls in the Editor and also allows you view the frame while viewing its other property pages.

Figure 4. Image Position controls
You can compose a frame from multiple images. Each time you select the Add Image button and choose another image, the image gets added to the list and to the image display area. You can also add multiple images by selecting more than one file. Press shift or ctrl while you click in the Select Image Files dialog box, and then choose Open. The Move Up and Move Down buttons above the Images list box move a selected image in the display order (z-order) for the frame. You can also move images by dragging them within the list. Selecting an image in the list and clicking the Delete button removes an image. To change an image you have loaded to another image file, you can click the filename to edit it directly or use the Ellipsis (…) button to bring up the Select Image Files dialog box and select a different file.

Figure 5. The Ellipsis button
You can use the Duration text box to set the duration for the frame; that is, how long the frame will be displayed. If a frame has no image and zero duration, the frame will not be displayed when the animation plays.
You can also specify a sound effect file to play when the frame is displayed. If you plan to load the character from a Web server, you may want to compress the sound effect file to minimize load time. You can then specify the compressed sound file in the Agent Character Editor. In addition, avoid using a sound effect with a duration longer than the duration of your animation and especially avoid a sound effect that loops, because the Microsoft Agent animation services do not send an animation complete event until the sound completes. Also avoid specifying a sound effect for any animation you assign to the Listening or Hearing states, because this interferes with speech input. Finally, while you can include more than one sound effect in an animation, avoid placing them so they overlap, because this may affect the timing of the animation. Also, keep in mind that sound effects may play at different rates based on the user's hardware.
To add frames to your animation, choose the New Frame command again and follow the same procedure. As an option, you can also load multiple images and automatically generate new frames for them. To use this feature, choose New Frames From Images from the Edit menu. The frames will be created in alphabetic order based on the image filenames. When you are finished defining all frames for your animation, you can choose the New Animation command again to begin a new animation.
There are other ways to add frames to animations and move frames within or between animations. You can select another frame (from the same or another animation) and choose Cut or Copy, then select the animation or a frame in that animation and choose Paste. You can also drag a frame from one animation to another. If you drag within an animation, the action moves the frame. If you drag to another animation, it copies the frame. Dragging to a preceding frame in the same animation inserts the frame before the frame to which you drag. Dragging to a following frame places it after the frame to which you drag. If you drag a frame using the right mouse button, releasing the button displays a pop-up menu with your transfer choices.
You can also create an animation by copying an existing animation (select the animation and choose Copy), and selecting the Animations icon or another animation icon and choosing Paste. The Editor automatically creates a new name for the animation, although you can change the name.