 To register a server with SQL Enterprise Manager
When registering a server with SQL Enterprise Manager, you register it at the computer that has SQL Enterprise Manager installed. This is done because login information must be stored locally on each computer that will use SQL Enterprise Manager. You cannot do this remotely.
This means, for example, that if six computers have SQL Enterprise Manager installed, and if you want all six installations of SQL Enterprise Manager to be able to administer a newly installed server, at each of those six computers you must start SQL Enterprise Manager and use the following procedure to register the new server.
The server name used by SQL Server is taken from the computer's name. Before registering a server, make sure that the server's computer name is a valid SQL identifier. The first character can be alphabetic or an underscore (_). Characters following the first character can include letters, numbers, or the symbols #, $, or _. No embedded spaces are allowed.
If other characters are used in the computer name, rename the computer. (It is best to do this before installing SQL Server.). For instructions on renaming computers, see your documentation for Windows NT. Also, if the computer is a member of a Windows NT domain, contact your network administrator to have the new computer name added to the domain.
To register a server with SQL Enterprise ManagerIf this is a new installation, the first time you run SQL Enterprise Manager it automatically opens the Register Server dialog box and prompts you register servers. If so, skip step 2 and proceed directly to step 3.

The Register Server dialog box appears.
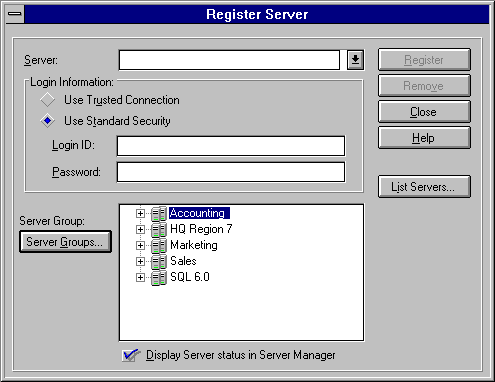
The preferred option for security is to use a trusted connection, where Windows NT security validates the user. (This requires integrated or mixed security. For information, see Chapter 8, Security Concepts.
If you selected Use Trusted Connection, skip this step.
This turns service polling on and off (using the Windows NT Service Control Manager). By default, this option is selected.
The server will become a member of this group. The default group is SQL 6.0, although you have the option of creating additional groups. You can change a server's group at any time.
If the group you need does not yet exist, create it by choosing the Server Groups button, and complete the Manage Server Groups dialog box that appears. For more information, see Creating Server Groups, earlier in this chapter.
For more information about registering servers, see the SQL Enterprise Manager online Help.