
Contents
Previous Topic: Using List View Controls
Next Topic: List View Control Reference
| ||
| ||
| ||
List View Updates in Internet Explorer
This section details the features that were added to the list view control by Microsoft® Internet Explorer. The following updates are described in this section:
- Columns Update
- Extended List View Styles
- List View Working Areas
- Virtual List View
Columns Update
List view controls now support new features for columns in report view. The new features are implemented by using the new members and mask values in the LVCOLUMN structure with standard column manipulation messages. The new features are column images and column ordering.
Column Images: List view controls can display images next to column titles. To implement this feature, specify the LVCF_IMAGE value and assign the proper value to the iImage member in the LVCOLUMN structure.
Column Ordering: List view controls can set the order in which columns are displayed. To implement this feature, specify the LVCF_ORDER value and assign the proper value to the iOrder member in the LVCOLUMN structure.
Extended List View Styles
Extended list view styles are not accessed in the same manner as standard window styles. That is, the SetWindowLong and GetWindowLong functions are not used to make extended style changes.
Two messages set and retrieve extended style information: LVM_SETEXTENDEDLISTVIEWSTYLE and LVM_GETEXTENDEDLISTVIEWSTYLE. Each message has a corresponding macro that can be used instead of sending the message explicitly. The macros are ListView_SetExtendedListViewStyle, ListView_SetExtendedListViewStyleEx, and ListView_GetExtendedListViewStyle.
List View Working Areas
List view controls now support working areas, which are rectangular virtual areas that the list view control uses to arrange its items. A working area is not a window and cannot have a visible border. By default, the list view has no working areas. When no working areas are present, the list view works exactly the same as before working areas were implemented.
By creating a working area, you can create an empty border on the left, top and/or right of the items or cause a horizontal scroll bar to be displayed when there normally wouldn't be one.
The number of current working areas can be obtained with the LVM_GETNUMBEROFWORKAREAS message. The working areas are changed with the LVM_SETWORKAREAS message and can be retrieved with the LVM_GETWORKAREAS message. Both of these messages take the address of an array of RECT structures as the lParam and the number of RECT structures as the wParam. The left and top members of these structures specify the coordinates of the upper-left corner (the origin) of the working area, and the right and bottom members specify the lower-right corner of the working area. All of the coordinates are in client coordinates of the list view. The maximum number of working areas allowed is defined by the LV_MAX_WORKAREAS value.
Changing the working area has no effect on list view controls that have the LVS_LIST or LVS_REPORT views, but the working areas will be maintained when the view type is changed. With the LVS_ICON and LVS_SMALLICON views, the working area can be modified to change the way the items are displayed. Making the width of the working area (right - left) greater than the client width of the control will cause the items to be wrapped at that width and the horizontal scroll bar to be displayed. Making the width of the working area narrower than the width of the control's client area will cause the items to be wrapped within the working area and not the client area. Setting the left and/or top members to a positive value will cause the items to be displayed starting at the working area, creating an empty space between the edge of the control and the items. An empty space can also be created between the right edge of the control and the items by making the width of the working area less than the client width of the control.
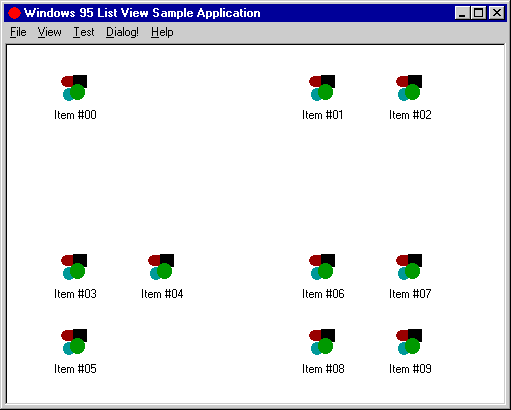
The following illustration is an example of a list view control that contains four working areas, each in a different quadrant of the client area and with a 25-pixel empty area around them.
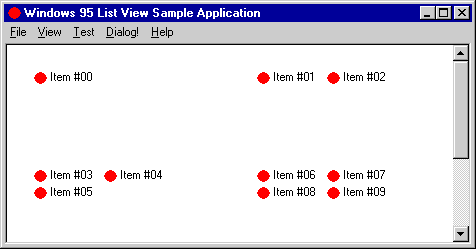
Here is the same list view when set to LVS_SMALLICON view:
When a working area is created, items that lie within the working area become members of it. Similarly, if an item is moved into a working area, it becomes a member of the working area to which it was moved. If an item does not lie within any working area, it automatically becomes a member of the first (index 0) working area. If you want to create an item and have it placed within a specific working area, you will need to create the item and then move it into the desired working area using the LVM_SETITEMPOSITION or LVM_SETITEMPOSITION32 message.
To determine which working area an item is a member of, you retrieve the working areas, retrieve the position of the item, and compare its position to the working areas. The following function will return the index of the working area to which the item belongs. If the function fails, it will return -1. If the function succeeds, but the item isn't inside any of the working areas, the function will return 0, because all items that are not inside a working area automatically become a member of working area zero.
int GetItemWorkingArea(HWND hwndList, int iItem)
{
UINT     uRects = 0;
int      nReturn = -1;
LPRECT   pRects;
POINT    pt;

if(!ListView_GetItemPosition(hwndList, iItem, &pt))
   return nReturn;

ListView_GetNumberOfWorkAreas(hwndList, &uRects);

if(uRects)
   {
   pRects = (LPRECT)GlobalAlloc(GPTR, sizeof(RECT) * uRects);

   if(pRects)
      {
      UINT  i;

      nReturn = 0;

      ListView_GetWorkAreas(hwndList, uRects, pRects);

      for(i = 0; i < uRects; i++)
         {
         if(PtInRect((pRects + i), pt))
            {
            nReturn = i;
            break;
            }
         }

      GlobalFree((HGLOBAL)pRects);
      }
   }

return nReturn;
}
Multiple working areas can be used for creating different areas within a view to which items can be moved or dropped. With this method, you could create areas in a single view that have different meanings. The user could then categorize the items by placing them in a different area. An example of this would be a view of a file system that has an area for read/write files and another area for read-only files. If a file item were moved into the read-only area, it would automatically become read-only. Moving a file from the read-only area into the read/write area would make the file read/write.
Multiple working areas can intersect, but any items that lie within the intersection will become members of the area with the lower index. So it is best to avoid this situation. When sorting multiple work areas, the items will be sorted compared to the other items within the same working area.
The following example demonstrates how to create one working area that simulates a 25-pixel empty space around the left, top, and right sides of the items.
{
#define  EMPTY_SPACE   25

RECT  rcClient;

GetClientRect(hwndListView, &rcClient);

rcClient.left += EMPTY_SPACE;
rcClient.top += EMPTY_SPACE;
rcClient.right -= (EMPTY_SPACE * 2);

SendMessage(hwndListView, LVM_SETWORKAREAS, 1, (LPARAM)&rcClient);
}
The following example demonstrates how to create two working areas in the control that take up about half of the client area and have a 25-pixel border around each rectangle.
{
#define  EMPTY_SPACE   25

RECT  rcClient;
RECT  rcWork[2];

GetClientRect(hwndListView, &rcClient);

rcWork[0].left = rcClient.left + EMPTY_SPACE;
rcWork[0].top = rcClient.top + EMPTY_SPACE;
rcWork[0].right = (rcClient.right/2) - EMPTY_SPACE;
rcWork[0].bottom = rcClient.bottom;

rcWork[1].left = (rcClient.right/2) + EMPTY_SPACE;
rcWork[1].top = rcClient.top + EMPTY_SPACE;
rcWork[1].right = rcClient.right - EMPTY_SPACE;
rcWork[1].bottom = rcClient.bottom;

SendMessage(hwndListView, LVM_SETWORKAREAS, 2, (LPARAM)rcWork);
}
Virtual List View
This section contains information about the new list view control style, "virtual" list view (LVS_OWNERDATA).
This information has been divided into the following areas:
- Virtual list view description
- Creating a virtual list view control
- Compatibility issues: styles and messages
- Handling virtual list view control notification messages
- Cache management
Virtual list view description
A virtual list view is a list view control that has the LVS_OWNERDATA style. The LVS_OWNERDATA style enables the control to handle an almost infinite number of items. Specifically, the control can support an item count up to a DWORD. This is possible because the overhead of managing item data is placed on the owner. This allows the virtual list view control to lend itself for use with large databases of information, where specific methods of accessing data are already in place.
A virtual list view control maintains very little item information itself. Except for the item selection and focus information, all item information must be managed by the owner of the control. All other item information is requested from the owner using LVN_GETDISPINFO notification messages.
Because this type of list control is intended for large data sets, it is recommended that you cache requested item data to improve retrieval performance. The list view provides a cache-hinting mechanism to assist in optimizing the cache. The hint is implemented in the form of an LVN_ODCACHEHINT notification message.
Creating a virtual list view control
Virtual list view controls are created using the CreateWindow or CreateWindowEx functions, specifying the LVS_OWNERDATA window style as part of the dwStyle function parameter.
The LVS_OWNERDATA style can be used with most other window styles, excluding the LVS_SORTASCENDING or LVS_SORTDESCENDING styles.
All virtual list view controls default to the LVS_AUTOARRANGE style.
Note Dynamically switching to and from the LVS_OWNERDATA style is not supported.
Compatibility issues: styles, states, and messages
List View Control Styles: All four of the list view styles (icon, small icon, list, and report view) support the LVS_OWNERDATA style. However, this style will not work with the LVS_SORTASCENDING or LVS_SORTDESCENDING style.
List View Item States: List view controls that have the LVS_OWNERDATA style do not store any item-specific information. Therefore, the only valid item state flags that can apply to an item are LVIS_SELECTED and LVIS_FOCUSED. No other state information will be stored for an item. One side effect of this is that state images cannot be used with list view controls that have the LVS_OWNERDATA style because the state image index for the item is stored in the item state field.
List View Messages: Most messages used to handle list view controls are fully supported. However, some messages have limitations or are unsupported when the LVS_OWNERDATA style is used. The following list summarizes the affected messages. Messages not listed here are fully supported.
Message Limitation LVM_ARRANGE This message does not support the LVA_SNAPTOGRID style. LVM_DELETEALLITEMS This message sets the item count to zero and clears all internal selection variables, but it does not actually delete any items. A notification callback will be made. LVM_DELETEITEM This message is supported for selection integrity only and does not actually delete an item. LVM_GETITEMSTATE This message returns only focus and selection states (those states stored by the list view control). LVM_GETNEXTITEM This message does not support the list view search criteria LVNI_CUT, LVNI_HIDDEN, or LVNI_DROPHILITED. All other criteria are supported. LVM_INSERTITEM This message is supported for selection integrity only. LVM_SETITEM This message is not supported. To set the item state, use the LVM_SETITEMSTATE message. LVM_SETITEMCOUNT This message sets the number of items currently in the list. The owner must be prepared to supply data for any item up to the maximum set using this message, as requested by the list control by notification. The message parameters have been updated to support virtual list view controls. LVM_SETITEMPOSITION This message is not supported. LVM_SETITEMSTATE This message allows only the selection and focus states to be changed for the item. LVM_SETITEMTEXT This message is not supported. LVM_SORTITEMS This message is not supported. Handling virtual list view control notification messages
List view controls with the LVS_OWNERDATA style send the same notification messages as other list view controls plus two new ones: LVN_ODCACHEHINT and LVN_ODFINDITEM. The following are the most common notifications sent by a list view control with the LVS_OWNERDATA style:
LVN_GETDISPINFO A virtual list view control maintains very little item information on its own. As a result, it often sends the LVN_GETDISPINFO notification message to request item information. This message is handled in much the same way as callback items in a standard list control. However, because the number of items supported by the control is probably very large, it is recommended that you cache item data to improve performance. When handling LVN_GETDISPINFO, the owner of the control should first attempt to supply requested item information from the cache (for more information, see Cache management). If the requested item is not cached, the owner must be prepared to supply the information by other means.
LVN_ODCACHEHINT A virtual list view sends the LVN_ODCACHEHINT notification message to assist in optimizing the cache. The notification message provides inclusive index values for a range of items that it recommends be cached. Upon receiving the notification message, the owner must be prepared to load the cache with item information for the requested range so that the information will be readily available when LVN_GETDISPINFO is sent later. LVN_ODFINDITEM The LVN_ODFINDITEM notification message is sent by a virtual list view control when the control needs the owner to find a particular callback item. The notification message is sent when the list view control receives quick key access or when it receives an LVM_FINDITEM message. Search information is sent in the form of an LVFINDINFO structure, which is a member of the NMLVFINDITEM structure. The owner should be prepared to search for an item that matches the information given by the list view control. The owner should return the index of the item if successful, or -1 if no matching item is found.
Cache management
General Cache Information: A list view control with the LVS_OWNERDATA style will produce a large number of LVN_GETDISPINFO notification messages. To improve performance in looking up item information, it is recommended that the owner of the control keep information for certain items in a globally allocated cache. To create the cache using global memory, use the GlobalAlloc function.
To assist in optimizing the cache, a virtual list view control sends a notification message, LVN_ODCACHEHINT, that provides information about the recommended items to include within the cache. LVN_CACHEHINT is sent as a WM_NOTIFY message, with the lParam value acting as the address of an NMLVCACHEHINT structure.
The NMLVCACHEHINT structure includes two integer members, iFrom and iTo, that represent the inclusive endpoints of a range of items that will most likely be needed. The owner must be prepared to load the cache with the item information for each of the items within the recommended range.
Frequently Accessed Items: The list control will often need item information for the first item (offset 0). The LVN_ODCACHEHINT notification message may not always include item 0, but it should always be included in the cache.
The last items in the list will be accessed often. Therefore, the owner may want to keep a second cache that includes the items at the end of the list. The requested range from LVN_ODCACHEHINT can be checked against the end cache to make it available automatically instead of reloading the same end range each time. This documentation provides examples of simple application-defined functions that perform cache management and notification message processing. For more information on these examples, see Virtual list view sample code.
Virtual list view sample code
This section includes samples of application-defined functions and structures that implement aspects of a virtual list view control and perform cache management.
Name Description OnNotify function Handles virtual list view notification messages. PrepCache function Performs basic cache management. RetrieveItem function Retrieves item information from the cache. RndItem structure Holds item information for use with a cache. Note For demonstration purposes, it is assumed that the cache used in this sample is a dynamically allocated array of the user-defined structure RndItem. The list view control in the example is assumed to have three columns—one column for the item label and two columns for subitems.
Sample Function: OnNotify
This sample user-defined function handles notification messages commonly sent from a virtual list view control.
LRESULT OnNotify( HWND hwnd, NMHDR* pnmhdr )
{
    LRESULT lrt = FALSE;

    switch (pnmhdr->code){
        case LVN_GETDISPINFO:
            RndItem rndItem;
            NMLVDISPINFO* pLvdi = (LPNMLVDISPINFO) pnmhdr;
            if (-1 == pLvdi->item.iItem){
                OutputDebugString("LVOWNER: Request for -1 item?\n");
                DebugBreak();
            }

            //  Get information for item at index iItem.
            RetrieveItem( &rndItem, pLvdi->item.iItem );

            if(pLvdi->item.mask & LVIF_STATE){
                //  Fill in the state information.
                pLvdi->item.state |= rndItem.state;
            }

            if(pLvdi->item.mask & LVIF_IMAGE){
                //  Fill in the image information.
                pLvdi->item.iImage = rndItem.iIcon;
            }

            if(pLvdi->item.mask & LVIF_TEXT){
                //  Fill in the text information.
                switch (pLvdi->item.iSubItem){
                    case 0:
                        //  Copy the main item text.
                        lstrcpy( pLvdi->item.pszText, rndItem.Title );
                        break;

                    case 1:
                        //  Copy subitem 1 text.
                        lstrcpy( pLvdi->item.pszText, rndItem.SubText1 );
                        break;

                    case 2:
                        //  Copy subitem 2 text.
                        lstrcpy( pLvdi->item.pszText, rndItem.SubText2 );
                        break;

                    default:
                        break;
                }
            }
            lrt = FALSE;
            break;

    case LVN_ODCACHEHINT:
        NMLVCACHEHINT* pcachehint = (NMLVCACHEHINT*) pnmhdr;

        // Load the cache with the recommended range.
        PrepCache( pcachehint->iFrom, pcachehint->iTo );
        break;

    case LVN_ODFINDITEM:
        LPNMLVFINDITEM pnmfi = (LPNMLVFINDITEM)pnmhdr;

        // Call a user-defined function to find the index according
        // to LVFINDINFO. Set return value to -1 if no hits are found.
        break;

    default:
        break;

    return( lrt );
}
Sample Function: PrepCache
This sample function accepts the range values for the cache suggested by a virtual list view control. It performs a verification to determine that the requested range is not already cached, and then it allocates the required global memory and fills the cache if necessary.
void PrepCache( int iFrom, int iTo )
{
/*  Global Variables
 *    g_priCache[] is the main cache.
 *    g_iCache is the index of the first item in the main cache.
 *    c_cCache is the count of items in the main cache.
 *
 *    g_priEndCache[] is the cache of items at the end of the list.
 *    g_iEndCache is the index of the first item in the end cache.
 *    g_cEndCache is the count of items in the end cache.
 */

    //  Local Variables
    int i;
    BOOL fOLFrom = FALSE;
    BOOL fOLTo = FALSE;

    //  Check to see if this is the end cache.
    if ((iTo == g_cItems - 1) && ((iTo - iFrom) < 30))  // 30 entries wide{
        // Check to see if this is a portion of the current end cache.
        if ((g_cEndCache) &&
            (iFrom >= g_iEndCache) &&
            (iFrom < g_iEndCache+g_cEndCache))
            return;  //  if a part of current end cache, no loading is necessary

        //  This is a new end cache; free the old memory.
        if ( g_priEndCache )
            GlobalFree( g_priEndCache );

        //  Set the index and count values for the new end cache; then get the memory.
        g_iEndCache = iFrom;
        g_cEndCache = (iTo - iFrom + 1);
        g_priEndCache = (PRndItem)GlobalAlloc( GPTR, sizeof( RndItem ) * g_cEndCache );

        if (! g_priEndCache);
            //  Out of memory. Perform error handling operations.

        //  Loop to fill the cache with the recommended items.
        for (i=0; i<g_cEndCache; i++);
            //  Call function that accesses item information and
            //  fills a cache element here.
    }

    else{    //  Not a member of the current end cache. Try primary cache instead.

        //  Check to see if iFrom is within the primary cache.
        if ((g_cCache) &&
            (iFrom >= g_iCache) &&
            (iFrom < g_iCache+g_cCache))
            fOLFrom = TRUE;

        //  Check to see if iTo is within the primary cache.
        if ((g_cCache) &&
            (iTo >= g_iCache) &&
            (iTo <= g_iCache+g_cCache))
            fOLTo = TRUE;

        //  If both iFrom and iTo are within current cache, no work is needed.
        if (fOLFrom && fOLTo)
            return;

        //  Enlarge the cache size rather than make it specific to this hint.
        if (fOLFrom)
            iFrom = g_iCache;
        else if (fOLTo)
            iTo = g_iCache + g_cCache;

        //  A new primary cache is needed; free the old one.
        if ( g_priCache )
            GlobalFree( g_priCache );

        //  Set the index and count values for the new primary cache, and then get the memory.
        g_iCache = iFrom;
        g_cCache = (iTo - iFrom + 1);
        g_priCache = (PRndItem)GlobalAlloc( GPTR, sizeof( RndItem ) * g_cCache );

        if (!g_priEndCache);
            //  Out of memory. Do error handling.

        //  Loop to fill the cache with the recommended items.
        for (i=0; i<g_cEndCache; i++);
            //  Call function that accesses item information and
            //  fills a cache element here.
    }
}
Sample Function: RetrieveItem
This sample function accepts two parameters—the address of the user-defined structure RndItem and an integer value representing the index of the item in the list. It checks the index value to discover if the desired item is cached. If it is, the pointer that was passed to it is set to a location in the cache. If the item is not in the main or end cache, the item information must be located manually.
void RetrieveItem( PRndItem prndItem, int index )
{
/*  Global Variables
 *    g_priCache[] is the main cache.
 *    g_iCache is the index of the first item in the main cache.
 *    c_cCache is the count of items in the main cache.
 *
 *    g_priEndCache[] is the cache of items at the end of the list.
 *    g_iEndCache is the index of the first item in the end cache.
 *    g_cEndCache is the count of items in the end cache.
 */

    //  Check to see if the item is in the main cache.
    if ((index >= g_iCache) && (index < g_iCache + g_cCache))
        *prndItem = g_priCache[index-g_iCache];

    //  If it is not, check to see if the item is in the end area cache.
    else if ((index >= g_iEndCache)
              && (index < g_iEndCache + g_cEndCache))
        *prndItem = g_priEndCache[index-g_iEndCache];
    else{
        //  The item is not in either cache;
        //  you should get the item information manually.
    }
}
Sample Structure: RndItem
This sample user-defined structure holds information placed in the cache. The structure has the following form:
typedef struct _RndItem
{
    int   iIcon;
    TCHAR Title[SIZE];                // SIZE is a user-defined macro value.
    UINT  state;
    TCHAR SubText1[SIZE];
    TCHAR SubText2[SIZE];

} RndItem, *PRndItem;
- iIcon
- Bitmap to be assigned to this item. The value represents offset within a previously created image list.
- Title
- Text for the item label.
- state
- Item state value.
- SubText1
- Text for the label of the first subitem.
- SubText2
- Text for the label of the second subitem.
Top of Page
© 1997 Microsoft Corporation. All rights reserved. Terms of Use.