Manual Device Configuration
[This is preliminary documentation and subject to change.]
Because not all library hardware units and system configurations support the RSM autoconfiguration feature, RSM provides a method for manually configuring library hardware units. However, you should not use this method unless it is absolutely necessary, because manually configured devices do not recognize system configuration changes. Always let RSM autoconfigure all devices when you add, move, or remove a device in an RSM system. If the autoconfiguration fails, you can complete the configuration manually.
To perform a manual configuration
-
After installing, moving, or removing hardware, let RSM start the process of autoconfiguration. This process adds incomplete registry entries and generates an operator request to manually configure each changer it cannot autoconfigure.
Note If you manually configured a changer when it was installed, RSM does not recognize changes made to that changer or its associated drives, and RSM does not start the autoconfiguration process.
-
After RSM generates an operator request for each changer that it cannot autoconfigure, stop RSM.
-
Back up the RSM database by copying %SYSTEMROOT%\System32\ntmsdata\* to a secure temporary directory.
-
Open the Windows NT registry in Regedt32 or RegEdit.
-
Go to the HKEY_LOCAL_MACHINE\System\CurrentControlSet\Services\
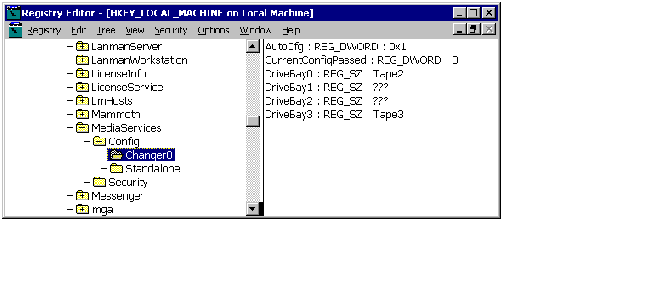
MediaService\Config key. There is a subkey for each changer in the system and a subkey for the stand-alone drives. The following figure illustrates a registry configuration that contains one changer (Changer0) and at least one stand-alone drive.

The following table describes the registry entries in the preceding figure.
| Registry Entry |
Description |
| AutoCfg |
Determines whether the current changer is automatically or manually configured. A value of zero (0) represents manual configuration, and a non-zero value represents autoconfiguration. |
| CurrentConfigPassed |
Represents the success of the current configuration. A non-zero value indicates that RSM did not find a conflict with the configuration the last time RSM was started. |
| DriveBayX |
Represents the drive bays associated with the changer (where X is a numeric value). Changers can be associated with any number of drive bays. The values of these entries map the drive bays to the drive inside them. Triple question marks (???) represent unrecognized drives that must be manually configured.
Note When RSM cannot establish communication with the changer, RSM does not create any drive bay entries. Manual configuration cannot solve this problem; you might have to replace the changer driver.
|
-
Go to the subkey for the changer that RSM did not configure and note the name of each unrecognized drive bay. Unrecognized drive bays have a value of ??? instead of a drive device name.
-
Open MMC and access the RSM Administration Tool.
-
Insert media in a drive that RSM does not recognize. RSM typically categorizes unrecognized drives as stand-alone drives. Check each of the stand-alone drives listed until RSM updates the right pane with the inserted media. Note the name of the drive that contains the media you inserted. You must associate this drive name with the appropriate drive bay by replacing the ??? in the registry entry for that drive bay later in this procedure.
If this identification process is unsuccessful, move to the next step. Otherwise, complete this step for each drive that RSM does not recognize and skip to step 12.
-
Go to the HKEY_LOCAL_MACHINE\Hardware\DeviceMap\SCSI key in the Windows NT registry and look for the port, bus, target, and logical unit ID of an unrecognized drive. Use the SCSI ID of the drive to ensure that you are looking at the correct drive.
-
Note the value of the DeviceName entry in the right window pane. This is the name of the current drive that replaces the ??? in the registry entry for the current drive bay.
-
Repeat steps 8 through 10 for each drive that RSM does not recognize.
-
Stop all processes that are accessing RSM drives.
-
Stop RSM.
Warning Do not continue until you are sure RSM is not running. It is very important not to edit the RSM entries in the registry while RSM is running.
-
When all drive activity stops, go to the RSM configuration information in the HKEY_LOCAL_MACHINE\System\CurrentControlSet\Services\
MediaService\Config key of the Windows NT registry.
-
Go to the first drive bay entry with a value of ???. This represents a drive that RSM does not recognize.
-
Replace the ??? with the appropriate drive name for that drive bay.
-
Set the AutoCfg flag to 0.
-
Repeat steps 16 and 17 for each drive that is not configured.
-
Close the Windows NT registry.
-
Restart RSM. It will read the new configuration information and initialize the devices.
-
Mount media in each drive in the library after RSM is initialized. If any of the configurations are incorrect, RSM generates an error message (during either initialization or mounting).
-
If the manual configuration was unsuccessful, stop RSM. Copy your backup version of the RSM database files back to the %SYSTEMROOT%\System32\ntmsdata\ directory to restore the database and restart the manual configuration process.
If RSM does not generate any error messages, the manual configuration was successful and you have completed the manual configuration process.
