Microsoft Corporation
Updated January 21, 1997
You've got installation questions? We've got installation answers. Everything you want to know about installing Microsoft® Access 97, with or without Microsoft Office, but aren't afraid to ask!
Should You Do a Typical or Custom Installation?
Selecting the Right Components
Microsoft Access 97 and 95: Successful Cohabitation
Install in Windows 95 or Windows NT Workstation Version 4.0
Add or Remove Components in Windows 95 or Windows NT Workstation Version 4.0
Install in Windows NT Workstation Version 3.51
Add or Remove Components in Windows NT Workstation Version 3.51
The Microsoft Access 97 Readme file contains late-breaking product information and documentation updates. It's always a good idea to peruse its contents for important caveats and tips about installing Microsoft Access 97 before you run Setup.
Also, the Readme file contains a list of all files installed by stand-alone Microsoft Access 97. You can use this list to verify the location or presence of a file after installation.
You can find the Readme file (Acread80.wri) in the following locations:
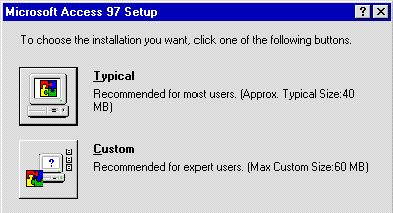
One easy way to save disk space is to do a Typical installation. This is a good choice if you are not a developer and you only use the most common features of Microsoft Access.
If you are installing from a CD-ROM, consider running Microsoft Access from your CD-ROM drive. Microsoft Access installs a minimum set of files on your hard drive and then accesses other files from the CD-ROM drive as they are needed.
Another option is to install Microsoft Access 97 on a Network and share it with all users from a network server. A network installation stores a minimum set of files on each client machine, and makes all other files available on the network server. This type of installation requires some preplanning and is usually done by a network administrator.
Finally, if disk space is scarce, you can do a minimum installation, which takes the least amount of disk space but limits the features of Microsoft Access to the bare bones.
| Type of Installation | Disk Space Requirements | |||
| Microsoft Access 97 | Microsoft Office 97, Professional Edition | |||
| Typical | 40 MB | 121 MB | ||
| Custom (Full) | 60 MB | 191 MB | ||
| Custom (Minimum) | 23 MB | (Varies) | ||
| Network | 13 MB | 24 MB (per client) | ||
| CD-ROM | 32 MB | 60 MB | ||
If you want to get up and running fast, choose Typical installation, which automatically decides which components to install and where to install them. You can always decide later to add or remove specific components.
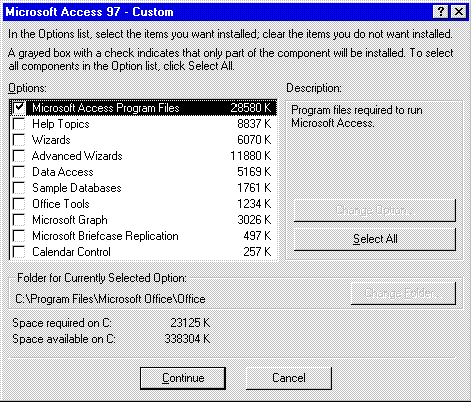
If you want to specify exactly which components to install, choose Custom installation. You can select just the components you want, or install every component if disk space is not a concern for you.

If you are a network administrator, you can run a shared version of Microsoft Access and other Microsoft Office products over a network from a server. Sharing files on a server reduces the amount of disk space needed on client computers machines. For more information, see Chapter 4 of the Microsoft Office 97 Resource Kit, which is available wherever computer books are sold and directly from Microsoft Press.
If you have the Microsoft Office 97 Resource Kit, be sure to read Chapter 6. This chapter describes the Network Installation Wizard, which lets you easily customize your network installation.
For brief instructions on installing and administering Office on a network, see the Network Readme file. You can find this file in the following locations:
If you install Microsoft Access from a CD-ROM, it contains the Office 97 ValuPack in addition to the normal Setup program. The ValuPack contains additional software, such as drivers, Help files, online books, and other programs and files you might find useful. Some components of the ValuPack have their own Setup program, while others only need to be copied.
Here are some of the components of the ValuPack that are especially useful to Microsoft Access 97 users.
| Component | Location |
| Data Access Pack Note: Contains three drivers not available through Setup: Lotus 1-2-3, Paradox, and Microsoft Exchange/Outlook™ |
\ValuPack\DataAcc |
| Online version of Building Applications with Microsoft Access 97 | \ValuPack\Access\Openbook.htm |
| Help files for WebBrowser ActiveX control (which comes with Microsoft Internet Explorer version 3.01) | \ValuPack\Access\WebHelp |
| Microsoft Internet Explorer version 3.01 | \ValuPack\IExplore |
| Web Publishing Wizard | \ValuPack\WebPost |
For more information about the ValuPack, see the Office 97 ValuPack Help file (Valupk8.hlp) in the ValuPack folder on the CD-ROM or on the network you installed from. This Help file contains overview information and specific installation instructions for each component.
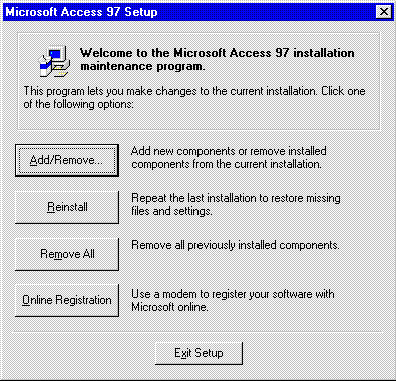
After you install Microsoft Access 97, you can run Setup again at any time to add Microsoft Access or other Office components—such as the Clip Gallery—or to remove them to free up disk space. You can also restore the previous installation (if, for example, folders are accidentally deleted), or you can uninstall Office.

Note If you want to keep an earlier version of Microsoft Access on the same computer as Microsoft Access 97, you must use the original Setup program for Microsoft Access 95 (not Office 97 Setup) to make changes to that installation.
If you decide to do a Custom installation, you have a few choices to make. What are all the Microsoft Access components? Which components are part of a Typical installation for Office? Which components in other Office products can Microsoft Access use? The following table gives you all the details you need to know. (An indentation in the first column indicates a subcomponent within a component.)
| Component and location in the Custom dialog box of Setup | Installed with Typical Setup? |
| Microsoft Access | |
| Microsoft Access Program Files | Yes |
| Help Topics | |
| Product Help | Yes |
| Programming Help | No |
| Wizards | Yes |
| Advanced Wizards | No |
| Sample Databases | |
| Northwind Database | Yes in Microsoft Access 97 No in Office 97, but you can select it in a separate dialog box |
| Orders Database | No |
| Developer Solutions Database | No |
| Microsoft Briefcase Replication | No |
| Calendar Control | |
| Calendar Control | No |
| Calendar Control Help | No |
| Data Access | |
| Database Drivers | |
| Microsoft Access Driver | Yes |
| dBASE and Microsoft FoxPro® Drivers | Yes |
| Microsoft Excel Driver | Yes |
| Microsoft SQL Server Driver | No |
| Text and HTML Driver | Yes |
| Office Tools | |
| Microsoft Office Shortcut Bar | No |
| Office Assistant | Yes |
| Spelling Checker | Yes |
| Organization Chart | Yes |
| Microsoft Graph | Yes |
| Microsoft Graph Help | Yes |
| Equation Editor | No |
| Microsoft Photo Editor | No |
| MS Info | Yes |
| Popular Clipart | Yes |
| Clip Gallery | Yes |
| Find Fast | Yes |
| Microsoft TrueType Fonts | Yes |
| Lotus VIM Mail Support | No |
| Find All Word Forms | Yes |
| Converters and Filters | |
| Graphics Filters | |
| Tag Image Format Import | Yes |
| Encapsulated PostScript Import | Yes |
| Windows Bitmap Import | Yes |
| Enhanced Metafile Import | Yes |
| Truevision Targa Import | No |
| AutoCAD DXF Import | No |
| Micrografx Designer/Draw Import | No |
| CorelDRAW Import | No |
| Computer Graphics Metafile Import | No |
| PC Paintbrush PCX Import | No |
| WordPerfect Graphic Import | Yes |
| WordPerfect Graphics Export | Yes |
| Macintosh PICT Import | Yes |
| Windows Metafile Import | Yes |
| GIF (Graphics Interchange Format) | Yes |
| Kodak Photo CD Import | No |
| JPEG File Interchange Format Import | Yes |
| PNG File Format Import | Yes |
| Getting Results Web Site Address | Yes |
You might want to do a minimum installation if disk space is tight on your computer but you still want to use the basic features of Microsoft Access. But, you'll be missing lots of great features, such as extensive help, all the wizards, and many drivers.
To do a minimum installation:

You may want to install Microsoft Access 97 along with Microsoft Access 95. For example, you want to preserve existing Microsoft Access 95 applications before you migrate them to Microsoft Access 97 at a later date. Or, you are a developer who needs to code and test in both versions.
By default, the Setup program keeps Microsoft Access 95 on your machine, but it will detect a prior version of Microsoft Access and prompt you if you want to keep it.
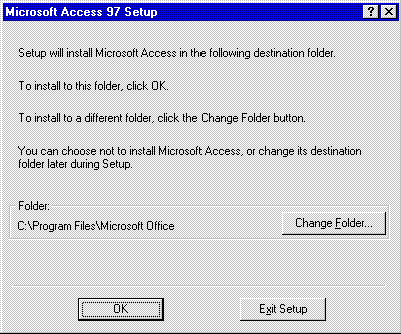
Microsoft Access 95 has a different default folder than Microsoft Access 97, but if you need to be explicit, click Change Folder to specify a different folder for Microsoft Access 97 when prompted by Setup.

For more information, see the Knowledge Base article, "Running Current & Earlier Access Versions Simultaneously." (MSDN Library, Knowledge Base)
Important If you're using a virus-detection utility, disable it before you run the Setup program because it may interfere with installation. Also, close any open applications.
Install in Windows 95 or Windows NT Workstation version 4.0
Add or remove components in Windows 95 or Windows NT Workstation version 4.0
Install in Windows NT Workstation version 3.51
Add or remove components in Windows NT Workstation version 3.51
Double-click the Setup icon in the Office program group.
Note To install the Web Publishing Wizard, click the ValuPack folder on your Microsoft Office or Microsoft Access CD-ROM, click the WebPost subfolder, and then double-click WebPost.exe.
Wizards Installed When You Select the "Wizards" Component in Setup
| AutoForm | Link Spreadsheet |
| AutoReport | Link Text |
| Combo Box | List Box |
| Command Button | Lookup |
| Crosstab Query | Microsoft Word Mail Merge |
| Database Wizard | Picture Builder |
| Export Text | PivotTable |
| Form | Publish to the Web |
| Import HTML | Report |
| Import Spreadsheet | Simple Query |
| Import Text | Switchboard Manager |
| Label | Table |
| Link HTML |
Wizards Installed When You Select the "Advanced Wizards" Component in Setup
| Add-In Manager | Linked Table Manager |
| Chart Wizard | Macro to Module Converter |
| Conflict Resolver | ODBC Connection String Builder |
| Database Splitter | Option Group |
| Documenter | Performance Analyzer |
| Find Duplicates Query | Subform/Subreport |
| Find Unmatched Query | Table Analyzer |
| Input Mask | User-Level Security |
Note The following wizards are always installed: Color Builder, Expression Builder, Field Builder, Query Builder, and Subform/Subreport Field Linker.