Michael P. Antonovich, MicMin Associates
October 1997
This paper introduces the use of the Project Manager in Microsoft® Visual FoxPro®. In it, you will learn:
As soon as you next start up Visual FoxPro! Seriously, you can begin using the Project Manager at any time. However, the sooner you begin using it, the sooner you begin reaping the benefits. Some of the benefits include:
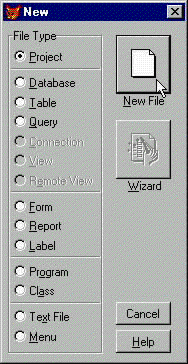
To create a new project, simply select File|New. From this dialog, select Project as shown below. There is no Wizard for creating a project, but then a new project is nothing more than an empty shell, a container of sorts that will eventually hold references to all the forms, data, reports images, menus, and other files belonging to a single application. But, until you start adding files to the project, it is empty.
Figure 1. Creating a new project in Visual FoxPro
You do have to supply a name to the project after clicking New File. You can place the project in any subdirectory in any drive of your system. However, be sure that the name you use is unique at least within the directory you place the project. (Actually, I recommend that project names be unique across your entire system. If you work for a corporation, each project name should be unique across the entire corporation.)
After creating the empty project, you can begin adding documents and files to the project. Figure 2 below shows the empty project. It consists of a page frame with six pages. The first page shows all file categories while subsequent pages show individual categories. You could work entirely within the ALL page, but as your project grows to dozens of files, this can be less efficient than looking at one category at a time.
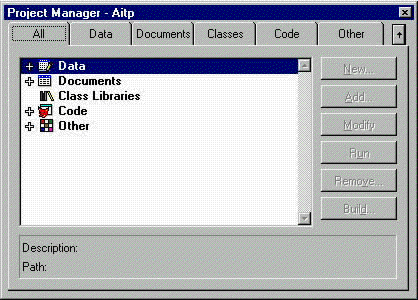
Figure 2. The empty project
A better way of working with files is by selecting the individual category pages. For example, the data page holds databases, free tables and query files; the Documents page holds forms, reports and labels; the Code page holds programs, API libraries, and applications; and the Other page holds menus, text files, and other files.
The project window can be docked like a toolbar at the top of the screen (but only the top). In this case, only the page tabs appear in the toolbar. When clicked, they display a drop-down list of the files stored on that page. You can click and drag any individual tab off the toolbar and let that page float on your desktop. Although you do not see the option buttons displayed to the right of the full dialog as shown in the above figure, you merely have to right-click on the detached page to display a shortcut menu with all these options and more. (To return a torn-off page, just hit the Close button in the title.)
You can include any file in a project, even files that are not going to be included in the EXE or APP file you later build. For example, you could include test programs and temporary files. Just having the file in the Project Manager does not automatically mean that it must be a part of your application. (All right, strictly speaking, the default Build options will include the file in the EXE or APP, but if there are no lines in your main program to call these test programs or temporary files, they just go along for the ride taking up space. Furthermore, you can explicitly exclude any file from the application when it is built.)
When the time comes to clean out these temporary files and test programs from your project, do you have to remember what to delete and what to keep? Frequently, the fastest technique is to clear the entire project (or start a new one) and add only the main or start program. Then select the Rebuild Project option after clicking the Build button. Visual FoxPro will begin with the main program and identify and add to the project all programs, reports, and other files directly called by the code. However, if you have files that are indirectly referenced (such as via macro substitution) VISUAL FOXPRO cannot locate these files. You must add those to the project manually.
Suppose you already created several files for an application. Is it too late to use a project?
No!
Open or create a project. Typically, the first files added to a project are the data files. In VISUAL FOXPRO, the use of database containers (DBCs) is preferred. (DBCs offer longer field names, captions, validations, table triggers, stored procedures, permanent relations, referential integrity, and so on). If the database already exists, simply open the data page and select the Database subcategory and click Add. VISUAL FOXPRO displays the standard Open dialog allowing you to select a DBC file from your system. After you select a DBC, VISUAL FOXPRO adds information to the project to identify the DBC and where it is stored.
Figure 3 below shows the screens you see when you create a new database container.
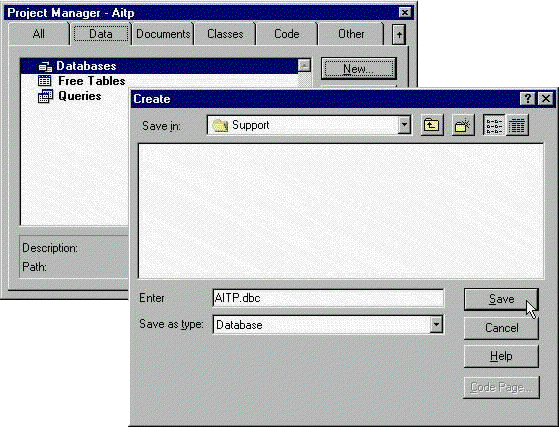
Figure 3. Creating a new database container
Once you have a database container, a plus sign appears before the subcategory DATABASES indicating that the project has one or more database containers. If you click the plus sign, the outline expands to show the names of the database containers. Click the plus sign in front of a database container name and the outline expands again to show the container categories:
For a new database container, these categories are empty and have no symbol in front of them. If they contain data, they will have a plus sign which when clicked displays more information. For example, if Tables displays a plus sign, clicking it displays the names of the tables in the database container. This technique is called "drilling down" into the database container.
You can add new tables or existing tables to the database container using the buttons along the right side of the Project Manager dialog or by right-clicking the Databases category. The figure below shows a stand-alone table, NEWMEMBER.DBF, being added to the database container. After adding it, you can use the Project Manager to drill down into the table to see its fields and indexes.
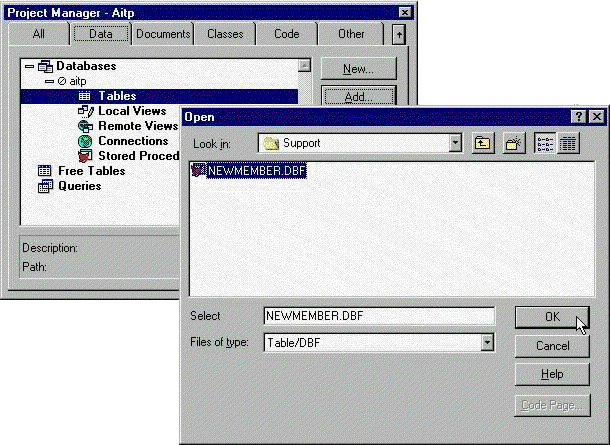
Figure 4. Adding a new table to the database container
Use the same method to add or create new files of other types (reports, forms, and so on).
To run any program, report or form directly from the Project manager, first select it and click the RUN button along the right side of the dialog.
Of course, if the program, report, or form depends on the presence of specific memory variables, certain files to be open, or other instantiated objects, you may need to create a "driver" program to set up these conditions before calling the program, report, or form. Even so, this could be the easiest way to test individual modules of your application before including them as part of the larger application. This type of testing is often referred to as Unit Testing. If you test each module individually, then you only need to test the interaction between modules when you assemble the final application.
The Project Manager makes it easy to build either application files or executable files.
To build an application/executable file, click the Build button in the bottom right of the Project Manager dialog.
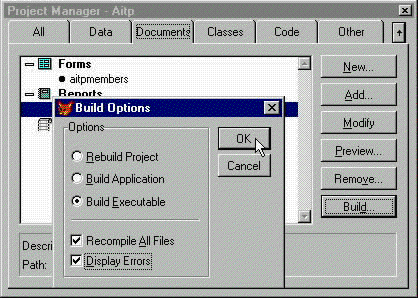
Figure 5. Building an application or executable file
The Build Options dialog let you select from three build options.
First, you can simply rebuild the project. This option reads the files in the project and looks for references to forms, reports, labels, menus, and other files that are not currently in the project. If it finds any, it searches through the VISUAL FOXPRO search path to find them and adds them to the project automatically. However, if it cannot find a referenced file, it prompts the user to locate it.
Next you can create an application (APP). Note, however, that you must have Visual FoxPro installed on any machine on which you want to run an application. You can also choose to create an executable file, which can be run on systems that do not have VISUAL FOXPRO installed. The two options at the bottom of the dialog tell VISUAL FOXPRO to recompile all files, not just those changed since the last build. The last option displays errors, if found, when the build ends. Otherwise, you must manually open the ERR file with the same name as the application or executable to see the errors or even to find out of errors occur. If you select this option, and no error window appears when compilation ends, you know the compile was successful.
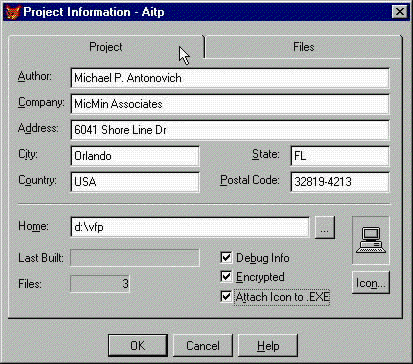
Figure 6. Creating an application
Before you actually build the application or executable, you may want to check the Project information. Display this dialog by selecting Project Info from the Project menu.
This dialog consists of a page frame with two pages. The first page contains generic project information such as your name or the name of the company. It also displays the home directory, which by default is the directory from which VISUAL FOXPRO runs. However, you can change this option to perhaps the root directory of the application.
It also lets you select options related to security. Debug Info and Encrypted options are not selected by default. If you want to use the Debugger to trace errors, you need Debug Info, but cannot use the Encrypted option. However, after testing, you may want to turn off Debug and turn on Encrypted and recompile before distributing the application to your users. This provides some security from programs that attempt to de-compile your application back to source code.
The last option lets you attach an Icon to the EXE, which you then select with the Icon… button on the right. This icon is used when you create a shortcut to the application on the desktop.
The second page of the Project Information dialog lists all the files in the project and the date of last modification. You can also use this page to determine which files to include in the project and which file is the main file. The check box in the Included column remains empty for files that are not included. By default, VISUAL FOXPRO does not include tables or database containers. An included file cannot be modified, so typically you would not want to include a table here. However, you might use it to store a fixed table of passwords.
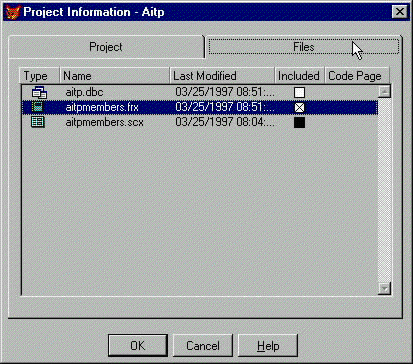
Figure 7. The second page of the Project Information dialog box
Included files have an "X" in the box. One file should have its square filled in solid. This is the main program (or form or menu). This is the file that starts executing when the application runs.
The above section covered adding items to the project as well as creating new items. However, you will occasionally want to delete an item from the project either because you no longer need it because the functionality was added somewhere else or because you need to remove some test files before building the final application. Simply select the file you want to remove and click the Remove button on the right side of the Project Manager. Project Manager will give you the option to simply remove the object from the project or to both remove the object from the project and delete the source from disk. Keep in mind that if you delete the file, you may not be able to recover it.
The Project Manager not only stores the names of the components in it, but also a relative reference to the files from the home location of the Project Manager. Therefore, when you move the Project Manager, the relative references may not be able to find the files, and unless their directory is in the VISUAL FOXPRO search path, you will be prompted to locate each of the files. If you have a large number of files in different directories, this can be time consuming. However, once you tell the Project Manager to search one directory, it remembers to search there the next time it encounters a file with a bad reference.
Even opening the project itself creates a minor error because the project's home location is also stored in the project. You will see a message like the following:
Project has been moved, make <new directory> the new home directory?
Two buttons, Yes and No, appear beneath this message. If you select Yes, you may still have to locate other files in the Project Manager.
On the other hand, suppose you move the Project Manager and its files as a relative unit to another location (such as a different drive, but with the same directory structure). You may only have to respond to the first prompt above that the project has been moved and has a new home directory. This is because the Project Manager stores an absolute reference to itself, but only relative references to other files in the project.
Unlike the simple, single file or at least the single directory applications of old DOS application days, Microsoft Windows® applications typically store files in several directories including a main application directory, the WINDOWS directory and the WINDOWS/SYSTEM directory. Furthermore, most Windows applications allow the user to select the directory in which to store files. They also often place a program icon in the Program Manager (Windows 3.x) or a reference in the Start menu (Windows 95). Finally, Windows applications often use a large number of support files, typically having the extension DLL or more recently OCX.
You could manually identify all the files required for your application and using a tool like PKZIP create a set of installation disks. However, the user interface for PKZIP does not allow the user to unzip files in more than a single directory and its immediate subdirectories. Installing files across different directories along different branches of your drive, much less different drives is not supported. You could of course resort to a series of PKZIP files and a batch file to control their expansion with a batch file. You might even be clever enough to get the application added to the Program Manager or Start menus. However, VISUAL FOXPRO provides a tool to perform these steps painlessly.
The Setup Wizard allows you to create a set of diskettes to distribute your compiled VISUAL FOXPRO application to other users. The following figure shows the first page of the Setup Wizard.
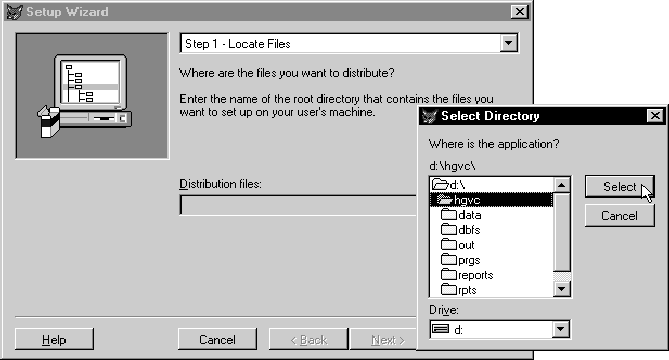
Figure 8. The Setup Wizard
Step 1 prompts for the application's distribution tree. This is the directory and its associated subdirectories containing the files to distribute. Note that it is usually not the same as your working directory that probably contains source files, temporary files, and other accumulated files not needed by the end user (unless you are distributing the source). Therefore, it is usually best to create a separate directory structure for files you want to distribute.
Note Although you can have any number of subdirectories under the root directory of the tree, your executable or application file must be in the root.
Figure 9 below shows the second step in the wizard, which prompts for optional components. You must know if you need to include the Visual FoxPro runtime, MS Graph runtime and ODBC drivers (and which ones) and OLE servers. Don't select these options unless you have to. For example, you might use the Setup Wizard to distribute an application that users will run from the source with their own copy of VISUAL FOXPRO but who might need ODBC drivers or OLE servers. The runtime for Microsoft Graph 5.0 adds several MBs to the distribution as do the ODBC driver files.
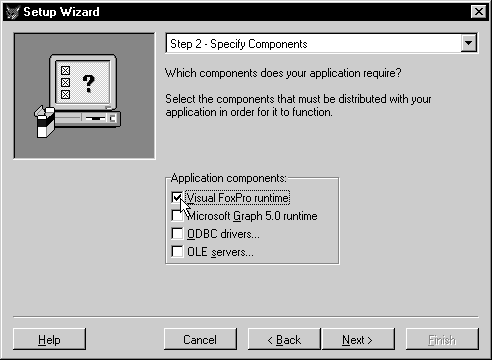
Figure 9. Selecting optional components in the Setup Wizard
Visual FoxPro 5.0 applications can be installed on 32-bit systems only such as Windows 95 and 98 and Windows NT®. Visual FoxPro 3.0 was the last version to support Windows 3.x (16-bit systems).
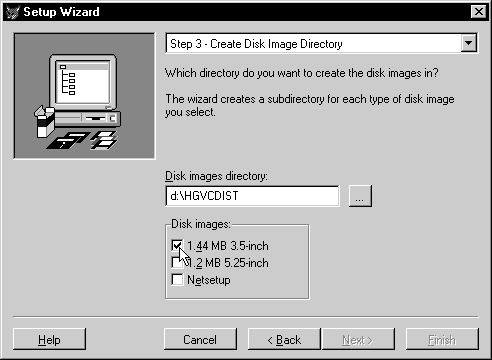
Figure 10. Creating the Disk Image Directory
In the third step (see Figure 10 above), you identify the directory where the wizard writes the disk images it creates. For each selection here, the wizard creates a subdirectory under the directory named to the left. The directory identifies the root for the distribution files. However, it does not itself contain any files. Rather it contains subdirectories named COMPRESS, DISK144, DISK12 and NETSETUP for the different types of disk images that it creates. The COMPRESS directory is a working directory for the compressed files. Note that Netsetup creates a single directory in which all the distribution files are placed. This is great if you plan on distributing the application on a CD or if you will install from a network directory. Your only other alternative is to choose either a 1.44 MB or 1.2 MB diskette format. These options create subdirectories under DISK144 and DISK12 respectively, one subdirectory for each physical diskette. Then you can simply copy the contents of these directories onto a set of blank formatted distribution diskettes.
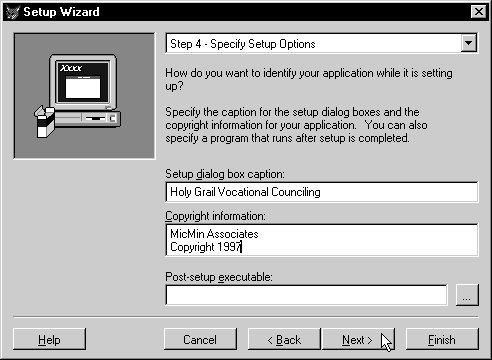
Figure 11. Specifying setup options
Step four (Figure 11) prompts for a text string that appears at the top of dialog boxes when you run the distribution diskettes. You can also include a copyright message that appears in the About section of the Control menu of the setup routine.
Finally, you can specify a file to execute after the installation is complete. Use this option to further customize files in the application or even to run the application itself.
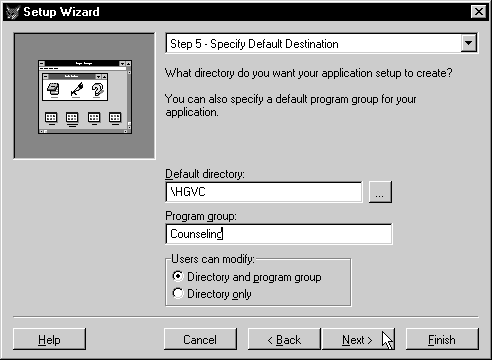
Figure 12. Defining your default destination directory
Step five lets you define a default destination directory for the application. You can also specify a Program Manager Group (Programs line in Windows 95). Note that you can choose whether to let the user change the Program Manager group, but the user always has the ability to change the directory in which to install the application. This is so the user can resolve conflicts between applications trying to use the same subdirectory. This means, of course, that you should never hard-code directory references in your application. All directory references should be made relative to the directory in which the application starts.
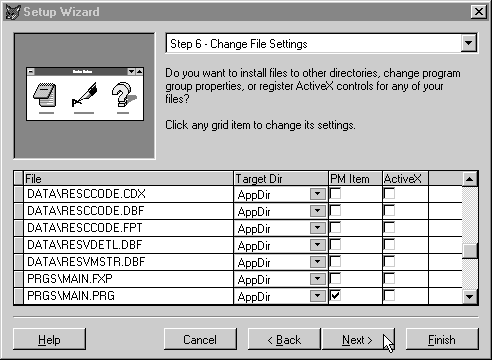
Figure 13. Changing file settings
In the sixth step of the wizard, the user can review the files in the distribution directory and determine which ones should be added to the Program Manager or installed as ActiveX® objects and registered as such.
While many applications may only have a single executable program, you may have a series of application stored in the same directory and distributed as a group. In this case, you need to identify each executable file by clicking in the Program Manager Item check box. Note also that you can specify which directory each file belongs in. However, if you set up your distribution tree correctly, you should not need to make any changes here.
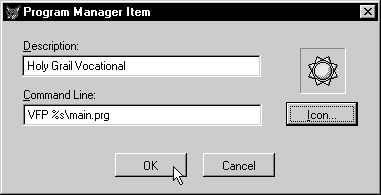
Figure 14. Supplying the icon description and the command line string
The dialog above shows the options available for each item added to the Program Manager. First, you need to supply a description to appear beneath the icon selected on the right. You also must supply a command line string to define how to execute the program. In this case, notice the "%s" at the beginning of the application filename. This shortcut substitutes the actual name of the subdirectory where the file is installed by the user (remember the prior step where the user can select a directory?) when the installation program runs.
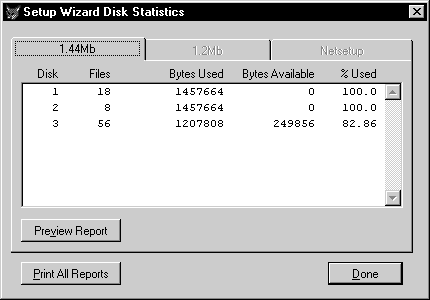
Figure 15. Disk statistics
The Setup Wizard then proceeds to create the diskette images you specified. This can take quite a long time, especially if you have a large number of libraries, use MS Graph, or ODBC drivers or many ActiveX objects. However, when it finishes, a page like the one above shows a summary of the number of diskettes used, each disk image size and the number of files per disk.
There are also reports available that provide more information about the disk images. The report includes a list of files by diskette with its expanded, compressed, and allocated sizes.
Your final step is to transfer these disk images to the diskettes you want to use for distribution. Be sure to begin with blank formatted diskettes with no bad sectors.