By Steve Hoag
March 1997
If you know how to use one Microsoft® Windows® application, you know how to use them all—or so the story goes. In the real world, differences in user interface design and behavior from one application to another often results in increased training and support costs. In a corporate environment, enforcing a consistent user interface across all of your applications can help reduce those costs. When it comes to user interface design, inconsistency breeds uncertainty; familiarity breeds usability.
Most development shops establish coding standards for form layout and appearance, menu structures, tabbing and text selection behavior, and so forth. Actually, enforcing those standards can prove difficult at best, adding unnecessarily to development and testing time. The “paste and hack” method often employed to share user interface elements can lead to subtle bugs in your code.
Microsoft Visual Basic® version 5.0 makes it easy to enforce consistency in your user interface designs by encapsulating the design with templates. Templates provide an easy way to create reusable form frameworks that can be used in multiple applications, enforcing a consistent look and feel.
How many times have you recreated a common form, such as a log in dialog box, splash screen, or an about box? Many applications require these types of forms; the requirements for their design are basically the same from one application to the next. Even so, each time that you create a new version of a common form, you probably introduce slight changes in its appearance or even its behavior. While the differences may seem insignificant to you, they can often confuse the casual user of your application.
Templates, new in Visual Basic 5.0, allow you to create a common form once and reuse it in any application. Previously, of course, you could always reuse forms by copying them from one project to the next, but that method tended to be problematic. It was easy to accidentally save the form in its original location after making changes, breaking the application that you “borrowed” it from. When you select a template to add to a new project, Visual Basic creates a new instance of the form in your project directory.
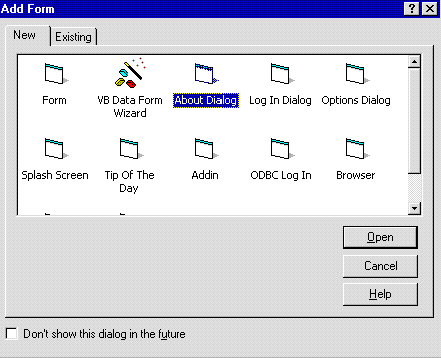
To add an existing form template to your application, click Add Form on the Project menu and select the desired form ( Figure 1). (If you don’t see any templates in the Add Form dialog box, select Options on the Tools menu, click on the Environment tab and select the Show Templates for Forms option.) A new instance of the form is added to your Project Explorer window; you can then add application-specific code as you would with any other form.

Figure 1. Form templates available from the Project menu.
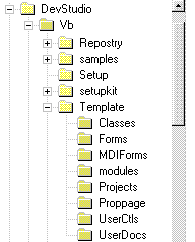
By default, templates are stored in the Template subdirectory of the VB directory. For group development, you’ll probably want to put your templates in a shared network directory and set permissions to Read-only to protect the templates. You can set a new location by changing the Templates Directory path from the Environment tab of the Options dialog box.
Form templates that ship with Visual Basic 5.0 Professional and Enterprise editions include Log In Dialog, Splash Screen, Options Dialog, Browser, Querys, About Dialog, Tip Of The Day, and several more. All of the basic functionality is either built-in or stubbed out with comments pointing out where application-specific code is needed. For example, the Tip Of The Day form simply requires you to add a text file containing your tips, then add one line of code to your application:
FrmTips.Show vbModal
Just like that, you’ve added Tip of the Day functionality complete with a Show at Startup option and random or sequential browsing. Think about how much time and effort it would take to create this form from scratch and you can easily see the benefit of using form templates.
The form templates included in the box are a great start, but what do you do if they don’t meet your needs? No problem—just modify the existing templates to fit your requirements or create your own templates from scratch. If you can create a form, you can create a template. That’s because a form template is actually a form; it becomes a template by saving it to the Templates\Forms subdirectory.
Unless you really enjoy debugging and fixing your applications, there are a few things you’ll need to consider before turning a form into a template. First of all, keep in mind that a form template must be able to stand alone. That means you shouldn’t add references to other forms or hard coded paths to data or bitmaps. Likewise, in order to make your template completely reusable, you should avoid subroutines or functions that are application-specific.
Because your template will be shared with other programmers, any code within the form should be thoroughly commented. Be sure to include comments pointing out the areas where code will need to be added. You’ll also want to stub out the Click event for menus and buttons with an explanation of their intended function.
Pay careful attention to the graphic design of your form template—after all, reusing a bad form isn’t going to improve usability. If you have established corporate guidelines for interface design, follow them; if not, try to adhere to the standards defined in the Windows Interface Guidelines for Software Design (Microsoft Press, 1995). Consider testing the usability of your interface design, especially if it will be used in numerous applications.
Once you have finished building your template, save it in the Forms subdirectory or your Templates directory. Any .frm file in this directory will show up as a template in the Add Form dialog box. You can also add templates to this directory by copying them, but don’t forget to copy the associated .frx file as well.
While the discussion so far has been limited to form templates, the same concepts apply to any type of Visual Basic module, including classes, standard (.bas) modules, user controls, user documents, MDI forms, property pages, and even entire projects. This is a great way to share and reuse just about anything that you can create in Visual Basic.
Templates for other modules are created and saved in the same manner as form templates, except they need to be saved to the appropriate subdirectory (Figure 2). For example, to create a user control template, save it in the UserCtls subdirectory—it will then be available from the Add User Control dialog box.

Figure 2. Template directory structure
Class templates present a slightly different case—because a class by definition stands on its own, a class template wouldn’t be very useful. Instead, think of a class template as simply a storage mechanism for class modules. Save copies of your commonly used classes in the Classes subdirectory.
Project templates can be especially useful in replacing a function that appears to be missing from Visual Basic 5.0. In earlier versions of Visual Basic, you were able to control which controls would appear in the toolbox for a new project by editing the Autoload.vbp (or Autoload.mak) file.
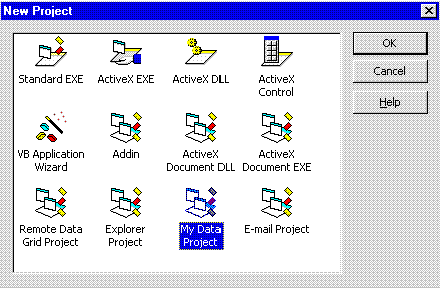
There is no Autoload file in VB 5.0, so how do you start a project with more than just the standard controls? It’s easy—just start a new project and add the desired controls from the Components dialog box, and then save your project in the Projects subdirectory. For example, if you frequently create applications that use a Remote Data control and a Data Bound Grid control, add them to a blank project and save it as “My Data Project” in the Templates\Projects directory. The next time you open the New Project dialog box, My Data Project will be available along with the standard project types (Figure 3).

Figure 3. Adding your project template
You can easily create project templates for each type of project that you work with: data access, Internet, mail, and so forth. You may also want to include commonly used classes, code modules, and form templates to your project templates before saving the template. While you can save these additional modules to the Project directory, it’s best to save them in the directories for their respective types. That way, they’ll be available for use in other projects as well.
The Application Wizard, new in Visual Basic 5.0, eliminates many of the tedious tasks involved in creating an application framework by automatically creating standard forms, menus, and more. Unfortunately, the forms created by the Wizard may not conform to your established standards, and they can’t easily be modified. For example, the Splash Screen form has a generic logo. Wouldn’t it be great if it could create a form that already contained your corporate logo?
While you can’t modify the standard templates used by the Application Wizard, you can get it to use your own form templates to build the application. Instead of using the generic Splash Screen template, create your own template with your logo and other information built in. The Standard Forms step of the wizard contains a Form Templates command button that launches a dialog box listing all of the templates in your Forms subdirectory. Just check off the forms that you need and the wizard will automatically add them to the project for you.
Templates and the Application Wizard can be used together to improve your productivity, facilitate reuse, and enforce consistent user interfaces. Start building your template collection today—your users (and your management) will thank you, and you don’t have to tell them how easy it was.