SourceSafe Basics
Fortunately, most of the Visual Basic work you'll do when using SourceSafe for version control will still be done in Visual Basic! We typically keep SourceSafe loaded and minimized, entering it only when we need to Checkout files (for making changes, exclusively), or Update files (to update the SourceSafe project with your files). We've found the cumbersome aspect of SourceSafe to be its lack of integration with Visual Basic — it works, but you have to follow a specific set of steps to make it work, and you might need to change your habits slightly. Presumably, the first Microsoft release will make the Visual Basic/SourceSafe hand-off much smoother.
Here's an example session that illustrates the basics. Suppose you've got a Visual Basic project, ACME1, with a form you need to make some changes to. Follow these steps:
- Enter SourceSafe, and use the Get command to bring read only versions of all of the project's files into your working directory.
- Enter Visual Basic. Load the project that corresponds to the SourceSafe project whose files you did the Get on, and you'll see that those files are flagged as read only by Visual Basic. If you make changes in Visual Basic at this point, you won't be able to save them, since these files are read only. This can be confusing at first, since you can't exit without being asked to save your changes, but you can't save your changes since the files are read only.
- So re-enter SourceSafe, and Checkout the files you want to change. Checkout the .MAK file as well, since otherwise you won't be able to save it either. Checking the files out gives you exclusive rights to them and allows you to make changes.
- Re-enter Visual Basic and you'll see that the read only flags are gone. Make changes and save in Visual Basic.
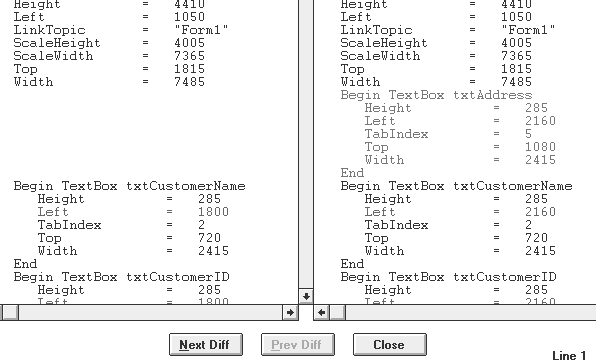
- Re-enter SourceSafe. Select the file(s) you changed in Visual Basic, and click the Diff toolbar button (or select the Info/Difference menu command). This will let you see the most recent changes you've made to the file (the Diff's between your current version and the most recently Updated SourceSafe version). Figure 8 shows an example of what this might look like. In this case, we've made changes to a form file's interface, and SourceSafe shows the new version on the right, the older version on the left hand side of the split window screen.

Figure 8: Viewing SourceSafe Diff's
- Next, with that file selected, click the Update toolbar button (or select the SourceSafe/Update menu command). After entering any optional comments (for large changes, a pretty good idea), the file will be checked back into the SourceSafe project, and be available for others on the project team to work with. Remember, the files will at this point be read only to you until you do another Checkout.
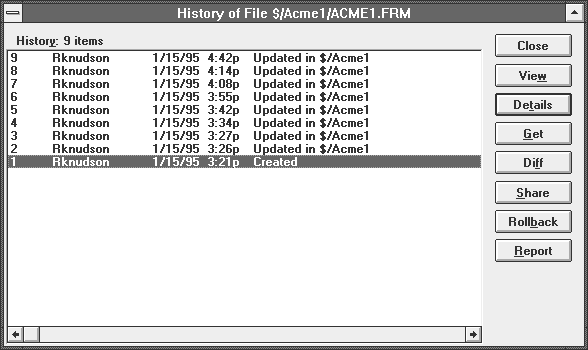
- Now if you do a Diff, you won't see any changes (because your file and the project file are the same). But you can review a complete History of a file at any time. With the file selected, click the History toolbar button (or select the Info/History menu command), and you'll see the History dialog we show in Figure 9.

Figure 9: SourceSafe's file history dialog
From looking at the figure, you can see how SourceSafe supports a Rollback to a previous file version.


