Presented by: Ken Spencer
Email: Ken Spencer@32X.com
With Microsoft® Visual InterDev™ Web development system database tools and ADO, you can quickly build compelling active Web applications. This session will show you how to use advanced Web-to-database programming techniques, including design-time controls, parameterized SQL queries and stored procedures, and more. You will also learn how to use the Database Designer feature to create and administer SQL ServerÔ databases, such as creating new tables, modifying tables and relationships, creating database diagrams, and creating stored procedures.
Visual InterDev provides a tremendous set of tools and features for building and maintaining Web applications. Users can use these applications to enter, update, and delete data from any ODBC 3.0 database.
You can quickly create database Web pages with multiple tables, lookups based upon HTML Forms and Select fields, images, and much more. With the features of ADO and the Design-time controls, you can quickly generate the server-side script necessary and build a fully functional application.
This session will focus on the details for hooking your page to the database and for working with the back-end database. The samples in this session use SQL Server since Visual InterDev supports it with the most features. We will differentiate where SQL Server features are available and standard ODBC 3.0 features apply to other databases.
The first step in building our database is to understand how to build the database interface. This section will focus on Query Designer and the other features of Visual InterDev that rely on it. For instance, we will see how a Design-time control uses Query Designer to build a parameterized query with hooks into your ASP code.
You can use the Query Designer in conjunction with Visual InterDev design-time controls, like the Data Range Header Control. However, in a database project you can also use the Query Designer to create standalone queries.
Adding input sources to the Query Designer
As an alternative, drag a diagram from the Database Designer from the Data View page and drop it on the Query Designer. This will insert the tables in the diagram into the Query Designer. Dragging is a fast way to get several tables in the Query Designer when a database diagram containing the tables already exists. (Creating database diagrams, or schemas, is a topic covered later.)
Creating a simple query
The query results will appear in the Results pane. This data is live and can be modified by simply editing it in the Results pane.
Expressions can be used to perform various tasks. They are useful for concatenating strings such as two names, a city and state, or performing calculations. Query Designer can be used to enter expressions and build SQL expressions for a database query.
Using expressions in a query
Expressions can be used in a query to change the way the information retrieved from the database is displayed or used. For instance, a user might retrieve a price field and a tax field from the database and wish to display them as total price. This can be accomplished by adding the two fields together in the query:
Price + Tax
An alias is set for the alias of the expression to TotalPrice. The alias will be shown as the header for that field in the Results pane.
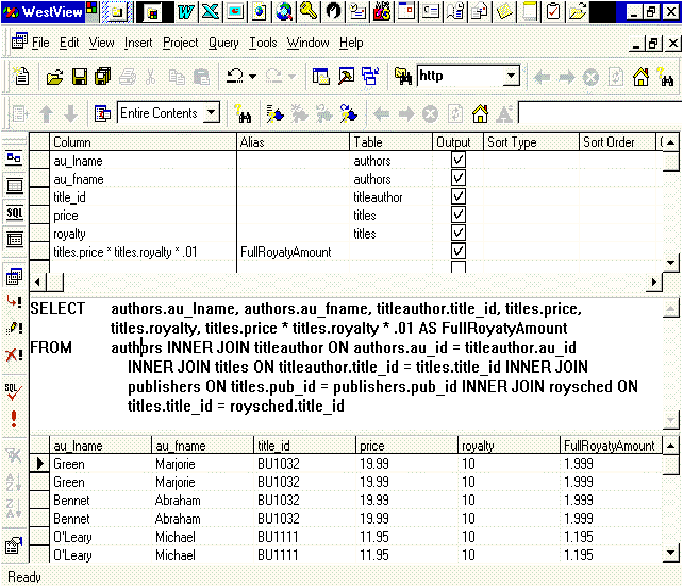
A sample expression has been created using the pubs database from SQL Server. Figure 1 shows Query Designer with a query and the Results pane visible.

Figure 1. Query Designer shows a typical query and the Results pane generated from its execution.
Figure 1 shows the query in the Grid pane at the top of the window. The expression was created to calculate an amount called FullRoyaltyAmount according to the formula below:
FullRoyaltyAmount = Price * (Royalty *.01)
The Alias column was set to FullRoyaltyAmount to create the header shown in the Results pane.
Text fields can also be combined. This is useful when a query needs to return a concatenated value like a full name that consists of first and last name fields.
Hiding fields
Query Designer can hide a field using the Output field. Remove the check mark from this column and the field will not be displayed in the output. When the output column for a field or expression is unchecked, the field or expression is removed from the Select statement in the SQL pane.
Query Designer allows complex and simple query building. Queries that perform updates to a database, delete rows from a database table, or execute stored procedures in a database can be created. Stored procedures in particular are an extremely powerful tool for many applications.
Using the SQL pane to build queries
The SQL pane is useful for creating original queries by the other panes as well as editing the SQL generated for a particular query.
The SQL pane is also great for entering SQL statements that cannot be created using the Diagram or Grid panes. For example, an Insert Into query can be created and executed in the SQL pane, even though the other panes do not support that type of query. The SQL pane will automatically format the SQL statement as it is entered.
Executing a stored procedure
The Results pane will contain any output from Select statements in the stored procedure. Figure 2 shows the Query Designer after the stored procedure was executed.
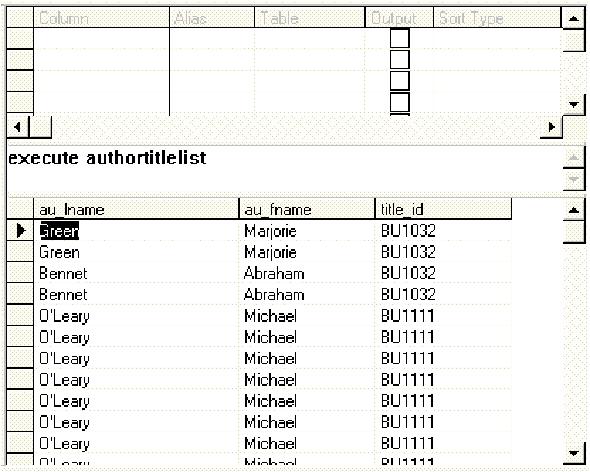
Figure 2. Query Designer can be used to execute stored procedures.
Figure 3 shows an HTML page that we created from a sample in the Active Server Page Roadmap. This form was hooked to an .ASP file named DBTest.asp.
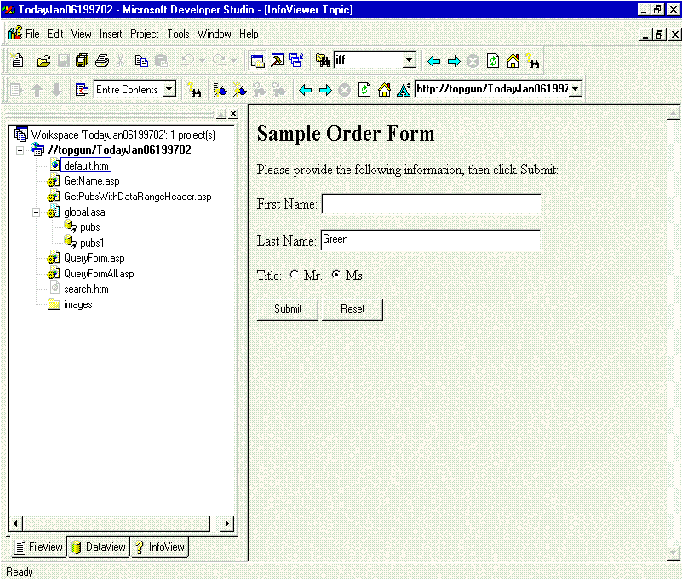
Figure 3. With this sample page, the user can enter the last name of an author to search for in the database.
In Figure 3, the name “Green” is typed into the Last Name text box. When the Submit command button is clicked, the form will post the submit action and call DBTest.asp. DBTest.asp will run, resulting in the page shown in Figure 4.
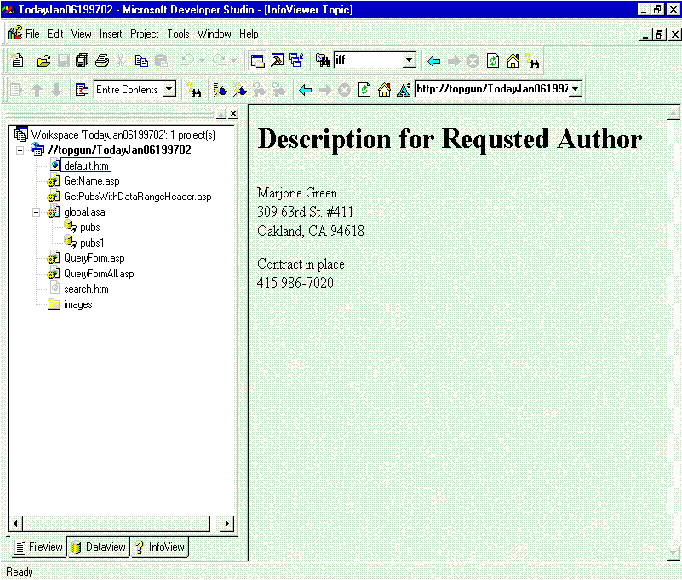
Figure 4. The text on this page was generated with a simple .ASP file.
Only one line of code was necessary to implement. The following instructions demonstrate how to build the query used in this sample.
Creating parameter queries
Figure 5 shows the Define Query Parameters dialog. This dialog appears when you run a query with parameters in Query Designer.
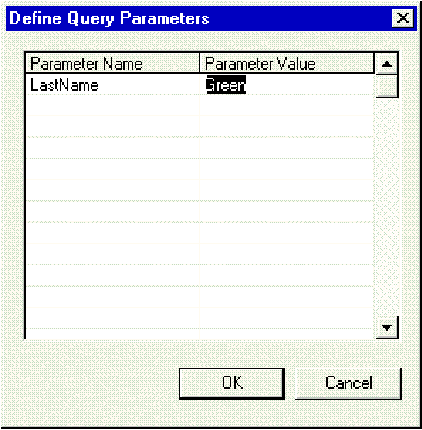
Figure 5. The Define Query Parameters dialog provides run-time support within Query Designer for replaceable parameters.
Figure 6 shows the Query Designer after the query has executed. The result of the query shows only the record for the author named “Green,” which matches our query parameter in Figure 5.
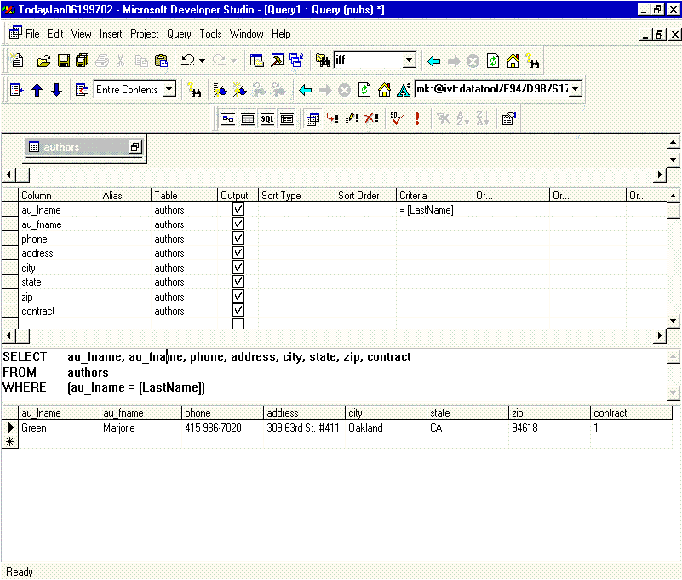
Figure 6. The SQL pane shows the format of the query constructed in the Grid pane.
When a query is constructed using Query Designer and a Data Range control (or Data Command Control), the .ASP page will include the following code:
If fNeedRecordset Then
 Set pubs = Server.CreateObject("ADODB.Connection")
 pubs.ConnectionTimeout = Session("pubs_ConnectionTimeout")
 pubs.CommandTimeout = Session("pubs_CommandTimeout")
 pubs.Open Session("pubs_ConnectionString"), __
		Session("pubs_RuntimeUserName"), _
		Session("pubs_RuntimePassword")
 Set cmdTemp = Server.CreateObject("ADODB.Command")
 Set DataRangeHdr1 = Server.CreateObject("ADODB.Recordset")
 cmdTemp.CommandText = _
		"SELECT au_id, au_lname, au_fname, phone, address,” _
		& “ city, state, zip, contract FROM authors “ _
		& “WHERE (au_lname = '" & LastName & "')"
 cmdTemp.CommandType = 1
 Set cmdTemp.ActiveConnection = pubs
 DataRangeHdr1.Open cmdTemp, , 0, 1
End If
Notice the line that starts with “cmdTemp.CommandText” midway through the code. This line determines the recordset that will be generated by the SELECT statement. The Design-Time Data Range control has generated the correct syntax for the SELECT statement, including the parameter.
The parameter “lastname” is concatenated with the WHERE clause to form our complete SELECT statement. The “lastname” parameter is now an ASP script variable named “lastname.” We set the variable equal to our form variable by inserting the following code at the start of the .ASP file called by the form’s POST event:
LastName = Request.Form("LName")
This code sets the script variable “LastName” to the value of the form variable “lname” it retrieves with Request.Form(“Lname”). The Parameter Query is complete.
For complete working examples of parameterized queries, see the sample applications: StateQuery.asp and OrderList.asp. Both of these examples use Design-time controls and parameterized queries to pull information dynamically from a database.
You can use Query Designer to quickly create action type queries that can update fields in a database, insert values into fields, and delete entire rows.
Creating an Update query
Figure 7 shows the Query Designer Grid and SQL panes with a simple Update query.
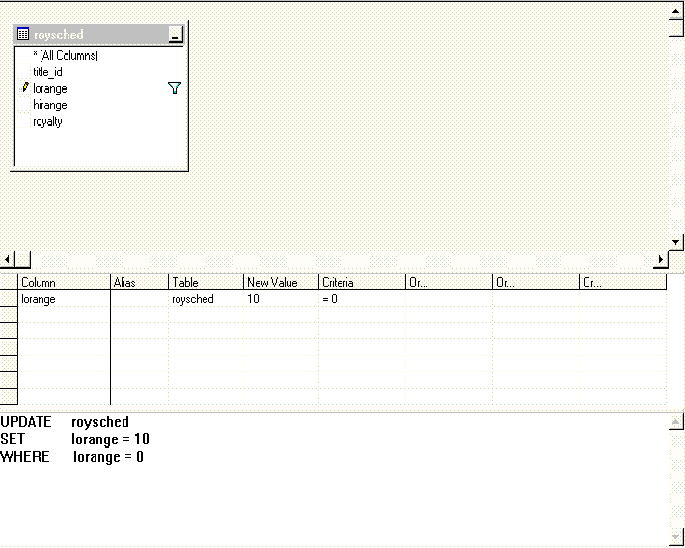
Figure 7. The SQL pane shows the Update statement that Query Designer generated from the information in the Grid pane.
The sample Update statement in Figure 7 will change the min_lvl field to 78 for each row that it is currently set to 75. We executed this query, and Query Designer displayed the message shown in Figure 8.
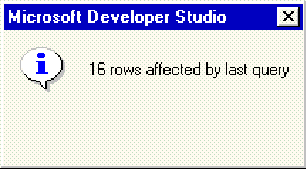
Figure 8. The message provides the number of rows updated.
Query Designer can be used to build and to test complex update queries and can be pasted into various applications.
You can use Query Designer to create a complete Update or Insert query that can be used with your ASP code. Just like a normal parameter query, Query Designer will let you add your parameters for an Update query. Figure 9 shows Query Designer with two parameters: Lname and Fname. These parameters will actually be variables in our ASP code.
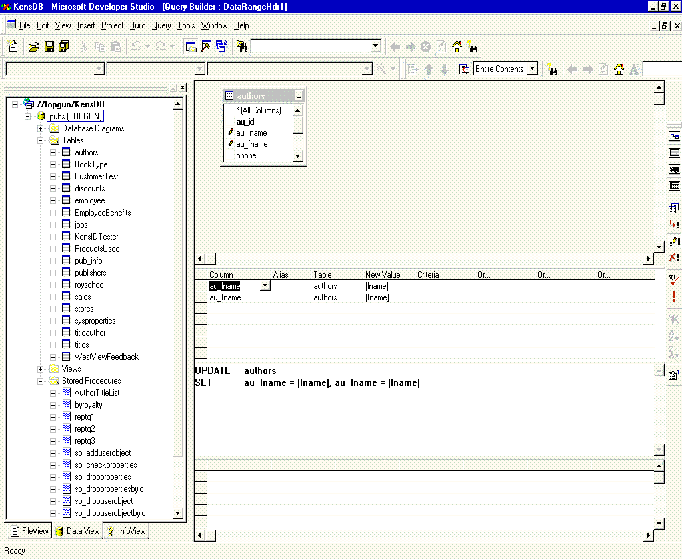
Figure 9. The two parameters are used in our ASP code to set the values.
You can see the parameters in the New Value column in Query Designer. The script that is generated by the Design-time control contains the following code for our SQL:
cmdTemp.CommandText = "UPDATE authors SET au_lname = '" _
	& lname & "', au_fname = '" & fname & "'"
The lname and fname parameters are concatenated into the SQL just like a standard parameter query. All you need to add is the code to set these variables:
Lname = “Jones”
Fname = “Smith”
Enter these two lines before the Design-time control code is executed, and that’s it. Your query will take care of updating the database.
Creating an Insert query
Insert queries take the results of the query and insert them into another table.
Query Designer can be used to quickly create Delete queries in SQL similar to the Update queries previously discussed. A Delete query for a SQL Server or Oracle or similar database will execute much faster than stepping through each row using ADO or some other type of database interface. The same rules that applied to the performance of an Update query apply to Delete queries.
The last sample (OrderList.asp) in this section uses ASP code, ADO, and HTML to provide the customer with a simple interface. The challenge with this page was to build an interface with a drop-down list of customers. The user could select a customer from the list, and the page would look up the customers’ orders.
We used a simple Visual BasicÒ Scripting Edition subroutine named GetCustomerList to retrieve the customer names. The names are extracted using ADO and stored in the LookList variable. We have pulled a few short snippets of code from OrderList.asp to demonstrate. The first one shows the subroutine definition:
<script language="VBScript" runat="Server">
Dim LookList

Sub GetCustomerList ()

Set DataConn = Server.CreateObject("ADODB.Connection")
DataConn.ConnectionTimeout = _
	Session("DataConn_ConnectionTimeout")
DataConn.CommandTimeout = Session("DataConn_CommandTimeout")
DataConn.Open Session("DataConn_ConnectionString"), _
	Session("DataConn_RuntimeUserName"), _
	Session("DataConn_RuntimePassword")
Set cmdTemp = Server.CreateObject("ADODB.Command")
Set dtaCustomerList = Server.CreateObject("ADODB.Recordset")
cmdTemp.CommandText = "SELECT * FROM Customers "
cmdTemp.CommandType = 1
Set cmdTemp.ActiveConnection = DataConn
dtaCustomerList.Open cmdTemp, , 0, 1

Do While Not dtaCustomerList.EOF
	LookList  = LookList & "<Option>" & _
	   dtaCustomerList("ContactLastName")
	dtaCustomerList.MoveNext
Loop
End Sub
The Do While loop processes the records in the recordset and places them in the LookList variable. The appropriate HTML <Option> tag is concatenated with the value in the database field to form the complete string. The LookList variable will contain a string of “<Option> name” entries when the subroutine completes.
The next snippet of code is part of the main logic of the page. This code executes the Select Case statement to determine which part of the page to display. The GetCustomer case displays when the page first displays.
Select Case Pagemode
%>
<%Case "GetCustomer":%>
<form action="OrderList.asp" method="POST">
  <p>Customer Last Name:<select name="CustomerList" size="1">
  <%GetCustomerList%>
  <%=LookList%>
  </select> </p>
  <p><input type="submit" name="LookCustomerNow"
   	value="Lookup"></p>
</form>
<%Case "DisplayCustomer":%>
<h1>Order Information for:</h1>
<%
response.write HeaderInfo
%>
Notice the two script entries after the start of the <Select> tag. The first entry executes the subroutine: <%GetCustomerList%>. This retrieves the list of customers from the database.
The next line writes the values in LookList to the HTML stream: <%=LookList%>
That’s all there is to it! All of the database code to retrieve the customers is located in the subroutine.
There is more code in the page that is not shown. This code contains a function named LookUpCustomer that retrieves customer information for a specific customer from the database after the user selects a customer from the list. This function returns a valid customer ID field.
The other code uses a Design-time control (DataRange Header control) to retrieve a specific customer from the database. The query uses the CustomerID we retrieved with LookUpCustomer to pull the appropriate records from the database.
Visual InterDev has a number of database management features. The Data View tab provides a single management point for editing the data in a table, creating stored procedures, and more. Most of the database features (Query Designer, stored procedure editor, editing tables directly, etc.) in Visual InterDev will work with any ODBC 3.0 database.
When you connect your Web application to a SQL Server 6.5 database, you get some extra features that you can use to not only view, retrieve, and manipulate database records, but also to actually create and manage the database structures themselves. These database management features bring the ease of use of Microsoft Access-like features to the process of setting up and administering the SQL Server 6.5 database right inside the Visual InterDev IDE.
The Database Designer features are activated from Data View. Visual InterDev can be used to administer SQL Server databases outside the context of a "Web project." Use the New Project Wizard to set up a separate "database project." The database project may be added to an existing workspace or managed in its own workspace.
When working inside a Database project, you can also create stand-alone SQL Queries, stored in .dtq files associated with the project. Thus, even for Web projects, it can be advantageous to create database projects – you can even put a Web project and a database project in a single global workspace for convenience.
If the database is SQL Server 6.5, then you can create and manipulate tables using Data View.
Creating a new table
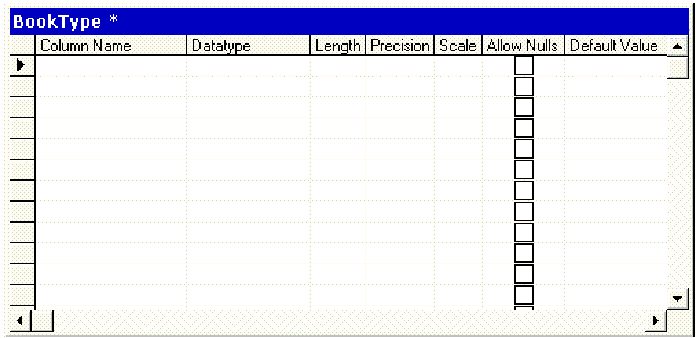
Figure 10. The Table Designer allows table definitions to be created and edited.
To add columns to the table shown in Figure 10, enter the column name and press the TAB or ENTER key. This will move the cursor to the datatype column where the datatype can be chosen from a drop-down list box.
Right-clicking an open space in a Database Designer view and choosing the Table command can also create a new table.
You can also open an existing table in "Design-mode" by right-clicking on the table name and choosing "Design." This will open the table so that you can change column properties, add columns, keys and indexes, or even rename the table.
The Visual InterDev stored procedure editor will work with any ODBC database supported by Visual InterDev that also supports stored procedures. For instance, Microsoft Access does not support stored procedures and cannot use this feature. Oracle client/server databases support stored procedures and Visual InterDev provides the tools for manipulating them.
Creating a new stored procedure in Data View
Executing a stored procedure is accomplished by using the Shortcut menu for a stored procedure.
Executing a stored procedure
The output of a stored procedure will be displayed in the Output window. A stored procedure can also be executed in Query Designer.
You can also edit an existing stored procedure from Data View.
Editing a stored procedure
You can open a table and modify its contents directly in Data View.
Opening a table
You can also double-click a table name to open it.
Changes made to the data in the Results pane are saved when the cursor is moved to another row in the database. These dynamic updates make it essential to use care when changing data in a database.
A table can also be opened by double-clicking its name in the Data View. When you open a table, Visual InterDev actually starts Query Designer with only the Results pane open. You can use the toolbar to display the other panes and even change the query and save it.
Figure 11 shows the interface of Visual InterDev with a Database Design open in the Database Designer. Database Diagrams are only available for SQL Server 6.5.
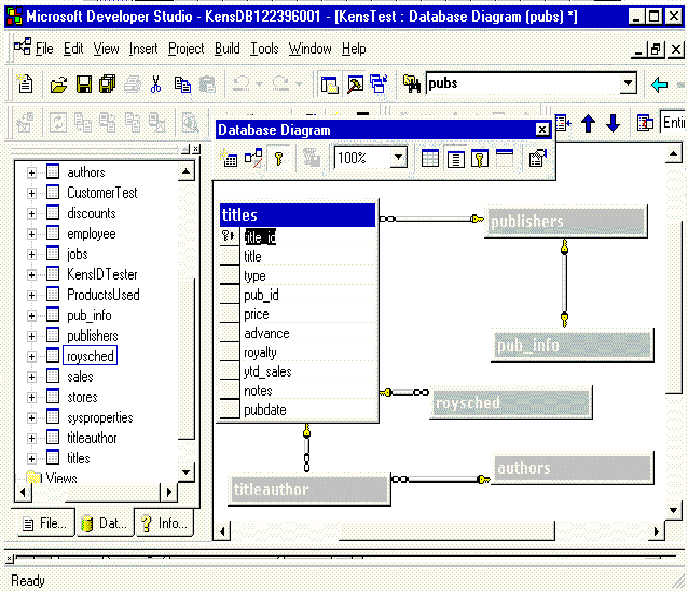
Figure 11. The Database Designer interface for building relational databases.
The Database Designer has an easy-to-use drag and drop interface, plus extensive Shortcut menus for working with database items. Tables can be dragged to new locations in a diagram. The links to other tables will follow a table when it moves. Tables from the Data View can also be dragged to a diagram.
Adding new diagrams to a project
Tables in a diagram are represented by the tables widget. The tables widget can display just the table’s name, the table’s name and column names, the table’s name and column names and column properties, or the table’s name and the names of the keys for the table. The amount of information displayed for each table in a diagram is set by right-clicking a table and selecting the setting from the Shortcut menu or clicking the appropriate button on the Database Designer toolbar. Figure 12 shows the Database Designer view of a simple database.
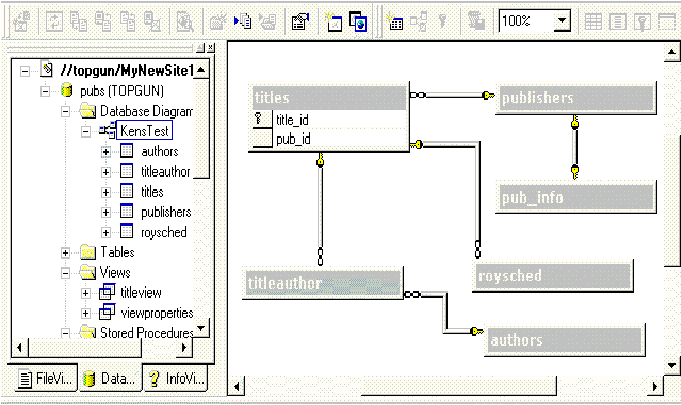
Figure 12. The Database Designer displays the links between tables.
Figure 12 shows the display variation allowed with the table widget. The Titles table has the columns displayed while the other table widgets just display the table name.
The Database Diagrams folder in the Data View contains all of the diagrams in a project. A diagram can be opened by double-clicking the diagram name in this folder.
Adding a table to the database and diagram
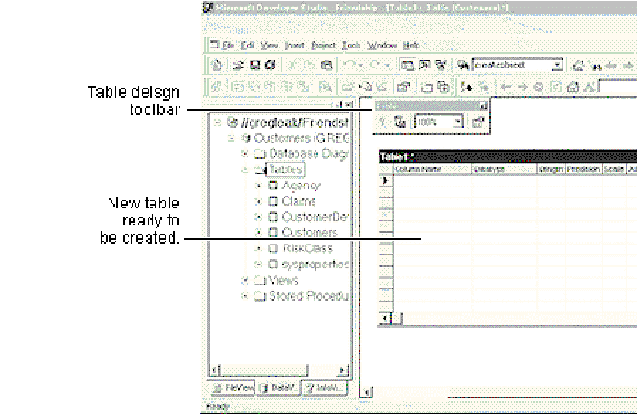
Figure 13. The Table Designer is shown in the Right pane.
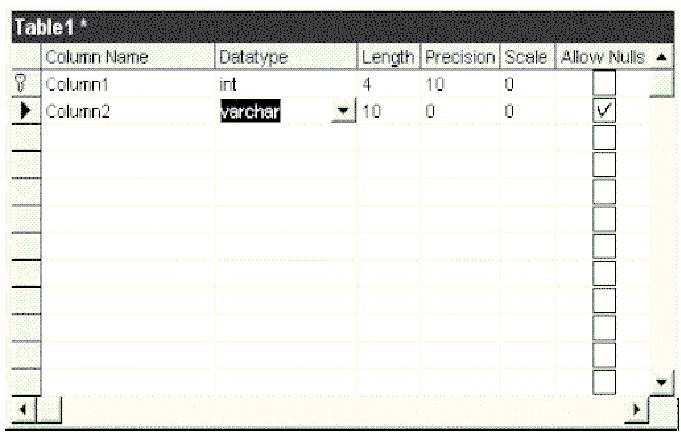
Figure 14. The Table Designer now has two columns defined.
Using the Database Designer, any existing table can be easily modified.
Modifying existing tables
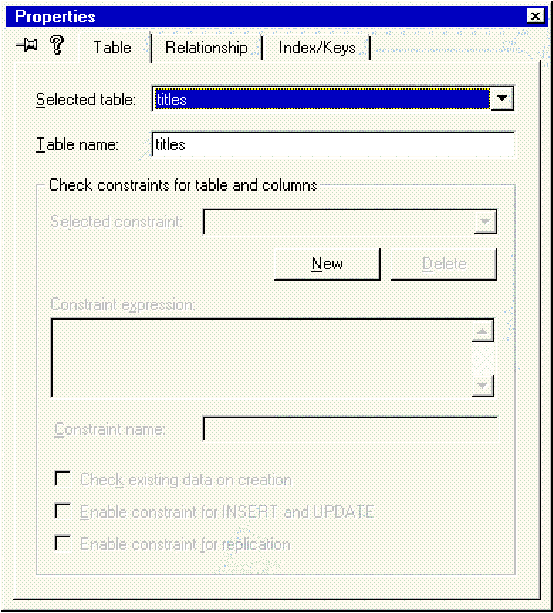
Figure 15. The Properties dialog allows changes to be made to existing tables.
Saving and / or viewing the DDL script
Ordinarily on a client/server DBMS system such as SQL Server, such changes would require many manual commands written in Data Definition Language (DDL). The Database Designer generates the DDL automatically as the user works, and no changes are committed until the user is set. The user can edit and view the SQL change script to see or change the DDL generated.
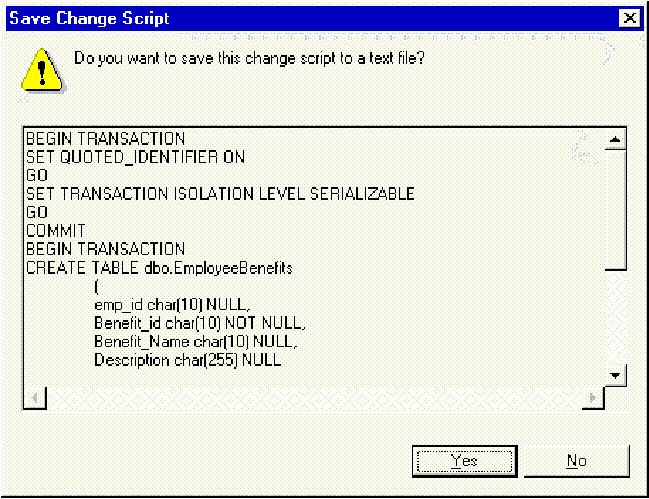
Figure 16. The Save Change Script dialog allows the script to be saved to a file.
If the script is saved, it is saved in the current working directory. The name of the file will be DbDgmN.sql, where N begins at 1 and is incremented each time you save the script.
The Database Designer will maintain relationships between tables even as tables are dropped and recreated based on column data type or other changes. Also, when changing an index or key, the database designer will optionally ripple changes through any related tables that use that field as a foreign key. The Database Designer will not read through existing triggers and change these, however.
I hope you have enjoyed this presentation. Visual InterDev is a great tool and should be a valuable asset to your organization.
Ken Spencer
www.32X.com/
E-mail: Ken Spencer@32X.com
© 1997 Microsoft Corporation. All rights reserved.
The information contained in this document represents the current view of Microsoft Corporation on the issues discussed as of the date of publication. Because Microsoft must respond to changing market conditions, it should not be interpreted to be a commitment on the part of Microsoft, and Microsoft cannot guarantee the accuracy of any information presented after the date of publication.
This document is for informational purposes only. MICROSOFT MAKES NO WARRANTIES, EXPRESS OR IMPLIED, IN THIS SUMMARY.
Microsoft and Visual Basic are registered trademarks and Visual InterDev is a trademark of Microsoft Corporation.
Other product or company names mentioned herein may be the trademarks of their respective owners.