Using ScanDisk
ScanDisk is a full-featured disk analysis and repair program. ScanDisk runs automatically when you start Windows 95 Setup. After Windows 95 is installed, you can use ScanDisk on both uncompressed and compressed drives. ScanDisk checks compressed drives created with compression software from other vendors, but it checks these drives as if they are uncompressed. ScanDisk, however, can provide a detailed analysis of compression structures on DoubleSpace and DriveSpace drives.
Note
Windows 95 provides two versions of ScanDisk: a new graphical Windows-based version that you can run from the Start menu or from Windows Explorer, and an MS-DOS – based version that is contained on the Windows 95 startup disk. For information about running ScanDisk from the command line or in batch files, see Appendix A, "Command-Line Commands Summary."
ScanDisk checks and fixes problems in the following areas on hard disk drives, floppy disk drives, RAM drives, and memory cards:
- File allocation table (FAT)
- Long filenames
- File system structure (lost clusters, cross-linked files)
- Directory tree structure
- Physical surface of the drive (bad sectors)
- DriveSpace or DoubleSpace volume header, volume file structure, compression structure, and volume signatures
Note
ScanDisk cannot find or fix errors on CD-ROM drives, network drives, or drives created by using assign, subst, join, or interlnk.
ScanDisk can check and repair mounted DriveSpace or DoubleSpace drives. You can run ScanDisk from the command prompt to check and repair unmounted compressed volume files (CVFs). When you run ScanDisk to check a compressed drive, by default, ScanDisk checks the host (physical) drive first. In general, you should allow it to do so because an error on the host drive could cause problems with the compressed drive.
To run ScanDisk
- Click the Start button, click Run, and type scandisk
Note See the following procedure to run ScanDisk on unmounted CVFs.

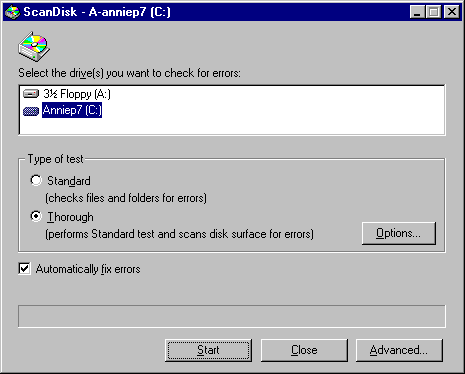
- Click the drive you want to analyze or repair.
- In the Type Of Test area, click Standard or Thorough.
- Standard checks the files and folders on the selected drive for errors.
- Thorough checks files and folders for errors, but it also checks the physical integrity of the disk's surface.
- If you do not want ScanDisk to prompt you before repairing each error it finds, make sure Automatically Fix Errors is checked.
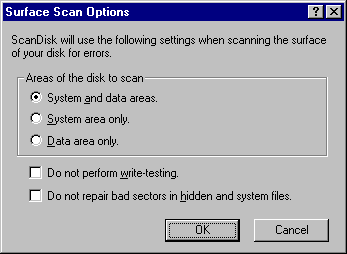
- If you are running a thorough test, click the Options button to specify which areas of the disk to check or which type of processing to perform. Select the options you want to use, and then click OK.

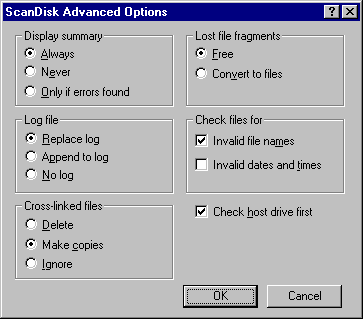
- Click the Advanced button to set advanced options as needed, and then click OK. For information about each option, see online Help.

- To begin checking the disk, click the Start button.
To run ScanDisk on unmounted CVFs
Tips for Running ScanDisk
- Consider putting ScanDisk in the STARTUP directory to run it each time you start your computer.
Or, if you have installed Microsoft Plus! for Windows 95, keep ScanDisk in the list of scheduled programs run by System Agent. For more information, see "Microsoft Plus! Utilities for Disk Management" later in this chapter.
- You can also run ScanDisk from the Tools properties dialog box for a drive. To do this, right-click that drive's icon, click Properties, and then click the Tools tab. Click the Check Now button to begin running ScanDisk.
- You can use the command-line equivalent command, scandskw, in a batch file. For more information about this command, see Appendix A, "Command-Line Commands Summary."


