Configuring SNMP Security
SNMP security allows you to specify the communities and hosts a computer will accept requests from, and to specify whether to send an authentication trap when an unauthorized community or host requests information.
To configure SNMP security
- Double-click the Network option in Control Panel to display the Network Settings dialog box.
- In the Installed Network Software list box, select SNMP Service, and then choose the Configure button.
- In the SNMP Service Configuration dialog box, choose the Security button.
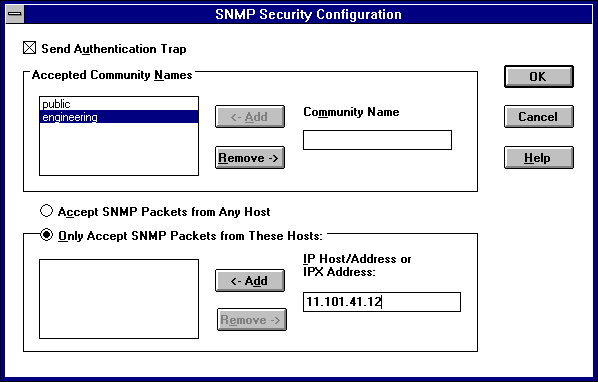
- If you want to send a trap for failed authentications, select the Send Authentication Trap check box in the SNMP Security Configuration dialog box.
- In the Community Name box, type the community names in which you will accept requests. Choose the Add button after typing each name to move the name to the Accepted Community Names list on the left.
A host must belong to a community that appears on this list for the SNMP service to accept requests from that host. Typically, all hosts belong to public, which is the standard name for the common community of all hosts. To delete an entry in the list, select it, and then choose the Remove button.
- Select an option to specify whether to accept SNMP packets from any host or from only specified hosts.
- If the Accept SNMP Packets From Any Host option is selected, no SNMP packets are rejected on the basis of source host ID. The list of hosts under Only Accept SNMP Packets From These Hosts has no effect.
- If the Only Accept SNMP Packets From These Hosts option is selected, SNMP packets will be accepted only from the hosts listed. In the IP Host/Address Or IPX Address box, type the host names, IP addresses, or IPX addresses of the hosts from which you will accept requests. Then choose the Add button to move the host name or IP address to the list box on the left. To delete an entry in the list, select it, and then choose the Remove button.
- Choose the OK button.
The SNMP Service Configuration dialog box reappears.
To specify Agent information (comments about the user, location, and services), choose the Agent button. Continue with the configuration procedure, as described in the next section.
- After you complete all procedures, choose the OK button. When the Network Settings dialog box reappears, choose the OK button.
The Microsoft SNMP service and SNMP security have been configured and are ready to start. You do not need to reboot the computer.