You can reserve a specific IP address for a client. Typically, you need to reserve addresses in the following cases:
If multiple DHCP servers are distributing addresses in the same scope, the client reservations on each DHCP server should be identical. Otherwise, the DHCP reserved client receives different IP addresses, depending on the responding server.
Important The IP address and static name specified in WINS take precedence over the IP address assigned by the DHCP server. For such clients, create client reservations with the IP address that is defined in the WINS database.
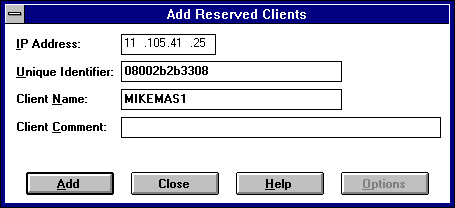
You can continue to add reservations without closing this dialog box.
After the IP address is reserved in DHCP Manager, the client computer must be restarted to be configured with the new IP address.
If you want to change a reserved IP address for a client, you have to remove the old reserved address, and then add a new reservation. You can change any other information about a reserved client while keeping the reserved IP address.
Reserving an address does not automatically force a client who is currently using the address to move elsewhere. If you are reserving a new address for a client or an address that is different from the client's current one, you should verify that the address has not already been leased by the DHCP server. If the address is already in use, the client that is using it must release the address by issuing a release request. To make this happen, at the Command Prompt of the client computer, use the ipconfig /release command. Clients using MS-DOS, and possibly clients using third-party operating systems, will have to restart their computers for the change to take effect. Because the client's current address is now reserved, the client is moved to a different address.
Reserving an address also does not force the client for whom the reservation is made to move to the reserved address. In this case, too, the client must issue a renewal request. At the Command Prompt of the client computer, use the ipconfig /renew command, and then restart the computer if necessary. The DHCP server will note that the client has a reserved address, and will move the client.
Note You can only change values in the Client Properties dialog box for reserved clients.
You can also view and change the options types that define configuration parameters for selected reserved clients by choosing the Options button in the Client Properties dialog box. Changing options for a reserved client follows the same procedure as use to originally define options, as described in "Defining Options for Reservations" earlier in this chapter.