.DBF-style Help is simple to create and uses standard Visual FoxPro tables that port easily to other Visual FoxPro platforms. If you want a simple solution to providing help, if you're developing cross-platform applications, or if you prefer to maintain a backward-compatible help file, you can provide .DBF-style help for your users.
This chapter discusses:
.DBF-style Help files, or Help tables, are free tables that are displayed in the Help window. With this style of Help, your users can:
A sample .DBF-style Help file, Ttrade.dbf, is included in Visual FoxPro and is located in the Visual Studio Ö\Samples\Vfp98\Tastrade\Help directory. The following sections use the Ttrade.dbf sample to describe designing and navigating .DBF-style Help.
To view the Ttrade.dbf sample Help file
SET HELP TO TTRADE.DBF
HELP
Visual FoxPro displays the Ttrade .DBF-style Help in its own window.
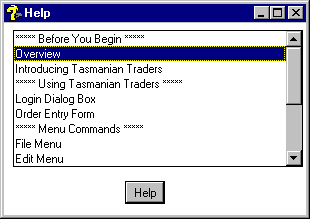
The .DBF Help window has two modes, Topics and Details. The Topics mode displays a list of all the topics in the Help file. Note that the font for the .DBF Help window is MS Sans Serif and cannot be changed.
.DBF Help window in Topics mode

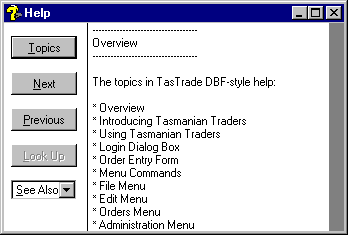
When you double-click a topic, the contents of that topic appear in Details mode.
.DBF Help window in Details mode

Help tables hold a maximum of 32,767 records and must contain at least two fields. The table may have an optional first field for context sensitivity. The following example shows you the setup of a typical Help table:
TTRADE table in Browse mode

There are no requirements for the field names. The field types are, in order:
Numerical This field is optional and contains the Help context ID used with context-sensitive Help.
Character This is the topic name that appears in the Topics mode of the Help window.
Memo This field holds the information displayed in the Details mode of the Help window.
Beyond these requirements, you can add as many additional fields as you wish.
Ttrade.dbf is a small example of a .DBF-style Help file. You can pattern your Help file after Ttrade.dbf, or you can create your own design. Because a Help file is a table, you can create your own Help file by creating a new table or by copying and changing an existing one.
To view or edit the Ttrade.dbf table, open it and browse through it as you would any other table. If you've previously run the command SET HELP TO TTRADE.DBF, you must first use the SET HELP OFF command before opening Ttrade.dbf.
Several kinds of topics are included in Ttrade.dbf, including:
You might consider these and other categories for your own Help file.
When a user selects a topic from the Topics mode, the Help window displays the contents of the memo field named Details.
See Also cross-references appear at the end of the Details information for most Help topics. These references are displayed automatically in the See Also box and act as direct links to related topics.
To create a See Also cross-reference
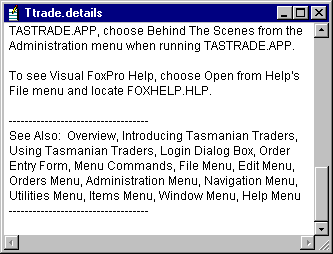
Case doesn't matter in the See Also list, and Visual FoxPro trims leading and trailing spaces from each referenced topic. For example, cross-references for the Overview topic appear in the following illustration.
Contents of the Overview topicís memo field

Tip Add lines above and below your See Also section at the end of your topic to separate it visually from the contents of the topic.
When locating a topic in the See Also box, Visual FoxPro tries to match the userís selection with the first Help topic that consists of or begins with the same text string. If Visual FoxPro cannot find a match, it displays ďNo help found for topicnameĒ in the status bar.
Your user will be able to easily access Help if you include a Contents command on your Help menu that uses the HELP command. When a user chooses the Contents command, the Help window appears in Topics mode. The user can either scroll through the list to find the desired topic or type a letter to select the first topic starting with that letter. Once a topic is selected, there are three ways to display information about the topic:
In your application code, you specify which Help file is used, which and when topics are displayed, and other optional settings. If you include context-sensitive Help, your users can easily get Help on demand from your applicationís dialog boxes and menu commands.
Specify your Help table by issuing the command SET HELP TO filename. This closes the current Help table if one is already open and opens filename as the new Help table.
In a typical programming scenario, save the name of the current Help file in a variable and specify the name of your Help file in your initialization code, as in the following example:
cUserHlp = SET("HELP", 1)
SET HELP TO MYHELP.DBF
When the application exits, you can restore the original Help file:
SET HELP TO (cUserHlp)
After specifying the Help table, you can specify which topics you want to display in these ways:
To select topics by name, use the HELP Topic command. When you use this command, Visual FoxPro searches the Help table to find the record whose topic field matches Topic. The search is case-insensitive.
When Visual FoxPro finds a match, it displays the contents of the Details memo field in the Details mode of the Help window. If Visual FoxPro cannot find a match, it displays all the topics in a list in the Help Topics dialog box with the closest match highlighted.
You can design your application so that your user is able to get context-sensitive Help in two ways:
When a user presses F1 in your application, Visual FoxPro can display a context-sensitive Help topic. To do this, assign a Help context ID to a topic in your Help table and assign the same value to the HelpContextID property of your form or control. When the form or control has the focus and the user presses F1, Visual FoxPro displays the matching topic.
Note F1 is enabled for context-sensitive Help by default. Because this is a recognized standard for Help, redefining this key is not recommended.
If you add Help buttons to your forms, users can access Help more easily. You should especially consider adding a Help button if your user is a novice.
To create a context-sensitive Help topic
Now you're ready to map the Help topic to your form. It's a good idea to map a Help button, the form, and its objects to the same Help topic.
To set context-sensitivity and add a Help button
THIS.SetAll("HelpContextID", 7)
HELP ID THIS.HelpContextID
Tip Save the Help button as a class so that you can easily add it to any form. In the Form Designer, choose Save As Class from the File menu. For more information about saving objects as classes, see Chapter 9, Creating Forms.
To specify a location for your Help, you must create your own window using the DEFINE WINDOW command. Use this command in your initialization code to specify the size and location of the window and then display the window by activating or showing it.
For example, the following commands define a window named test and display the current Help table within that window:
DEFINE WINDOW test FROM 1,1 TO 35,60 SYSTEM
ACTIVATE WINDOW test
HELP IN WINDOW test
Because you can add any number of fields to a Help table and can use any logical expression to select Help topics, only your imagination limits the kind of Help system you can create.
For example, you can: