Tables, used individually, are helpful for storing and viewing the information you work with. But if you organize your tables into a database, you can tap more of the power of Visual FoxPro. By putting your tables into a database, you can reduce storage of redundant data and protect the integrity of your data. For example, you do not have to repeatedly store the name and address of a customer for each order that the customer has placed. You can store the customer’s name and address in one table and relate that information to orders stored in another table. If the customer’s address changes, you only need to update one record. You can control how fields are displayed or what values may be entered into fields. You can also add views and connections to a database for updating records or expanding your access to remote data.
This chapter explains the basics: incorporating tables or views into a database, setting relationships between tables, and controlling data entry and other properties for database tables. Databases, the process of database design, and the use of database table properties are covered in more detail in Chapter 5, Designing Databases, and Chapter 6, Creating Databases, in the Programmer’s Guide.
This chapter discusses:
A database provides a working environment where you can store a collection of tables, establish relationships between the tables, and set properties and data validation rules that control how the related tables work together. A database is stored as a file with a .dbc extension.
Contents of a database
You can use databases independently or incorporate them into a project by adding them to the Project Manager. To access the tables within a database, the database must be open.
To open a database
You can also choose Open from the File menu and choose the name of a database.
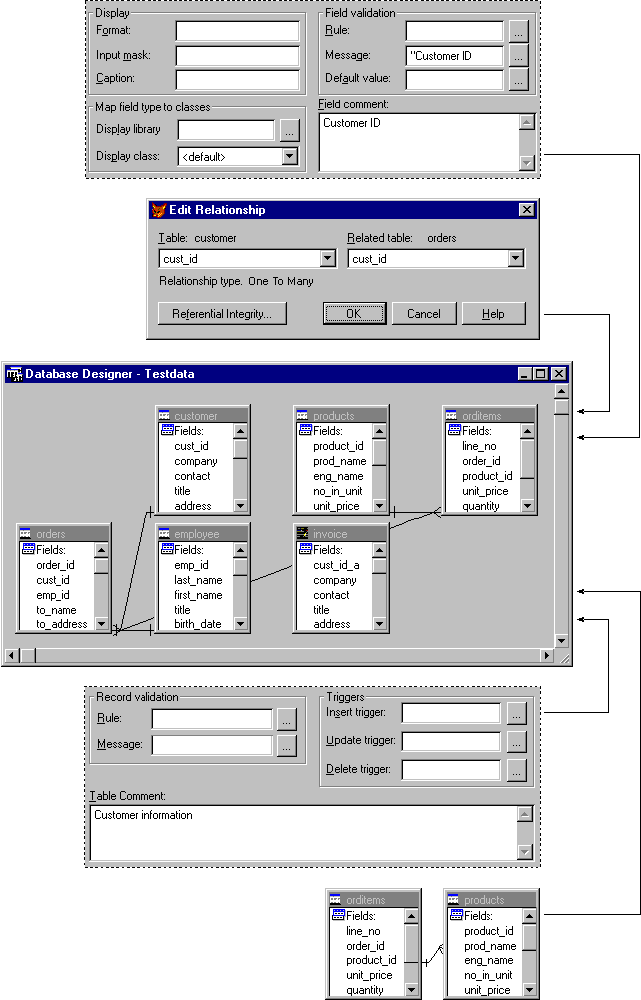
To look at the structure of a sample database, try opening Testdata.dbc, which is found in the Visual Studio …\Samples\Vfp98\Data directory.
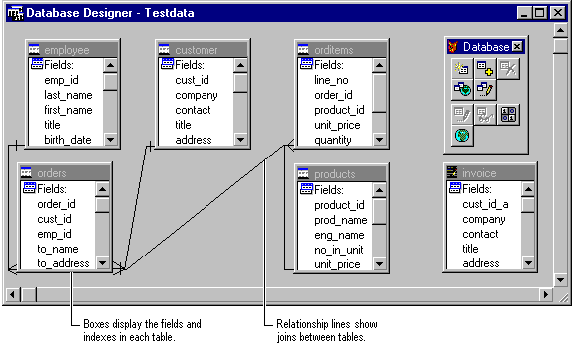
When you open a database, the Database Designer appears, showing you the tables that make up the database, and the relationships between them.
Tables in the Database Designer
The Database Designer toolbar displays so that you can quickly access database-related options. Database commands are available on the Database menu; you can also display shortcut menus by clicking the right mouse button in the Database Designer.
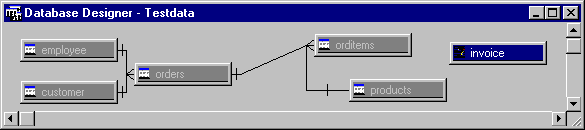
You can resize the tables in the Database Designer to see more or less of the fields and the indexes they contain, or collapse the table to show only the table names, which is helpful if your database contains many tables.
To expand or collapse a single table
To expand or collapse all the tables
Collapsed view of tables in a database
You can change the layout of your tables displayed in the Database Designer. For example, after working in the database, you might want to return the tables to the default height and width or you might want to improve the layout by aligning the tables.
To arrange the tables in a database
In the Database Designer, the title bar of the table you selected is highlighted.
| To | Select |
| Arrange the tables alphabetically by name | By name |
| Arrange the tables by type | By type |
| Align the tables in a row | Horizontally |
| Align the tables in a column | Vertically |
| Return the tables to their original size | Resize objects to default height and width |
To keep notes about the database, you can add a comment.
To add a comment to a database
To incorporate your data into a database, first create a new database, then add the tables you want to work with and define the relationships between them. You can also create new local or remote views from within the Database Designer to incorporate them into your database.
You can use the Database Wizard to help you create a new database. The wizard provides templates and poses a series of questions to help you set up your database based on your answers.
To create a database using the Database Wizard
You can also access the Database Wizard from the menu by choosing New from the File menu, selecting Database, and selecting the Database Wizard option.
The wizard provides templates for tables and views, indexes, primary keys, and relationships you can choose or edit.
To create a new database
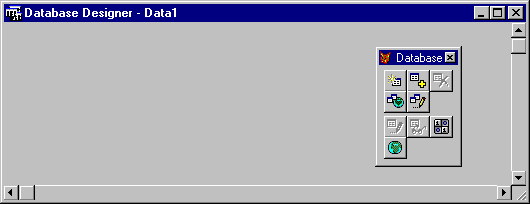
When you create a new database, an empty Database Designer window is displayed, along with the Database Designer toolbar.
A new database in the Database Designer
Begin building your database by adding the tables you want to use. You can select any table that is not currently part of another database. Since tables can only belong to one database at a time, you need to remove a table from a database before you can use it in a new database.
To add a table to a database
You can remove a table from a database if it is no longer needed, or if you need to use it in another database.
To remove a table from a database
Views display records from one or more tables and can be used to update those source tables. If you want to add a local view to your database, you can create one from the tables or views currently contained in your database, or from free tables outside your database. If the information you need is on a remote data source, you can create a remote view from it and incorporate that view into your database.
Because views exist only within the context of a database, you must create a view within your database in order to incorporate it into your database.
For information about creating local or remote views, see Chapter 5, Updating Data with Views.
If your database has many tables and views, you might want to quickly locate a specific table. You can use the Find command to highlight the table or view you want to work with.
To find a table in a database
If you want to show only the tables or only certain views, you can choose to display only tables or certain views.
To display only the tables or views
The Database Designer makes it easy to create relationships between tables by linking their indexes. The relationships you create in a database are called persistent relationships, because they are stored as part of the database. Each time you use the tables in the Query or View Designers, or in the Data Environment Designer when creating forms, these persistent relationships appear as default links or joins between the tables.
Before you can create a relationship between tables, the tables you want to relate need to have certain fields and indexes in common. The fields are called primary and foreign key fields. The primary key field identifies a specific record within a table. The foreign key field identifies the related records that reside in another table within the database. You also need to add a primary index to a primary key field and a regular index to a foreign key field.
Indexes to support a relationship between two tables

To determine which tables need the fields, think about how your data is related by number of records. For example, one customer can have many orders. So, the customer table holds the primary records and the orders table has the related records.
To prepare the primary table for a relationship to the table with the related records, you need to add a primary key field to the primary table, which in our example is Customers. You know this because the Customer table will contain one record for many related records in the Orders table.
To provide a common field between the two tables, you need to add a foreign key field to the table with the related records, which in our example is the Orders table. The foreign key field should match the primary key field with the same data type and usually the same name as the primary key field. The indexes you create on the primary and foreign key fields should have the same expression.
For more information about primary key fields, foreign key fields, and relationships, see Chapter 7, Working with Tables, in the Programmer’s Guide.
To prepare for relationships
Note Use the same expression for both indexes. For example, if you use a function in the expression on the primary key field, you need to use the same function in the expression on the foreign key field.
With the key fields and indexes defined, you are now ready to create a relationship. If your tables are not already indexed, you need to open them in the Table Designer and add indexes to them. For information on indexing tables, see Chapter 2, Creating Tables and Indexes.
To create a relationship between tables
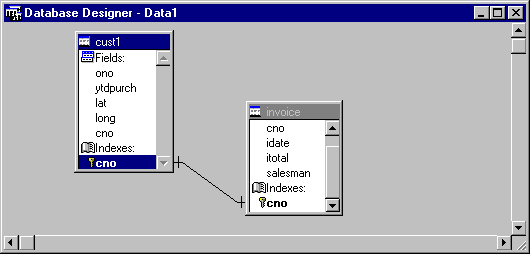
Once you set the relationship, you see a line connecting the two tables in the Database Designer.
Note You can see relationship lines only if the Relations option in the Database Properties dialog box is turned on. You can access the Database Properties dialog box by choosing Properties from the shortcut menu in the Database Designer.
Line shows the relationship between two tables.
You can also edit the relationship.
To edit a relationship between tables
Edit Relationship dialog box
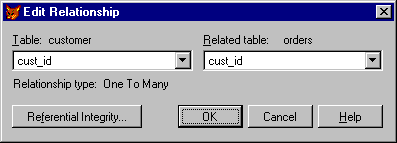
The type of relationship created is determined by the type of index used on the child table. For example, if the index on the child table is a primary or candidate index, the relation is one-to-one; otherwise (for unique and regular indexes) it is a one-to-many relationship.
When you add tables to a database, you can immediately take advantage of additional properties not available when working with free tables. These properties are stored as part of the database, and remain with the table only as long as it belongs to the database.
Using properties for fields in a database table, you can:
The following sections describe some of these properties. You can find more information in Chapter 7, Working with Tables, in the Programmer’s Guide.
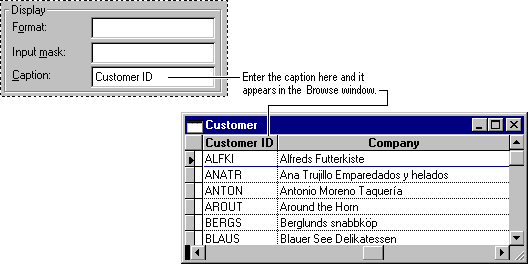
You can display descriptive labels for fields you display in the Browse window or on your forms by using field captions.
To assign a caption to a field
For example, if the name of a field is Cust_ID, you can add a caption such as “Customer ID” to the field. Each time you browse the table, use the field in a query or view, or add the field to a form; you see the caption instead of the field name as a label for the field.
Column name based on caption
As you set up the structure of your tables, you may want to enter notes or comments to remind you or others of what the table field represents. You can annotate each field by typing a message in the Field Comment box in the Table Designer.
Comments clarify the purpose of a field.

To add a comment to a field
You can make data entry into your table easier by supplying default values for fields and by defining validation rules for values entered into fields.
If you want to have a value entered into a field automatically whenever you create a new record, you can set a default value for that field using the field properties in the Table Designer. For example, if most of your sales come from one particular region, you might want to set that region as the default value for the region field.
To set a default value for a field
For example, you might want all new records in a Products table to have a default “reorder at” setting of 15 units.
Setting a default value for a field

By entering a validation rule for a field when defining the structure of a table, you can control the type of entry that can be made to that field. For example, you could restrict the acceptable entries for a field to a list of states, open purchase order numbers, valid ID numbers, and so on.
To set a validation rule and validation text for a field
For example, try creating a simple address table and restricting the entries in the Country field to “UK” or “USA.”
Customer.country = "UK" OR Customer.country = "USA"
You can also specify the message to display if the validation rule is not met. For example, you could display this message:
"Country must be USA or UK. Please reenter value."
When creating your validation rule, you must create a valid Visual FoxPro expression that takes into account the field length, that a field can either be empty or contain the desired value, and so on. Your expression may include functions if the functions evaluate to true or false.
For example, assume you are using the Customer table from the Visual Studio …\Samples\Vfp98\Data directory, and you want to be sure that any new customer ID codes are less than 6 characters long. In the Validation Rule box for the Cust_ID field, you could enter:
LEN(ALLTRIM(CUST_ID)) < 6
Then, in the Validation Text box, you would enter this error prompt:
"Customer ID must be less than 6 characters. Please reenter."
If you try to enter a customer ID that is too long, the validation text appears in a dialog box.
Validation text appears when incorrect value is entered.

Just as you can assign database properties to the individual fields within a table, you can set properties which apply to the entire table, or to the records within a table. In the Table Designer, you access these properties on the Table tab.
If you want two or more fields to be compared, or to meet a certain condition as records are entered into a table, you can set a validation rule for the table.
To set a validation rule
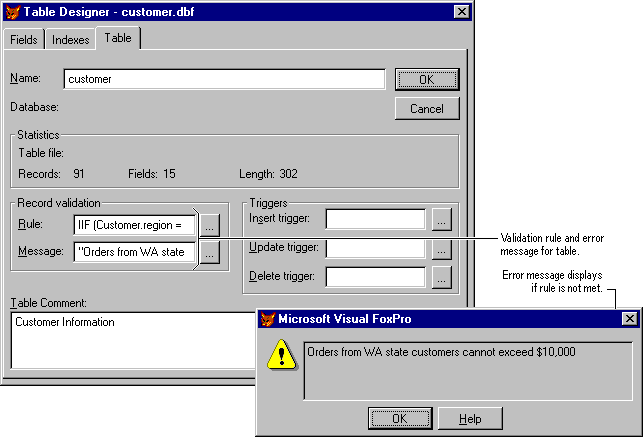
For example, assume you are using the Customer table found in the Visual Studio …\Samples\Vfp98\Data directory, and don’t want customer orders from the state of Washington to exceed $10,000. You can enforce this rule by typing the following expression into the Validation Rule box in the Table tab:
IIF(Customer.region = "WA" and Customer.maxordamt > 10000, .F.,.T.)
The Message Text value could be something like:
"Orders from WA state customers cannot exceed $10,000"
Entry rejected based on validation rule.
Triggers are expressions that activate whenever a record is inserted, deleted, or updated in the table. Usually, triggers involve writing a program, or stored procedure, that is activated when the table is changed. For more information about triggers, see “Using Triggers” in Chapter 7, Working with Tables, in the Programmer’s Guide.
After establishing relationships, you can also set rules for managing the related records in your database. These rules govern referential integrity. For example, if you add a supplier record, you might want to automatically add information about the supplier's products to the Products table. To help you set up rules to control how records are inserted, updated, or deleted in related tables, you can use the Referential Integrity Builder.
Referential Integrity button in Edit Relationship dialog box

To use the Referential Integrity Builder