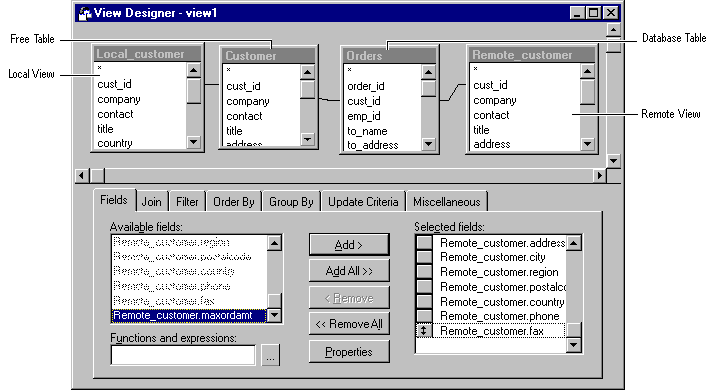
With Visual FoxPro, you can query multiple tables and views, and combine remote and local data into a view. This capability is useful when the data you need is stored in two or more tables, or split between local tables and tables on a remote data source.
For information about setting up simple one-table queries and views, see Chapter 4, Retrieving Data, and Chapter 5, Updating Data with Views, For more information about joins, see Chapter 7, Working with Tables, in the Programmer’s Guide.
This chapter discusses:
When you need access to information stored in two or more tables, just add all the relevant tables to your query and join them on common fields. Then you can search the records in all the tables for the information you need. You can use any combination of database tables, free tables, and local or remote views in your queries.
Using multiple tables or views in a query

Because the term “view” can refer to both an input source or the object you are creating, the term “table” is used for both tables and views used as input sources. The term “view” is used for the object you create with the View Designer.
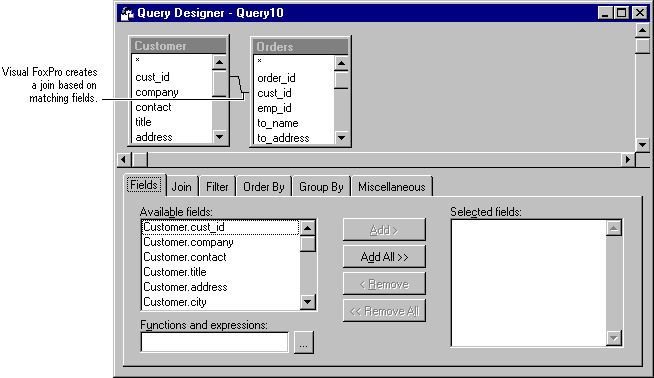
When you add tables or views to your query, Visual FoxPro suggests a possible join between the tables or views, based on matching field names.
For example, if you add the Customer table in the Visual Studio …\Samples\Vfp98\Data directory to the Query Designer, and then add the Orders table, Visual FoxPro suggests a join between the tables based on the matching fields Customer.cust_id and Orders.cust_id.
Suggested join between tables
If you are using a database that contains persistent relationships defined between the views or tables within it, Visual FoxPro uses the existing relationships as default joins.
If you want to add database tables or views to your query, you may need to open the appropriate database to make them available.
To add a table or view to a query
-or-
If you want to add a table that is not part of the database, choose Other, locate the table in the Open dialog box, and choose OK.
If Visual FoxPro cannot suggest a likely match between fields, select the matching fields in the Join Condition dialog box yourself.
With multiple tables in your query, you can control which records your query selects by altering or adding joins. Using the Join Condition dialog box, you can change the join type set between the tables.
Joins appear automatically when you add the tables. However, if the field names of related fields do not match, you might have to create your own joins between tables. You can create additional joins by dragging between the fields of tables in the Query Designer, or by choosing the Add Join button in the Query Designer toolbar to display the Join Condition dialog box.
Join Condition dialog box
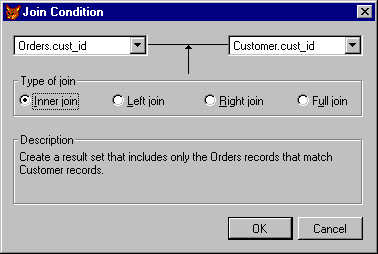
When you add or alter a join, you can select a type of join to expand or narrow your results. The easiest way to create a join is by using the Join Condition dialog box.
To create a join between tables
Note Join columns only if they have the same size and data type.
| To retrieve… | Use… |
| Only records from both tables that match the join criteria, the most common type of join | Inner Join |
| All records from the table on the left side of the join criteria and only records that match the join criteria from the table on the right side of the join criteria | Left Join |
| All records from the table on the right side of the join criteria and only records that match the join criteria from the table on the left side of the join criteria | Right Join |
| All records from both tables whether or not they match the join criteria | Full Join |
For more information about joins, see Chapter 8, Creating Views, in the Programmer’s Guide.
You can also delete or modify existing joins. Although you can still run a query without the joins, the results usually have little practical value and may require large amounts of time to process.
To delete a join
-or-
In the Join tab, select the join condition and choose Remove.
Besides filters and join types, you can control your results by changing the criteria used in the join. Joins do not have to be based on an exact match of fields; you can set up different join relationships based on Like, Exactly Like, More Than, or Less Than criteria.
Join criteria are similar to filter criteria; they both compare values and then include records that match the criteria. Unlike a filter which compares a field value to a filter value, the join criteria compares the field value from one table to the field value of the other table.
For example, when you query two tables joined on their respective customer ID fields (Customer.cust_id = Orders.cust_id), the query retrieves only the records in which these two fields match, and which also meet any other filter you set in the query.
To modify a join
For more information about logical operators used in join criteria, see Logical Operators.
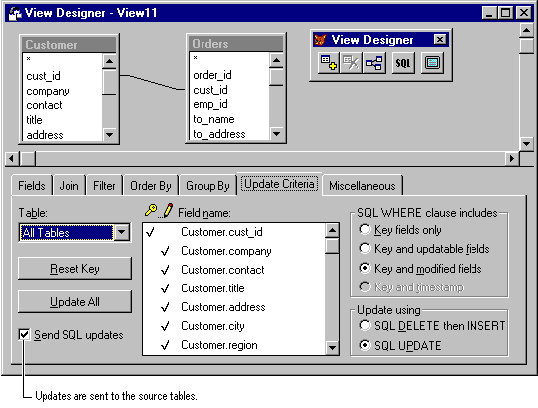
You can also combine two or more local tables in a local view. The process of defining a multi-table view is similar to working with multiple tables in a query. But using views gives you the added capability to update the source tables when working with the output of the view.
For example, you can join the Customer and Orders tables, from the Visual Studio …\Samples\Vfp98\Data directory, in a view, and set criteria to select a subset of the combined records. As you update the results in a Browse window or in a form, the updates you make can be sent back to update the source tables.
Combining tables in a view
To join tables in a view
To enable updating of the source tables
Note To activate the Send SQL updates option you must first set a key field in one of the tables.
For more information about controlling updates to tables, see Chapter 17, Programming for Shared Access, in the Programmer’s Guide.
When you connect to a remote data source, you can gain access to many related tables. You can select the tables you need and adjust the relationships between them, if necessary, to get the information you need.
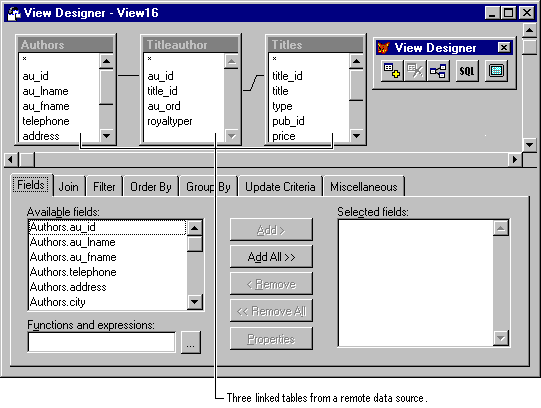
For example, suppose you are connected to a publications database, which contains many interrelated tables. If you are searching for information about titles and authors, you could use three related tables: Authors, Titles, and Titleauthor.
Multiple tables in a remote view
To create a multitable remote view
As with local views, you can use the options in the Update Criteria tab in the View Designer to control how updates are made to the source tables.
If data you need is stored on a remote data source, and is related to information in a local table, you can combine the local and remote data in a view.
First, you can create a remote view to select only the relevant records you want to work with from the remote server; then, using a local view, you can join the remote view with the related local table.
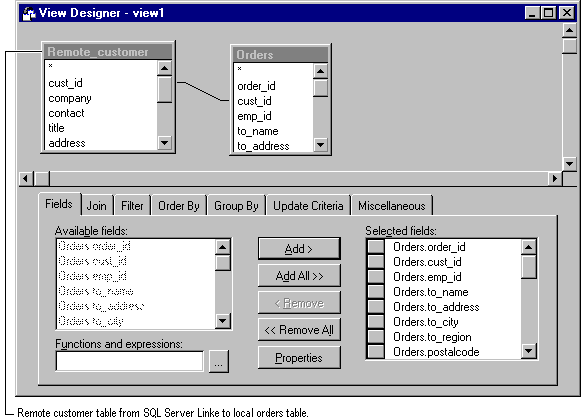
For example, suppose you have a large master customer database on a server and a local table that stores country code information. You can create a remote view, connect to the server, and select customer records of interest; then create a local view and add the remote view and the local table to it.
As you work with the records in the local view to enter new orders, you can choose to update the remote view and the local table. If you close the local view and then close the remote view, the remote view will update the table on the remote customer database.
Remote view and local table in a local view
To combine remote and local data in a view
For more information about working with views within other views, see “Combining Views” in Chapter 8, Creating Views, in the Programmer’s Guide.