When you need answers quickly, use the Query Designer to retrieve the information stored in your tables and views. For example, you might need to know the answers to questions like:
With the Query Designer, you can search for records that meet the criteria you specify. You can also order and group the records as needed, and create reports, tables, and graphs based on the results.
This chapter describes how to create and work with simple read-only queries based on tables (.dbf files) or views. For information about working with multitable local queries or remote data, see Chapter 6, Querying and Updating Multiple Tables, For information about creating views, see Chapter 5, Updating Data with Views.
This chapter discusses:
You may want to create queries for various reasons: to organize information for a report, to answer a quick question, or to see any relevant subset of your data. Whatever your aim, the basic process of creating a query is the same.
Using the Query Designer, you select the table or view you want information from, specify the criteria to extract records from the table or view, and then direct the results of your query to the type of output you want, such as a browse window, report, table, label, and so on. When you’ve created a query you want to keep, you can save it by giving it a name. Queries are stored as files with a .qpr extension.
The query design process
After you have decided what information you need to find, and what table or view it is stored in, you’ll go through the following general steps when creating queries:
If you want help creating a query quickly, use one of the Visual FoxPro query wizards. A query wizard asks you in which tables or views you want to search for information, and sets up a query based on your answers to a series of questions.
For more information about the query wizards, press F1 for Help while you are using the wizard.
To create a query with a wizard
You can also choose Wizards on the Tools menu to start a wizard.
If you don’t want to use a query wizard, you can use the Query Designer to create your query. You can start the Query Designer from the Project Manager or from the File menu.
To start the Query Designer
You can also start the Query Designer by choosing New from the File menu, selecting the Query option, and selecting New File.
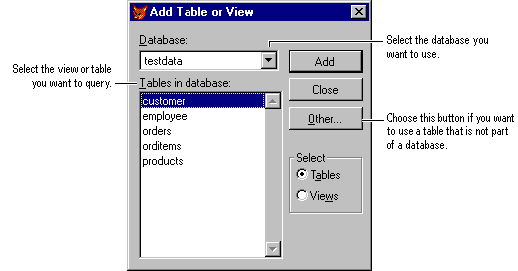
When you create a new query, you will be prompted to select a table or view from the current database or from a free table.
Selecting a table or view to query
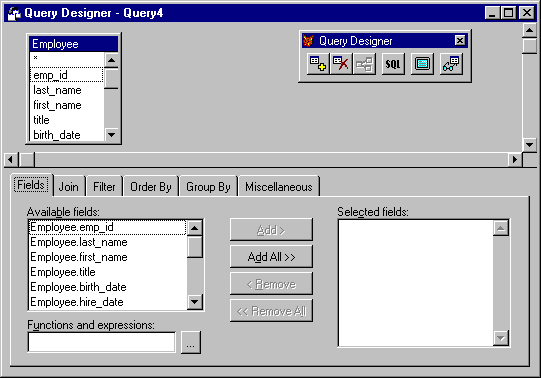
After you select a table or view, Visual FoxPro displays the Query Designer window.
The Query Designer window
You can easily change to a different table or view.
To use a different table or view
After you have opened the Query Designer and selected the table or view that contains the information you want, you can define your results. At a minimum, you need to select the fields you want. You can also define your results by setting the order the selected fields appear and setting filters to select which records appear.
Before you can run a query, you must select some fields to include in the results. In some cases, you might want to use all the fields from the table or view. At other times, you might want to focus the query on a few selected fields, such as fields you want to include in a report.
Be sure to include any fields you might want to use to sort or group the results of your query. When you select the fields, you can also set the order they appear in your output.
Use the Fields tab in the lower pane of the Query Designer to select the fields you want to include in the results of your query.
The Fields tab in the Query Designer
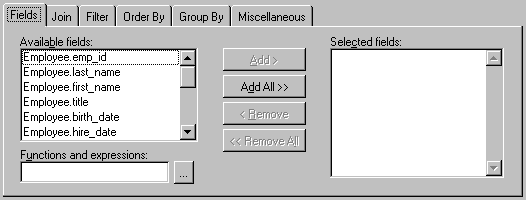
To add a field to the query output
-or-
You can select all of the fields by name or use the asterisk wild card. If you select the fields by name, the exact names of the fields are included in the query. If you run the query after adding fields to the table, the new fields are not included in the results.
If you use the wild card, the asterisk is included in the query and includes all fields that are in the table at the time of the query. If the table structure has changed since the query was created, the new fields also appear in the query results.
To add all available fields to a query at once
-or-
You can make your query results easier to read and understand by adding a descriptive caption to a results field. For example, you might want to display the word “SumMaxOrd” at the top of the results column instead of the field name or expression, SUM(MaxOrdAmount).
To add an alias for a field
SUM(maxorderamt) AS SumMaxOrd
The order that fields appear in the Fields tab determines the order of the columns of information in your query output.
Setting the order of output columns
To change the column order of the query output
If you want to change the order that rows of information will be sorted, use the Order By tab instead.
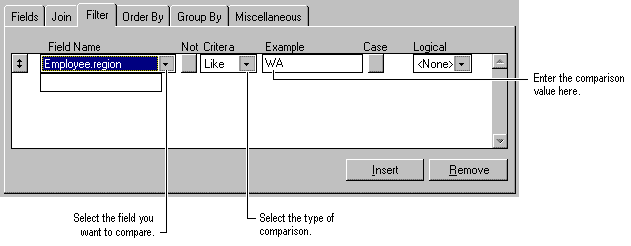
Selecting the records you want to find is the key step that determines the results of your query. With the Filter tab in the Query Designer, you can formulate the WHERE clause of a select statement to tell Visual FoxPro which records to search for and retrieve.
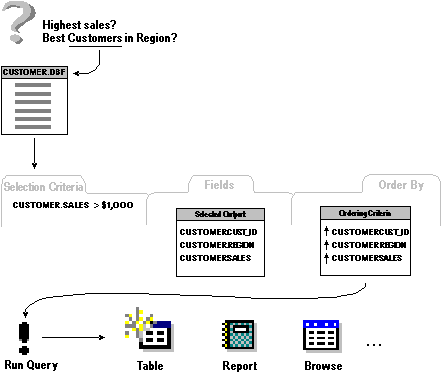
You may want to find a specific subset of data to include in a report or other output: for example, all customers with outstanding balances, all customers in a specific region or postal code, and so on. To see only the records you want, enter a value or range of values to compare the records against.
In Visual FoxPro, you use the Filter tab to specify which field you want to use for selecting records, choose a comparison criterion, and enter an example of the value you want the field to be compared to.
Defining criteria for query results
To specify a filter
Note You can’t use General or Memo fields in a filter.
If you want to reverse the meaning of a logical operator, select the Not button. For example, if you want to find customers in all regions except Washington, use the selection expression in the following example:
Customer.region Not Like WA
To further tune your search, you can add more filters in the Filter tab. For more information, see the section, Fine-Tuning Your Search, later in this chapter.
If you are using more than one table or view in your query, you can expand the records you select by the join type you choose. For more information about joins, see Chapter 8, Creating Views, in the Programmer’s Guide.
With the output of your query defined, you can now organize the records that appear in your results by ordering and grouping on the output fields. If you want, you can also filter the groups that appear in your results.
Ordering determines the order in which records or rows will be sorted when they appear in the output of your query. For example, you could sort records by State and then by City, or sort them in ascending order based on the outstanding account balance.
Use the Order By tab to set the sort order for your query. The sort order determines the order in which rows or records will appear in your query output.
First select the fields you want to use from the Selected Fields box and move them to the Ordering Criteria box. Then arrange the fields in the order you want them to appear in the query results.
To set ordering criteria
To remove ordering criteria
The order in which fields appear in the Ordering criteria box determines the order of importance when the query results are sorted. The first field determines the primary sort order.
For example, if the first field in the Ordering criteria box is Customer.region and the second field in the Ordering criteria box is Customer.city, the results will be ordered by Customer.region. If more than one record in the customer table has the same region field value, these records are additionally ordered by Customer.city.
Setting sort order with the Order By tab
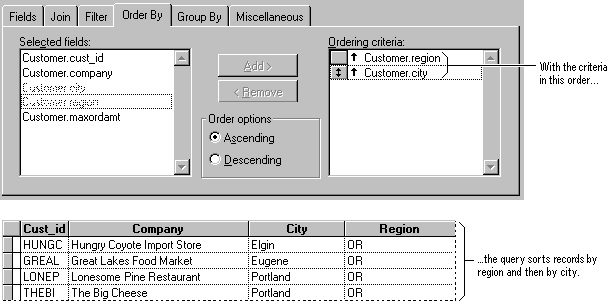
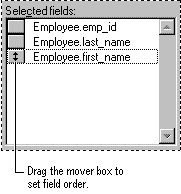
To adjust the importance of a sort order field, use the button to the left of the field to drag the field to the desired location in the Ordering criteria box.
You can sort in ascending or descending order by setting the buttons in the Order options area. Each order field appears in the Output fields box on the Filter tab with an up arrow or down arrow next to it, indicating whether the sort on that field is to be made in ascending or descending order.
Grouping consolidates or gathers similar records into one record so you can perform calculations based on groups of records. For example, you might want to find the sum of all orders to a specific region. Instead of looking at all the records individually, you can group all the records from the same region into one record, and get the sum of all the orders from that region. To control how records are grouped, use the Group By tab in the Query Designer.
Grouping is most useful when used in conjunction with an aggregate function, such as SUM, COUNT, AVG, and so on.
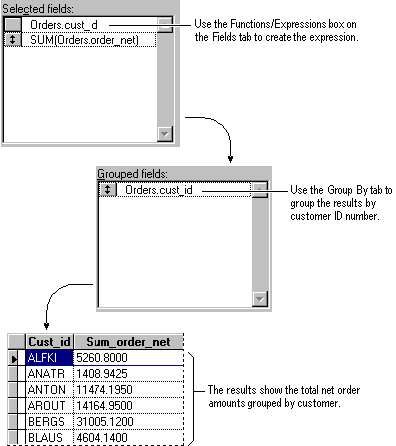
For example, suppose you want to see the total dollar amount of orders for each customer ID number in your orders table. You need to group all the order records for a given customer ID into one record, and find the sum of the order amounts.
You first use the Fields tab to add the expression SUM(Orders.order_net) to the output of your query, then use the Group By tab to group the results by customer ID number. The results show total net orders for each customer:
Setting Group By options
To set grouping options
-or-
Choose the dialog button to use the Expression Builder to enter an expression in the Functions and expressions box.
You can also set a filter on the grouped results.
To set a filter on grouped or consolidated records rather than on individual records, choose Having on the Group By tab. You can use a field name, an aggregate function on a field name, or another expression in the Field Name box.
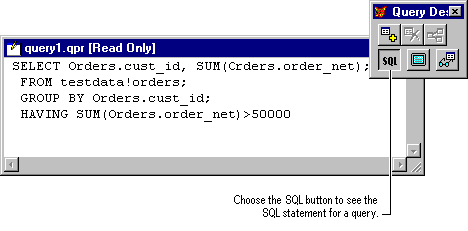
Building on the previous example, you could use the query that shows total sales by customer number, then use the Having button to restrict the output to customers having more than $50,000 in net orders:
Setting criteria for a group

To set a Having option on a group
When you have finished designing your query, you can start the query by choosing the Run button. Visual FoxPro executes the SQL select statement you built with the Query Designer, and sends the results to a Browse window.
To run a query
If you want your results to go to a different destination, you can direct your results to a form, table, report, or other destinations. If you like to know what the SQL statement looks like, you can view the SQL statement that you built.
For more information, see SELECT - SQL.
You can send the results of your query to different destinations. If you have not selected an output destination, the results of your query will be shown in a Browse window.
When you choose Query Destination on the Query menu, or choose the Query Destination button on the Query toolbar, the Destination dialog box displays, so you can choose where to send your query results.
To choose a query destination
Choosing a query destination
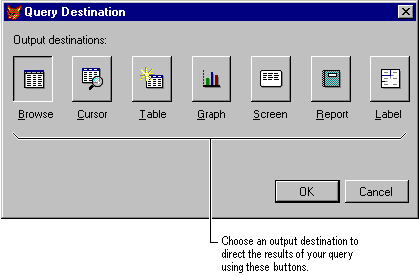
Use this table to choose the destination for your query output.
| If you want to | Choose this output option |
| Display the results of your query in a Browse window | Browse |
| Save the results of your query in a temporary read-only table with the name you assign it | Cursor |
| Save the results of your query as a table with the name you assign it | Table |
| Make the query results available for use with Microsoft Graph, a separate application included with Visual FoxPro | Graph |
| Display the results of your query in the main Visual FoxPro window, or in the currently active output window | Screen |
| Send the output to a report file (.frx) | Report |
| Sends the output to a label file (.lbx) | Label |
Many of the options have additional choices you can make to affect the results. For example, the Report option lets you open a report file and customize the report before printing, or you can choose a Report Wizard to help you create the report. For more information, see Chapter 7, Designing Reports and Labels.
If you want to make sure the query is properly defined, you can view the SQL statement built by the Query Designer. Also, you can add comments to the query describing its purpose. The comments you add appear in the SQL window.
At any time while you are creating your query, you can see the SQL statement your query is building by choosing View SQL from the Query menu or by choosing the SQL button on the toolbar.
A read-only window displays the SQL statement. You can copy the text in the window and paste it into the Command window or incorporate it into a program.
To see the SQL statement for your query
The SQL statement for a query
If you want to identify your query in some manner, or add notes about it, you can add comments to your query that will help identify it and its purpose.
To add a comment to a query
Adding comments to your query
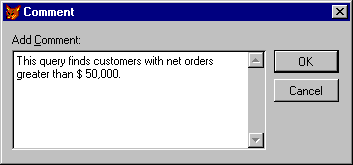
Comments you enter appear at the top of the SQL window, preceded by an asterisk.
Other options available with the Query Designer make it easy to further customize your queries. You can use filters to expand or narrow your search. You can also add expressions to perform calculations or functions on the data in your fields.
You might find that you want more control over the results returned by a query. For example, you might want to find records that meet more than one criterion, such as customers from a given state who have outstanding balances greater than $1,000. Or, you might need to retrieve records that meet either one criterion or another: customers from Washington or from California. In either case, you need to add more statements to the Filter tab.
In Visual FoxPro, filter statements are automatically combined with a logical AND when you enter them in successive rows in the Filter tab. If you want to retrieve records that meet two or more alternative conditions, you can insert a logical OR operator between rows with the Add Or button.
If you want your query to retrieve only records that meet more than one criterion, list the criteria on separate lines in the Filter tab. Criteria in a series are combined with an implicit AND statement, so that only records that meet all the criteria listed will be retrieved.
For example, suppose you are searching an employee table, and you want to see all the Sales Representatives in the United Kingdom. You would enter the two conditions you are searching for on separate lines:
Combining two filters
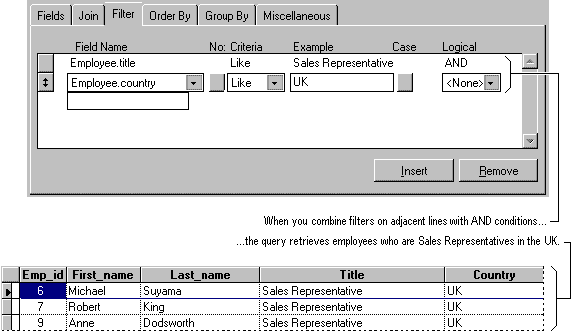
To set AND conditions
If you want your query to retrieve records that meet any of a series of filters, combine filters by inserting OR conditions between them.
For example, you might want to search for customers who live in Washington or California:
Adding an OR between two filters
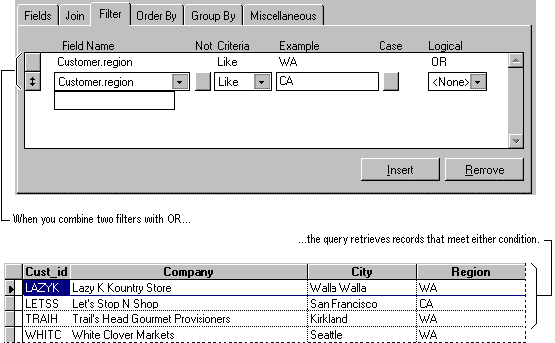
To set OR conditions
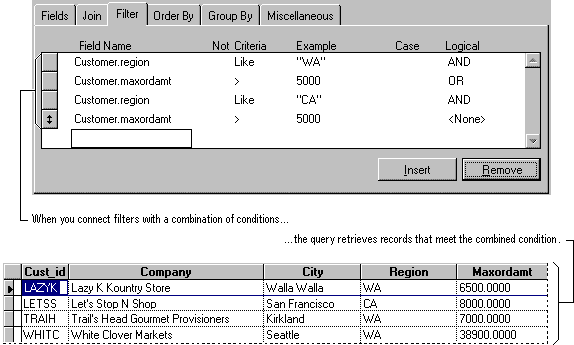
You can also combine AND and OR conditions to select specific sets of records.
For example, you might want to retrieve records for customers from Washington or California who have maximum order amounts larger than $5,000.
Combining different filters
Duplicate records are records in which every field of the result matches. If you want to remove duplicate records from the query results, select the No Duplicates box on the Miscellaneous tab. Otherwise, make sure the No Duplicates box is cleared.
Note If No Duplicates is selected, the word DISTINCT precedes the fields in the SELECT portion of the SELECT command.
You can specify how many or what percentage of records with the highest or lowest values in a particular field you want the query to return. For example, the query can display those records with the 10 highest or lowest values in a specific field or the records with the highest or lowest 10 percent of values in the field.
Using the Top setting on the Miscellaneous tab, you can either set a number or a percentage of records you want to see. To set whether you are choosing the top or bottom, you set the sort order for your query to either descending to see the top or ascending to see the bottom.
To retrieve a number or percentage of top records
You can create more flexible and powerful queries if you incorporate expressions, either in a filter or as result fields.
You can also include functions and expressions in the output of your query, using the box at the bottom of the Fields tab. If you want to name the field holding the expression, you can add an alias.
For example, you might want your query results to include the sum of all order amounts with the alias Total:
SUM(orders.order_amt) AS Total
Creating an expression to include in your query results

You can type an expression directly into the box or use the Expression Builder on the Fields tab.
To add an expression to your query output
-or-
Choose the dialog button to use the Expression Builder and enter an expression in the Functions and expressions box.
Note Null values are ignored in calculations. For more information on null values in expressions, search for “Null Values”.
Instead of simply searching for records that match one or more fields, you can use an expression to combine two fields, or perform a calculation based on a field and search for records that match the combined or calculated field.
You can type expressions directly into the Example box. If you want some help, you can use the Expression Builder, which is available from the dialog button next to the Expressions and Functions box in the Fields tab.
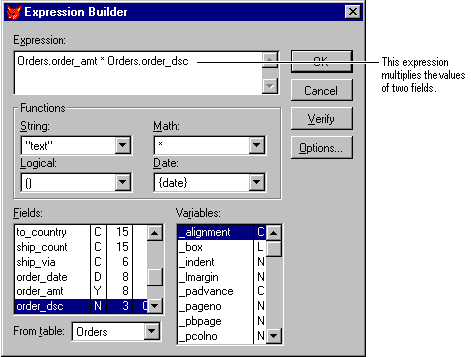
For example, using the Orders table, you might want to check total discounts for a customer by combining order amount and order discount in an expression like the following:
Orders.order_amt * Orders.order_dsc
Creating an expression in the Expression Builder