BitBlt Versus PaintPicture
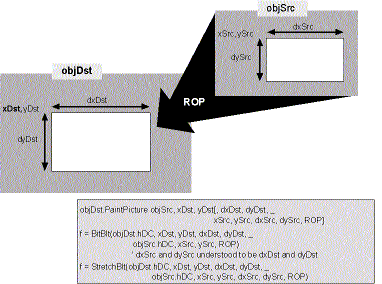
To blit, you need a source object to blit from and a destination object to blit to. You must specify the size of both objects as well as the blit mode. Figure 7-7 provides a conceptual view of the operation and examples of how each element fits into the syntax of PaintPicture, BitBlt, and StretchBlt.

Figure 7-7. Three ways to blit.
The Bit Blast code that combines one picture with another is listed below. A careful study of this code highlights the differences between the Windows Way and the Basic Way:
Private Sub cmdBlit_Click()
    Dim rop As Long
    rop = lstROP.ItemData(lstROP.ListIndex)
    If chkBitBlt.Value = vbChecked Then
        Call BitBlt(pbDst.hDC, 0, 0, dxBlt, dyBlt, _
                    pbSrc.hDC, 0, 0, rop)
        pbDst.Refresh
    Else
        pbSrc.Picture = pbSrc.Image
        pbDst.PaintPicture pbSrc.Picture, 0, 0, , , , , , , rop
    End If
End Sub
The BitBlt function works on the device contexts of source and destination objects. In Visual Basic, you can blit to the hDC property of forms, picture boxes, and the printer. You can also borrow an HDC from any other window (such as the desktop) using the GetDC and ReleaseDC functions (see “Borrowing Device Context Handles,” page 371), or you can create a memory device context, as you’ll see later. But you can’t use BitBlt on Image controls because they don’t have an hDC or an hWnd property.
BitBlt, like all API functions, lacks optional arguments. You must provide the starting x and y coordinates (0, 0), the height and width of the blit (dxBlt, dyBlt), and the starting coordinates of the source (0, 0). Because the sizes of the source and the destination are always the same, you don’t need to provide a source size (although you must do so with StretchBlt). For now, we’ll skip the last BitBlt argument, which contains the raster operation (ROP) mode; we’ll come back to it in “All About ROPs,” page 401.
The dxBlt and dyBlt values are calculated elsewhere with this statement:
With pbTest(3)
    dxBlt = ScaleX(.Width, vbTwips, vbPixels)
    dyBlt = ScaleY(.Height, vbTwips, vbPixels)
Since all the images being blitted in Bit Blast are the same size, you can use the size of any one; pbTest(3) happens to be convenient. BitBlt and its relatives work in pixels by default, so if you’re dealing with twips you must convert. ScaleX and ScaleY usually work best, but the sidebar “Three Ways of Scaling,” page 381, explains other methods.
Visual Basic knows nothing about BitBlt and has no idea that you’ve altered the DC by blitting to it. You must call the Refresh method to make your changes show up on the screen. Refresh is unnecessary when AutoRedraw is set to True on the destination.
If you’re familiar with BitBlt (as many Visual Basic programmers are), PaintPicture could take some getting used to. The argument order and the format are very different. The object to be painted is the destination, and the picture painted from is the first parameter. Notice that PaintPicture works on pictures, whereas BitBlt works on device context handles. That means that you can (and often should) use PaintPicture on Image controls.
The PaintPicture method combines the functionality of BitBlt and StretchBlt. (More on StretchBlt later.) In order to emulate both, PaintPicture needs a lot of arguments. Luckily, most PaintPicture arguments (although not enough to suit me) are optional. After the source picture, the arguments are the starting point of the destination, the size of the destination, the starting point of the source, the size of the source, and finally the ROP.
Since Bit Blast does a simple transfer between picture boxes of the same size, default values are OK for all the location and size arguments. You should be able to write this:
pbDst.PaintPicture pbSrc.Picture, , , , , , , , , ROP
It doesn’t work that way, however. PaintPicture requires the arguments for the destination starting point instead of defaulting to 0. So, instead, you need the following:
pbDst.PaintPicture pbSrc.Picture, 0, 0, , , , , , , ROP
Maybe the designer was thinking of blitting from a picture box to a form. A value of 0 doesn’t make sense in such a case, but it certainly does in my example and in many others.
The Windows API also provides a PatBlt function to blit a pattern onto a device context. Windows NT goes even further: it provides MaskBlt to create masks and PlgBlt to blit a rectangle onto a parallelogram. Unfortunately, these functions weren’t implemented for Windows 95.
