Default members
Visual Basic’s support of default members is one of the features that distinguishes it from other languages. Historically, Visual Basic supported default members on controls back in version 1—long before the Component Object Model borrowed the feature. Unfortunately, although Visual Basic recognized default members in controls or classes written in other languages, it didn’t support creating your own default members until version 5. And it still doesn’t support default members directly through the language.
The only way to set the default member for your class is through a dialog box that seems to have been carefully designed for the sole purpose of violating as many user-interface principles as possible. Visual Basic calls the dialog box shown in Figure 3-4 the Procedure Attributes dialog box. I call it the DBFH (Dialog Box From Hell). It’s kind of embarrassing even to describe this feature, and an advanced programming book shouldn’t have to explain specific fields of a dialog box. But there’s no getting around it.
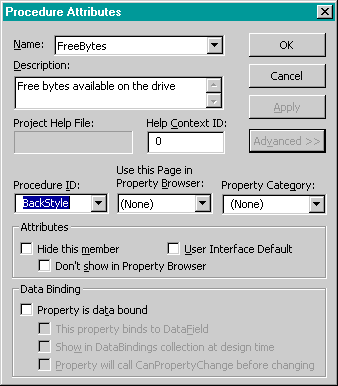
Figure 3-4. The Procedure Attributes dialog box (a.k.a., the Dialog Box From Hell).
The first step in setting the default property is to choose the best one. It’s not always obvious. If no member waves its hand and hollers “pick me,” you might be better off skipping the default member rather than picking one at random. That’s not the case with the CDrive class; the Root property is clearly the right choice. You can initialize the object by setting it, or you can read it to get the most important element of the object:
driveCur = “c:\”                   ‘ Initialize a drive
Debug.Print driveCur               ‘ Print the drive name
The default member is normally a property, but it’s also possible to define a method function as the default. There’s not much difference semantically between a method function and a property get procedure. In fact, if you want a read-only member, the only reason to implement it as a property get rather than as a method is that the property will generate a better error message if a user tries to assign to it.
Having chosen the Root property as the default, you might expect to be able to set the default property with a Default keyword or some other language feature. Nope. You have to do it with the dialog box that sets all the attributes of your methods and properties. The key attribute that you ought to provide for every single member of public classes is the description. The description will appear in the Object Browser, and your customers will consider you rude if you don’t provide it. The previous version of Visual Basic had a way to set the description through the Object Browser, but it was so obscure and unintuitive that many users never figured it out. It’s a little easier in version 5. You should get in the habit of providing descriptions even if you don’t set default properties. Do as I say, not as I do.
Since you’re going to be using this dialog box for every single member, let’s start it off right. Put the cursor on the chosen property and press the accelerator key…oops. Now why would there not be an accelerator key or toolbar button for a dialog box you were going to call continually? Well, at least you can customize the toolbar and context menus to make access easier.
OK, so you choose Procedure Attributes from the Tools menu. The top half of the dialog box in Figure 3-4 appears. At this point, you can enter the description. In real life, you would also enter the Help Context ID. There’s also a field for the project help file, but you must enter the help file elsewhere—in the Project Properties dialog box.
There’s no visible place to specify that this is the default property. You must click the Advanced button to set a default member. Is setting a default member an advanced operation? Apparently someone thinks so.
When you click the Advanced button, the other half of the dialog box appears and you see several fields that have absolutely nothing to do with what we’re doing. It turns out that this dialog box was designed for creators of controls, and since we’re creating a class, not a control, most of the fields are irrelevant. Of course, Visual Basic knows whether we’re creating a control or a class, so you might expect it to disable the extraneous fields. Nope. The dialog box lets you set a class property to be data bound or to have a property category even though these features have absolutely no effect on classes.
You might notice a checkbox that says User Interface Default. Perhaps checking this will make the current property the default. Don’t even think it. This checkbox, too, is for control developers and will have no effect, although you can set it to your heart’s content. Can you guess which of the gadgets in the dialog box actually sets the default property? OK, I’ll give you a hint. Internally, in a way that is completely hidden from and irrelevant to Visual Basic programmers, the Component Object Model decides which class member is the default by looking at a variable that assembly language programmers would call an ID (even C++ programmers don’t have to know this). Yes, you guessed it. The Procedure ID combo box is where you set the default property.
When you click the down arrow of the combo box, you’ll see a list of random words. The first two, None and Default, are in parentheses for reasons that I couldn’t even guess. The obvious choice is to select Default, and in fact that happens to be correct. But just out of curiosity, let’s take a look at some of the other choices. What do you think it would mean to set the Root property of the CDrive class to BackColor or hWnd? If you guessed that it would have no effect whatsoever, you win a trip to Disneyland and the honorary title of Visual Basic Dialog Box Designer for a Day.
Naming Private Data
No matter what object-oriented language you use, you will probably run into a common naming problem. Often, you must assign different names to variables that represent the same value. For example, assume that you are defining a FileName property. The program using the property might have a variable containing a filename that it wants to assign to the FileName property. A user
following the Hungarian naming convention described in Chapter 1 (“Basic Hungarian,” page 16) might name the variable sFileName. When a user assigns that value to the property, the value is actually passed as an argument to the Property Let procedure. You need a name for the filename parameter; sFileName springs to mind. Now you need to store the same value internally. Again, sFileName is the obvious choice for the name of the internal version. And what about the property name itself? From the outside, the property looks like a variable, smells like a variable, and tastes like a variable. Why shouldn’t it have a variable name? How about sFileName?
In practical terms, using the same name for the external and internal variables is not a problem. The external variable has a different scope than all the others and might be written by a different programmer years later; therefore, similar names are OK.
Nevertheless, following the Hungarian naming convention for properties is usually a bad idea. Your code ends up as gobbledygook: thgMyThing.nMyCollection.iProperty. Besides, your code will then be using a convention very different from the one used in controls, forms, and other predefined objects. Generally, it’s bad manners to impose your own naming conventions on the outside world.
A conflict still exists between the parameter name in the Property Let procedure and the name in the internal version. You must arbitrarily make these different, even though they represent the same thing. You can mangle the internal version in one of two ways. The MFC class library for Visual C++, for instance, always prefixes the internal member variables in a similar situation with m_ (as in m_sFileName). But I have an irrational prejudice against underscores in variable names, particularly in front of Hungarian prefixes; I’d much rather use a postfix. I considered using I (for internal) for all my internal variables, but I eventually switched to using A (for argument) with all parameter variables in Property Let statements. That way, the modified name doesn’t affect Property Get procedures.
Of course, if you find anything about this dialog box confusing, no problem. Just click the Help button. Or click the What’s This icon. Oops! There is none. At least you can press F1 to get help that will attempt to explain the mess. But you haven’t seen anything yet. Just wait until we talk about creating collections in Chapter 4.