From CShellLink to CShortcut
Using the CShellLink coclass is halfway between using Visual Basic objects and using API functions. The syntax looks right, but the methods seem to be written by a child who hasn’t learned how to speak proper Visual Basic yet. So rather than forcing our users to decipher the illiterate scrawls of CShellLink, we’ll filter them through a more intelligible CShortcut wrapper class.
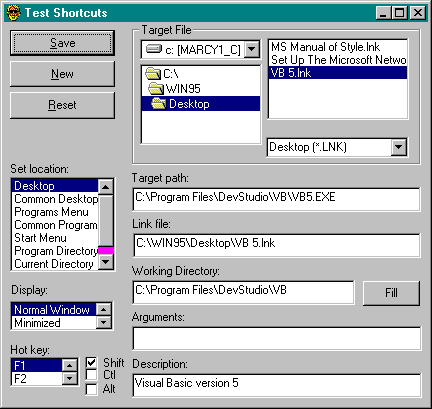
Figure 10-4 on the following page shows a sample program that uses CShortcut. I’m not going to get into this much except to say that the GUI doodads on the form represent CShortcut properties. To create a shortcut, you set some properties on the form and click the Save button. A shortcut with those properties will be written to the specified location. Normally, you’ll save shortcuts to the desktop, but you might also write them to the Programs submenu on the Start menu, or to any other place you choose.
The controls in the Target File frame normally allow you to specify the program or other file that the shortcut will point to, but when you select an LNK file, everything works backwards. The Resolve method is automatically called on LNK files to get the shortcut object. Once the object is updated, the form is filled out with the resulting properties.

Figure 10-4. The Test Shortcuts program.
Since the example is a little bit messy, I’ll show you some simpler code that creates a new shortcut:
With shortcut
    .Path = “C:\HelpMe\HelpMe.Exe”
    .Arguments = “Right now”
    .DisplayMode = edmMaximized
    sLink = .Save(edstDesktop)
End With
This illustrates how to create a shortcut—set all the desired properties and then save them. It takes only a few more lines of code to open a link file, change the display setting, and then execute the target program:
With shortcut
    .Resolve GetDesktop & “HelpMe.LNK”
    .DisplayMode = edmMinimized    ‘ Change to minimize
    sPath = .Save(edstDesktop)     ‘ Save the changes
    Shell sPath                    ‘ Run the shortcut program
End With
You might well argue that this object-oriented interface isn’t really any easier than a couple of procedures with optional arguments. OK. The GShort module (SHORT.CLS) has the procedures you want: CreateShortcut and UpdateShortcut.
CreateShortcut is simpler in the functional format:
CreateShortcut edstDesktop, “C:\HelpMe\HelpMe.Exe”, edmMinimized
Use the named arguments if you want to give lots of arguments in any order. You can probably guess the simple implementation:
Sub CreateShortcut(LinkFile As Variant, _
                   Path As String, _
                   Optional DisplayMode As Long = edmNormal, _
                   Optional WorkingDirectory As String, _
                   Optional Arguments As String, _
                   Optional Description As String, _
                   Optional IconIndex As Long = 0)
    Dim shortcut As New CShortcut
    With shortcut
        .Path = Path
        .WorkingDirectory = WorkingDirectory
        .DisplayMode = DisplayMode
        .Arguments = Arguments
        .Description = Description
        .Icon = IconIndex
        .Save LinkFile
    End With
End Sub
UpdateShortcut is messier because it must return all its data through reference parameters. I prefer the object-oriented format. The implementation looks like a backward version of CreateShortcut. Check it out in SHORT.CLS.
My shortcut example has a HotKey list box and check boxes for Shift, Control, and Alt keys, but this interface looks crude when compared to the user interface on the shortcut properties dialog box. The Shortcut Key field looks like an ordinary text box, but when you press keys, it automatically enters the text for the corresponding keys and shift masks. It wouldn’t take much to give your applications the same feature. An XHotkey control would let you easily add hot key functionality to any program. The short-cut properties dialog box also has a Change Icon button that displays all the icons embedded in the current EXE and allows you to browse for icon files that you might want to attach to the shortcut. You could write a CIconPicker class that provides the same behavior. Use the ExtractIcon API function (see Chapter 8) to create the list of embedded icons.
