StretchBlt Versus PaintPicture
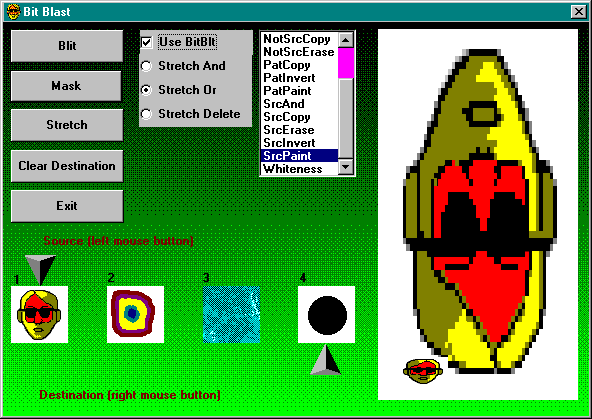
The code for the Stretch button in Bit Blast illuminates more of the differences between the Basic Way and the Windows Way. Figure 7-8 on the following page illustrates what happens when you stretch a bitmap.

Figure 7-8. Stretching a bitmap in the Bit Blast program.
The Stretch button performs two blits: one to stretch the image larger while turning it inside out and one to compress it while turning it backward:
Private Sub cmdStretch_Click()
    If chkBitBlt.Value = vbChecked Then
        ‘ Stretch inside out
        Call StretchBlt(hDC, ScaleX(Width, vbTwips, vbPixels) * 0.97, _
                             ScaleY(Height, vbTwips, vbPixels) * 0.9, _
                             -dxBlt * 3.5, -dyBlt * 6.5, _
                             pbSrc.hDC, 0, 0, dxBlt, dyBlt, vbSrcCopy)
        ‘ Compress backward
        Call StretchBlt(hDC, ScaleX(Width, vbTwips, vbPixels) * 0.75, _
                             ScaleY(Height, vbTwips, vbPixels) * 0.8, _
                             -dxBlt * 0.9, dyBlt * 0.5, _
                             pbSrc.hDC, 0, 0, dxBlt, dyBlt, vbSrcCopy)
    Else
        With pbSrc
            .Picture = .Image
            ‘ Stretch inside out
            PaintPicture .Picture, Width * 0.97, Height * 0.9, _
                                   -.Width * 3.5, -.Height * 6.5
            ‘ Compress backward
            PaintPicture .Picture, Width * 0.75, Height * 0.8, _
                                   -.Width * 0.9, .Height * 0.5
        End With
    End If
End Sub
StretchBlt has the same arguments as BitBlt, except that it adds arguments for the source size. The whole idea of stretching a bitmap is that the source size and the destination size should differ. Despite its name, StretchBlt can also compress. (Think of it as negative stretching.) You can also stretch pictures backward or inside out by changing the signs of the arguments.
Some differences are obvious. StretchBlt requires that you convert to pixels; PaintPicture uses the default mode (twips, in this case). But the subtle differences are more interesting.
Notice the line that assigns the Image property of the source to the Picture property:
With pbSrc
    .Picture = .Image
This line ensures that the picture being blitted contains a bitmap. For example, the fourth picture box in Bit Blast contains a blank bitmap with a circle drawn over it using the Circle method. The device context of the picture box contains both the circle and the blank bitmap, but its Picture property contains only the bitmap. If you blit with BitBlt, the entire device context is copied. With PaintPicture, however, you copy only the picture with its blank bitmap. You would have a similar problem if the picture box’s picture contained a metafile or an icon, since PaintPicture can’t blit these elements with a ROP mode.
The solution is to copy the image to the picture. When you assign the Image property, Visual Basic takes a snapshot of the device context with all its contents—pictures and drawings—and creates a bitmap, which it hands off as the Image property.
If you comment out the image-to-picture assignment, you’ll see another difference in the marble pattern shown in the third box. The size of the picture used by PaintPicture is not the same as the HDC used by StretchBlt. The marble bitmap is much larger than the picture box, but it is clipped because AutoSize is False. PaintPicture stretches the entire picture, including the hidden part. StretchBlt stretches the clipped surface. Assigning the image gives the picture the same clipped snapshot you see on the screen.
When you compress a picture, StretchBlt has to merge many rows of pixels into fewer rows. The SetStretchBltMode function sets one of three modes for dealing with the extra lines. You can combine the extra lines with the remaining lines, using either an AND operation or an OR operation, or you can simply delete the extra lines. Using the SetStretchBltMode function on the destination surface has no effect on how PaintPicture compresses images, however. Visual Basic chooses a default mode (apparently the delete mode), and that’s that.
