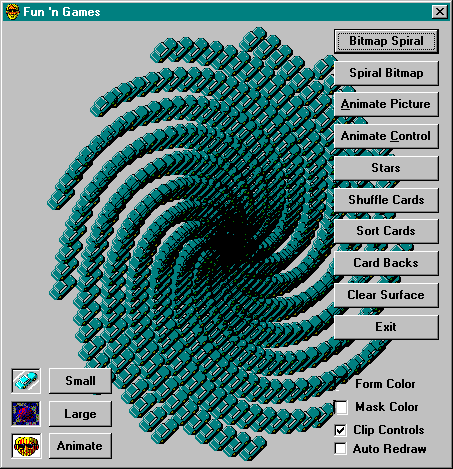
Sub BmpSpiral(cvsDst As Object, picSrc As Picture)
With cvsDst
    ‘ Calculate sizes
    Dim dxSrc As Long, dySrc As Long, dxDst As Long, dyDst As Long
    dxSrc = .ScaleX(picSrc.Width): dySrc = .ScaleY(picSrc.Height)
    dxDst = .ScaleWidth: dyDst = .ScaleHeight
    ‘ Set defaults (play with these numbers for different effects)
    Dim xInc As Long, yInc As Long, xSize As Long, ySize As Long
    Dim x As Long, y As Long
    xInc = CInt(dxSrc * 0.01): yInc = CInt(dySrc * 0.01)
    xSize = CInt(dxSrc * 0.1): ySize = CInt(dySrc * 0.1)
    Dim radCur As Single, degCur As Integer, angInc As Integer
    degCur = 0: angInc = 55
    ‘ Start in center
    x = (dxDst \ 2) - (dxSrc \ 2): y = (dyDst \ 2) - (dySrc \ 2)

    ‘ Spiral until off destination
    Do
        ‘ Draw at current position
        .PaintPicture picSrc, x, y, , , , , , , vbSrcAnd
        ‘ Calculate angle in radians
        radCur = (degCur - 90) * (PI / 180)
        ‘ Calculate next x and y
        x = x + (xSize * Cos(radCur))
        y = y + (ySize * Sin(radCur))
        ‘ Widen spiral
        xSize = xSize + xInc: ySize = ySize + yInc + 1
        ‘ Turn angle
        degCur = (degCur + angInc) Mod 360
    Loop While (x > 0) And (x + dxSrc < dxDst - dxSrc) And _
               (y > 0) And (y + dySrc < dyDst)
End With
End Sub
If you have an Image control with a bitmap picture, draw it on the current form with the statement BmpSpiral Me, imgSmallBmp.Picture.
Although previous versions of Visual Basic didn’t provide a built-in way to blit, they did have a built-in way to stretch. The Stretch property of the Image control provided the moral equivalent of StretchBlt with no ROP mode. If all you want to do with a picture is stretch or compress it, it’s hard to beat using the Image control with its Stretch property set to True. So how do you think Visual Basic implements the Stretch and AutoSize properties? Your guess is as good—and probably the same—as mine: StretchBlt.

Sub SpiralBmp(cvsDst As Object, picSrc As Picture, _
              ByVal xOff As Long, ByVal yOff As Long)
With cvsDst
    Dim xLeft As Long, xRight As Long, yTop As Long, yBottom As Long
    Dim dxSrc As Long, dySrc As Long, xSrc As Long, ySrc As Long
    Dim xDst As Long, yDst As Long, xInc As Long, yInc As Long
    Dim x As Long, y As Long
    ‘ Initialize
    dxSrc = .ScaleX(picSrc.Width): dySrc = .ScaleY(picSrc.Height)
    xInc = dxSrc / 20: yInc = dySrc / 20
    xLeft = 0: yTop = 0:
    xRight = dxSrc - xInc: yBottom = dySrc - yInc

    ‘ Draw each side
    Do While (xLeft <= xRight) And (yTop <= yBottom)
        ‘ Top
        For x = xLeft To xRight Step xInc
            .PaintPicture picSrc, x + xOff, y + yOff, xInc, yInc, _
                x, y, xInc, yInc, vbSrcCopy
        Next
        x = x - xInc: yTop = yTop + yInc
        ‘ Right
        For y = yTop To yBottom Step yInc
            .PaintPicture picSrc, x + xOff, y + yOff, xInc, yInc, _
                x, y, xInc, yInc, vbSrcCopy
        Next
        y = y - yInc: xRight = x - xInc
        ‘ Bottom
        For x = xRight To xLeft Step -xInc
            .PaintPicture picSrc, x + xOff, y + yOff, xInc, yInc, _
                x, y, xInc, yInc, vbSrcCopy
        Next
        x = x + xInc: yBottom = y - yInc
        ‘ Left
        For y = yBottom To yTop Step -yInc
            .PaintPicture picSrc, x + xOff, y + yOff, xInc, yInc, _
                x, y, xInc, yInc, vbSrcCopy
        Next
        y = y + yInc: xLeft = xLeft + xInc
    Loop
End With
End Sub