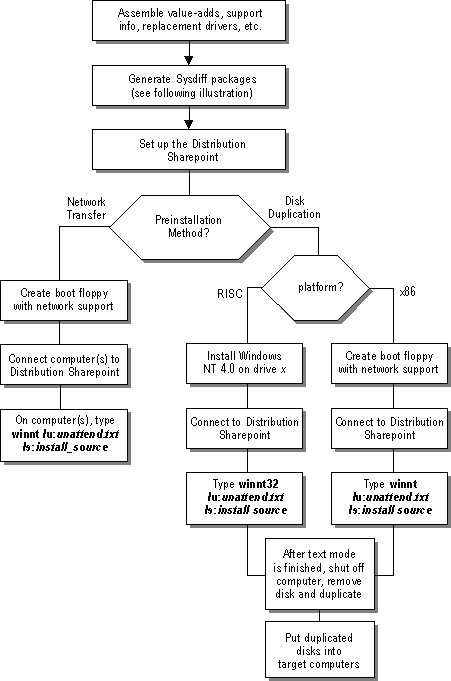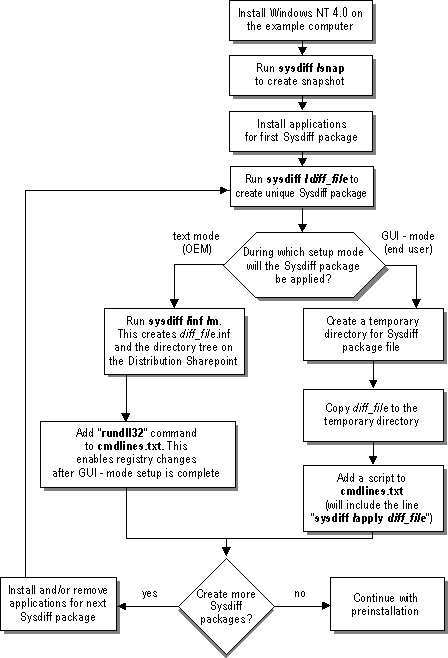
Sysdiff is used in several steps.
1. First, run sysdiff /snap to take a snapshot of the Windows NT retail version of the system after it has been installed on a reference computer. The reference computer needs to be of the same general hardware type (x86, MIPS, Alpha, or PowerPC) as the destination computers. The %systemroot% (for example, C:\Winnt) must be the same on the reference and destination computers.
2. Then, after the system has been customized by installing applications, run sysdiff /diff again to create the difference file.
3. Finally, run sysdiff /apply as part of an Unattended Setup to apply the difference file to a new installation. The sysdiff /apply command can also be run at any time after installation is complete.
Alternately, run sysdiff /inf to create an INF and add the files included in the difference file to the $OEM$ directory tree. Then invoke the INF with a command in the $OEM$\Cmdlines.txt file, or at any time after installation is complete.
4. Optionally, you can run sysdiff /dump to dump the difference file information in a form that you can read. Use the sysdiff /dump command to review the contents of the difference file.
If you want to distribute computers or hard disks that are ready for GUI-mode setup, use the winnt /u or winnt32 /u command to install your customized version of Windows NT Workstation, including the difference file — but stop the process after text mode Setup is complete by turning off the computer. Then duplicate the hard disk, using the xcopy command. The duplicated disks will include all the information copied during text mode, including the contents of the $OEM$ directory and its subdirectories. These directories will be deleted, along with other temporary directories used by Setup, after GUI mode setup is completed. GUI mode setup proceeds the first time the computer is turned on.
The sysdiff process is shown in the following illustrations (Figures 2.1 and 2.2).

Figure 2.1 Pre-installation using sysdiff

Figure 2.2 Creating and applying a sysdiff package
1. Install the retail version of Windows NT Workstation or Windows NT Server on a computer of the same general type (x86, Alpha, MIPS, or PowerPC) as the destination computers.
2. At the command prompt, type the following command:
sysdiff /snap [/log:log_file] snapshot_file
where:
log_file
is the name of an optional log file created by sysdiff.
snapshot_file
is the name of the file containing the snapshot of the system. Specify any valid Win32-based filename.
1. After the snapshot file has been created, install the applications that you want to include in the distributed version of the system.
2. At the command prompt, type the following command:
sysdiff /diff [/c:title] [/log:log_file] snapshot_file difference_file
where:
/c:title
specifies a title for the difference package
log_file
is the name of an optional log file created by sysdiff.
snapshot_file
is the name of the file containing the snapshot of the system. This file must be created from the same installation as you modified in step one. If you use a file created on another computer or from another installation, sysdiff will fail.
difference_file
is the name of the file containing the differences between the system as it existed when the snapshot file was created and the system as it currently exists. Specify any valid Win32®-based filename.
1. Place the difference file in a subdirectory of the $OEM$\$$ directory.
2. Add the following command to the $OEM$\Cmdlines.txt file:
sysdiff /apply /m [/log:log_file ] difference_file
where:
/m
causes the file changes in the per-user profile structure to be mapped to the Default User profile structure, rather than to the profile structure for the user logged on when the difference file was created.
For example, if you were logged on as Administrator when you installed the applications to be included in the difference file, then the .lnk files and other user profile files would be created in the %WinDir%\Profiles\Administrator directory (where %WinDir%\ is the value of the %USERPROFILE% environment variable). But this directory does not yet exist when the files are copied during GUI-mode setup. For a preinstallation, these files should be placed into %WinDir%\Profiles\Default User instead of %WinDir%\Profiles\Administrator. By using the /m switch to place the files in the Default User profile structure, you ensure that the applications are available to all users when they first log in.
log_file
is the name of a log file to which sysdiff writes information describing its actions. This parameter is optional.
difference_file
specifies a file generated by an earlier invocation of sysdiff /diff. The %SystemRoot% must be the same as it was on the system that was used to generate the original difference_file. For example, if a difference file was generated on a Windows NT Workstation installation in C:\Winnt, then that difference file can be applied on other computers only if those computers are running Windows NT installed in C:\Winnt.
Note
You can also run the sysdiff /apply command from the command line. For example, you can use this command to apply a difference file that contains applications to an existing installation of Windows NT Workstation 4.0.
Run the following command:
SYSDIFF /inf /m [/u] sysdiff_file oem_root
where:
/m
causes the file changes in the per-user profile structure to be mapped to the Default User profile structure, rather than to the profile structure for the user logged on when the difference file was created.
For example, if you were logged on as Administrator when you installed the applications to be included in the difference file, then the .lnk files and other user profile files would be created in the %WinDir%\Profiles\Administrator directory (where %WinDir%\ is the value of the %USERPROFILE% environment variable). But this directory does not yet exist when the files are copied during GUI-mode setup. For a preinstallation, these files should be placed into %WinDir%\Profiles\Default User instead of %WinDir%\Profiles\Administrator. By using the /m switch to place the files in the Default User profile structure, you ensure that the applications are available to all users when they first log in.
/u
specifies that the INF file be generated as a Unicode text file. By default, the file is generated using the system ANSI codepage.
sysdiff_file
is a Win32 path to a file that was created by sysdiff's difference mode.
oem_root
is the Win32 path of a directory. The $OEM$ structure will be created in this directory, and the INF will be placed there with the name Instapp.inf.
The output of this command is a file with the name dif_file.inf, where dif_file is the name of the difference file (without the three character filename extension). If the difference filename is more than eight characters long, it will be truncated to eight characters. For example, if sysdiff_file was named Custom.dif, the INF created by the sysdiff /inf command will be Custom.inf. If sysdiff_file was named Marketing.dif, the INF created by the sysdiff /inf command will be Custom_m.inf.
Because the INF file is copied during text mode Setup, it should be placed in the $OEM$\Textmode directory and listed in the Txtsetup.oem file in that directoryTMTM. On x86 machines, Txtsetup.oem and all files listed in it must also be listed in the [OEMBootFiles] section of the answer file.
Add a line to $OEM$\Cmdlines.txt to invoke the INF you created from the sysdff difference file. The command is of the same form as you would use to invoke any Windows 95-style INF. The format is as follows:
"RUNDLL32 syssetup,SetupInfObjectInstallAction section 128 inf"
where:
Section
specifies the name of the section in the INF file.
Inf
specifies the name of the INF file. This should be specified as a relative path to avoid invoking Setup's default INF rules, which look for an unqualified filename in the system inf directory instead of the current directory. For example, specify ..\newtools.inf, not just newtools.inf.
The command is always enclosed in double quotation marks.
· Use the command,
sysdiff /dump difference_file dump_file
This creates a text file with the name specified in the dump_file parameter that contains information regarding the contents of the difference file.