Computers running Windows NT Server are already placed throughout the Terra Flora network. On the Terra Flora network diagram, servers operating the DHCP service have been located in all three domains. In the California domain, CANTS40ENT03 is designated as a DHCP server. In the Northeast domain, NENTS40ENT01 plays that role, and in the Europe domain, it is EUNTS40ENT01. The DHCP service is part of the Windows NT Server product, and enabling the service is simple to do.
A client computer obtains an address from a computer running the DHCP service when the client computer starts up. This depends on the client being able to locate the server responsible for leasing it an IP address. Because of this, the IP address of the server must not change; that is, the server running the DHCP service must have a static (unchanging) IP address.
To configure a static server address
1. In the Microsoft TCP/IP Properties dialog box, click the IP Address tab.
2. In Adapter, select the network adapter for which you wish to specify an IP address (if necessary), and then click OK.
3. Click Specify an IP address.
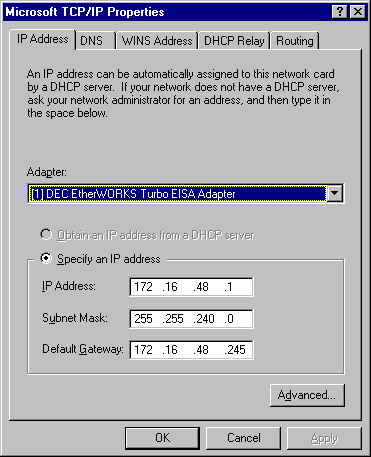
The settings in your dialog box will be similar to the following:

You must restart the server for these settings to take effect.
The option selected in the diagram is Specify an IP address. The administrator assigns a static IP Address, Subnet Mask, and Default Gateway address for the DHCP server.
Note If the administrator specified an IP address and IP address information during the setup of Windows NT Server, the above step can be skipped.
DHCP can be installed as part of Setup. If DHCP is not installed as part of Setup, it must be configured on at least one network computer running Windows NT Server.
1. Click Start, point to Settings, and click Control Panel.
2. Double-click Network.
3. Click the Services tab.
4. Click Add.
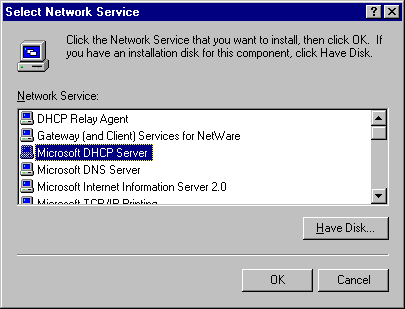
The Select Network Services dialog box appears.
5. In Network Service, click Microsoft DHCP Server.
6. Click OK if loading from the network.
Or, click Have Disk to load the software from disks or a CD-ROM.
7. Type the full path to the Windows NT Server DHCP files, and then click OK.
You must restart the server for the changes to take effect.
Note
You must be logged on as a member of the Administrators group to install the DHCP service.
The addition of the DHCP service places DHCP Manager on the Administrative Tools menu. Once the installation is complete on the computer running Windows NT Server, use DHCP Manager to complete the configuration of the DHCP server.
To access DHCP Manager
Click Start, point to Programs, point to Administrative Tools, and click DHCP Manager.
Using the DHCP Manager, the administrators at Terra Flora can configure, set up and maintain all the computers running Windows NT Server with the DHCP Server service enabled from a single computer or from any computer.
The DHCP Manager contains a list of the servers that it can administer. Initially, this list is empty. Until servers are added to the server list, the options provided with DHCP are not available. Even the first computer running Windows NT Server on which you install DHCP must be added to the server list before it can be administered. DHCP Manager.
To add a DHCP server to the Server List
1. On the Server menu of DHCP Manager, click Add.
The Add DHCP Server to Server List dialog box appears.
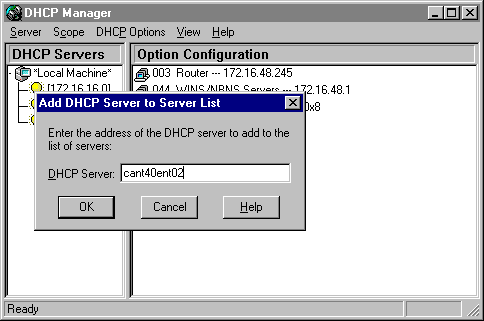
2. In DHCP Server, type the IP address of the DHCP server to be added to the list, and then click OK.
3. Repeat steps 1 and 2, if necessary, to add all the network computers running Windows NT Server with DHCP service enabled.
Note
You cannot administer network servers running other dynamic addressing programs from a computer running Windows NT Server with DHCP service enabled.
On any given network, for clients to obtain dynamic IP addresses, there must be at least one computer running Windows NT Server DHCP service. Once the DHCP Server service is installed on a computer running Windows NT Server, and the Windows NT server is added to the server list, a DHCP scope must be created.
A DHCP scope consists of a pool of IP addresses on a given subnet, such as 223.223.223.1 to 223.223.223.200, that the DHCP Server can lease to DHCP Clients.
At Terra Flora, each computer running Windows NT Server DHCP service will store at least one scope containing the ranges of IP addresses that the Windows NT Server DHCP service can lease to requesting clients. Each scope will contain a unique pool of addresses from which to assign IP addresses.
Refer to the Terra Flora diagram. On the California domain PDC, a scope will be named CAPDCDHCP and will contain its own unique pool of IP addresses that will be assigned as clients start up. The scope on the BDC will be named CABDCDHCP and will also have a unique pool of addresses.
When the computer running Windows NT Server DHCP Service receives a request from a DHCP enabled client for an IP address, the DHCP server will select an available IP address from its pool of IP addresses and offer it to the DHCP client, along with other configuration information that can be displayed using various DOS commands.
The computers running Windows NT Server DHCP service will not only provide Terra Flora with the ability to dynamically configure clients IP addresses, but DHCP will, as part of the service it provides, record that address as leased to the client, eliminating the need for manual tracking of IP addresses. The DHCP leasing policy can be fully configured by administrators, eliminating any need for manual intervention.
The Windows NT Server DHCP service lease mechanism provides the following benefits:
Users no longer need to acquire an IP address from an administrator to properly install and configure TCP/IP. When a client is configured to use automatic DHCP, it will automatically lease an IP address from a DHCP Server at start up.
The Windows NT Server DHCP Service supplies all of the necessary configuration information to all of the DHCP-enabled clients and servers. As long as the DHCP Server maintains the correct configuration information, none of the clients or servers will ever be incorrectly configured. At Terra Flora, the difficulty of tracing network problems that resulted from incorrectly configured workstations and servers will be a thing of the past.
Administrators define a pool of IP addresses that the Windows NT DHCP Service will lease to the DHCP clients. Administrators no longer need to keep track of which IP address are in use and which IP addresses are available.
When the client computer changes subnets and starts up on its new subnet, it will lease an IP address from a Windows NT Server running the DHCP Service that is appropriate for the subnet on which it is now located.
For example, if you change a DNS server address, it gets distributed to the network client dynamically.
Note
DHCP clients will cache their old IP addresses and will request the old IP addresses from the DHCP server if it is available. In most cases, the DHCP server will have the address available, as it assigns new addresses before scavenging old addresses.
A scope includes the following:
The maximum lease duration can be set to either 'Unlimited' or up to 999 days, 23 hours, and 59 minutes. For details on what happens when a lease expires, see Chapter 7, "Managing Microsoft DHCP Servers."
The default length of an IP address lease can be configured to a longer or shorter amount of time by an administrator.
Based on the number of available IP addresses in the DHCP scopes, how many of the scope's IP addresses will typically be in use by DHCP clients, and the frequency with which the DHCP clients will be rebooting or changing subnets, the lease duration for a DHCP Lease duration at Terra Flora will be configured at 7 days. This will provide a good balance between having too many addresses leased out to computers that are no longer on the network, and the renewal network traffic.
At Terra Flora, the guidelines for determining the appropriate lease duration were:
Terra Flora had to consider the number of IP addresses available in each DHCP scope. If there would be a large number of IP addresses available in the DHCP scope and relatively few DHCP clients, the lease duration should likely be increased in length. Increasing the lease duration would reduce the frequency that the DHCP clients will query the DHCP Server to renew their leases and therefore somewhat reduce network traffic.
If there was to be a limited number of IP addresses available in the DHCP scope, most of which will be in use at any given time, it would be desirable to reduce the lease duration. In addition, if DHCP clients on a given network would frequently be changing subnets and therefore requiring a different IP address, it would be beneficial to reduce the lease duration, especially if there are a limited number of IP addresses available. Reducing the lease duration would require DHCP clients to renew their leases more frequently, but would also ensure that any unused IP addresses in the pool are seen as available to lease by the DHCP server as soon as possible.
At Terra Flora, the descriptive comment will be the name of the Domain on which the DHCP server resides.
The creation of DHCP servers scopes is performed from the DHCP Manager
To create a scope
1. Open DHCP Manager and double-click the DHCP server you want to manage.
2. On the Scope menu, click Create.
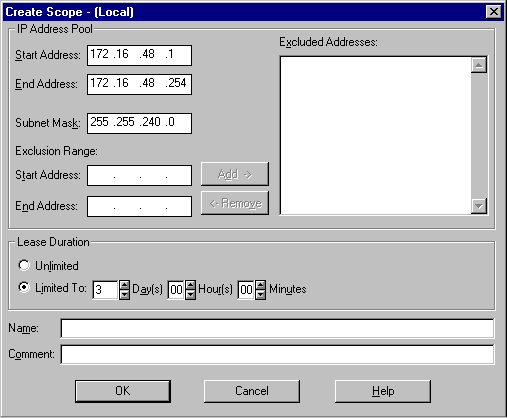
3. Under IP Address Pool, enter the server's beginning IP address in Start Address.
4. In End Address, enter the last IP address.
5. To add exclusion ranges, type a range in Exclusion Range, and click Add; then repeat for as many ranges as you want to set.
6. To remove exclusion ranges, click the range in Excluded Address, and then click Remove.
7. Under Lease Duration, click Limited To and enter the amount of time that the lease will last.
8. In Name, type the name of the scope.
9. If appropriate, type remarks in Comment, and then click OK.
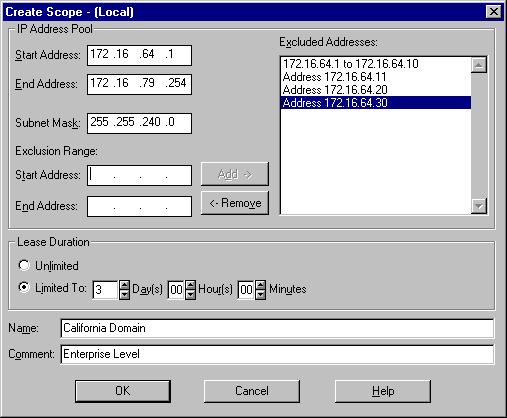
Terra Flora will configure a scope named "California" for the California Domain on the PDC. The Lease Duration at Terra Flora will be defined at seven days.
Note Once the administrative scope has been created, it must be activated before the DHCP Server will lease any IP addresses from the DHCP scope's IP address pool.
A DHCP scope is activated and deactivated from the DHCP Manager Scope menu. In DHCP Manager, active scopes will be preceded by a light bulb icon that looks as it is turned on and deactivated scopes will be preceded by a gray light bulb that looks as if it is turned off.
Once a DHCP scope has been created any of the scope's settings, such as the range of the IP address pool, it can be modified from the Scope Properties menu.
The DHCP Manager allows the reservation of a specific IP address for a computer. At Terra Flora, the plan is to reserve DHCP IP addresses on the network in the scope for the following devices and computers:
The IP address for the DHCP servers were assigned during the Windows NT Server Setup. The addresses assigned to the DHCP servers will now be reserved for those servers.
The administrator will reserve IP addresses using Add Reservations on the DHCP Manager Scope menu. When the computer client requests an IP address from the DHCP Server, the DHCP Server will always return the reserved IP address.
Note
The static addresses placed in Add Reservations will always override any configuration options specified using DHCP Manager.
To reserve a client address in DHCP:
1. In DHCP Manager, double-click the DHCP server you want to manage.
2. Click the scope in which you want to add reservations.
3. On the Scope menu, click Add Reservations.
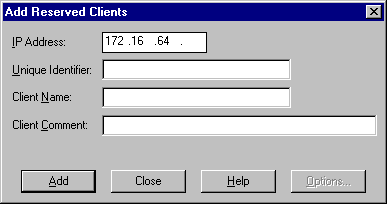
Two important entries in the dialog box are:
The unique identifier is the media access control (MAC) address for the DHCP client and can be obtained by typing the following command at the command prompt on the client computer for which the address will be reserved:
This entry should be the computer name of the DHCP client. The name is used only for identification purposes. This entry is not available when adding reservations for MS-DOS–based DHCP clients.
Notes It is critical that Unique Identifier entry be correct because the MAC address is sent as part of the DHCP client's request for an IP address to the DHCP Server. If this value is not correct, no match is found on the DHCP server, which means the DHCP Server will assign the client any available IP address instead of the reserved IP address.
On Windows 95 clients, you must run the program Winipcfg.exe to view the MAC or physical address.
At a minimum, a DHCP server must provide the DHCP client with the following information:
These items are referred to as configuration parameters. There are about 60 other predefined DHCP configuration parameters, called options, that an administrator can configure through the DHCP Manager for one or all scopes on a DHCP server. For a complete listing of the options and their meanings, see Chapter 7, "Managing Microsoft DHCP Servers"
There are four methods that can be used to set the DHCP Options:
When you set a global DHCP option, the option takes affect for all DHCP scopes defined on the selected DHCP server. Global DHCP options appear in the DHCP Manager with a globe icon proceeding them.
Setting a scope DHCP option will set the option only for the selected scope on the Options Scope menu. DHCP options configured for a scope are displayed with a series of computer icons proceeding them in DHCP Manager.
Setting a default DHCP option modifies the default value for one of the DHCP Options. When a default value is set, the default value becomes the default that was set during administration rather than the DHCP default that was set during installation of DHCP.
This method can be used to configure one or more of the DHCP options for a specific DHCP client. DHCP options can be set for a client only if the DHCP client has a reserved IP address. The only way to see if a DHCP option is set for a DHCP client is to view the properties of an active client lease on the Scope Active Leases menu and then clicking Options.
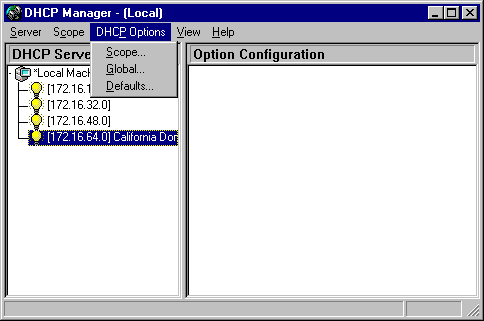
Configure a Global, Scope, or Default DHCP Option on the DHCP Options menu by clicking Global, Scope, or Default.
If Scope or Global is selected, the following dialog box appears, indicating which menu option was selected by printing the title of the menu option in the title bar.
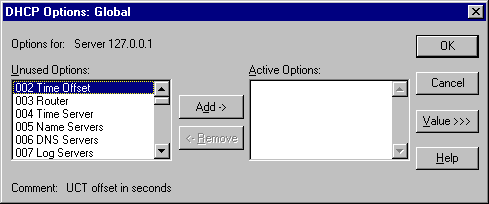
To configure DHCP options globally or by scope
1. In DHCP Manager, double-click the DHCP server you want to manage.
2. Click the scope for which you want to configure DHCP Options.
3. On the DHCP Options menu, click Global to change options globally.
Or, click Scope, to change options by scopes.
4. Click Edit Array.
Enter the changes that you want for DHCP options.
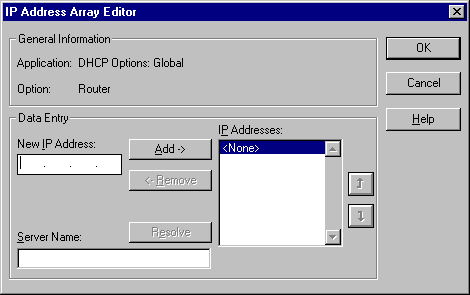
Using the dialog box, the administrator can change or add a new DHCP option to the list and configure it with the proper settings.
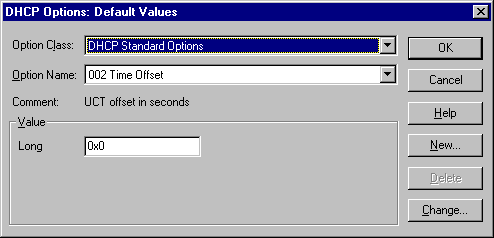
To configure Default DHCP Options
1. If necessary, click the DHCP Standard Options default as the value in Option Class.
2. In Option Name, click Change to change the default.
Or, click New to create a new default.
3. When the fields that need to be changed appear, enter the appropriate settings, and then click OK.
Configuring client options can be performed only if the IP address for the client has been reserved. Configuring client options is performed using a different graphical interface than was used to configure the Global, Scope or Default options.
For details about reserving addresses, see "Reserving IP addresses," earlier in this chapter.
To configure DHCP options for a particular client
1. Click the server where the reserved client's IP address resides for which you want to enable options.
2. Click the scope that contains the client reservation.
3. On the Scope menu, click Active Leases.
4. Click the client that you want to configure.
5. Click Properties.
6. Click Options.
The DHCP Options: Reservations dialog box appears.
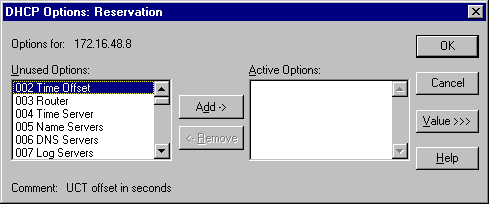
7. In Unused Options, click the option you want to add for the client, and then click Add.
8. To change or enter a value for the option, click it in Active Options, and then click Value.
9. Enter the appropriate value, and click OK.
For a complete description of the options available, see Chapter 7, "Managing Microsoft DHCP Servers."
If a DHCP option is set for more than one level, such as for both global and scope, precedence is in the following order:
These include:
Some of the DHCP options administrators typically configure are:
The Router parameter requires the IP addresses for one or more routers and is the equivalent of the Default Gateway entry in the TCP/IP configuration dialog box.
The Domain Name Server parameter requires the IP addresses for one or more DNS servers.
This option is used to specify DNS domain names to be used for host name resolution.
The WINS/NBNS (NetBIOS Name Servers) Servers parameters requires IP addresses for one or more WINS/NBNS servers.
This DHCP option can be used to configure the method that the DHCP client will use to resolve computer (NetBIOS) names: 0x1 (b-node), 0x2 (p-node), 0x4 (m-node), or 0x8 (h-node).
Note
A computer running Windows NT Server DHCP service can be configured to automatically provide IP addresses of the WINS and DNS servers used in the name resolution process. This removes the requirement of individually configuring each client with the WINS and DNS server IP addresses. The only requirement for the client is to click Obtain an IP address from a DHCP server on the Microsoft TCP/IP Properties dialog box.
Computers running Windows NT Server DHCP service have the ability to use the bootP relay service which enables clients on one subnet to access a DHCP server on another subnet. Refer to the Terra Flora network diagram. In the Terra Flora California domain, all the servers running Windows NT Server DHCP service are located on the Enterprise level.
There are three subnets in the California domain, and only one subnet contains the servers running Windows NT Server DHCP service. The two subnets that do not contain computers running Windows NT Server DHCP service have a computer running Windows NT Workstation or Windows NT Server that acts as DHCP relay or bootP relay agent. The DHCP bootP relay agents are named CANTS40DIV03 and CANTS40DPT02.
When a dynamic client computer on the subnet where the bootP relay agent resides requests an IP address, the request is forwarded to the subnet's bootP relay agent. The bootP relay agent, in turn, is configured to forward the request directly to the correct computer running Windows NT Server DHCP service. The computer running Windows NT Server DHCP service returns an IP address directly to the requesting client.
For a detailed discussion on the bootP relay agents, see Chapter 7, "Managing Microsoft DHCP Servers."
Configuration of the DHCP bootP relay agent is a two-step process. The first step is to install the DHCP Relay Agent Service on the computer that will act as a bootP relay agent. The DHCP Relay Agent Service is a Windows NT Server service. The bootP agents can then be configured, using the Microsoft TCP/IP Protocol Properties dialog box, with the IP address of the computer running Windows NT Server DHCP, so the agent will know where to forward requests from clients for available IP addresses. Installing the service and configuring the agents are both performed using Network in Control Panel.
To install the DHCP Relay Agent Service
1. In the Network dialog box, click the Services tab.
2. Click Add.
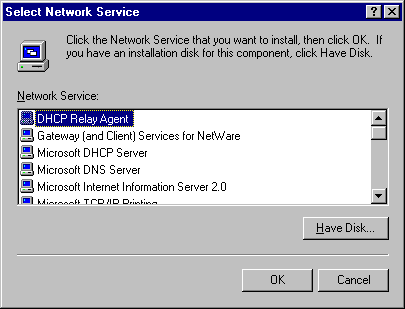
3. Under Network Service, click DHCP Relay Agent, and then click Have Disk if loading the software from disks or a CD-ROM.
Or, click OK if loading from the network.
4. In the message that appears, type the full path to the Windows NT Server DHCP files, and click OK.
The DHCP service is installed.
5. Click Close.
Configuration and binding information is checked.
You must shut down and restart the computer before the new settings will take effect
Addition of the TCP/IP address of the computers running Windows NT Server DHCP service to the bootP relay agents is performed in the TCP/IP Properties dialog box.
To add an IP address to the bootP relay agent:
1. In the Network dialog box, click the Protocols tab.
2. Click TCP/IP Protocol, and then click Properties.
3. Click the DHCP Relay tab.
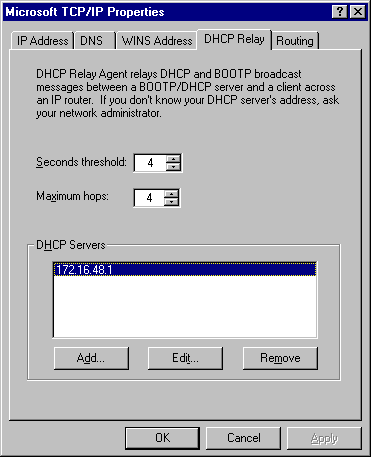
4. Check that the Seconds threshold and Maximum hops settings are set at 4.
5. Under DHCP Servers, type the IP address of the server that will provide the IP addresses to the subnet's requesting clients.
6. Click Add, and then click OK.