
A WINS server is a computer running Windows NT Server using the Microsoft TCP/IP protocol and the WINS server software. WINS servers maintain a database that maps computer names to IP addresses, allowing users to easily communicate with other computers while gaining all of the benefits of using TCP/IP.
For a complete discussion of the WINS service, see Chapter 8, "Managing Microsoft WINS Servers."
Installing a WINS server is part of the process of installing Microsoft TCP/IP in Windows NT Server. The following instructions assume you have already installed the Windows NT Server operating system on the computer.
You must be logged on as a member of the Administrators group to install WINS.
To install a WINS server
1. Click Start, point to Settings, and click Control Panel.
2. Double-click Network.
3. Click the Services tab.
4. Click Server, and then click Add.
5. In the Select Network Service dialog box, click Windows Internet Name Service.

6. Click Have Disk if you are loading the software from disks or a CD-ROM.
Or, click OK if loading from the network.
7. In the Windows NT Setup dialog box, type the full path to the Windows NT Server WINS files, and then click Continue.
You must shut down and restart the computer before the new settings will take effect. The WINS Manager then appears on the Administrative Tools (Common) menu on the desktop.
The addition of the WINS service places the WINS Manager on the Administrative Tools (Common) menu. Once the installation is complete on the computer running Windows NT Server, use WINS Manager to complete the configuration of WINS.
To start WINS Manager
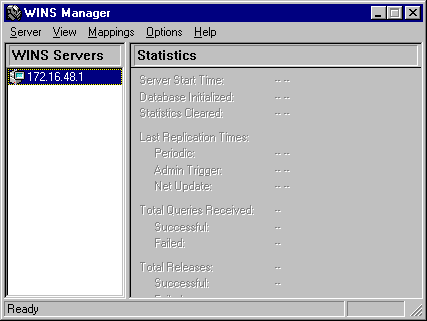
Before you can administer and manage WINS servers, you must add the WINS servers to the Server List using the WINS Manager graphical interface. At Terra Flora, all computers running Windows NT Server WINS service will be added to the WINS Server List. Until the WINS servers are added to the list, no WINS features are available. Once the servers are added to the list, administration of any computer running Windows NT Server WINS Service can take place from any other computer running Windows NT Server WINS Manager.
To Add a WINS server to the Server List
1. On the WINS Manager Server menu, click Add.
The Add WINS Server to Server List dialog box appears.

2. In WINS Server, type the IP address of the DHCP server to be added to the list, and then click OK.
Once a WINS Server is added to the list, configuration of the server can take place.
Terra Flora will configure multiple WINS servers to increase the availability and balance the load among servers. To configure a WINS server, you must be a member of the administrators group of that server.
To configure a WINS server
1. In WINS Manager, click the server you want to configure.
2. On the Server menu, click Configuration.
The WINS Server Configuration dialog box appears.
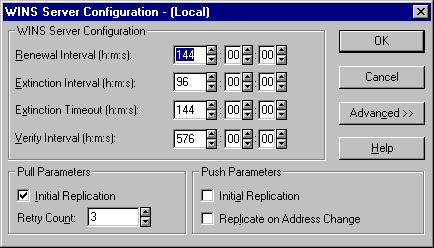
3. Select the configuration options you want.
4. Click Advanced to configure other options.
The database backup path must have a directory specified.
This means that if they are no longer valid, they will be overwritten by the new registration or replica. By default, this option is not checked.
5. When you have completed all changes in the WINS Server Configuration dialog box, click OK.
Notes
All of the WINS servers on a network can be configured to communicate with each other so that a name registered with one WINS server will eventually be known by all WINS servers. In addition to registration of all names on the network with all WINS servers, all WINS servers will eventually be notified when a name is released. Replication is carried out among replication partners, rather than by each server replicating to all other servers. Each WINS server must be configured with at least one other WINS server as its replication partner.
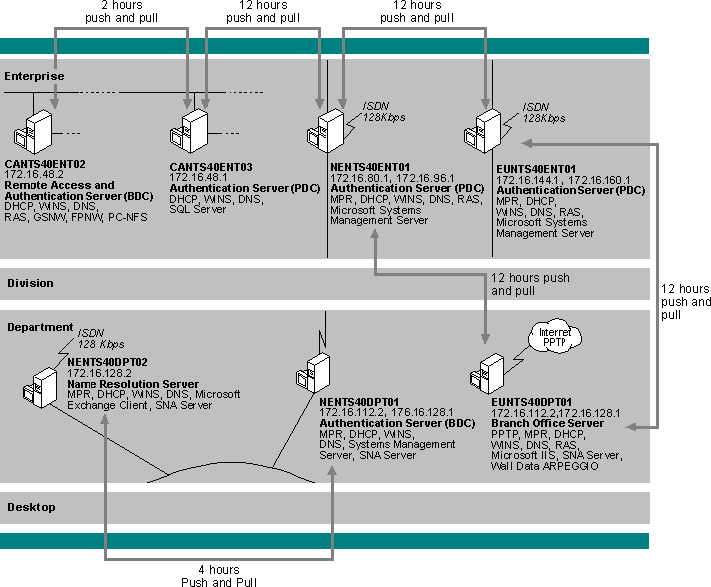
In Terra Flora's main California Domain, one WINS server will be designated as the central server, and all other WINS servers will be configured as both push and pull partners of this central server. A pull partner is a WINS server that pulls in replications of database entries from its partner by requesting and then accepting the replications. A push partner is a WINS server that sends update notification messages to its partner when its WINS database has changed. This configuration ensures that the WINS database on each server contains names addresses for every network computer.
The Terra Flora network diagram of the California domain shows only two of the WINS servers. At Terra Flora, WINS will be enabled on several computers running Windows NT at the Enterprise level. All of these computers running Windows NT Server WINS server will be configured as push and pull partners of each other.
The PDC will act as the central server. It will push changes made to its database to the next server in the line, which then pulls the changes from the PDC. This will continue down the line, with the server last on the line pushing back to the central server, which will pull in changes from the last server on the line. This ensures that all the databases on all WINS servers are replicated and up-to-date.
Additionally, the administrator can perform a replication immediately or at a specified time.
To add a replication partner to a WINS server
1. On the WINS Manager Server menu, click Replication Partners.
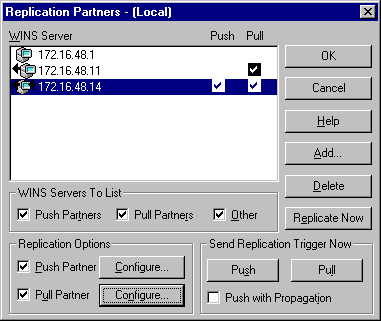
The Replication Partners dialog box appears, showing all replication partners of the WINS server.
2. Click Add.
3. Type the IP address of the WINS server that is to be added as a push or pull partner.
The added server can be configured as either a push or pull partner to the WINS server. The replication partner will automatically be added as both a push and pull partner of the server that is being configured. This can be changed.
To configure replication partners for a WINS server
1. In WINS Server in the Replication Partners dialog box, click the server you want to configure.
2. Under Replication Options, select the Push Partner check box, the Pull Partner check box, or both, to indicate the appropriate replication partnership.
3. Under Replication Options, select the Configure check box for each of the appropriate settings.
The Push Partners Properties or Pull Partners Properties dialog box appears.
To define pull partner properties
1. In Start Time on the Pull Partner Properties dialog box, type a number to indicate when replication should begin, using any separator (such as AM or PM) for hours, minutes, and seconds.
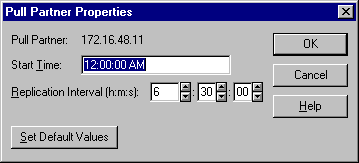
2. In Replication Interval, type a time in hours, minutes, and seconds to indicate how often replications will occur.
Or, to use values specified in the Preferences dialog box, click Set Default Values.
3. Click OK.
The AM and PM designators are part of your time setting in International (in Control Panel).
To define push partner properties
1. In Update Count on the Push Partner Properties dialog box, type the number of additions and updates that can be made to records in the database before replication must take place.
The minimum value is 20; replications that have been pulled in from partners do not count as insertions or updates in this context.
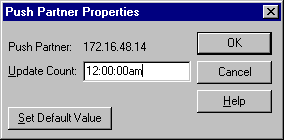
2. Click OK.
If you decide later to reset the values specified in the Preferences dialog box, you can reopen the Push Partner Properties dialog box and click Set Default Values.
You can also immediately replicate the database between the partners, rather than waiting for the start time or replication interval specified in the Preferences dialog box. For details, see "Setting Preferences for WINS Manager" later in this chapter.
You probably want replication to begin immediately after you make a series of changes, such as entering a range of static address mappings.
To trigger replication
1. On the Server menu of WINS Manager, click Replication Partners.
2. Click the WINS servers to which you want to send a replication trigger.
Or, if you want the selected WINS server to propagate the trigger to all its pull partners, select the Push With Propagation check box.
3. Under Send Replication Trigger Now, click Push or Pull, depending on which partners you want to trigger.
If Push With Propagation is not selected, the selected WINS server does not send the trigger to its other partners.
If Push With Propagation is selected, the selected WINS server sends a propagate push trigger to its pull partners after it has pulled in the latest information from the source WINS server. If it does not need to pull in any replicas because it has the same or more up-to-date replicas than the source WINS server, it does not propagate the trigger to its pull partners.
To start replication immediately
Static mappings are permanent lists of computer name-to-IP address mappings. In the table, the administrator indicates the computer name and matches the IP address the computer. When a network client sends a name request to the WINS server, the WINS server will always respond with the name entered by the administrator. At Terra Flora, all DNS servers, DHCP servers and other WINS servers will be statically added to all WINS servers.
Note
If DHCP is also used on the network, a reserved (or static) IP address will override any WINS server settings. Static mappings should not be assigned to WINS-enabled client computers.
You can add static mappings to the WINS database for specific IP addresses using two methods:
To type static mappings in a dialog box
1. On the Mappings menu, click Static Mappings.

2. Click Add Mappings.
3. In Name, type the computer name of the system for which you are adding a static mapping.
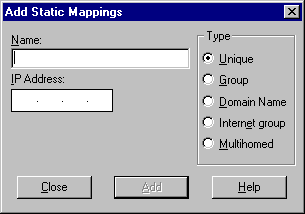
WINS Manager automatically adds the two backslashes (\\), which normally proceed the entry of a computer name.
4. In IP Address, type the address for the computer.
5. In Type, click to indicate whether this entry is a unique name or a group with a special name, and then click Add.
The mapping entry is immediately added to the database, and the check boxes are cleared so that you can add another static mapping entry.
The settings available under Type include the following:
If Internet Group or Multihomed is selected under Type, the dialog box shows additional controls for adding multiple addresses. Click the down arrow (button) to move the address you type into the list of addresses for the group. Use the up-arrow button to change the order of a selected address in the list.
Entries for static mappings of unique and special group names can be imported from any file with the same format as the LMHOSTS file, which is described in Chapter 10 "Using LMHOSTS Files." Scope names and keywords other than #DOM are ignored. Static Mapping for normal group and multihomed names can be added only by typing entries in the Add Static Mappings dialog box.
Note
For Internet group names defined in this dialog box (that is, added statically), make sure that the primary domain controller (PDC) for that domain is defined in the group if the PDC is running Windows NT Advanced Server version 3.1.
To import a file containing static mapping entries
1. In the Static Mappings dialog box, click Import Mappings.
2. In the Select Static Mapping File dialog box, enter the name of the file containing the names to be mapped.
The specified file is read, and then a static mapping is created for each computer name and address. If the #DOM keyword is included for any record, an Internet group is created (if it is not already present), and the address is added to that group.
For more information on managing Static Mappings, see Chapter 8, "Managing Microsoft WINS Servers."
Several options can be configured to administer WINS servers. The control preferences are on the Options menu.
To set preferences for WINS Manager
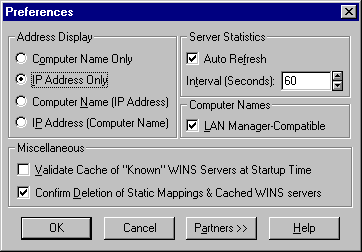
This check box should be selected unless your network accepts NetBIOS name from other sources.
The minimum value is 20.
WINS Manager also automatically refreshes the statistical display each time an action is initiated while you are working in WINS Manager.
LAN Manager computer names are limited to 15 characters, as compared to the 16-character NetBIOS names used by some other sources, such as Lotus Notes. In LAN Manager names, the 16th byte is used to indicate whether the device is a server, workstation, messenger, and so on. When this option is selected, WINS adds and imports static mappings with 0, 0x03, and 0x20 as the 16th byte.
All Windows – based networking, including Windows NT, follows the LAN Manager convention.
The replication interval should be equal to or less than the lowest refresh time interval that is set on any of the replicating WINS servers. The minimum value for the replication interval is 40 minutes.