
Once a Windows NT Server DNS server is installed, DNS Manager is added to the Administrative Menu. Using DNS Manager, the administrator can add servers running Windows NT Server 4.0 DNS service to the server list. Once added, the administrator can view and change parameters of any of the Windows NT Server 4.0 DNS servers in the list.
To open the DNS Manager
· Click Start, point to Programs, point to Administrative Tools, and click DNS Manager.
The Domain Name Service Manager window appears.

All of the servers running Windows NT Server 4.0 DNS service on the network can be administered and managed from any single computer running Windows NT Server DNS service, through the DNS Manager interface. To do this, the administrators at Terra Flora will add the servers to the server list using the DNS Manager interface. DNS features will not be available on any of the computers running Windows NT until the server is added to the server list.
To add a DNS server
The Add DNS Server dialog box appears.
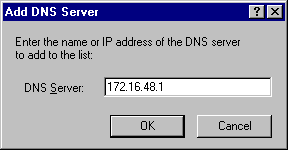
The server appears in the server list in Domain Name Service Manager.
Three of the four existing zones will be moved to servers running Windows NT Server 4.0 DNS service.
The administers at Terra Flora will remove the appropriate zone, boot and cache files from the system servers which currently store the zones of Terraflora.com, Nursery.Terraflora.com and Supply.Terraflora.com. The files will then be placed in the SystemRoot\System32\DNS directory of the proper new server running Windows NT Server 4.0 DNS service which will, from that point forward, store the zone information.
The Terra Flora administrator will use the editor that they are familiar with to change the information about the zones in the boot file as appropriate.
Once the files are in the proper directory, the zone's structure can be viewed using the DNS Manager graphical interface. The administrators will be able to view the structure of the Nursery.Terraflora.Com and Supply.Terraflora.Com and Terraflora.Com zones.
A zone is the administrative tool for information about the DNS domains. At Terra Flora, Terraflora.Com is the main authoritative DNS domain and the root zone. Three additional zones called Nursery.Terraflora.Com, Supply.Terraflora.Com and Retail.Terraflora.Com exist at Terra Flora. At Terra Flora, three of the zones have been moved to computers running Windows NT DNS Service. See the previous section "Copy the Files" for details.
Because of the mission critical nature of the applications in the retail division, the Retail.Terraflora.Com zone will be maintained. A fifth zone will be created to split the Retail.Terraflora.Com zone. This fifth zone will include only servers running Windows NT Server 4.0 DNS server. The zone will be set up as both primary and secondary in order for replication of the resource record database to take place. Two servers will store the zone information, one will store the primary zone information and one will store the secondary zone information.
To add the primary NT.Retail.Terraflora.Com zone
1. In Domain Name Service Manager, click the server for which you will be creating the zone.
2. On the DNS menu, click New Zone.
The Create new zone for IP address of the server selected dialog box appears.
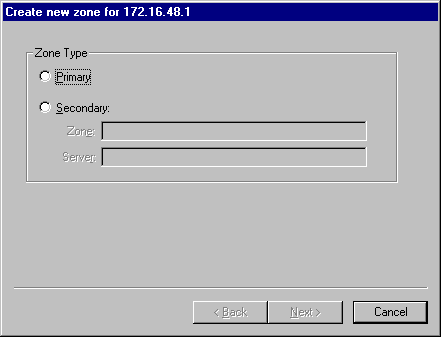
3. Click Primary.
4. Click Next.

5. In Zone Name, type the name of the root domain within the zone.
6. If necessary, type the name of the database file in which you want the DNS resource records to be stored in Zone File.
7. Click Next.
8. Click Finish.

An SOA (Start of Authority) record is created in the database file entered in step 7. The SOA record indicates the Name Server which is the best source of information for supplying name resolution data.
NT.Retail.Terraflora.Com will also be set up as a secondary zone and the server assigned will be different than the one assigned for the Primary zone. If the server that stores the primary zone goes down, the server storing the secondary zone will be used for name resolution.
Selecting Primary as a zone type indicates that the zone does not obtain it's resource records from any other zone, the DNS Administrators are required to add, delete and modify all necessary resource records to the primary zone files.
The root domain is a DNS domain with multiple sections, each with a maximum of 63 characters and separated by a period (.). The zone name must be unique. The zone name will be NT.Retail.Terraflora.Com.
The default name of the Zone File will be the same name as entered in the Zone Name field.
To add the secondary NT.Retail.Terraflora.Com zone
1. In Domain Name Service Manager, click the server for which you will be creating the secondary zone.
2. On the DNS menu, click New Zone.
The Create new zone for IP address of the server selected dialog box appears.
3. Click Secondary as the Zone Type.
4. In Zone, type the name of the zone.
5. In Server, type the name of the server on which the primary zone information is stored, and then click Next.
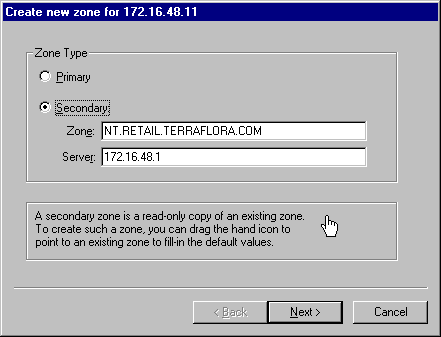
The secondary zone name appears in Zone Name.
6. In Zone File, type the name of the secondary database file you want the DNS resource records to be stored in, and then click Next.

7. Click Add, and enter the IP address of the IP Master, which is the server on which the primary zone information is stored.
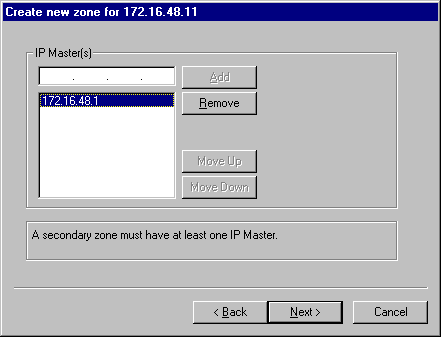
8. Click Next.
9. When a message appears, confirming that all the information for the new zone has been entered, click Finish.

Selecting Secondary as the zone type indicates that the zone obtains its resource records from the primary zone. This means that the DNS Administrators are required to add, delete, and modify all resource records in the primary zone and not this secondary zone.
At Terra Flora, the zone name will be NT.Retail.Terraflora.Com, matching the primary name. The name should always be the primary zone name. When the secondary server starts, a query will be sent to the server specified as the IP Master for the zone file with the same primary name.
The default name in Zone File will be the name you entered in Zone Name.
Each secondary zone must have at least one IP master. You can add more than one IP master and move them in the list using the Move Up and Move Down buttons.
During the process of creating the new NT.Retail.Terraflora.Com zone, Terra Flora specified the database file name and database server which would store the zone's database information. Resource records need to be added to the zone's database file that will indicate how computer names will be resolved.
Terra Flora has configured the DNS system so that when a client requests an IP address from the DNS server, the server on which the zone file for Terraflora.Com resides is examined first. If the name cannot be resolved within the Terraflora.Com file, the request is then forwarded to the servers on which the zone files for Retail.Terraflora.Com, Nursery.Terraflora.Com, and Supply.Terraflora.Com reside.
The resource records implementing this lookup already exist in all zones, except for the new NT.Retail.Terraflora.Com zone which was just created. New resource records must be put in the two zones Terraflora.Com and NT.Retail.Terraflora.Com.
Additionally, the resource records that exist in Nursery.Terraflora.Com and Supply.Terraflora.Com must be changed to reflect the information about the new server that now stores the zone files for Nursery.Terraflora.Com and Supply.Terraflora.Com.
The resource records that will be added to or changed for each of the zones are described below:
An A (Address) record will be added supplying the host name and host address of NT.Retail.Terraflora.Com, which will indicate to other DNS servers and to the primary server storing the Terraflora.Com zone database file to search the NT.Retail.Terraflora.Com zone database file to resolve the clients name requests.
An NS (Name Server) record will be added supplying the DNS Name Server name for the NT.Retail.Terraflora.Com zone, which will indicate to other DNS servers and to the server storing the Terraflora.Com zone database file to search the zone database file of NT.Retail.Terraflora.Com to resolve the request.
The NS (Name Server) records will be changed to indicate the new DNS Name Server information for the Nursery.Terraflora.Com and Supply.Terraflora.Com zones.
Other records can be added as necessary by the Terra Flora administrators, but these records are key in resolving name requests.
An A (Address) record will be added supplying the host name and host address of NT.Retail.Terraflora.Com to indicate to other DNS servers that the information stored in the NT.Retail.Terraflora.Com database should be examined for name resolution.
An NS (Name Server) record will be added supplying the DNS Name Server name for the NT.Retail.Terraflora.Com zone to indicate to other DNS servers that the information stored in the NT.Retail.Terraflora.Com database should be examined for name resolution.
The NS (Name Server) records will be changed supplying the new DNS Name Server name for the Supply.Terraflora.Com and Nursery.Terraflora.Com zone to indicate to other DNS servers that the information stored in the two zones should be examined for name resolution.
Other records can be added as necessary by the Terra Flora administrators, but these records are key in the continued use of DNS at Terra Flora.
To add a database resource record
1. In Domain Name Service Manager, click the zone for which you will be creating the new record.
2. On the DNS menu, click New Record.
The New Resource Record dialog box appears.

In Record Type, click the record you want to add.
The dialog box changes, depending on which type of record you selected. For example, the For Domain name that is the zone name appears when you specify an NS record.
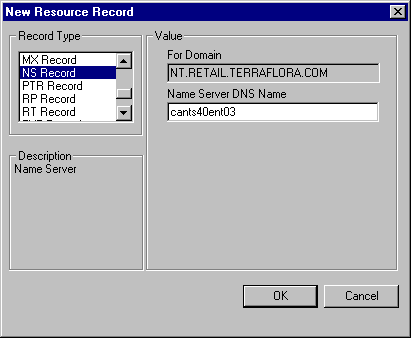
4. Under Value, type the necessary information, such as the Name Server DNS Name for NS records, which specifies the server name that will be used to resolve name requests.
5. Click OK.
To change a database resource record
1. In Domain Name Service Manager, click the server that stores the zone with which you want to work.
2. Click the zone that contains the record you want to change.
3. In Record for zone name, click the record type you want to change.
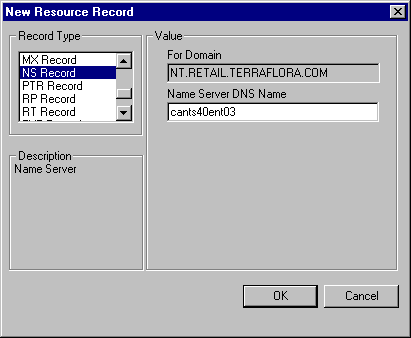
4. Double-click the record to be changed.
The dialog box changes, according to the kind of information required. For example, the Terra Flora administrator would type the name of the server which will now store the zone information for Nursery.Terraflora.Com in Name Server DNS Name.
5. To change another database resource record, repeat these steps.
For example, at Terra Flora, the administrator would repeat this procedure for Supply.Terraflora.Com.
6. When finished making changes, click OK.
At Terra Flora, the database resource records will need to be reviewed and changed as necessary.
In the case of Terraflora.Com, the administrator will be changing the NS record for Nursery.Terraflora.Com and Supply.Terraflora.Com. Consequently, the administer would complete the procedure for one record to step 5 and then repeat the procedure for the other record.
At Terra Flora, there are DNS Servers that are not running Windows NT Server 4.0 in the Retail.Terraflora.Com zone that will be added to the zone files residing on the servers running Windows NT Server 4.0 DNS service. The static entry of the DNS servers ensures that all DNS servers will be searched in an attempt to map name and IP addresses. An A (Address) and NS (Name Server) resource record will be added to each zone for each DNS server that is to participate in name resolution.
When a server running Windows NT Server 4.0 DNS Service receives a DNS request to resolve a specified DNS name to an IP address, it will search its A (Address) resource records until it finds one whose DNS name matches the one specified in the request. It then returns the IP address stored in that A (Address) resource record to the requesting computer.
If the server cannot locate an A (Address) resource record for the requested DNS name, and if Use Wins Resolution is enabled, the DNS server will extract the host name, which is the text of the name, on the left hand side of the name, up to the first period, and send a request to a the specified WINS server asking it to map the host to an IP address. If the name was registered with WINS, WINS will return the associated IP address to the DNS server and the DNS server will return it in response to the original DNS request.
Any number of WINS servers can be specified for fault tolerance purposes. The server running Windows NT Server DNS service will try to locate the name by searching the WINS servers in the order listed.
To enable WINS Lookup
1. In Domain Name Service Manager, click the zone for which you will be enabling WINS Lookup.
2. On the DNS menu, click Properties.
3. In the Zone Properties dialog box, click the WINS Lookup tab.

4. Select the Use WINS Resolution check box.
5. Under WINS Servers, type the WINS Server IP address that will be used for resolution.
6. Click Add.
You can repeat the procedure to add as many WINS servers for resolution as needed.