
The Macro toolbar is displayed whenever you open a macro-editing window, and it provides a number of debugging tools. In addition, WordBasic includes some statements used primarily for debugging. This section describes these debugging tools and statements.


The Trace button
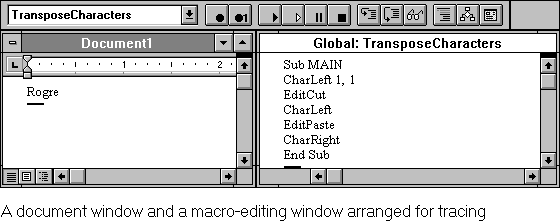
When you click the Trace button, Word runs the active macro and highlights each instruction as it runs it. Tracing happens very quickly because the macro runs at approximately its normal speed. Tracing can be useful for macros with many conditionals and loops, in which the flow is complex. You can use tracing to quickly determine, for example, whether a particular branch of an If control structure is run.
Of course, the macro-editing window must be visible, or you cannot see the instructions as they are highlighted. You can use the Arrange All command on the Window menu to layer a document window and a macro-editing window horizontally. You may also want to arrange the windows vertically, as in the following illustration, so that you can see more macro instructions at the same time.

The Step button
The Step button, along with its close relative the Step Subs button, is probably the most useful debugging tool. You can use the Step button to run a macro literally step by step. Each time you click the Step button, Word highlights an instruction and pauses; when you click the Step button again, Word runs the instruction and highlights the next one. In this way, you can monitor the effect of each instruction in your macro. This capability is especially useful for macros that move the insertion point in complex ways.
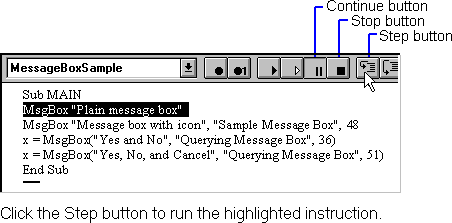
As you're stepping through a macro, you can click the Stop button to stop running the macro or the Continue button to run the remaining instructions consecutively without pausing.
Note
If the active macro calls a subroutine or function in another macro, Word steps through the called subroutine or function as well. To see Word step through the instructions, open the macro or macros being called and arrange the macro-editing windows so they are all visible in the Word window before clicking the Step button.
Stepping through long macros can be inefficient, particularly if most of the macro works fine and you're stepping through a lot of instructions just to get to the one in which the problem occurs. The solution is to use a Stop instruction to pause the macro just before the point where the error occurs, and then use the Step button to step through the instructions that generate the error. For more information on using Stop, see "Statements Useful for Debugging" later in this section.

The Step Subs button
The Step Subs button works just like the Step button except that it doesn't step through subroutines or user-defined functions; it only steps through the main subroutine. This button is useful when you know that the problem you're trying to isolate is not contained in a macro's subroutines or user-defined functions. For macros with only a main subroutine, choosing this button has the same effect as choosing the Step button.

The Show Variables button
The Show Variables button displays the Macro Variables dialog box, in which you can see and change the values of variables. The Show Variables button is active only when the macro is paused. You can pause a macro by using the Step button to step through it, or you can use a Stop instruction to pause it at a certain point.
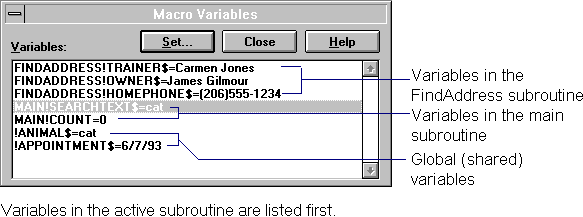
The Macro Variables dialog box can display variables defined in the main subroutine, variables defined in subroutines and user-defined functions, and variables shared by all subroutines; variables in the active subroutine are listed first. Variable names are preceded by the name of the subroutine or function for which they are defined, separated by an exclamation point. For example, in the following illustration, the string variable searchtext$ in the main subroutine is listed as MAIN!SEARCHTEXT$. The string variable owner$ in the FindAddress subroutine is listed as FINDADDRESS!OWNER$. The shared variable animal$ is listed as !ANIMAL$.
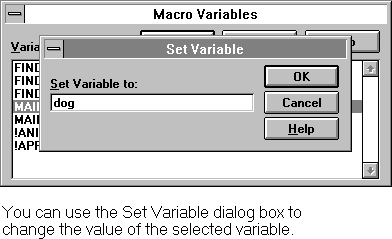
You can use the Set button in the Macro Variables dialog box to display the Set Variable dialog box, where you can change the value of the selected variable. It's particularly useful to change the values of variables that control loops. After running the loop enough times to test it, you can change the value of the controlling variable so that the macro can escape from the loop early.
Note
The Macro Variables dialog box does not display the values of array variables or dialog records. Use the MsgBox or Print statements to display the values of array elements.

The Add/Remove REM button
One of the most useful debugging techniques is to deactivate part of your macro by "commenting it out." You do so by turning instructions into comments, either by placing an apostrophe (') in front of them or by placing a REM instruction in front of the line. The Add/Remove REM button does the latter.
For example, you may want to test a macro that includes an instruction to print a document, but you probably don't want to print each time you test the macro. The solution is to comment out the FilePrint instruction as follows:
REM FilePrint "LETTER.DOC"
When you've finished testing the macro, you can select the instructions you commented out, and then click the Add/Remove REM button again to remove the REM statements and reactivate the instructions.
The following are WordBasic statements you can insert as instructions in your macro to assist in debugging.
When Word is running a macro and it encounters a Stop instruction, it pauses the macro at the Stop instruction. You can use a Stop instruction to pause a macro just before or after the place where you suspect a problem.
By default, the Stop statement produces a message box to notify you that it has paused the macro.
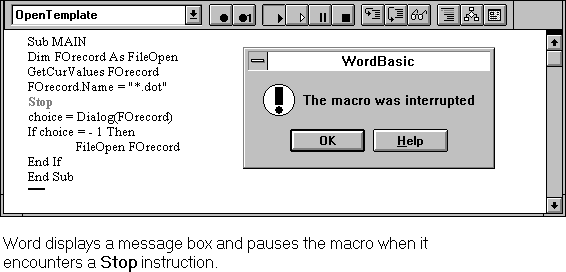
This message box is unnecessary if the macro-editing window is visible because Word highlights the Stop instruction in red. You can add an argument to the Stop instruction so that it does not display a message box — the instruction Stop -1 suppresses the message box.
This statement displays the Macro Variables dialog box. It's the equivalent of pausing the macro and choosing the Show Variables button at a given point in your macro.
Although you can check the status of most variables using the Macro Variables dialog box, that dialog box does not display array variables or dialog records. You can use the MsgBox statement to display and monitor these values. The MsgBox statement does not display numeric values, but you can use the Str$() function to convert numeric values into strings.
The Print statement is useful for the same reasons MsgBox is, but it does not interrupt the macro as a message box does. You can also use it to display numeric values — you don't have to convert them to strings first, as you do with the MsgBox statement.