Automating Forms
Macros can be used to automate the process of filling in Word forms. Information that would otherwise have to be typed manually can be filled in automatically. Custom commands can be created that are appropriate for a particular form.
Several types of macros are useful for automating forms. They include the following:
- "On-entry" and "on-exit" macros. Every form field in a form can have an on-entry macro, triggered when the field is activated, and an on-exit macro, triggered when the user moves to another field.
- Auto macros. Auto macros such as AutoNew and AutoClose provide a useful starting point for automation. For example, an AutoNew macro, triggered when a new form document is created, can run a series of other macros to guide the user through filling in the form. For more information on auto macros, see Chapter 2, "Getting Started with Macros."
- Macros assigned to a menu or a toolbar. Users filling in forms customized for a particular task can often benefit from custom commands. Turning macros into custom commands and placing them on menus or a toolbar gives them accessibility and visibility.
- MACROBUTTON fields. These fields, which trigger macros, provide
another way to embed macros within a form. For example, you could use a MACROBUTTON field to insert a bitmap of a dialog box button that says "Click Here to Print." A button embedded in a form makes an important command hard to miss.
A form should be made into a template so that whenever a user wants to fill in a new form, he or she creates a new document based on the form template. The new form inherits the form's boilerplate text and formatting. Any macros used to automate the form can be stored in the template. If the template is protected for forms, so are new documents based on it.
Here are some other points to keep in mind when automating a form:
- A drop-down form field can contain no more than 25 items. Use a dialog box when you want to present more items.
- You can use the EditGoTo statement to move to a form field. The following instruction selects the form field named "Check1":
EditGoTo "Check1"
- "Check1" is the default bookmark name for the first check box form field inserted in a form. You can change a bookmark name for a form field by unprotecting the form and double-clicking the field.
- For items that the macro will insert into the form — such as an invoice number or part number on an invoice — you can use either bookmarks or form fields to mark where the items are to be inserted. If you use form fields, you can use the SetFormResult statement to set the result of a form field. The following instruction inserts "Hello" into the "Text1" form field.
SetFormResult "Text1", "Hello"
- A form field isn't necessary unless you also want to allow the user to insert the information. Even when a document is protected for forms, a macro can insert information into any part of the document (unlike a user, who can type in form fields only). For example, the following instructions insert "Hello" at the beginning of the document:
StartOfDocument
Insert "Hello"
- Some WordBasic statements, such as InsertFormField, are not available when a document is protected for forms. In this case, the macro needs to unprotect the document, run the statement and then protect the document for forms. The following instructions unprotect the document, insert a text form field at the top of the document, and then protect the document for forms:
If DocumentProtection() = 1 Then
    ToolsUnprotectDocument
    StartOfDocument
    InsertFormField .TextType = 0
    ToolsProtectDocument .Type = 2, .NoReset = 1
End If
- If the .NoReset argument is not specified in a ToolsProtectDocument statement, unlocking and locking a document resets the form fields to their default results. If .NoReset is set to 1, Word does not reset form fields to their default results when a document is protected for forms (.Type = 2).
- In Word version 7.0, the DocumentProtection() function returns a number indicating the type of document protection. In Word version 6.0, use the CommandValid() function to determine whether a document is protected.
- You can connect a form to a database in several ways. For example, the invoice form described in this section uses dynamic data exchange (DDE)
to query a Microsoft Excel database and then displays the information — customer names or products — in a dialog box. If you're working with a large number of items, however, loading them into the dialog box can be slow. Another solution would be to open the database within Microsoft Excel itself: to make it the active application, in other words. A Microsoft Excel macro could then send the information selected in the database to the form in Word.
Another possibility would be to use the open database connectivity (ODBC) extensions for WordBasic to work with a database. A Word macro could then place the selected information in the appropriate field in the form. For information on using the ODBC extensions, see Appendix B, "ODBC Extensions for Microsoft Word," in Part 3, "Appendixes." Note that the ODBC extensions described in Appendix B are not available on the Macintosh.
- When the Save Data Only For Forms option is selected (Save tab, Options dialog box, Tools menu), the Save As command (File menu) creates a comma-delimited record of the setting of every form field in a document. The record is the same as a record created with the Write instruction. You can write a macro to retrieve this record and add it to a database file.
- You can use the SetFormResult statement to set the default result for a
form field. A form field's default result is displayed each time a document
is protected for forms. If you create a new document based on a protected template, the new document displays the default results of the form fields it contains. - You can use the SetFormResult statement without the Result[$] argument to update a calculation form field. For example, the following instruction updates the "Total" calculation form field:
SetFormResult "Total"
For a complete list of form statements and functions, see "Language Summary" in Part 2, "WordBasic Reference."
Example
This form, including the macros described here, is available as INVOICE2.DOT (Windows) or INVOICE FORM (Macintosh) on the Microsoft Word Developer's Kit disk.
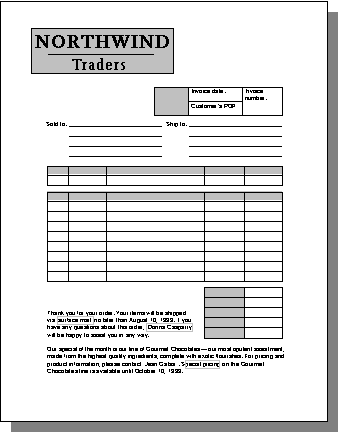
When a salesperson creates a new invoice, an AutoNew macro inserts a number for the Invoice Number and Customer's P.O. Number, and updates fields that indicate the Invoice Date, Date Ordered, and Date Shipped.
The new document is protected for forms, so the salesperson can type in form fields only and can't inadvertently disturb other parts of the form. Because the form is protected, the salesperson can use the tab key to move from one form field to another.
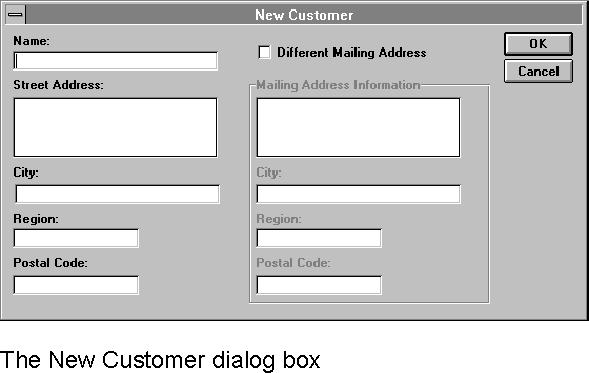
When the new invoice is created, the first form field — the New Customer check box — is automatically selected. When the user moves to the first form field in the address, an on-entry macro runs. The on-entry macro evaluates whether the New Customer check box is selected or cleared. If the check box is selected, indicating a new customer, the macro displays the New Customer dialog box as shown in the following illustration.
If the New Customer check box is cleared, indicating an existing customer, the macro displays a dialog box that allows the salesperson to query a Microsoft Excel database for the customer's address. He or she can type any part of the customer's name to get a list of customer names that match.

If a match is found, the macro displays a dialog box in which the salesperson can select the address he or she wants.
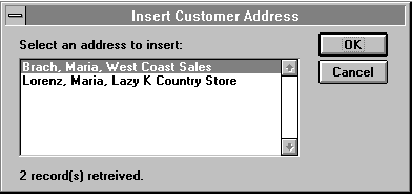
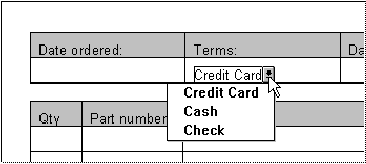
The macro then places the information in the Sold To area of the form. The salesperson can select the type of terms and shipping method from drop-down form field lists.
When the salesperson moves into the Quantity column, an on-entry macro displays the following dialog box showing a list of the items available.
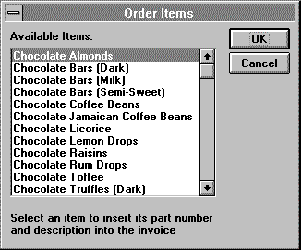
When the salesperson selects the item and quantity, the macro then inserts this information into the form, along with the corresponding part number, unit price, and total amount. Each item selected by the salesperson is entered on a separate line of the form.
When the salesperson has entered all the items ordered in the invoice, he or she then chooses the Total Orders button in the Order Items dialog box. The macro adds the figures in the Total Amount column, calculates the sales tax (if any), and inserts the appropriate figures.
When the salesperson has completed the form, it is printed out and the data is saved. The modified Close command (File menu) sends the form data to a Microsoft Excel database that stores a record for every invoice.


