
The previous chapter introduced you to Microsoft Excel objects and explained properties and methods. This chapter focuses on the language that you use to manipulate Excel objects, Visual Basic for Applications (VBA). VBA is an implementation of Microsoft's award-winning visual programming tool Visual Basic, embedded in Excel. It is the glue that binds Excel objects together when you create custom applications. This chapter explains the most important VBA concepts, including subroutines, variables, data types, arrays, constants, functions, scoping, control structures, and VBA editing and debugging tools.
Although this chapter is comprehensive, its explanation of VBA moves at a rapid pace. This chapter will not necessarily serve well as a tool for learning everything about VBA. The purpose here is to give you as much information as is necessary to create powerful applications in Excel. After this chapter covers the fundamentals of the VBA language, the rest of this book focuses on using VBA with Excel objects to create custom applications.
Note Microsoft Excel Visual Basic for Applications Step by Step by Reed Jacobson (Microsoft Press, 1994) thoroughly explains all aspects of coding VBA modules.
If you are already familiar with Visual Basic, you might want to merely skim some of this chapter because many of the syntax constructs used in VBA are identical to those used in Visual Basic. You should, however, read the sections that focus on those areas in which VBA differs from Visual Basic.
You should also review the summary list titled "Differences Between VBA and Visual Basic" on page 124 of this chapter.
F Y I
Where to Find the VBA Macro Code Examples
This book includes numerous examples of VBA macro code. You can find all of the code examples in the files on the companion disk packaged with this book. You might want to start Excel, open the appropriate file, and step through the code examples in the file as you read. (For Chapter 2, for example, the file is named CHAP02.XLS.) Note that the name of each macro in a file follows a predefined naming convention. For example, the first macro for this chapter is named Chap02aMacro1_SetRangeValue. The name has three components:
Chap02a: The name of the VBA module in which the macro resides in the CHAP02.XLS file
Macro1: An indication of the sequential order of the macro in this chapter
_SetRangeValue: A description of what the macro does
This naming convention helps you find a specific code example. Thus, the macro named Chap02fMacro59_IfThenElse resides in the VBA module named Chap02f, is the 59th macro in the chapter, and demonstrates the use of the If-Then-Else control structure. In the text, we abbreviate macro names by using, for example, simply "Macro59."
VBA code is contained in what is called a "VBA macro." There are two types of macros: subroutines and functions. We discuss VBA subroutines first in this chapter. VBA functions, which are simply subroutines that return values, are discussed in detail in the section titled "Function Macros," beginning on page 74.
The VBA subroutine is the basic building block of all VBA applications. A subroutine is simply a stand-alone segment of code that holds a series of VBA commands. A VBA application can be defined as consisting of at least one VBA subroutine, although VBA applications generally consist of several subroutines (and functions). Let's take a look at a simple VBA macro:
Sub Chap02aMacro1_SetRangeValue()
    Workbooks(1).Worksheets(1).Range("A1").Value = 1
End Sub
In specifying a VBA subroutine, you must use certain keywords. In Macro1 above, for example, the word Sub on the first line and the words End Sub on the last line are the keywords that define the VBA subroutine. (All VBA subroutines begin with Sub and end with End Sub.)
Note The Sub and End Sub keywords in the example code above are formatted in boldface. In a VBA module in Excel, however, they usually appear on the screen in blue. (They appear in boldface in this example and in the code examples throughout the remainder of this book to make them stand out.) Excel colors all VBA keywords blue to show you as you write code that it recognizes the keywords you have entered. If you ever enter a keyword in Excel and Excel does not color it blue, go back and check your spelling. You will most likely have made an error in typing the keyword. You will find as you read this chapter that keywords are an integral part of the various features of VBA.
A subroutine in its simplest form can be defined as any segment of VBA code that contains the word Sub as the first word in the first line and the words End Sub in the last line. The subroutine example above assigns the number 1 to the Value property of the upper left cell on the first worksheet of the first workbook. Let's look at a few other simple examples of VBA subroutines. The following subroutine closes the active workbook:
Sub Chap02aMacro2_CloseWorkbook()
    ActiveWorkbook.Close
End Sub
The example subroutine below sets the Name property of the first worksheet in the first workbook to "My First Worksheet" and then sets the Visible property of the same worksheet to False, hiding the worksheet from view:
Sub Chap02aMacro3_SetWorksheetProperties()
    Workbooks(1).Worksheets(1).Name = "My First Worksheet"
    Workbooks(1).Worksheets("My First Worksheet").Visible = False
End Sub
Macro4 below resets the Visible property of the first worksheet to True:
Sub Chap02aMacro4_SetVisibleProperty()
    Workbooks(1).Worksheets(1).Visible = True
End Sub
As Macro3 showed, VBA subroutines can contain multiple VBA commands or, in this case, property assignments; a single VBA subroutine can contain thousands of lines of VBA commands. It is a good idea, however, to keep VBA subroutines short and concise so that they are easy to edit and understand.
How do you create and use the above VBA macros in Excel? Before you can write VBA macros, you must understand the structure of Excel workbook files and the process of inserting a VBA module in a workbook file. Let's deviate here from our discussion of VBA code to briefly cover these topics.
After you start Excel, you see a screen similar to the one shown in Figure 2-1.
Figure 2-1. The Excel startup screen.
One of Excel 5's most distinguishing characteristics is that its files can contain multiple spreadsheets, or "worksheets," as they are called in Excel. In fact, a single Excel 5 workbook file can contain hundreds, even thousands, of worksheets. (In past versions of Excel, one Excel file corresponded to one Excel worksheet.) You access the different worksheets in an Excel workbook file by clicking the tabs located along the bottom border of the workbook file window. If you are running Excel as you read this book, try clicking the different tabs. As you click a tab, the corresponding worksheet is displayed in the workbook file window.
Note If no workbook file is displayed after you start Excel, you can open a new default workbook file by choosing the New command from the File menu.
An Excel workbook file can include five different types of sheets: worksheets, charts, Excel 4 Macro sheets, dialogsheets, and VBA modules. (Each is described below.) You must understand the multi-sheet architecture of the Excel workbook file if you are to understand how to enter and edit VBA code and even how to design VBA applications.
Worksheet: A standard Excel spreadsheet that contains a grid of cells in which numbers and data can be entered. In the Excel object model, the Worksheet object is used to refer to a worksheet. Figure 2-1 shows a worksheet.
Chart sheet: A sheet that contains a chart. A chart sheet does not contain grids of cells; it contains a chart only. Note that a chart in Excel can exist either in a chart sheet or as a graphical image floating on a worksheetthis second type of chart is referred to as an "on-sheet chart," meaning "a chart on a worksheet." It is easy to confuse "chart sheets" and "on-sheet charts." Simply remember that a chart sheet is a chart that is on a separate sheet by itself. Note that in the Excel object model, the Chart object is used to refer to chart sheets. Figure 2-2 on the next page displays a chart sheet.
Excel 4 Macro sheet: A sheet that contains Excel 4 XLM macros. If you have used Excel macros in earlier versions of Excel, you are familiar with the XLM macro language and how XLM macros are written and edited on separate sheets. An Excel 4 Macro sheet is not used to create VBA applications and exists in Excel 5 only for backward compatibility with applications that were developed in earlier versions of Excel. You can access an Excel 4 Macro sheet with VBA, however, by using the Excel4MacroSheets method, which returns a Worksheet object.
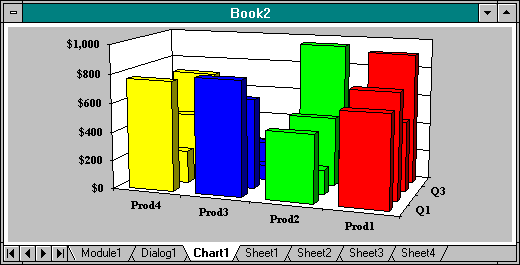
Figure 2-2. A chart sheet.
Dialogsheet: A sheet that holds a graphical display of a dialog box. You use dialogsheets to design dialog boxes that you then incorporate in VBA applications. (In Chapter 5, you'll find information about designing dialog boxes.) In the Excel object model, the DialogSheet object is used to refer to dialogsheets. Figure 2-3 displays a dialogsheet.

Figure 2-3. A dialogsheet.
Module: A sheet that contains VBA code. Modules are used to enter, edit, and store VBA code. As you write VBA applications, you will spend a good deal of time in VBA modules, so learning as much as you can about VBA modules and the VBA editing environment will make the job of creating and debugging code easier. Note that in the Excel object model hierarchy, the Module object is used to refer to VBA modules. The following section describes how to insert a VBA module. Figure 2-4 displays a VBA module.
Figure 2-4. A VBA module.
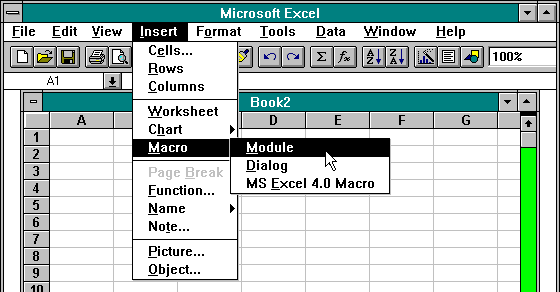
To create a VBA application, you need to add code to a module, but when you first start Excel, a default workbook file contains only worksheets. (Click the tabs at the bottom of the workbook window, and you will see that this is the case.) You can insert a VBA module in a workbook in one of two ways. The first way is straightforward: From the Insert menu, choose the Macro command, and then select Module.
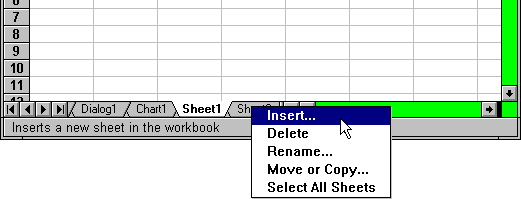
The second way involves using an Excel shortcut menu:
1. Point to any of the worksheet tabs at the bottom of the workbook window, and click the right mouse button to display the shortcut menu.Note
If you are running Excel for the Macintosh, hold down the Option and Command keys while you click the mouse button to display the shortcut menu.

You now have a blank VBA module in which you can enter VBA code. You could save the workbook file that contains the VBA module and reopen it later to continue to write and edit VBA code in the same module. For now, though, keep the workbook file open so that you can enter and run a VBA macro.
To enter a macro in a VBA module, you simply begin typing at the top of the module. Remember that a VBA macro must begin with the keyword Sub and end with the keywords End Sub. Try entering the following macro:
Sub Chap02aMacro5_DisplayMsgBox()
    MsgBox "Hello World"
End Sub
This macro uses a built-in VBA function named MsgBox, which displays a message box on the screen. The MsgBox function takes as its first argument a string (up to 256 characters long) that is displayed in the body of the message box. MsgBox can also take several other arguments that govern how the resulting message box is displayed (the types of buttons used, the title, and so forth); however, the first argument is all that is necessary to display a simple box that includes the message and an OK button. MsgBox is one of several built-in VBA functions that allow you to perform an action aside from manipulating properties and methods of Excel objects.
After you enter Macro5 in your VBA module, the next step is to execute it. You can execute a macro in one of four ways:
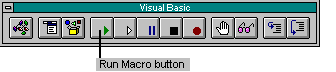
Run Macro5. If the macro executes successfully, a message box is displayed in the middle of the screen. Choosing OK closes the message box and causes the macro to finish executing.
F Y I
More Ways to Run Macros
You can also run a macro by attaching it to a menuitem or a shortcut key or by referencing a VBA function in a spreadsheet formula. These topics are covered in the "FYI" titled "Executing a Function by Calling It from a Worksheet Cell," beginning on page 76, and in the section titled "The Menu Editor Button," beginning on page 112.

Now try entering and executing the following macro:
Sub Chap02aMacro6_SetRangeValue()
    Worksheets(1).Visible = True
    Worksheets(1).Range("A1:B1").Value = 1
    Worksheets(1).Select
End Sub
After you execute Macro6 above, the first worksheet of the active workbook is displayed, and the value 1 appears in the cells that correspond to the range A1:B1 on the worksheet. Next try making a minor change to the macro by specifying a new range address of A1:F20.
Sub Chap02aMacro7_SetRangeValue()
    Worksheets(1).Range("A1:F20").Value = 1
    Worksheets(1).Select
End Sub
By running the above macro, you can set the value of a block of cells in a worksheet all in one command.
Variables are used to hold and manipulate values, or data, when a macro is executing. Using variables saves you time and effort in coding and makes your macros run faster. Variables can assume several different data types (see the next section), including various numeric types, strings, objects, variants, and user-defined types. Before you use a variable in your code, it is often a good idea to "dimension," or declare, the variable to set aside space in memory for holding the variable during execution. To dimension a variable, you include a simple statement at the top of your VBA macro, as explained in the section titled "Dimensioning a Variable," beginning on page 46.
The types of values that variables can hold are referred to as "data types." The following is a list of the data types that VBA variables can accommodate. For each data type, the list includes the amount of memory (in parentheses) required to hold a single variable for each data type and a definition.
Boolean: (2 bytes) True or False.
Integer: (2 bytes) Integer between -32,768 and 32,767.
Long: (4 bytes) Integer between -2,147,483,648 and 2,147,483,647.
Single: (4 bytes) Single precision floating-point (real number):
Negative single numbers: -3.042823E38 to -1.401298E-45.
Zero.
Positive single numbers: 1.401298E-45 to 3.042823E38.
Double: (8 bytes) Double precision floating-point (real number):
Negative double numbers: -1.79769313486232E308 to -4.94065645841247E-324.
Zero.
Positive double numbers: 4.94065645841247E-324 to 1.79769313486232E308.
Currency: (8 bytes) Currency; useful for fixed-point calculations in which accuracy is imperative:
-922,337,203,685,477.5808 to 922,337,203,685,477.5808.
Date: (8 bytes) Date values between January 1, 100, and December 31, 9999.
Object: (4 bytes) Object variable that can be used to refer to any Excel object.
String: (1 byte per character) String of text characters from 0 to 2 billion characters, depending on the operating system in which you are running Excel. (In Microsoft Windows 3.1, the upper limit on string variables is 65,535 characters.)
Variant: (16 bytes + 1 byte for each character if the variant holds a string) Can be used to represent any VBA data type (except a user-defined type). Occasionally you will need to store a piece of data in a variable and will be uncertain of the data's type. In such a situation, the variant data type is useful.
User-defined: (dependent on definition) Similar to data structures in other programming languages. User-defined types allow you to store multiple values of different data types in a single variable.
It is probably a good idea to know the names of the different data types listed above as well as the types of data they represent. For the numeric data types, however, you need not memorize the exact upper and lower bounds of the numbers they represent. Instead, you might want to remember these general definitions:
|
Integer |
Medium-size integer numbers up to roughly 32,000 |
|
Long |
Large integer numbers |
|
Single |
Very large floating-point numbers |
|
Double |
Very, very large floating-point numbers |
You dimension, or declare, a variable in a VBA macro to tell VBA to set aside extra memory to hold the variable while the macro executes. The amount of memory that VBA sets aside is determined by the variable's data type (as shown in the preceding list). You dimension a variable before it is used by placing a Dim statement for the variable at the beginning of a VBA macro or VBA module. Although you need not dimension variables before they are used, by doing so you can improve the performance of your macros and make them easier to debug. (You'll read more about the performance costs of undeclared variables in the section titled "The Pros and Cons of Using Variants," beginning on page 54.) Here is an example Dim statement for dimensioning a variable:
Dim Var1 As Integer
The above statement declares Var1 as a variable of the Integer data type and, by doing so, sets aside 2 bytes of memory for Var1. Three keywords are included in the statement above: Dim, As, and Integer. Let's take a look at each of the components:
|
Dim |
Keyword that indicates a variable declaration (abbreviation for "dimension") |
|
Var1 |
Name of the variable |
|
As |
Keyword used as a qualifier to separate the variable name from the data type |
|
Integer |
Keyword that represents the name of the data type; can be any one of Integer, Long, Single, Double, Currency, Date, Object, String, Variant, or user-defined types |
Here are some other examples of variable declarations:
Dim Var2 As Double
Dim Var3 As Date
Dim Var4 As Currency
Dim Var5 As Variant
It is possible to declare more than one variable in a single Dim statement. For each variable that you declare, however, you must use the As keyword, specify the appropriate data type, and include a comma to separate one variable from the next. The following is an example:
Dim Var2 As Double, Var3 As Date, Var4 As Currency, Var5 As Variant
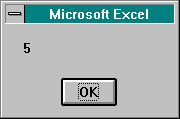
Now let's take a look at using a variable in a macro. Macro8 uses an Integer variable to set the Value property of a Range object:
Sub Chap02aMacro8_UseIntegerVariable()
    Dim Num1 As Integer
    Num1 = 5
    Worksheets(1).Range("A1").Value = Num1
    Worksheets(1).Select
End Sub
This macro sets the Value property of range A1 on the first worksheet to the value stored in Num1, which in this case is 5. In the third line of the macro, an Integer value is assigned to the Num1 variable. Num1 then holds that value while the macro executes. In the fourth line of the macro, we use Num1 to set the Value property of the specified Range object. Let's look at an example in which a variable is assigned the value of a range:
Sub Chap02aMacro9_GetRangeValue()
    Dim Num1 As Integer
    Num1 = Worksheets(1).Range("A1").Value
    MsgBox Num1
End Sub
Macro9 above uses Num1 to get the setting of the Value property of the specified Range object. Assuming that Macro9 is run in the same workbook as the previous Macro8, the statement in the third line of Macro9 returns the value 5 and assigns it to the Num1 variable. Num1 then holds the value and is used again in the fourth line of the macro to display the value in a message box:
Macro9 above merely displays in a message box the setting for the Value property of range A1 on the worksheet. The same result can be accomplished easily without using a variable, as the following example shows:
Sub Chap02aMacro10_DisplayRangeValue()
    MsgBox Worksheets(1).Range("A1").Value
End Sub
After reviewing the above example, you might be asking yourself, "Why use variables at all?" One good reason to use variables is if you need to use a specific value numerous times. For example, let's say you need to write a macro that assigns the Value property of range A1 in the active workbook's second, third, and fourth worksheets to the same setting as the Value property of range A1 in the first worksheet. If you do not use variables, you must write the following macro:
Sub Chap02aMacro11_SetValues()
    Worksheets(2).Range("A1").Value = Worksheets(1).Range("A1").Value
    Worksheets(3).Range("A1").Value = Worksheets(1).Range("A1").Value
    Worksheets(4).Range("A1").Value = Worksheets(1).Range("A1").Value
End Sub
If you use variables, however, you can write the same macro in fewer keystrokes and produce a macro that is easier to read and understand:
Sub Chap02aMacro12_UseIntegerVariable()
    Dim Num1 As Integer
    Num1 = Worksheets(1).Range("A1").Value
    Worksheets(2).Range("A1").Value = Num1
    Worksheets(3).Range("A1").Value = Num1
    Worksheets(4).Range("A1").Value = Num1
End Sub
In addition to offering fewer keystrokes and code that's easier to read, using variables makes your code execute faster. Macro12, for example, executes faster than does Macro11. We will look further at speed issues later in this section. For now, however, remember that every property or method reference and every hierarchical object reference requires a certain amount of processing by Excel and therefore a certain amount of time. In Macro11 above, you can count the number of object and property references by counting the number of times the dot operator (.) is used. In lines 2, 3, and 4 of Macro11, the dot operator is used four times in each line, for a total of twelve times in the whole macro. In Macro12, the dot operator is used two times in each of lines 3, 4, 5, and 6 for a total of eight times in the macro. If we think of the dot operator as representing a unit of processing time, Macro12 should take roughly two-thirds the time to execute that Macro11 does, which is indeed the case. With macros this simple, you cannot see the speed difference on your computer. With larger and more complicated macros, however, the difference becomes apparent.
Let's look at another example, this time using a variable of a data type other than Integer:
Sub Chap02aMacro13_DisplayString()
    Dim String1 As String
    String1 = "Hello World"
    MsgBox String1
End Sub
Macro13 assigns a value to the String variable String1 and then displays the value in a message box. And, in one more example, the macro below transfers a value from a String variable to the Value property of the Range object:
Sub Chap02aMacro14_UseStringVariable()
    Dim String1 As String
    String1 = "Important Data"
    Worksheets(1).Range("A1").Value = String1
    Worksheets(1).Select
End Sub
An object variable is a variable that is used to refer to an object. As you become a VBA expert, you will find that object variables are of tremendous use because they reduce the number of keystrokes required to write your VBA code. They make your code easier to read, and they improve the performance of your macros. Throughout the pages that follow, several examples demonstrate these advantages.
You declare and assign values to object variables in a slightly different way from that for other variables. Let's take a look at a code segment that shows how you make these declarations and assignments:
Dim Range1 As Object
Set Range1 = Worksheets(1).Range("A1")
You will notice that the declaration statement in the first line above is much like declarations for other variables. As you'll see shortly, however, in the declaration for an object variable you can actually specify the type of object being declared. But for now, focus on the second line, in which an object is assigned to the variable. Note that when you assign an object to an object variable, you must always use the Set keyword. If you look at the example above, for instance, the components of a statement that involves the assignment of an object variable are as follows:
|
Set |
Keyword that indicates the assignment of an object variable |
|
Range1 |
Name of the object variable |
|
= |
Assignment operator |
|
Worksheets(1).Range("A1") |
Object assigned to the variable |
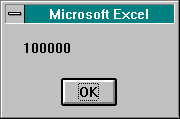
What can you do with an object variable? Let's take a look at an example. The macro on the next page uses an Integer variable and an object variable to set the Value property of a Range object.
Sub Chap02aMacro15_UseObjectVariable()
    Dim Num2 As Long
    Num2 = 100000
    Dim Range1 As Object
    Set Range1 = Worksheets(1).Range("A1")
    Range1.Value = Num2
    MsgBox Range1.Value
End Sub
Macro15 above shows that we can use the object variable Range1 to set the Value property of the object Worksheets(1).Range("A1")and then display the setting for that Value property in a message box:
As mentioned, you can use the exact name of the type of object when you declare a variable. For example, it is possible to dimension a Range object in the following manner:
Dim Range1 As Range
In this example, we use the specific name of the object, "Range," as the type of the object variable as opposed to the generic Object type. Here are a few other examples of object variable declarations in which the names of the objects are used as types when the variables are declared:
Dim Workbook1 As Workbook
Dim MyWorksheet As Worksheet
Dim XL As Application
You might wonder how you will know the name of the type of object to use when declaring object variables. Object types are simply the names of the objects in Excelthe same names that appear in the Excel object model hierarchy diagram in Chapter 1 (Figure 1-2, page 18) and the same names that are used for Excel objects throughout this book. After you become familiar with the 128 objects in Excel, you will know their names well.
Note that it is possible to make the same three object variable declarations shown above by using the generic Object type instead of the specific names of objects, as the example on the next page shows.
Dim Workbook1 As Object
Dim MyWorksheet As Object
Dim XL As Object
So, if it's possible to use the generic Object type when declaring object variables, why bother with declaring variables by using specific object names? If you declare object variables by using specific object names, you see better performance in your macros than if you use the generic Object type. When VBA performs a property setting or a method call on an Excel object via an object variable, VBA must first determine the type of object that the variable represents. If the generic Object type is used to declare the variable, VBA must do some extra work to determine the specific object type to which the variable refers. If the object variable is declared by specifying the name of the object to which the variable refers, however, VBA does not have to do that extra work. For simple macros, either approach will do. But for large and complicated applications, you can see measurable improvements in performance if you use object names to declare object variables rather than the generic Object type.
Let's take a look at an example in which declaring an object variable as a specific object type improves performance. Macro16 below uses two object variables that are declared with the generic Object type to exchange values between cells A1 and A2 on the first worksheet. The macro uses a For-Next loop to execute the operation 1000 times and the VBA Timer function to keep track of how much time is required for the macro to execute:
Sub Chap02aMacro16_UseGenericObjectType()
Dim Range1 As Object
Dim Range2 As Object
Dim StartTime As Variant
Dim x As Integer
Set Range1 = Worksheets(1).Range("A1")
Set Range2 = Worksheets(1).Range("A2")
StartTime = Timer
For x = 1 To 1000
Range1.Value = 5
Range2.Value = Range1.Value
Next
MsgBox (Timer StartTime) & " seconds."
End Sub
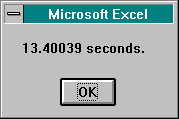
After you run Macro16, a message box indicates how much time it took the macro to execute:

You can rewrite the same macro using the Range type to declare the two Range object variables:
Sub Chap02aMacro17_UseSpecificObjectType()
Dim Range1 As Range
Dim Range2 As Range
Dim StartTime As Variant
Dim x As Integer
Set Range1 = Worksheets(1).Range("A1")
Set Range2 = Worksheets(1).Range("A2")
StartTime = Timer
For x = 1 To 1000
Range1.Value = 5
Range2.Value = Range1.Value
Next
MsgBox (Timer StartTime) & " seconds."
End Sub
Macro17 should run faster than Macro16 because VBA has to spend less time evaluating the types of objects to which the variables Range1 and Range2 refer. Here is the message box displayed by Macro17; when you compare the Macro16 and Macro17 times, it is apparent that Macro17 is faster:
F Y I
The Ampersand Operator (&)
In Macro16 and Macro17, we've introduced the ampersand operator (&). Ampersands are used to concatenate the contents of variables with stringsor even strings with strings. In the preceding two macros, VBA evaluates the elapsed time and then combines it with the literal string to form a single string that is passed to the MsgBox function.
As we've seen, using object variables cuts down on the time required to write code, makes code easier to read, and makes your macros run faster. You save time writing your code by using object variables because object variables allow you to represent hierarchical object references with a single word (the name of the variable). For example, the following macro sets the Value, RowHeight, and ColumnWidth properties of the Range object; displays the setting for the Value property in a message box; and then calls the ClearContents method. Hierarchical object references starting at the Worksheet object are used to access the properties and methods of the Range object in this example:
Sub Chap02aMacro18_RangeObject()
    Worksheets(1).Range("A1").Value = 25
    Worksheets(1).Range("A1").RowHeight = 50
    Worksheets(1).Range("A1").ColumnWidth = 50
    MsgBox Worksheets(1).Range("A1").Value
    Worksheets(1).Range("A1").ClearContents
End Sub
You could rewrite this macro using an object variable to refer to the Range object, as the following example shows:
Sub Chap02aMacro19_RangeObjectVariable()
    Dim Range1 As Range
    Set Range1 = Worksheets(1).Range("A1")
    Range1.Value = 25
    Range1.RowHeight = 50
    Range1.ColumnWidth = 50
    MsgBox Range1.Value
    Range1.ClearContents
End Sub
Macro19 appears more concise than Macro18, and, in fact, fewer keystrokes were required to write Macro19. Using object variables also makes code easier to read; when you look at the statements in Macro19, you can easily see that actions are being performed on the same object throughout.
The third advantage of using object variables is improved performance. Object references take a certain amount of processing time in VBA, which you can approximate by counting the number of occurrences of the dot operator (.). Compare Macro19 with Macro18 above, and you will see that using an object variable results in fewer dot operators in Macro19 (five) than in Macro18 (ten). In fact, Macro19 runs roughly twice as fast as Macro18. Although it is difficult to measure the time differences between these two macros, such time differences become obvious, for example, when you are dealing with looping structures that execute hundreds of times.
VBA has an interesting feature that is well appreciated by the renegade developer but scorned by those who are more organized in their code-writing habits. The feature is called "optional variable declaration." You've probably noticed that in all the macros that have been presented in this section on variables, each variable used has first been declared with a Dim statement. In reality, however, Dim statements are optional. If you fail to use a Dim statement to declare a variable, VBA simply dimensions the variable for you. For example, let's look at one of the macros presented earlier:
Sub Chap02aMacro13_DisplayString()
    Dim String1 As String
    String1 = "Hello World"
    MsgBox String1
End Sub
You can write this macro without the Dim statement; it executes in the same way as Macro13, even though the Dim statement for the variable String1 is omitted:
Sub Chap02aMacro20_NoVariableDeclaration()
    String1 = "Hello World"
    MsgBox String1
End Sub
When a Dim statement for a variable is omitted, the variable assumes the default data typein this case, it's the Variant data type. In essence, therefore, String1 in Macro20 above is a variable of the Variant data type. Because variants can take on values of any data type, the macro runs without problem. In the following example, Macro20 has been rewritten to explicitly declare the variable as a variant:
Sub Chap02aMacro21_UseVariant()
    Dim String1 As Variant
    String1 = "Hello World"
    MsgBox String1
End Sub
When a value is assigned to a Variant variable, VBA evaluates the value and coerces the variable to match the value's data type. Because VBA's default data type is Variant, a variable assumes the Variant data type if you omit a Dim statement for that variable. (It is possible to change the default data type to a different type, as you'll see in the following pages.) Omitting Dim statements and assuming the default data type for variables reduces the number of keystrokes required to write your code. Some developers will appreciate being able to use a variable whenever and wherever they want without having to worry about whether it is properly declared.
Using a default Variant data type, however, presents three disadvantages, and programmers who are concerned about structure and organization are probably aware of these problems. First, the Variant data type requires more memory. If you look back to the section titled "Data Types for VBA Variables," beginning on page 44, you'll see that variables of the Variant type require more memory than variables of any other data type, with the possible exception of user-defined variables (covered later in this chapter). Variant variables require 16 bytes (plus 1 byte per character for strings)at least twice as much memory as is required for the other data types that also demand lots of memory: Currency, Date, and Double. For small macros, the memory demands present little problem, but with large and complicated macros that have lots of variables, you could definitely see performance problems; your application might even eat up all available memory.
The second disadvantage also involves performance. VBA is required to coerce a variable of the Variant type to meet the data type of any value being assigned to it. This process takes time. You see the results of these time demands most clearly when assignments to variants occur multiple times in a loop; each time the assignment occurs in each loop, VBA must perform the coercion.
The third disadvantage deals with keeping track of the data that variants contain. You can never be certain what type of data is contained in a Variant variable because a Variant can hold anything. Variants make debugging code and successfully implementing error-checking routines a cumbersome process. For example, if you always declare variables to be of specific data types, no question ever arises about the type of data a variable contains. If you use variants, however, you will often have to build checks into your code to determine whether the data held in the variant is of the proper type.
Let's take as an example a subroutine that performs a mathematical calculation on a variable. If the subroutine is called and an Integer variable is passed to the subroutine, no code need be implemented in the subroutine to determine that the data in the variable is numeric. If a Variant variable is passed to the same subroutine, however, error checking must be implemented to be sure that the variable contains numeric data and not a string, a date, or even an object reference. This error checking requires time and degrades performance further.
Despite the disadvantages mentioned here, variants do serve a purpose. In fact, variants are useful whenever you are uncertain about the type of data you are dealing with. For example, suppose you have written a subroutine that prompts a user to enter an integer. You can never be entirely certain that the user will actually enter an integerperhaps the user will mistakenly enter a text string or a real number instead. Your subroutine must be able to accept the user's input and check the data before manipulating the data further. Variants are well suited to accepting user input because they can accept any type of input. Therefore, you would likely use a variant to accept the user input and then, after performing error checking, pass the value to another variable of the appropriate data type before manipulating the data further.
VBA offers a feature called "forced variable declaration" that can keep you from inadvertently omitting variable declarations and thus protect you from the potential disadvantages of using variants. You can impose forced variable declaration in one of two ways: You can place the Option Explicit statement at the top of each VBA code module. (This statement must be included at the top of the module, before any subroutines or function macros.) Or you can choose the Options command from the Tools menu and, in the Options dialog box, click the Module General tab and check the Require Variable Declaration check box. When this check box is checked, Excel inserts the Option Explicit statement at the beginning of any new VBA module. Note that checking the Require Variable Declaration check box has no effect on existing VBA modules.

The following is an example of a macro that includes the Option Explicit statement:
Option Explicit
Sub Chap02bMacro22_UseString()
    Dim String1 As String
    String1 = "Hello World"
    MsgBox String1
End Sub
Again, the Option Explicit statement must reside at the beginning of the VBA module, before any subroutines.
If you remove the Dim statement but retain the Option Explicit statement, Excel generates an error message when you attempt to run this macro:
Option Explicit
Sub Chap02cMacro23_NoVariableDeclaration()
    String1 = "Hello World"
    MsgBox String1
End Sub
In Macro23 above, execution halts immediately, and Excel displays an error message:

You can circumvent this error message either by including a Dim statement for the String1 variable or by removing the Option Explicit statement.
It is possible in VBA to change the default data type to something other than Variant. To do so, place a DefType declaration at the beginning of a VBA module. For example, if you want all undeclared variables to default to an Integer data type, place the following statement at the beginning of a VBA module, before any subroutines:
DefInt A-Z
The arguments AZ after the DefInt keyword indicate that all undeclared variables that have names starting with any letter from A through Z (irrespective of case) should assume the Integer data type. Because DefType declarations take starting letters as arguments, it is possible for different undeclared variables in a module to take different data types, depending on each variable's first letter. For example, the following statements at the beginning of a VBA module force all undeclared variables that begin with the letter "I" to assume an Integer data type, all that begin with the letter "S" to assume a String data type, and all that begin with the letter "C" to assume a Currency data type:
DefInt I
DefStr S
DefCur C
In the absence of any DefType statements at the top of a VBA module, all undeclared variables assume the Variant data type by default.
Note You can place multiple VBA statements on a single line of code by separating the statements with a colon (:), as in the following example:
DefInt I: DefStr S: DefCur C
VBA allows you to create your own user-defined data types. Such user-defined data types are synonymous with structures found in other programming languages and can be defined simply as data types that form some combination of the other available data types in VBA. Using user-defined variables, you can group multiple values of different data types all in a single variable. Declaring a variable as a user-defined data type is a little more complicated than declaring a variable as another data type. Before you can declare a variable as a user-defined data type, you must first give a definition of the type. Definitions of user-defined types are always placed at the beginning of a VBA module.
Type PersonalData
    Dim PName As String
    Dim PAge As Integer
    Dim PBirthDate As Date
End Type
Let's look at the different components of the above user-defined type definition:
|
Type |
Keyword that indicates a user defined data type definition |
|
PersonalData |
Name of the user defined data type |
|
Dim PName As String |
First element of the user defined data type |
|
Dim PAge As Integer |
Second element of the user defined data type |
|
Dim PBirthDate As Date |
Third element of the user defined data type |
|
End Type |
Keywords that indicate the end of the user defined data type definition |
When placed at the top of a VBA module, the above user-defined data type definition creates a data type named PersonalData that contains three elements: a string represented by PName, an integer represented by PAge, and a date represented by PBirthDate. But how would you use a variable of the PersonalData type? Let's take a look at an example:
Type PersonalData
    Dim PName As String
    Dim PAge As Integer
    Dim PBirthDate As Date
End Type

Sub Chap02dMacro24_UserDefinedType()
    Dim User1 As PersonalData
    User1.PName = "Billijean"
    User1.PAge = 32
    User1.PBirthDate = #2/23/64#
    MsgBox User1.PName & ", Age " & User1.PAge & _
            ", Born " & User1.PBirthDate & "."
End Sub
In line 2 of Macro24 above, a variable named User1 is declared as type PersonalData. Then, in lines 3, 4, and 5, values are assigned to the different elements that are contained in the PersonalData type structure for User1: "Billijean" is assigned to PName, 32 is assigned to PAge, and #2/23/64# is assigned to PBirthDate. Line 6 of the macro then displays values of User1's elements in a message box:

F Y I
Date Literals
The macro above also introduces date literals. In line 5 of Macro24, an assignment is made to User1.PBirthDate by specifying a date that is enclosed in number signs (#). Number signs are required whenever you assign a literal date value to a Date variable. Literal dates are similar to literal stringsexcept that you enclose them in number signs instead of in double quotation marks.
VBA arrays offer a powerful approach to dealing with large amounts of data; you use VBA arrays much as you use arrays in other programming languages. An array is a variable that contains multiple valuesin the simplest definition, it is an indexed group of values that all have the same data type. Whereas a non-array variable is useful in dealing with a single value of a particular data type, an array is useful in dealing with multiple values of a particular data type.
In reality, arrays are more complex than you might gather from the definition just given because they are multidimensional. All dimensions of an array are indexed numerically. A one-dimensional array is simply a single, indexed list of values. The list has a starting point (the first item) and an ending point (the last item), and each item in the list falls in line between the starting and ending points; no two items overlap, so each item has a unique index.
A two-dimensional array is a bit more complicated and is a group of lists that are all the same length. Such a group of lists is more commonly known as a "table" or a "matrix." It contains rows and columns, much as a spreadsheet does, and each value in the table occupies a position that represents the intersection of a certain row with a particular column. Figure 2-5 shows a simple example of a two-dimensional array.
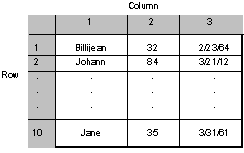
Figure 2-5. A two-dimensional array is commonly called a "table" or a "matrix."
A three-dimensional array can be characterized as a group of tables in which each table has the same number of rows and the same number of columns. The concept of a three-dimensional array is similar to an Excel workbook, which contains multiple worksheets. You can access any value in a three-dimensional array by specifying three pieces of information: the row, the column, and the table.
Taking this discussion even further, we see that a four-dimensional array can be characterized as a larger group that contains groups of tables in which each group has the same number of tables and each table has the same number of rows and the same number of columns. Again using the Excel workbook example, a four-dimensional array is analogous to a directory of Excel workbook files: You can access any value in a four-dimensional array by specifying a row, a column, a table, and a directory.
VBA arrays can have up to 60 dimensions. Consider the possibilities entailed in using 60-dimensional arrays, and you can come up with some very complex sets of data. For the most part, however, in VBA you use either one- or two-dimensional arrays; three-dimensional arrays are rare. Arrays of greater than three dimensions are extremely rare and, depending on their size, could require more memory than is usually available on a personal computer.
Arrays operate in much the same way as do variables. Before you use an array, you must first declare it and specify the data type for the values that the array is to hold. Note that an array can hold values only of a single data type. It is easy to get around this limitation, however, by declaring an array to be of the Variant data type, which allows the array to hold any type of data. Array data types are exactly the same as the variable data types discussed in the section titled "Data Types for VBA Variables," beginning on page 44. Let's take a look at an example of an array declaration. This example declares a one-dimensional array of the Integer data type:
Dim NumberArray(10) As Integer
You'll notice that this array declaration is similar to the variable declarations discussed previously, with one exception: A number is enclosed in parentheses after the name used in the declaration. The number in parentheses indicates that this declaration is for an array and not for a single-value variable. The value (or values) enclosed in parentheses after the name provides information about the architecture of the array. In the example above, the presence of only one number indicates that NumberArray is a one-dimensional array, and the number 10 indicates that the size of the array is 10or that the array can hold up to 10 integer values. That number actually refers to the upper bound of the array; when you state that the array can hold up to 10 values, it is assumed that the lower bound is 1.
F Y I
The Option Base Statement
Note that VBA allows lower bounds of arrays to start at either 0 or 1 by default, as governed by an Option Base statement at the beginning of a VBA module. Option Base 0 makes the default lower bound of the array 0, and Option Base 1 makes the default lower bound of the array 1. In the absence of an Option Base statement, array lower bounds are 0 by default. For the sake of simplicity, the examples that follow assume Option Base 1. Option Base statements are discussed in greater detail in the section titled "Option Base and Array Bounds," beginning on page 65.
A declaration for a two-dimensional array appears as follows:
Dim TableArray(10, 20) As String
TableArray above consists of 10 rows and 20 columns, which means it is capable of holding a total of 200 string values. And here's one more example. The following is a declaration for a three-dimensional array of variants:
Dim BigArray(50, 100, 5) As Variant
BigArray is composed of 5 tables, each of which consists of 50 rows and 100 columns, which means the array can hold up to 25,000 variants.
You can see from these examples that as you increase the number of dimensions of an array, its size (and therefore the number of values it can hold) grows quickly. After you declare an array, VBA sets aside enough memory to accommodate the array; how much memory must be allocated depends on the array's size and data type. Declaring a one-dimensional Integer array of size 10 requires 20 bytes because each Integer value occupies 2 bytes. BigArray declared abovethe three-dimensional array of variantsrequires at least 400,000 bytes (25,000 × 16). Take care if you plan to declare arrays of greater than two dimensions because they can eat up a lot of memory and negatively impact performance. The amount of memory allocated for an array depends on the amount of RAM available on your computer and the operating system under which you are running Excel. If you try to declare an array whose size will exceed the amount of available memory, you get an "Out of Memory" message.
After you declare an array, how exactly do you use it? Let's take a look at an example. Macro25 uses a three-element array of integers:
Sub Chap02dMacro25_IntegerArray()
    Dim Vals(3) As Integer
    Vals(1) = Int(100 * Rnd())
    Vals(2) = Int(100 * Rnd())
    Vals(3) = Int(100 * Rnd())
    MsgBox "Lottery Numbers: " & Vals(1) & ", " & _
            Vals(2) & ", " & Vals(3)
End Sub
In this macro, after the Vals array is declared in line 2 (a one-dimensional, three-element array of integers), assignments are made to the three elements in Vals in lines 3, 4, and 5. An assignment to an array element is similar to an assignment to a variable; however, for an array element, you must specify the index of the element to which the assignment is being made. In lines 3, 4, and 5, the index is specified in the parentheses that follow Vals.
Also notice an interesting formula that appears on the right side of the assignment statements in lines 3, 4, and 5. This formula uses two built-in VBA functions, Rnd and Int, to create a randomly generated integer between 0 and 100. The Rnd function generates real random numbers between 0 and 1. Rnd can take one argument, which can be used as a seed number. (See Excel's online VBA Help for details.) The Int function converts real numbers to integers by removing all numbers to the right of the decimal point (effectively, always rounding down). By multiplying the value returned by Rnd by 100 and then using the Int function to convert the product of this multiplication to an integer, we arrive at a random integer between 0 and 100. And by using the same formula three times to make assignments to the three elements of the Vals array, we end up with an array that contains three random integers. In line 6 of Macro25, you'll find a reference to each element by its index number, causing the values the array contains to be displayed in a message box:
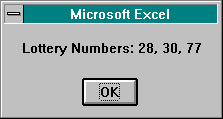
The next example shows the use of an array of variants:
Sub Chap02dMacro26_VariantArray()
    Dim Data(3) As Variant
    Data(1) = "Johann"
    Data(2) = 84
    Data(3) = #3/21/12#
    MsgBox Data(1) & ", age " & Data(2) & ", born " & Data(3)
End Sub
In the example above, values of different data types have been assigned to the different elements of the array: a string to the first element, an integer to the second element, and a date to the third element. Because Data is an array of variants, values of any type can be assigned to any of its elements. Line 6 of Macro26 displays the values held by the elements of the array in a message box. We could extend the above example and create a two-dimensional array that might hold name, age, and birth date data for, say, 10 people:
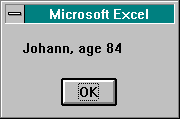
Sub Chap02dMacro27_2DVariantArray()
    Dim Data2(10, 3) As Variant
    Data2(1, 1) = "Johann"
    Data2(1, 2) = 84
    Data2(1, 3) = #3/21/12#
    MsgBox Data2(1, 1) & ", age " & Data2(1, 2) & _
           ", born " & Data2(1, 3)
End Sub
If we look at the Data2 array in Macro27 above as a table, the code assigns values to those elements in the first row of the table. Additional code could be written to provide data for nine more people. Note that we can rewrite Macro27 to take advantage of the PersonalData user-defined type explained earlier in this chapter. In fact, we can achieve the same functionality as that in Macro27 by using a one-dimensional array of the PersonalData type, as the following example shows. Remember, the user-defined type definition must occur at the top of the VBA module.
Type PersonalData
    Dim PName As String
    Dim PAge As Integer
    Dim PBirthDate As Date
End Type

Sub Chap02dMacro28_UserDefinedTypeArray()
    Dim Data3(10) As PersonalData
    Data3(1).PName = "Johann"
    Data3(1).PAge = 84
    Data3(1).PBirthDate = #3/21/12#
    MsgBox Data3(1).PName & ", age " & Data3(1).PAge
End Sub
Below is the message box displayed by Macro28:
VBA actually provides two different types of arrays: dynamic arrays and fixed-size arrays. All of the examples we have looked at so far in this section have been fixed-size arrays, in which the size of the array is specified in the array's declaration statement. When you declare a dynamic array, the size of the array is not specified. In fact, the size of a dynamic array can be specified at any time the code is executing.
Dynamic arrays are useful when you know that the size of the array you are working with is going to change during code execution. If you are concerned about conserving memory, you can adjust the sizes of any arrays you use to meet your immediate needs; otherwise, you might have arrays in your code that are doing nothing but taking up memory, which can have a negative impact on performance. Let's take a look at a dynamic array. Macro29 below uses the ReDim statement to dimension Data4 first as a one-dimensional, two-element array and then as a two-dimensional, thirty-element array:
Sub Chap02dMacro29_UseDynamicArray()
    Dim Data4() As Variant
    ReDim Data4(2)
    Data4(1) = Int(100 * Rnd())
    Data4(2) = Int(100 * Rnd())
    MsgBox "Lottery Numbers: " & Data4(1) & ", " & Data4(2)
    ReDim Data4(10, 3)
    Data4(1, 1) = "Johann"
    Data4(1, 2) = 84
    Data4(1, 3) = #3/21/12#
    MsgBox Data4(1, 1) & ", age " & Data4(1, 2) & _
           ", born " & Data4(1, 3)
End Sub
In line 2 of Macro29 above, we start by dimensioning an array, Data4, as a variant, without specifying the number of dimensions or the number of elements. This statement declares a dynamic array, yet it does not allocate any memory to the array. It is not until the ReDim statement in line 3 that memory is allocated for the array. The ReDim statement declares a one-dimensional, two-element array. Lines 4 and 5 are then used to assign random integer values to the two elements of the array, and line 6 of the macro displays the values held by the elements of the array in a message box. In line 7, we use the ReDim statement again to change the array to a two-dimensional array that contains 30 elements. We then assign values to the elements in the first row of the array and display the values in a message box. This example shows how you can conserve memory during code execution by using dynamic arrays and the ReDim keyword to redimension arrays as the code executes. For more information about using ReDim and dynamic arrays, see Excel's online VBA Help.
In the examples of arrays given so far, all numeric indexing of array dimensions has started at 1. As mentioned earlier, you can make numeric indexing for an array dimension start at 0, 1, or any number you choose. Many developers prefer to have array indexing start at 0, and some prefer 1. VBA makes it easy to choose either 0 or 1 as the basis for starting array indexing by using an Option Base statement at the beginning of a VBA module. If you don't specify Option Base at the beginning of a VBA module, VBA defaults to Option Base 0.
If you want array indexing to begin at a number other than 0 or 1, you must specify the lower and upper bounds of the index in the declaration of the array. The following is an example:
Sub Chap02dMacro30_UseArrayBounds()
    Dim Data5(4 To 5) As Integer
    Data5(4) = Int(100 * Rnd())
    Data5(5) = Int(100 * Rnd())
    MsgBox "Lottery Numbers: " & Data5(4) & ", " & Data5(5)
End Sub
In Macro30 above, Data5 is a one-dimensional, two-element array. In the declaration of the array, however, the numbers enclosed in parentheses after the array name specify the lower and upper bounds of the array. In essence, Data5 is a two-element array that has number indexing beginning at 4 and ending at 5.
Five functions are used often with arrays in VBA; these are Array, Erase, IsArray, LBound, and UBound. Let's take a brief look at each of these functions.
The Array function allows you to create an array during code execution without having to first dimension the array, as the following example shows:
Sub Chap02dMacro31_ArrayFunction()
    Data6 = Array("Johann", 84, #3/21/12#)
    MsgBox Data6(1) & ", age " & Data6(2) & ", born " & Data6(3)
End Sub
Line 2 of Macro31 above uses the Array function to create a fixed-size, one-dimensional, three-element array of variants. Well, that's not exactly correct, although it seems it should be. Data6 is not actually an array; it is a variant that contains an arraythe array that the Array function returns. Even though Data6 is not really an array, it acts like one, so we won't bother getting caught up in the technical details here. Suffice it to say, the above code works. Note that the Array function always returns an array of variants and conforms to the numeric indexing specified by the Option Base statement at the beginning of the VBA module.
The Erase function can be used to erase the data that an array holds. With fixed-size arrays, Erase erases the values held by all the elements of the array without deallocating any memory that the array occupies. For a dynamic array, however, Erase not only erases values but also deallocates all of the memory assigned to the array. Here's an example of using Erase to eliminate the values in a fixed-size array:
Sub Chap02dMacro32_EraseFunction()
    Dim Data7(2) As Integer
    Data7(1) = Int(100 * Rnd())
    Data7(2) = Int(100 * Rnd())
    MsgBox "Lottery Numbers: " & Data7(1) & ", " & Data7(2)
    Erase Data7
    MsgBox "Lottery Numbers: " & Data7(1) & ", " & Data7(2)
End Sub
Macro32 above assigns values to a one-dimensional, two-element array and then displays them in a message box. Then, by using the Erase function, the macro eliminates the values in the array. The second call to the MsgBox function in line 7 of the macro displays the value 0 for the elements of the array. The following is an example of calling Erase on a dynamic array:
Sub Chap02dMacro33_EraseDynamicArray()
    Dim Data8() As Integer
    ReDim Data8(2)
    Data8(1) = Int(100 * Rnd())
    Data8(2) = Int(100 * Rnd())
    MsgBox "Lottery Numbers: " & Data8(1) & ", " & Data8(2)
    Erase Data8
    MsgBox "Lottery Numbers: " & Data8(1) & ", " & Data8(2)
End Sub
Executing Macro33 above results in a runtime error in Excel; the macro fails in line 8. When the Erase function is called in line 7, it wipes out all memory allocated to the dynamic array, Data8. After the array's memory is deallocated, VBA has no way to evaluate the array indices that are specified in the call to MsgBox in line 8, which causes the macro to fail and VBA to generate an error message.
When Macro33 causes an error, a VBA Error dialog box is displayed telling you which error occurred. The error in this case is "Subscript out of range." At this point, you can choose to take one of four actions: End the execution of Macro33 (choose End), go directly to the line of code that caused the problem (choose Goto), access a help screen that describes the error and its probable cause (choose Help), or debug your code (choose Debug). If you choose Debug, a new window is displayed, from which you can step through your code, examine the contents of variables, or even execute single VBA instructions. For more information about using the Debug window, see the section titled "The Instant Watch Button," beginning on page 117.
Tip You can also get to the Debug window by choosing the Debug Window command from the View menu whenever a VBA module is active. The Immediate tab of the Debug window offers a great way to try out single instructions as you enter and edit your code. The Debug window's Immediate tab is also covered more thoroughly in the section titled "The Instant Watch Button," beginning on page 117.
IsArray is a built-in VBA function that allows you to test a variable to determine whether it is indeed an array. IsArray takes one argument and returns either True (if it is an array) or False (if it is not). IsArray is useful when you call a function that is supposed to return an array; you can use IsArray to verify that the value returned is indeed an array. The following example demonstrates IsArray:
Sub Chap02dMacro34_IsArrayFunction()
    Dim Data9(2) As Integer
    Dim ArrayBool As Boolean
    ArrayBool = IsArray(Data9)
    If ArrayBool = True Then
        MsgBox "Data9 is an array."
    End If
End Sub
Although the above example is not practical in a real-world sense, it does demonstrate the functionality of IsArray. In line 2 of the macro, an array is declared, and in line 3, a Boolean variable (ArrayBool) is declared. IsArray is then used to make an assignment to ArrayBool (either True or False). An If statement next determines whether the value in ArrayBool is True; if it is True, a message is displayed in a message box. (The syntax of the If statement is covered in detail, in the section titled "Altering Flow Using the If-Then-Else Control Structure," beginning on page 85.)
You can use the LBound and UBound functions to determine the lower bound and upper bound indices of an array. Here's an example:
Sub Chap02dMacro35_LBoundAndUBound()
    Dim Data10(4 To 15) As Integer
    MsgBox "The lower bound is " & LBound(Data10) & "."
    MsgBox "The upper bound is " & UBound(Data10) & "."
End Sub
A constant is a value that does not change during the execution of a macro. VBA constants are similar to constants found in other programming languages, and, in fact, constants represent exactly what their name implies: constant values. You use constants, therefore, when dealing with a value that you know will not change or that you do not want to change during the execution of a macro.
You declare constants in a manner that is similar to the way in which you declare variables, with one exception: Constants are assigned values in the same statement in which they are declared. After the declaration, constants cannot be changed. Any effort to change the value of a constant causes an error. Here's an example of a constant declaration:
Const MinVal As Integer = 1
As the example shows, you declare constants by using the Const keyword, followed by the name of the constant, the data type, and the value assigned to the constant. Constant data types are the same as those for variables, with one exception: You cannot declare a constant of a user-defined type. If you omit the data type for a constant in its declaration, the constant is given a data type that matches the value assigned to it. Note that expressions can also be used to assign values to constants, as in the following example:
Const TwoSquared As Integer = 2 * 2
You can also include multiple constant declarations in a single Const statement by separating the declarations with commas, as shown in the following example:
Const Con1 As Integer = 5, Con2 As Integer = 6, Con3 As Integer = 7
Constants do not come in the form of arrays, but you can use constants like you use a variable, provided you do not try to change the constant's value.
In VBA, it's possible to call, or execute, one macro from another macro. This capability allows you to separate your code into logical segments. You gain two advantages by separating code into multiple subroutines. First, if you want to use a VBA routine repeatedly, you need only write this routine once and store it in a macro that can be called by any macro that requires it. Doing so also makes editing this shared routine easier because you have to make changes in only one place. Second, you can separate your VBA code into discrete, logical segments that are easy to code, debug, and maintain. If you could not call one subroutine from another, your VBA macros would be extremely long and difficult to edit and debug.
Use logic, however, when breaking up your application into separate macros. A single macro should represent a single functional operation. Be careful not to go overboard in this respect; you could potentially write a separate macro for each VBA command in your application. Deciding when a particular operation should stand alone functionally is largely a matter of preference and experience. Let's take a look at an example. Macro36 calls the DisplayMessage macro to display a message:
Sub Chap02dMacro36_CallSecondMacro()
    Dim Range1 As Range
    Set Range1 = Worksheets(1).Range("A1")
    Range1.Value = 500
    DisplayMessage
End Sub

Sub DisplayMessage()
    MsgBox "Data has been entered."
End Sub
This macro enters data in range A1 of the first worksheet. Then, in line 5, the macro makes a call to the second macro, DisplayMessage. The DisplayMessage macro executes, displaying a message before returning control to Macro36.
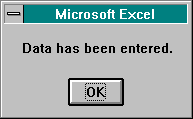
The DisplayMessage macro above is perhaps not practical; the call to the MsgBox function could just as easily have been placed in the body of Macro36. If you had several macros that involved entering data in some way, however, and all of them displayed a message box that indicated that data was entered, you could see how the DisplayMessage macro would be usefulensuring that all macros displayed the same message. Also, using the DisplayMessage macro simplifies the process of changing the message displayed. By including the message in only one macro, you have to change it only once, rather than having to make the change in several places.
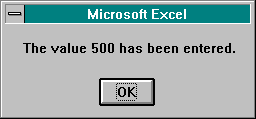
When you call one macro from another, it's possible to pass variables or data to the macro being called. This capability gives you greater power in separating your code into multiple subroutines by allowing a single routine to act on different inputs. Take as an example the DisplayMessage macro. It displays a message box that simply states "Data has been entered." Let's suppose you want the message box to display the actual value that has been entered insteadsomething like "The value 500 has been entered." The easiest way to do so is to specify an argument when calling the DisplayMessage macro. (You can pass a variable from one macro to another in two wayssee the next section.) In the following example, Macro37 calls and passes arguments to DisplayMessage2:
Sub Chap02dMacro37_PassArgumentToMacro()
    Dim Range1 As Range
    Set Range1 = Worksheets(1).Range("A1")
    Range1.Value = 500
    DisplayMessage2 Range1.Value
End Sub

Sub DisplayMessage2(Value1)
    MsgBox "The value " & Value1 & " has been entered."
End Sub
Two items of interest occur in the two macros above. First, in Macro37, the call to DisplayMessage2 contains an argument: Range1.Value. Second, in line 1 of the DisplayMessage2 macro, Value1 appears in the parentheses that follow the macro name. In this case, Value1 serves as a variable. And, in fact, Value1 assumes the value of the argument that is specified when the call to DisplayMessage2 is made. Value1 is then used in DisplayMessage2 to display the appropriate value in the message box:
Macro38 below shows another example of passing arguments when calling a macro. This macro passes elements of a user-defined type variable as arguments to DisplayMessage3:
Type PersonalData
    Dim PName As String
    Dim PAge As Integer
    Dim PBirthDate As Date
End Type

Sub Chap02dMacro38_PassUserDefinedElements()
    Dim User2 As PersonalData
    User2.PName = "Jane"
    User2.PAge = 35
    User2.PBirthDate = #3/31/61#
    DisplayMessage3 User2.PName, User2.PAge
End Sub

Sub DisplayMessage3(UserName, UserAge)
    MsgBox UserName & ", Age " & UserAge & "."
End Sub
In Macro38 above, two values are passed to DisplayMessage3: User2.PName and User2.PAge. DisplayMessage3 then displays both of those values in a message box.
You can pass a variable from one subroutine to another in two ways: by reference or by value. When a variable is passed by reference, the variable itself is actually passed to the macro that is called, and the called macro can change the variable. When a variable is passed by value, however, the variable's valueand not the variable itselfis passed to the macro that is called, and the called macro cannot change the variable.
How do you pass a variable by reference or by value? You do so by specifying either the ByRef or the ByVal keyword in the parentheses that follow the macro name in the macro that is being called.
Note If you fail to specify either the ByRef or the ByVal keyword, variables are by default passed by reference.
Macro39 below calls the ChangeName macro and passes the UserName variable by reference:
Sub Chap02dMacro39_PassArgumentByReference()
Dim UserName As String
UserName = "Jeff"
ChangeName UserName
MsgBox UserName
End Sub
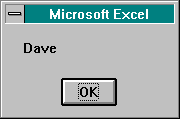
Sub ChangeName(ByRef UserName)
UserName = "Dave"
End Sub
In the first line of the ChangeName macro above, the ByRef keyword and the name of the variable are specified in the parentheses that follow the macro name, indicating that the variable is being passed by referencethat is, the actual variable is being passed to the subroutine. In addition, a new value is assigned to the UserName variable in ChangeName. In fact, when the ChangeName macro finishes executing and returns to the calling macro, Macro39, the new value of UserName, which is "Dave," is displayed in a message box:
Note that in the macros above, the original name of the variable used in Macro39 is the same as that used in the ChangeName macro: UserName. You are not required, however, to use the same name in both instances. For example, the two macros below have the same effect even though they use two different variable names:
Sub Chap02dMacro40_ByRefDifferentVariableNames()
    Dim UserName As String
    UserName = "Jeff"
    ChangeName2 UserName
    MsgBox UserName
End Sub

Sub ChangeName2(ByRef NewName)
    NewName = "Dave"
End Sub
Passing a variable by value does not involve passing the variable itself but rather the value of the variable. Therefore, changes to the variable in the called subroutine cannot affect the value of the variable in the calling routine. You pass a variable by value in the same manner as you pass a variable by reference except that you use the ByVal keyword:
Sub Chap02dMacro41_PassArgumentByValue()
    Dim UserName As String
    UserName = "Jeff"
    ChangeName3 UserName
    MsgBox "Yet remains as " & UserName & " in the original macro."
End Sub

Sub ChangeName3(ByVal UserName)
    MsgBox "The original name is " & UserName & "."
    UserName = "Dave"
    MsgBox "The name is changed to " & UserName & _
           " in the called macro."
End Sub
The original value of UserName is passed to the ChangeName3 macro above, and the value is displayed in a message box. ChangeName3 then changes the value of UserName and displays the new value in a second message box. Because the argument was passed to ChangeName3 by value, the UserName variable still retains its original value when ChangeName3 finishes executing and returns control to Macro41. The value is displayed in a message box in the last line of Macro41.
Two additional keywords can be used when passing arguments from one macro to another: Optional and ParamArray. The argument list of a called macro uses the Optional keyword to specify those arguments that are optional. After you declare an argument in an argument list as optional, all remaining arguments must be optional as well. In addition, all optional arguments are evaluated as variants.
Here's an example of an argument list that uses the Optional keyword:
Sub OptionalExample(ByVal Arg1, Optional ByRef Arg2, _
                    Optional ByVal Arg3)
A ParamArray argument will accept an arbitrary number of arguments from the calling macro and package them into an array of variants. (In the absence of any Option Base statement, the array is base 0.) You can use ParamArray only with the last argument in an argument list. Here is an example of an argument list that uses the ParamArray keyword:
Sub ParamArrayExample(ByVal Arg1, ParamArray Arg2())
For more information about the Optional and ParamArray keywords, see Excel's online VBA Help.
As mentioned, VBA uses two types of macros: subroutines and function macros. The first half of this chapter focused on subroutines; we'll look now at function macros.
Function macros are similar to subroutines; in fact, there are only three main differences between a function macro and a subroutine:
Let's take a look at an example of a function that returns the product of two numbers:
Sub Chap02dMacro42_CallFunction()
    Dim Var1 As Integer
    Dim Var2 As Integer
    Dim Var3 As Integer
    Var1 = 5
    Var2 = 10
    Var3 = Multiply(Var1, Var2)
    MsgBox Var3
End Sub

Function Multiply(ByVal Var1, ByVal Var2)
    Multiply = Var1 * Var2
End Function
The Multiply function shown above is a simple function that merely returns the product of its two arguments. Notice that in line 2 of the Multiply function, the product of the two arguments is assigned to the name of the function. Such a statement in a function macrowhere an assignment is made to the function namespecifies the return value of the function.
Note
You can specify the data type of each argument and of a function's return type, as in the following example:
Function Multiply (ByVal Var1 As Integer, _
ByVal Var2 As Integer) As Integer
Arguments and return types are variants by default if no data type is specified.
You might have noticed something interesting about the way in which Macro42 calls the Multiply function. The call is made by using an assignment statement in which a variable appears on the left side of the statement and the function name, along with a parameter list enclosed in parentheses, appears on the right side of the statement. This assignment statement assigns the return value of the Multiply function to the Var3 variable. In addition, the argument list for the function is enclosed in parentheses. In earlier examples of calling one subroutine from another, we saw that when arguments are passed to a subroutine, they are not enclosed in parentheses. You'd do well to remember the following general rules about passing arguments to functions or subroutines:
F Y I
Executing a Function by Calling It from a Worksheet Cell
You can execute a function macro by calling it directly from a worksheet cellin the same way that you can call one of Excel's built-in worksheet functions. For example, by entering the Multiply function in a VBA module, you can access the function through a formula in a worksheet cell, as the following example shows:
=Multiply(50,100)
Also note that when calling a function macro from a cell formula, instead of passing values to the function, you can also pass range addresses. The function accepts the addresses as arguments and evaluates the values they contain. Here is an example:
=Multiply(A1,B1)
This call to Multiply returns the product of the values in cells A1 and B1.
All VBA variables, constants, subroutines, and functions have what is called "scope," which refers to the area in the VBA application in which a specific variable, constant, subroutine, or function can be accessed. For example, let's suppose that you declare a variable named Var1 in a macro named Macro1. Then suppose that you write a second macro named Macro2 in which you want to access the variable declared previously in Macro1that is, Var1. If Var1 is declared in the body of Macro1 using the Dim keyword (shown in numerous examples in this chapter), Var1 has what is known as "procedure-level scope." That is, its scope is bounded by the procedure, or subroutine, in which it is declared. Therefore, you cannot access Var1 from Macro2unless you expand the scope of Var1.
Let's take a different examplea function named Function1 that has been written in a VBA module named Module1. Suppose you want to call Function1 from a macro that resides in a different modulespecifically, Module2. If Function1 was written using the Function keyword (as described in the previous section, titled "Function Macros"), Function1 has what is known as "project-level scope," meaning its scope is bounded by the workbook that contains the function. Because it has project-level scope, you can call Function1 from any macro in any VBA module in the workbook. If for some reason you wanted to prevent Function1 from being called by macros in other modules, you would have to limit the scope of Function1.
To get a more complete picture of scope, let's look at the scoping issues and at the ways you set scope for each of the main VBA elements we've discussed thus far: variables, constants, subroutines, and functions.
Although the scope of a variable refers to the area in your VBA application in which the variable can be accessed, the scope of a variable is also sometimes referred to as that area of the application in which the variable "stays alive" or retains the value that has been assigned to it. VBA provides three different levels of variable scope:
These levels apply to arrays as well as to single-value variables. Also note that user-defined type definitions, which must occur at the top of a VBA module, by default have project-level scope. That is, after a user-defined type definition has been entered, you can declare a variable of that type anywhere in the workbook.
The following sections look at each of these levels of scope in more detail.
A variable has procedure-level scope if it is declared using the Dim keyword in the body of a subroutine. In this example, Var1 has procedure-level scope:
Sub Chap02eMacro43_ProcedureLevelVariable()
    Dim Var1 As Integer
    Var1 = 55
    MsgBox Var1
End Sub
Any attempt to access Var1 from another macro will fail. Let's suppose that you write a second macro in the same module as Macro43 above and that in this second macro an attempt is made to access Var1. Let's also suppose that you change Macro43 by inserting a line at the end of the macro that calls this second macro. The resulting two macros would appear as follows:
Sub Chap02eMacro43ProcedureLevelVariable()
    Dim Var1 As Integer
    Var1 = 55
    MsgBox Var1
    Chap02eMacro44
End Sub

Sub Chap02eMacro44()
    MsgBox Var1
End Sub
Now, when you execute Macro43, the Var1 variable is declared and the value 55 is assigned to it and then displayed in a message box, as in the original macro. After the initial message box is displayed, however, the macro calls Macro44. Macro44 also attempts to display the value held by Var1 in a message box, but a blank message box is displayed instead of "55." Because Var1 has procedure-level scope, it does not retain its value outside of the macro (Macro43) in which it was declared. When Macro44 tries to access the value of Var1, VBA assumes that the Var1 variable referenced in Macro44 is an undeclared variant to which no value has been assigned and therefore displays an empty string in the message box. Figure 2-6 illustrates procedure-level scope.
If you want to be able to access the original value of Var1 (55) from Macro44, you could do so in one of two ways: As already discussed, you could pass Var1 from Macro43 to Macro44. Or you could change Var1 to module-level scope, which is described in the next section.
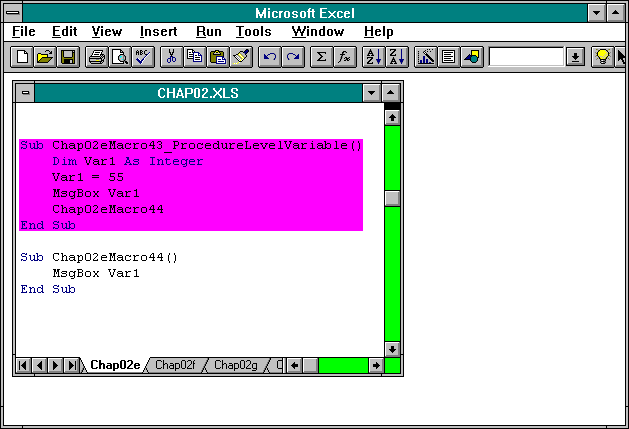
Figure 2-6. Var1, declared with procedure-level scope, is available only in Macro43. The shaded area represents the scope of Var1.
A variable with module-level scope can be accessed by any subroutine or function macro that resides in the module in which the variable is declared. To declare a module-level variable, you place the declaration at the beginning of the VBA module, before any subroutines or function macros, as in this example:
Dim Var2 As String

Sub Chap02eMacro45_ModuleLevelVariable()
    Var2 = "Hello World"
    Chap02eMacro46
End Sub

Sub Chap02eMacro46()
    MsgBox Var2
End Sub
In the example above, Macro46 successfully accesses the correct value of Var2 as set in Macro45 because Var2 has been declared as a module-level variable and therefore retains its value throughout the VBA module. Figure 2-7 on the next page illustrates module-level scope.
Let's consider another case, in which a module-level variable named Var3 is declared and assigned a value in Module1. Suppose, however, that you have a macro in Module2 that must have access to this variable. Because a module-level variable retains its value only in the module in which it is declared, you must change the scope of the variable to be able to access it from different modules, as the next section explains.
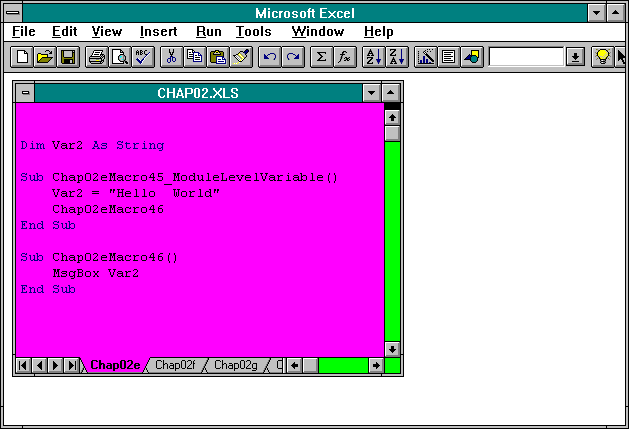
Figure 2-7. Var2, declared with module-level scope, is available in all of module Chap02e. The shaded area represents the scope of Var2.
A variable that has project-level scope can be accessed from and retains its value in any module in the workbook file in which it is declared. You declare variables of project-level scope by using the Public keyword; again, the declaration must occur at the beginning of any VBA module in the workbook, before any subroutines or function macros. Let's assume that we have two macros that exist in two different modules. One macro sets the value of a project-level variable, and the other displays the value in a message box. Here's an example:
Public Var3 As String

Sub Chap02fMacro47()
    Var3 = "This variable was declared and set in module Chap02f."
End Sub

Sub Chap02eMacro48_ProjectLevelVariable()
    Chap02fMacro47
    MsgBox Var3
End Sub
In the example above, Macro48 calls Macro47 in a separate module, which in turn sets the value of the project-level variable Var3. Macro48 then displays the value of Var3 in a message box. Figure 2-8 illustrates project-level scope.
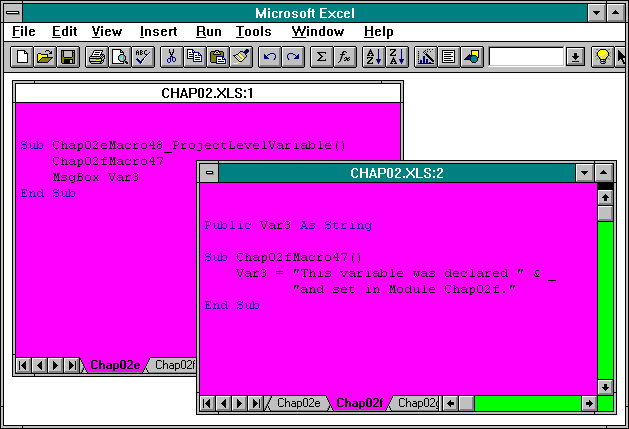
Figure 2-8. Var3, declared with project-level scope, is available in all modules in the workbook. The shaded area represents the scope of Var3.
We have seen how the Dim and Public keywords can be used to declare variables; however, the Static keyword can also be used to declare variablesat the procedure level only. Normally, if a procedure-level variable is declared with Dim, the variable ceases to retain its value after the subroutine in which it is declared finishes executingwhen execution encounters the End Sub or End Function statement at the end of the macro. Declaring a variable as Static extends the life of the variable until execution of all macros, including the macro in which the variable is declared, is finished, as shown in this example:
Sub Chap02fMacro49_StaticVariable()
    Chap02fMacro50
    Chap02fMacro50
End Sub

Sub Chap02fMacro50()
    Static Var1 As String
    Dim Var2 As String
    If Var1 = "" Then
        Var1 = "Var1: Static Value"
        Var2 = "Var2: Non-Static Value"
    End If
    MsgBox Var1
    MsgBox Var2
End Sub
Macro49 calls Macro50 twice. The first time it calls Macro50, the macro declares Var1 as a static variable and Var2 as a non-static variable. Execution then flows into an If statement, which compares Var1 to an empty string. The If statement evaluates to True because no value has yet been assigned to Var1. In the If statement, strings are assigned to both Var1 and Var2, and before the macro finishes executing, the values of Var1 and Var2 are displayed in message boxes. Macro50 returns control to Macro49, which then calls Macro50 a second time. Because Var1 was declared as a static variable, this time it retains its value and continues to retain its value until execution stops. The If statement evaluates to False because Var1 has retained its value; consequently, the assignment statements in the If clause are not executed. Finally, the values of Var1 and Var2 are displayed in message boxes a second time. Because Var1 has retained its value, we see the value of Var1 displayed, but because Var2 is non-static, it has not retained its value from the first time Macro50 executed. Therefore, when Var2 is displayed in a message box, we see only an empty string.
F Y I
A Few Words About Project-Level and Module-Level Variables and Compilation
After an assignment is made to a project-level or module-level variable, that variable maintains its value until a new assignment is made or until the user closes the Excel workbook file that contains the application. There is one other circumstance in which module-level and project-level variables lose the values they contain: when the VBA module in which those variables exist reaches an uncompiled state. A VBA module reaches an uncompiled state whenever a change is made to the modulespecifically, whenever the macro is edited. The first time a macro in the affected module is executed, the whole module is compiled. After this first execution, the module remains in a compiled state until any changes are made to it. To ensure that all modules are compiled at the time you save and distribute a VBA application, be sure to run at least one macro in each module to force compilation. You can also force all VBA modules to be compiled by creating what is called an "XLA Add-In." These topics are discussed in greater detail later in this book. For now, remember that if you edit a module, data held by any module or project-level variables in that module is lost, and you will be forced to run code to re-initialize the variables.
Constants have the same three levels of scope as do variables: procedure, module, and project. The way in which constants are declared with each level, however, differs slightly from that of variables. Constants that have procedure-level scope can be accessed only from within the subroutine in which they are declared. The following is an example:
Sub Chap02fMacro51_ProcedureLevelConstant()
    Const USCapitalCity As String = "Washington, D.C."
    MsgBox "The capital of the U.S. is " & USCapitalCity & "."
End Sub
You declare constants of module-level scope by using the Const keyword at the beginning of a VBA module, as shown in the following examples:
Const MoonLandingDate As Date = #7/20/69#
Sub Chap02fMacro52_ModuleLevelConstant()
    MsgBox "People first walked on the moon on " & _
           MoonLandingDate & "."
End Sub

Sub Chap02fMacro53_ModuleLevelConstant()
    MsgBox "I was in Los Angeles on " & MoonLandingDate & "."
End Sub
As the above examples show, module-level constants can be accessed by any macros that reside in the module. Note also that a module-level constant can be declared with the keyword Private, as in the following example:
Private Const MoonLandingDate As Date = #7/20/69#
Using the Private keyword in a declaration of a module-level constant makes the constant available in that particular module only. All module-level constants are private by default, however, so you need not be concerned about including the Private keyword.
To declare project-level constants, you include the Public and Const keywords at the beginning of a VBA module, as in the following example:
Public Const ColorOfSky As String = "Blue"
You can access project-level constants from anywhere in the workbook file in which they are declared.
Subroutines and function macros have only two levels of scope: module-level scope and project-level scope. Macros have, by default, project-level scope; they can be called by any macro in any module in the workbook. It is possible to declare a subroutine or function by using a Public keyword, as in the examples on the next page.
Public Sub Chap02fMacro54_ProjectLevelMacro()
    Dim Var1 As Integer
    Var1 = 1
    MsgBox AddOne(Var1)
End Sub

Public Function AddOne(ByRef Var1)
    AddOne = Var1 + 1
End Function
Because all macros by default have project-level scope, the only reason to use the Public keyword is to make those macros easily identifiable as being at the project level. Omitting the Public keyword, however, has no functional effect.
To make a macro module-level in scope, you use the Private keyword before the subroutine or function declaration. Note that declaring a macro by using the Private keyword makes it impossible for the macro to run stand-alone; private macros can be called only from other macros. The following is an example:
Sub Chap02fMacro55_ModuleLevelMacro()
    Var1 = GetRand
    Chap02fMacro56 Var1
End Sub

Private Sub Chap02fMacro56(ByVal Var1)
    MsgBox Var1 * GetRand
End Sub

Private Function GetRand()
    GetRand = Int(100 * Rnd())
End Function
In the example above, Macro55 first calls the GetRand function to get a random integer between 1 and 100 and then calls Macro56, passing the integer. Macro56 then multiplies its argument by the result of another call to GetRand before it displays the product in a message box.
You can declare subroutines and function macros as static, and when you do so, all variables in those subroutines and functions become static also. The following provides an example:
Sub Chap02fMacro57_StaticMacro()
    Chap02fMacro58
    Chap02fMacro58
End Sub

Static Sub Chap02fMacro58()
    Dim Var1 As String
    If Var1 = "" Then
        Var1 = "Var1 is not yet proven to be static."
    Else
        Var1 = "Var1 is static."
    End If
    MsgBox Var1
End Sub
Var1 in the example above is declared and set in Macro58 and is static because Macro58 is static. When you run Macro57, it calls Macro58 twice and displays a message box both times, the second time confirming that Var1 is indeed static.
VBA provides several control structures that you can use to control the flow of execution of your macros. You will find that these control structures give you a great deal of power and flexibility in creating complex routines. These control structures are functionally equivalent to those generally found in other programming languages, with the exception of one new structure in VBAthe For-Each-Next structure. The following list describes the most commonly used VBA control structures:
|
If-Then-Else |
Tests a condition and alters execution flow based on the results of the test |
|
For-Next |
Carries out a repetitive action a specific number of times |
|
While-Wend |
Carries out a repetitive action while a specific condition is True |
|
Do-Loop |
Carries out a repetitive action either while a specific condition is True or until a specific condition becomes True |
|
Select Case |
Branches to one of several possible code segments based on the value of a variable or the outcome of a specific test |
|
For-Each-Next |
Performs a repetitive action on each object in a collection or on each item in an array |
The following sections take a closer look at each of these control structures.
You use the If-Then-Else control structure to alter the flow of execution based on the evaluation of what is referred to as a "test condition." The code on the next page provides an example.
Sub Chap02gMacro59_IfThenElse()
    Dim Num1 As Integer
    Num1 = GetRandomNumber
    If Num1 = 7 Then
        MsgBox "Congratulations! You received the winning " & _
               Num1 & "."
    Else
        MsgBox "I'm sorry; you lose. Your number was " & _
               Num1 & "."
    End If
End Sub

Function GetRandomNumber()
    GetRandomNumber = Int(10 * Rnd())
End Function
Macro59 above starts by calling the GetRandomNumber function to set Num1 to a random integer between 1 and 10. The macro then uses an If statement to evaluate a test condition, Num1 = 7. If the test condition evaluates to True (Num1 is equal to 7), VBA executes the first MsgBox statement and displays a message announcing that the winning number has been received:
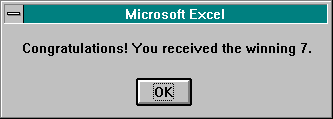
If the test condition in Macro59 evaluates to False (Num1 is not equal to 7), however, VBA executes the second MsgBox statement and displays a message stating that a losing number has been received.
Let's look at the individual elements that make up the above If-Then-Else statement:
|
If |
A keyword that indicates the start of an If-Then-Else statement. |
|
Num1 = 7 |
The test condition. The initial test condition always follows the If keyword and is used to determine the flow of execution through the If-Then-Else statement. The evaluation of the test condition can result in only one of two valueseither True or Falseand the execution flow is altered based on the result. If the test condition evaluates to True, execution flows to the line immediately after the If statement and continues until an Else statement is encountered. After the Else statement is encountered, execution jumps to the line that contains the End If keywords. If the test condition evaluates to False, execution jumps immediately to the line that contains the Else statement and continues until the End If statement is encountered. |
|
Then |
A keyword that signals the end of the test condition. |
|
MsgBox "Congratulations! You received the winning" & Num1 & "." |
The statement that is executed if the test condition (Num1 = 7) evaluates to True. |
|
Else |
A keyword that indicates where execution should stop if the test condition evaluates to True and where execution should start if the test condition evaluates to False. |
|
MsgBox "I'm sorry; you lose. Your number was " & Num1 & "." |
The statement that is executed if the test condition (Num1 = 7) evaluates to False |
|
End If |
Keywords that indicate the end of the If-Then-Else control structure. |
In an If-Then-Else statement, the Else keyword and the code segment that follows it are optional. If both are omitted and the test condition evaluates to False, execution flows immediately to the End If keywords and exits the If-Then-Else control structure.
As shown previously in Macro59, the If-Then-Else control structure is useful for executing statements selectively, depending on the evaluation of a test condition. Let's take a look at another example of If-Then-Elseone that contains the ElseIf keyword. Macro60 below prompts the user for a password. Depending on the password entered, the macro grants certain worksheet access and displays a message box that indicates the level granted:
Sub Chap02gMacro60_IfThenElseIf()
    Dim Password As String
    Password = GetPassword
    If Password = "level1" Then
        For Each Sheet In ActiveWorkbook.Sheets
            Sheet.Visible = True
            Sheet.Unprotect
        Next
        MsgBox "You have read/write access to all sheets."
    ElseIf Password = "level2" Then
        ActiveWorkbook.Worksheets(1).Visible = True
        ActiveWorkbook.Worksheets(1).Unprotect
        MsgBox "You have read/write access to one worksheet."
    ElseIf Password = "level3" Then
        ActiveWorkbook.Worksheets(1).Visible = True
        MsgBox "You have read-only access to one worksheet."
    Else
        MsgBox "Password incorrect. Please try again."
    End If
End Sub

Function GetPassword()
    GetPassword = LCase(InputBox("Enter Password:", "Password"))
End Function
In Macro60, the If-Then-Else statement contains two instances of an ElseIf keyword followed by a condition. The ElseIf keyword provides an alternative test condition if the previous test condition evaluates to False. The first test condition in Macro60 comes immediately after the If keyword: Password = "level1". If this initial test condition evaluates to False, execution jumps immediately to the first ElseIf keyword, at which point a new test condition is introduced: Password = "level2". From here on, VBA ignores the original condition and concentrates solely on the new one. If the new test condition evaluates to False, execution again jumps to the next ElseIf keyword, where the process continues.
Looking at Macro60, you might have noticed a few other items of interest. The segment that immediately follows the If statement includes a For-Each-Next loop. (For-Each-Next is discussed in greater detail in the section titled "Using VBA's For-Each-Next Control Structure," beginning on page 101.) The For-Each-Next loop in this macro goes through all the sheets in the active workbook and performs the same two actions on each sheet: It sets the Visible property of each sheet to True so that the user can see the sheets, and it calls the Unprotect method on each sheet. (Individual sheets in an Excel workbook can be password protected; calling the Unprotect method unprotects a sheet.) Unprotect takes a single argumenta string that represents a password. It is possible to protect a sheet without a password. Let's assume that the worksheets don't have a password in this example; therefore, no password argument is passed to Unprotect. As you look at the other code segments that follow the ElseIf keywords, you can see that, depending on the evaluation of each test condition, the Visible property of the first worksheet is selectively set to True, and the Unprotect method of the same worksheet is selectively called.
F Y I
Using the LCase and InputBox Functions to Get Lowercase User Input
Line 3 of the preceding Macro60 calls a function named GetPassword, in which you might have noticed a few new items. Let's take a look at this function again:
Function GetPassword()
GetPassword = LCase(InputBox("Enter Password:", "Password"))
End Function
GetPassword uses two built-in VBA functionsLCase and InputBox. LCase takes one string argument and returns the same string with all letters converted to lowercase. InputBox displays a box on the screen that requests input from the user. InputBox takes several optional arguments, although here we will concern ourselves only with the first two arguments. The first argument is a string that will be displayed to the user as a prompt in the body of the input box. The second argument is a string that will be displayed at the top of the input box in the title bar. When the InputBox function is called, an input box is displayed that includes the appropriate prompt string and title bar string as well as an empty edit box in which the user can type a value. If the user chooses OK in the input box, the string value that the user has entered is returned. (If the user chooses the Cancel button, however, an empty string is returned.) In the GetPassword function, the string is then passed to the LCase function, which converts it to lowercase.
The For-Next control structure lets you execute the same action a certain number of times. Let's take a look at an example in Macro61 below, which raises the number contained in the variable Base to the power of the number contained in the variable Power:
Sub Chap02gMacro61_ForNext()
    Dim Base As Integer
    Dim Power As Integer
    Dim Result As Integer
    Dim Count1 As Integer
    Base = 4
    Power = 5
    Result = 1
    For Count1 = 1 To Power Step 1
        Result = Result * Base
    Next
    MsgBox Base & " raised to the " & Power & "th power = " & Result
End Sub
This macro determines the result of the value of 4 raised to the fifth power by using a For-Next loop. VBA has a built-in exponent operator (^) that can easily perform this calculation for you. To assign the value of 4 raised to the fifth power to variable Num2, you execute the following statement:
Num2 = 4 ^ 5
We are using the For-Next loop in this circumstance, however, as an example only. Macro61 above uses four integer variables to perform the calculation: Base, which holds the value 4; Power, which holds the value 5; Result, which holds the result of 4 raised to the fifth power; and Count1, which is used as the counter in the For-Next loop. Let's look at the individual components of the For-Next loop:
|
For |
Keyword that indicates the start of the For-Next loop. |
|
Count1 = 1 To Power |
Expression that contains a counter variable as well as start and end values that determine the number of times the loop is executed. In this case, a variable named Count1 is used as the counter variable. The To keyword is used to separate the start value from the end value. With 1 as the start value and Power as the end value, the loop begins executing by setting the counter variable equal to 1. |
|
Step 1 |
Keyword used to specify the value by which the counter variable is incremented or decremented with each loop execution. In the majority of For-Next loops, the step value is 1. It is possible, however, for the step value to be any real number, and it can even be a negative number (in which case the counter variable is decremented with each loop execution). At the beginning of every loop execution, the counter variable is compared with the end value. If the step value is positive and the counter variable is greater than the end value, execution flows out of the loop and on to the statements that follow the For-Next loop. On the other hand, if the step value is negative and the counter variable is less than the end value, execution also flows out of the loop. Specifying the Step keyword and the step value is optional; if you omit them, VBA assumes Step 1. |
|
Result = Result * Base |
Statement that is executed with each loop. The body of a For-Next loop can contain multiple statements. |
|
Next |
Keyword that indicates the end of the For-Next loop. Each time execution encounters the Next keyword, the step value is added to the counter variable, and execution flows back to the top of the For-Next loop. There the counter variable is once more compared with the end value to determine whether the loop should be executed again. |
Macro62 below includes another example of the For-Next loop. The macro uses the InputBox function to prompt the user to enter a number and then employs a For-Next loop, along with two nested If-Then-Else control structures, to calculate the factorial of the number. (The factorial of n is the product of all the integers from 1 to n; the factorial of 0 is defined as 1, and n must be greater than or equal to 0.)
Sub Chap02gMacro62_ForNextIfThenElse()
    Dim NumberString As String
    Dim Num As Integer
    Dim Factorial As Double
    Dim Count1 As Integer
    NumberString = InputBox("Enter Number:", "Calculate Factorial")
    If IsNumeric(NumberString) Then
        Num = Val(NumberString)
        If Num >= 0 Then
            Factorial = 1
            For Count1 = 1 To Num
                Factorial = Factorial * Count1
            Next
            MsgBox "The factorial of " & Num & " is " & Factorial
        Else
            MsgBox "Factorials cannot be calculated on negative numbers."
        End if
    Else
        MsgBox "The factorial could not be calculated.  Please try again."
    End If
End Sub
Again, we calculate the factorial as shown in Macro62 above for example purposes only. (Excel has a built-in worksheet function that calculates the factorial with much greater ease.) In Macro62, we combine two If-Then-Else statements with a For-Next loop. The test condition of the first If-Then-Else statement introduces a built-in VBA functionIsNumeric. The IsNumeric function takes a single argument and returns True if the argument is numeric or False if it is not. If the user enters a number, the test condition evaluates to True, and execution flows into the code segment that follows the If statement. Another built-in VBA function, Val, is included in the first line of the code segment after the If statement. The Val function takes a string, converts it to a number, and, in this case, assigns it to Num. The Val function is required here because the value that InputBox returns is always a string, and the string must be converted to a number before its factorial can be calculated.
Execution next flows into a second If-Then-Else statement, in which a test condition is used to determine whether the Num variable is greater than or equal to 0. If this second test condition evaluates to True, execution flows to the code segment after the second If statement and enters a For-Next loop in which the factorial is calculated and assigned to the Factorial variable. (Note that the factorial of 0 is indeed 1.) If the test condition of the second If statement evaluates to False, the macro displays a message to indicate that factorials cannot be calculated for negative numbers; if the user enters a non-numeric string, the test condition of the first If statement evaluates to False, and a message box explains that the factorial could not be calculated and that the user should try again. But if the user enters a numeric value, a message displays its factorial:

Although we have included two If-Then-Else statements in Macro62 to do some error checking, Macro62 will still, in some instances, break. For example, if the user enters a value greater than 170, Macro62 generates an "Overflow" error message because factorials of numbers greater than 170 exceed the upper bound of a Double variable (roughly 1.79E308). Macro62 also fails to check whether the user has entered a real number that contains values to the right of the decimal point. VBA automatically converts any numeric input to an integer if you assign the result of the Val function to an Integer variable, so Macro62 simply truncates real number input and acts as if it had been given an integer.
While-Wend is another VBA looping structure; it is similar in concept to the For-Next control structure. Instead of looping a set number of times, however, While-Wend loops as long as a specified test condition evaluates to True. Let's look at a simple example. Macro63 uses a While-Wend loop to obtain a specific number from the Rnd function:
Sub Chap02gMacro63_WhileWend()
    Dim LotteryEntry As Integer
    LotteryEntry = 0
    While LotteryEntry <> 7
        LotteryEntry = Int(10 * Rnd())
        Beep
    Wend
    MsgBox "Your number is " & LotteryEntry & ". You Win!!"
End Sub
Macro63 provides a foolproof way of ensuring that the Rnd function always returns a 7. The macro uses a While-Wend loop along with a test condition that causes the loop to continue executing until the value of the variable LotteryEntry is equal to 7. The test condition compares LotteryEntry with the integer 7 by using a not-equals operator (<>). You read the test condition statement above, therefore, as "LotteryEntry not equal to 7." With each loop that is executed, a new random integer is assigned to LotteryEntry. You will also notice that the macro uses the VBA Beep function to tell the computer's internal speaker to beep every time the loop executesthis is purely for effect. If you run this macro multiple times on your computer, you hear a different number of beeps with each execution because the series of numbers generated by successive calls to the Rnd function is random.
Tip Use the Randomize statement in your applications to force Rnd to generate a different sequence of random numbers each time the application is run. Otherwise, Rnd generates the same sequence of numbers each time you open the application's workbook file. For more information about random number sequences, see the topic titled "Rnd Function" in Excel's online VBA Help.
Let's take a closer look at the elements of the above While-Wend loop:
|
While |
Keyword that indicates the start of the While-Wend loop. |
|
LotteryEntry <> 7 |
Test condition used to determine whether the loop should execute. If this condition is True, the loop executes. If it is False, execution flows to the Wend keyword at the end of the loop and continues with the rest of the macro. |
|
LotteryEntry = Int(10 * Rnd( )) |
First statement executed with each loop. |
|
Beep |
Second statement executed with each loop. |
|
Wend |
Keyword that signals the end of the While-Wend loop. |
Macro64 below shows a more realistic example of using While-Wend. The macro and the accompanying GeoQuiz function form the basis of a geography quiz application. Macro64 makes repetitive calls to the GeoQuiz function, which prompts the user to enter the name of the country that corresponds to a specified capital city:
Sub Chap02gMacro64_GeographyApplication()
    Dim GeoResult As Boolean
    Dim GeoCount As Integer
    Dim GeoArray(3,2) As String
    GeoArray(1, 1) = "Copenhagen"
    GeoArray(1, 2) = "Denmark"
    GeoArray(2, 1) = "Beijing"
    GeoArray(2, 2) = "China"
    GeoArray(3, 1) = "Cairo"
    GeoArray(3, 2) = "Egypt"
    GeoResult = True
    GeoCount = 1
    While GeoResult And GeoCount <= UBound(GeoArray, 1)
        GeoResult = GeoQuiz(GeoArray(GeoCount, 1), _
                            GeoArray(GeoCount, 2))
        GeoCount = GeoCount + 1
    Wend
    If GeoResult Then
        MsgBox "Congratulations.  All of your answers are correct."
    End If
End Sub

Function GeoQuiz(ByVal Capital, ByVal Country)
    Dim CountryName As String
    Dim PromptString As String
    PromptString = Capital & " is the capital of which country?"
    GeoQuiz = True
    While (CountryName <> UCase(Country)) And GeoQuiz
        CountryName = UCase(InputBox(PromptString, "GeoQuiz"))
        If CountryName = "" Then
            'User chose Cancel or OK with no input.
            GeoQuiz = False
        Else
            PromptString = CountryName & _
              " is not correct. Try again." & Chr(13) & _
              Capital & " is the capital of which country?"
        End If
    Wend
    If GeoQuiz Then
        MsgBox Country & " is the correct answer."
    End If
End Function
Macro64 and the GeoQuiz function combinein several waysmany of the components that this book has already discussed and also introduce several new items. Let's step through the macro and take a look at what it shows.
At the beginning of Macro64, two variablesGeoResult and GeoCountand one arrayGeoArrayare declared. GeoArray is a two-dimensional array that, if we look at it as a table, has two columns of data in each row: the name of a capital city in the first column and the name of the corresponding country in the second column. After the array is initialized, execution in Macro64 flows into the While-Wend loop. The loop has a test condition that evaluates two expressions that are joined by an And operator; both expressions must be True for the test condition to be True. GeoResult is a Boolean variable that is used to capture the return value from the GeoQuiz function. The first time the While-Wend loop executes, GeoResult is True. GeoCount is a counter that is used to loop through the array's rows. The test condition for the While-Wend loop checks for two items: that GeoResult is True and that GeoCount is less than or equal to the upper bound of the first dimension of GeoArray. If both expressions in the test condition evaluate to True, execution enters the loop's body.
A call is made in the body of the loop to the GeoQuiz function. The macro passes two arguments to GeoQuiz: a capital city name and a corresponding country name from GeoArray. Using GeoCount, we can specify which row of the array is current. In short, GeoQuiz takes the first argument (the capital city), displays it in an input box, and asks the user to enter the corresponding country:
If the user enters the correct answer, GeoQuiz returns a value of True, which is assigned to GeoResult. The second statement in the While-Wend loop in Macro64 is used to increment GeoCount to move to the next row of the array. Execution then goes back to the beginning of the While-Wend loop, where the process begins again. If the user enters all country names correctly, GeoCount eventually becomes greater than the upper bound of GeoArray, causing the test condition to evaluate to False and execution to exit the loop. Execution then flows to the If statement at the end of Macro64, which displays the message box at the top of the next page if all answers are correct.

The GeoQuiz function takes two arguments: a capital city name and a corresponding country name. In the While-Wend loop in GeoQuiz, the InputBox function is first invoked; it displays the capital city's name and asks the user to enter the corresponding country. If the user chooses Cancel in the input box or leaves the edit box blank, the function's return value is set to False, causing the loop to end. A comment explains what part of the code is executed when the user chooses Cancel or leaves the edit box blank.
If the user enters a value in the input box and chooses OK, execution flows to the start of the While-Wend loop, where the test condition is evaluated again. If the user has entered the incorrect country, the test condition evaluates to True, and the loop executes again. If the user enters at least one character and chooses OK, the function return value retains the value of True. The test condition evaluates to False when the user enters the correct country, and execution flows to the end of the While-Wend loop. Because the function's return value is still True, a message box tells the user that the correct answer has been entered:
F Y I
Comments in Code Listings
A comment begins with an apostrophe ('); everything to the right of the apostrophe is part of the comment. A comment can be on a line by itself as in the GeoQuiz function, or it can be at the end of a line of code. If you use comments on the same lines as your code, use tabs to align the comments; comments should make your code morenot lessreadable.
In the GeoQuiz function, review the assignment statement for the PromptString variable at the end of the While-Wend loop. The statement involves building a string that says something along the lines of "The country name you entered is not correct. Please enter another country name." At the end of the first line of the assignment statement, the line continuation character (_) is used to continue the statement on a second line. In addition, on the following line, we see a built-in VBA function called Chr. The Chr function takes one argumenta number from 0 through 255and returns the ASCII character that corresponds to the argument. In GeoQuiz, Chr(13) evaluates to a linefeed character, which causes the prompt displayed in the input box to wrap around to a new line. Calling Chr(13) twice inserts two linefeed characters in the prompt.
Note Chr(13) produces a linefeed character when used with the MsgBox or InputBox functions whether running in Windows or on the Macintosh. In Windows, Chr(10) will also generate a linefeed for these two functions. To produce a linefeed in the text of a TextBox object, however, you must use Chr(10) in Windows and Chr(13) on the Macintosh.
Macro64 and the GeoQuiz function are perhaps the most complicated macros encountered so far in this book. They could easily form the basis of a geography quiz application that could be used in a real-life educational setting. You would simply have to retrieve the names of all the countries in the world and their corresponding capital cities from a database or an Excel worksheet. And you would probably want to improve the user interface by using custom graphics and perhaps dialog boxes, which offer more flexibility than do input boxes. As this example shows, input boxes are limited. Chapter 5 includes a discussion of designing dialog boxes. Because you can add many features to a dialog box, you can create a user interface that is custom designed.
The Do-Loop control structure is similar to While-Wend. Do-Loop, however, provides two important features that While-Wend does not. First, Do-Loop lets you choose whether to specify the test condition at the beginning or at the end of the loop. With While-Wend, you can specify the test condition only at the beginning of the loop. Placing the test condition at the end of the loop, however, guarantees that the loop will always execute at least one time. Second, Do-Loop allows you to specify that execution of the loop should continue either while the test condition is True or until the test condition becomes True. This second feature, however, is achievable with While-Wend; by using the VBA Not operator, you can easily transform a test condition that allows execution while it is True into a test condition that executes until it is True.
Let's take a look at some examples. We saw that Macro63 employed While-Wend to retrieve random integers until a 7 was returned. Here's how the same macro would be written using Do-Loop:
Sub Chap02gMacro65_DoWhileLoop()
    Dim LotteryEntry As Integer
    LotteryEntry = 0
    Do While LotteryEntry <> 7
        LotteryEntry = Int(10 * Rnd())
        Beep
    Loop
    MsgBox "Your number is " & LotteryEntry & ". You Win!!"
End Sub
If we compare Macro65 above with Macro63 on page 93, we see only two subtle differences: The keyword Do appears before the keyword While in Macro65, and the keyword Loop replaces the keyword Wend. We can rewrite the above macro in several different ways, however, using Do-Loop. In Macro66 below, the While keyword is replaced with the Until keyword, and the not-equals operator (<>) that compares the LotteryEntry variable to the value 7 is replaced with an equals operator (=):
Sub Chap02gMacro66_DoUntilLoop()
    Dim LotteryEntry As Integer
    LotteryEntry = 0
    Do Until LotteryEntry = 7
        LotteryEntry = Int(10 * Rnd())
        Beep
    Loop
    MsgBox "Your number is " & LotteryEntry & ". You Win!!"
End Sub
By using Do-Loop, we can continue to make changes to this macro. In Macro67 below, for example, we keep the Do keyword at the top of the loop but move the Until keyword and the test condition to the end of the loop after the Loop keyword. Making this change ensures that the loop will execute at least one time because the test condition is not evaluated until the end of the loop. As a result, we no longer need to initialize LotteryEntry before entering the loop.
Sub Chap02gMacro67_DoLoopUntil()
    Dim LotteryEntry As Integer
    Do
        LotteryEntry = Int(10 * Rnd())
        Beep
    Loop Until LotteryEntry = 7
    MsgBox "Your number is " & LotteryEntry & ". You Win!!"
End Sub
We can make one final change to show the last permutation of Do-Loop: Substitute the While keyword for the Until keyword at the end of the loop. In doing so, we must change the equals operator (=) back to a not-equals operator (<>):
Sub Chap02gMacro68_DoLoopWhile()
    Dim LotteryEntry As Integer
    Do
        LotteryEntry = Int(10 * Rnd())
        Beep
    Loop While LotteryEntry <> 7
    MsgBox "Your number is " & LotteryEntry & ". You Win!!"
End Sub
The Select Case control structure alters the flow of execution to one of several possible code segments, depending on the value of a variable or the evaluation of an expression. Using Select Case is similar to using multiple ElseIf statements to redefine a test condition in an If-Then-Else control structure. Earlier, Macro60 used an If-Then-Else statement to prompt a user for a password and then, depending on the password entered, provided a certain level of access privilege to an Excel workbook. Let's rewrite Macro60 using a Select Case statement:
Sub Chap02gMacro69_SelectCase()
    Dim Password As String
    Dim Sheet As Object
    Password = LCase(InputBox("Enter Password:", "Password"))
    Select Case Password
        Case "level1"
            For Each Sheet In ActiveWorkbook.Sheets
                Sheet.Visible = True
                Sheet.Unprotect
            Next
            MsgBox "You have read/write access to all sheets."
        Case "level2"
            ActiveWorkbook.Worksheets(1).Visible = True
            ActiveWorkbook.Worksheets(1).Unprotect
            MsgBox "You have read/write access to one worksheet."
        Case "level3"
            ActiveWorkbook.Worksheets(1).Visible = True
            MsgBox "You have read-only access to one worksheet."
        Case Else
            MsgBox "Password incorrect. Please try again."
    End Select
End Sub
The following list describes the components of the Select Case control structure used above in Macro69:
|
Select Case |
Keywords that indicate the beginning of the Select Case control structure. |
|
Password |
Test expressioncan be a variable or an expression. The test expression is evaluated, and execution flows to the Case statement that contains an expression equal to the test expression. If no such Case statement exists, execution flows to a Case Else statement. If no Case Else statement exists, execution flows to the End Select statement at the end of the control structure. |
|
Case "level1" |
First Case expression. If the test expression is equal to the Case expression listed here, execution flows to the code segment that starts on the following line and continues until another Case statement is encountered, at which time execution flows to the End Select statement. If the test expression is not equal to the Case expression listed here, execution flows to the next Case statement. |
|
Case "level2" |
Second Case expressionhandled in the same way as Case "level1". |
|
Case "level3" |
Third Case expressionhandled in the same way as Case "level1". |
|
Case Else |
Evaluates to True if all of the other Case expressions evaluate to False. If Case Else evaluates to True, execution flows to the code segment that follows the Case Else statement. |
|
End Select |
Keywords that signal the end of the Select Case control structure. |
Macro70 below also uses a Select Case control structure, but the one it uses differs slightly from the original Select Case control structure we looked at in Macro69:
Sub Chap02gMacro70_SelectCase()
    Dim Score As Integer
    Score = Int(100 * Rnd())
    Select Case Score
        Case 0 To 33
            MsgBox "Score: " & Score & Chr(13) & _
                   "You're in the first third."
        Case 34 To 66
            MsgBox "Score: " & Score & Chr(13) & _
                   "You're in the second third."
        Case 67 To 100
            MsgBox "Score: " & Score & Chr(13) & _
                   "You're in the last third."
    End Select
End Sub
In Macro70, the Case expressions cover a range of values. Each Case expression specifies a starting value, followed by the To keyword, and then an ending value. If the test expression for the control structure is equal to a value that falls within one of the ranges specified, the appropriate Case expression evaluates to True, and the code segment that corresponds to that Case expression is executed.
For-Each-Next is perhaps the most powerful looping control structure in VBA. In fact, few programming languages provide such a powerful control structure. For-Each-Next allows you to loop through all of the objects in a collection or all of the elements in an array and perform the same action on each object or element. The following is a simple example of the For-Each-Next control structure:
Option Base 1
Sub Chap02gMacro71_ForEachNext()
    Dim CountryArray(5) As String
    Dim Country As Variant
    CountryArray(1) = "India"
    CountryArray(2) = "Peru"
    CountryArray(3) = "Greece"
    CountryArray(4) = "Canada"
    CountryArray(5) = "Kenya"
    For Each Country In CountryArray
        MsgBox Country
    Next
End Sub
Macro71 above assigns country names to the five elements of the array CountryArray and then uses the For-Each-Next control structure to display the value of each element in the array in a message box:

Note that a loop is executed a certain number of times exactly as in the For-Next control structure. The benefit of For-Each-Next, however, is that you don't have to worry about trying to figure out how many times the loop should execute; it executes as many times as there are elements in the array (or objects in the collection). For example, we could rewrite Macro71 and use a standard For-Next loop, as shown in Macro72 below:
Sub Chap02gMacro72_ForNext()
    Dim CountryArray(5) As String
    Dim Count1 As Integer
    CountryArray(1) = "India"
    CountryArray(2) = "Peru"
    CountryArray(3) = "Greece"
    CountryArray(4) = "Canada"
    CountryArray(5) = "Kenya"
    For Count1 = 1 to UBound(CountryArray)
        MsgBox CountryArray(Count1)
    Next
End Sub
With the For-Next loop in Macro72 above, however, we've had to use a counter variableCount1to count from 1 to the upper bound of the array. Note also that in the body of the For-Next loop we've had to index CountryArray to retrieve values from the array. The For-Each-Next loop in Macro71 did not require a counter variable; nor did it require that the array be indexed in the body of the loop. Let's take a look at the elements of the For-Each-Next loop shown in Macro71:
|
For Each |
Keywords that indicate the start of a For-Each-Next loop. |
|
Country |
Variable to which all the elements in the group will be assigned. The group can be either an array or a collection of objects. If the group is an array, this variable must be of the Variant data type. If the group is a collection, this variable must be of the Variant data type, of the generic Object data type, or of the specific object data type that corresponds to the objects in the collection. |
|
In |
Keyword that separates the variable from the group. |
|
CountryArray |
The groupcan be either an array or a collection of objects. The loop executes as many times as there are items in the group. With the first loop, the variable is set to the value of the first item in the group; with each successive loop, the variable is set to the value of each successive item. |
|
MsgBox Country |
Action that is performed in the body of the loop. |
|
Next |
Keyword that indicates the end of the loop. After reaching Next, execution flows back to the start of the loop, where the For Each keywords appear. If, after reaching Next, the variable is equal to the last element of the group, execution breaks out of the loop and continues with the rest of the macro. |
Note If the group in a For-Each-Next statement is an array, the values of the array elements can only be retrieved; you cannot use For-Each-Next to change the items in an array. If the group is a collection, however, you can use For-Each-Next to display or change the properties of the objects in the collection.
Let's take a look at what happens when For-Each-Next is used with a two-dimensional array. Note how For-Each-Next allows access to each element in the array, regardless of dimension:
Sub Chap02gMacro73_ForEachNext2DArray()
    Dim StudentNames(2, 2) As String
    Dim NameVar As Variant
    StudentNames(1, 1) = "Nancy"
    StudentNames(1, 2) = "Tim"
    StudentNames(2, 1) = "Margie"
    StudentNames(2, 2) = "Louie"
    For Each NameVar In StudentNames
        MsgBox NameVar
    Next
End Sub
For-Each-Next visits all elements in all dimensions in Macro73 above. Accomplishing the same using For-Next instead would require two For-Next loopsone nested in the other. Macro74 below uses a For-Each-Next loop to go through all of the elements in a six-dimensional array, incrementing a counter with each element encountered:
Sub Chap02gMacro74_ForEachNext6DArray()
    Dim BigArray(5, 5, 5, 5, 5, 5) As Boolean
    Dim Var1 As Variant
    Dim Var2 As Integer
    Var2 = 0
    For Each Var1 In BigArray
        Var2 = Var2 + 1
    Next
    MsgBox Var2
End Sub
Accessing every element of a multidimensional array using standard For-Next loops would be much more difficult.
Although For-Each-Next loops are powerful with arrays, their real power comes when you use them with collections of objects. Let's take a look at a simple example:
Sub Chap02gMacro75_ForEachNextWorksheet()
    Dim SheetVar As Worksheet
    For Each SheetVar In ActiveWorkbook.Worksheets
        MsgBox SheetVar.Name
    Next
End Sub
Macro75 above uses a For-Each-Next loop to access each Worksheet object in the ActiveWorkbook's Worksheets collection, displaying the value of the Name property for each worksheet in a message box:
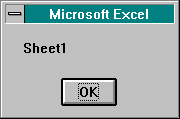
It is possible to change the value of the Name property of each worksheet, as the following example shows:
Sub Chap02gMacro76_ForEachNextWorksheet()
    Dim SheetVar As Worksheet
    For Each SheetVar In ActiveWorkbook.Worksheets
        SheetVar.Name = "Work" & SheetVar.Name
        MsgBox SheetVar.Name
    Next
End Sub
Macro76 above changes the Name property of each worksheet in the workbook by attaching the string "Work" to the front of each name. To reinstate the names, you could use the following:
Sub Chap02gMacro77_ForEachNextWorksheet()
    Dim SheetVar As Worksheet
    Dim x As Integer
    x = 1
    For Each SheetVar In ActiveWorkbook.Worksheets
        SheetVar.Name = "Sheet" & x
        x = x + 1
        MsgBox SheetVar.Name
    Next
End Sub
Macro78 below sets the Visible property of all worksheets in the ActiveWorkbook to False, effectively hiding every worksheet from view:
Sub Chap02gMacro78_ForEachNextWorksheet()
    Dim SheetVar As Worksheet
    For Each SheetVar In ActiveWorkbook.Worksheets
        SheetVar.Visible = False
    Next
End Sub
Macro79, on the other hand, restores all worksheets to view:
Sub Chap02gMacro79_ForEachNextWorksheet()
    Dim SheetVar As Worksheet
    For Each SheetVar In ActiveWorkbook.Worksheets
        SheetVar.Visible = True
    Next
End Sub
You can also use For-Each-Next to call methods on objects in a collection. Macro80 adds 10 new workbooks, arranges all of the workbooks in a tiled fashion in the Excel work area, and then deletes all the workbooks except the workbook in which the code is being run:
Sub Chap02gMacro80_ForEachNextWorkbook()
Dim x As Integer
Dim Book As Workbook
    For x = 1 To 10
        Workbooks.Add
    Next
    Windows.Arrange
    MsgBox "Workbooks have been arranged."
    For Each Book In Application.Workbooks
        If Book.Name <> ThisWorkbook.Name Then
            Book.Close
        End If
    Next
    ActiveWindow.WindowState = xlMaximized
End Sub
This macro first uses a For-Next loop to add 10 new workbooks; it does so by calling the Add method on the Workbooks collection. Then, by calling the Arrange method on the Windows collection, the macro arranges all of the workbooks in a tiled fashion on the screen. A message box pauses execution so that you can see the result:
Next a For-Each-Next loop is used to test the value of each Workbook object's Name property. If the name does not match the name ThisWorkbook, the Close method is called on the Workbook object. Last, the macro sets the WindowState property of the ActiveWindow object to the constant xlMaximized, which adjusts the window size so that it fills the entire Excel work area.
You might recall that the Range object can act like a collection of objects, so you can use the For-Each-Next loop to set properties and call methods on Range objects. The following is an example:
Sub Chap02gMacro81_ForEachNextRange()
    Dim SheetVar As Worksheet
    Dim Cell As Range
    For Each SheetVar In ActiveWorkbook.Worksheets
        SheetVar.Select
        For Each Cell In Range("A1:F20")
            Cell.Value = 25
        Next
    Next
End Sub
Macro81 uses a For-Each-Next loop nested in another For-Each-Next loop to set the Value property of all cells in Range("A1:F20") for each worksheet in the ActiveWorkbook object. The first For-Each-Next loop scrolls through all the worksheets in the Worksheets collection, calling the Select method on each worksheet object.
Macro81 can be made more interesting if you change it to set the ColorIndex property of each cell's Interior object. (Interior is an object that exists inside the Range object.) By setting the ColorIndex property of the Interior object to 15, for example, you can make the interior of each cell light gray:
Sub Chap02gMacro82_ForEachNextRange()
    Dim SheetVar As Worksheet
    Dim Cell As Range
    For Each SheetVar In ActiveWorkbook.Worksheets
        SheetVar.Select
        For Each Cell In Range("A1:F20")
            Cell.Interior.ColorIndex = 15
        Next
    Next
End Sub
Previously, Macro81 set the Value property of each cell in Range("A1:F20") equal to 25. Let's use Macro83 to create a few minor deviations in this range of cells on the first worksheet.
Sub Chap02gMacro83_SetDeviations()
    Worksheets(1).Select
    Range("B5") = 24
    Range("C2") = 26
    Range("D10") = 27
    Range("E18") = 22
End Sub
Looking at the range of cells that contains these minor deviations from 25, it is difficult to see which cells in the range differ. We need a macro that will go through the range, identify the cells that contain deviations, and make them stand out. Such a macro would be useful, for example, in a quality control application or in a financial application in which deviant values of grave importance must stand out. Macro84 accomplishes the task:
Sub Chap02gMacro84_ForEachNextRange()
    Dim Cell As Range
    Worksheets(1).Select
    For Each Cell In Range("A1:F20")
        If Cell.Value <> 25 Then
            Cell.Font.Size = 18
            Cell.Font.Bold = True
            Cell.Interior.ColorIndex = 3
        End If
    Next
End Sub
This macro first calls the Select method on the first worksheet in the workbook. Then it uses a For-Each-Next loop to scroll through all of the cells in Range("A1:F20"). An If statement tests whether the Value property of each Range object is equal to 25. If the Value property is not equal to 25, the Size property of the Font object (in the Range object) is set to 18, the Bold property of the Font object is set to True, and the ColorIndex property of the Interior object (in the Range object) is set to 3 (equal to Red). Macro84 successfully identifies all of the Range objects in Range("A1:F20") on the first worksheet that have a Value property not equal to 25 and makes those objects stand out so that they are easily identifiable:

The With statement is new to VBA in Excel 5it allows you to abbreviate object references. Using With statements provides three main advantages: They reduce the amount of code you have to type, make your code easier to read, and improve your code's performance. Perhaps the best way to see the advantages that With statements offer is to take a look at two different macros that accomplish the same taskone that does not use the With statement and one that does. Macro85 does not use With:
Sub Chap02hMacro85_NonWith()
    ActiveWorkbook.Worksheets(2).Range("A1").Font.Bold = True
    ActiveWorkbook.Worksheets(2).Range("A1").Font.Italic = True
    ActiveWorkbook.Worksheets(2).Range("A1").Font.Size = 22
    ActiveWorkbook.Worksheets(2).Range("A1").Font.Name = "Times New Roman"
    ActiveWorkbook.Worksheets(2).Range("A1").Font.ColorIndex = 3
    Worksheets(2).Select
End Sub
The above macro contains five statements that set five properties of the Font object contained in the second worksheet's cell A1. Approximately 360 keystrokes were required to write the macro. As it is currently written, Macro85 contains 21 object and property references (as indicated by the number of instances of the dot operator [.]), each one of which requires time to evaluate. The same macro can be rewritten using the With statement:
Sub Chap02hMacro86_With()
    With ActiveWorkbook.Worksheets(2).Range("A1").Font
        .Bold = True
        .Italic = True
        .Size = 22
        .Name = "Times New Roman"
        .ColorIndex = 3
    End With
    Worksheets(2).Select
End Sub
Macro86 required 202 keystrokes and contains nine object and property references. That's roughly 56 percent of the keystrokes and 43 percent of the object and property references used in Macro85. You could argue that by using With you can enter your code in half the time and make it run twice as fast. The example comparison that Macro85 and Macro86 provide is a fabrication; object references in Macro85 could have been shortened, improving performance and reducing keystrokes. But this fabrication clearly illustrates the advantages of using the With statement. Although not all code benefits from using With to as great a degree as is shown here, code benefits often enough that you should remember the following rule:
Rule Use the With statement whenever and wherever you can to shorten code, make code easier to read, and improve performance.
It probably doesn't make sense to use With when you are setting a single property or calling a single method; it does make sense to use With, however, if you are setting more than one property or calling more than one method. The examples on the next page illustrate further.
Sub Chap02hMacro87_NestedWith()
    With ActiveWorkbook.Worksheets(3)
        .Select
        .Unprotect
        With .Range("A1")
            MsgBox .Value
            .Value = 200
            .RowHeight = 60
            .ColumnWidth = 20
            .Font.Size = 20
            .Interior.ColorIndex = 3
        End With
    End With
End Sub
Macro87 above uses two With statementsone nested in the other. The macro first calls the Select and Unprotect methods on the third worksheet and then displays the setting of the Value property of Range("A1") in a message box. Next Macro87 changes the Value property to 200, sets the RowHeight and ColumnWidth properties, and then sets the Size property of the Font object and the ColorIndex property of the Interior object.
Macro88 uses a For-Next loop to slowly shrink the size of the active window, uses four additional For-Next loops to move the shrunken window along the four borders of the screen, and then restores the window to its normal size:
Sub Chap02hMacro88_With()
    Application.Windows.Arrange
    With ActiveWindow
        For x = 1 To 25
            .Height = .Height - 10
            .Top = .Top + 5
            .Width = .Width - 20
            .Left = .Left + 10
        Next
        .Top = 0
        .Left = 0
        For x = 0 To 250 Step 5
            .Top = x
        Next
        For x = 0 To 400 Step 5
            .Left = x
        Next
        For x = 250 To 0 Step -5
            .Top = x
        Next
        For x = 400 To 0 Step -5
            .Left = x
        Next
    End With
    Application.Windows.Arrange
    ActiveWindow.WindowState = xlMaximized
End Sub
You can see in Macro88 that by using the With statement, you can abbreviate numerous property references throughout the body of the macro.
Although this chapter has covered most of the functions and statements you will use to design applications in VBA, it is not possible or practical to cover in detail in this book all VBA functions and statements. A few additional VBA functions and statements deserve mention, however, and they are listed here:
|
Abs |
Returns the absolute value of a number |
|
CurDir |
Returns the current MS-DOS or Macintosh path |
|
Date |
Returns the current system date |
|
Exit Do |
Causes execution to break out of a Do-Loop |
|
Exit For |
Causes execution to break out of a For-Next or For-Each-Next loop |
|
Exit Function |
Causes execution to break out of a function macro |
|
Exit Sub |
Causes execution to break out of a subroutine |
|
Fix |
Returns the integer portion of a number, rounding appropriately |
|
Int |
Returns the integer portion of a number, always rounding down |
|
IsArray |
Returns True if an expression is an array |
|
IsDate |
Returns True if an expression is a date |
|
IsEmpty |
Returns True if no value has been assigned to a variable |
|
IsError |
Returns True if an expression is an error value |
|
IsNull |
Returns True if an expression evaluates to Null |
|
IsNumeric |
Returns True if an expression evaluates to a number |
|
IsObject |
Returns True if an expression represents an object |
|
Len |
Returns the length of a string |
|
Now |
Returns the current date and time |
|
Shell |
Runs an executable program |
|
Sqr |
Returns the square root of a number |
|
Str |
Returns a string representation of a number |
|
StrComp |
Performs a string comparison |
|
Time |
Returns the current system time |
|
TypeName |
Returns the data type of a variable |
For more information about other VBA functions and statements not covered here, see Excel 5's online VBA Help or the Microsoft Excel Visual Basic for Applications User's Guide that's shipped with Excel 5.
VBA comes with several advanced editing and debugging tools that will be of great help when you write code. You access most of the debugging tools from the Visual Basic toolbar, shown below. Here we take a look at the buttons on the Visual Basic toolbar and briefly discuss the functions they serve.
To display the Visual Basic toolbar, choose the Toolbars command from the View menu, select Visual Basic, and then choose OK.
The Insert Module button is the first button on the left on the Visual Basic toolbar:
Simply click the Insert Module button to insert a new VBA module.
The Menu Editor button is the second button from the left on the Visual Basic toolbar. Clicking the button displays the Menu Editor dialog box, shown on the next page. The Menu Editor is an easy-to-use tool for editing Excel menubars and menus. You can save menu changes with a workbook; menu settings are file-specific. Also note that you can manipulate menus with VBA through the Menu, MenuBar, and MenuItem objects.
The Menu Editor dialog box provides access to all seven menubars in Excel, and you can use it to delete menus from or add menus to any menubar.
You access different menubars in the Menu Editor by selecting them from the Menu Bars drop-down list box. To delete a menu, select the menu name from the Menus list box, and choose the Delete button. To add a menu, select the location on the appropriate menubar where you want to insert the new menu, and choose the Insert button; then type the caption for the new menu in the Caption edit box.
Note If you are running Microsoft Windows, you can specify a command underline by inserting an ampersand (&) in the menu caption before the appropriate letter. A command underline represents a key that the user presses to choose the menu. (This option is not available on the Macintosh.)
You can also delete or add menuitems on any menu. To delete a menuitem, select the appropriate entry from the Menu Items list box, and choose the Delete button. To add a menuitem, from the Menu Items list box, select the item before which you want to insert the new item, choose the Insert button, and enter a caption (use an ampersand [&] if you want to specify a command underline). Finally, from the Macro drop-down list box, select a macro to assign to the menuitem you are adding. You insert and delete menuitems in a submenu in much the same way as you do menuitems in a regular menu.
Tip You can restore all of Excel's default menus at any time by choosing the Restore All button.
The Object Browser button is the third button from the left on the Visual Basic toolbar:
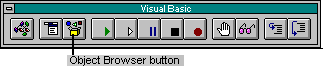
Clicking the Object Browser button displays the Object Browser dialog box, which shows you all of the programmable objects that are installed and registered on your systemalong with their associated properties and methods:
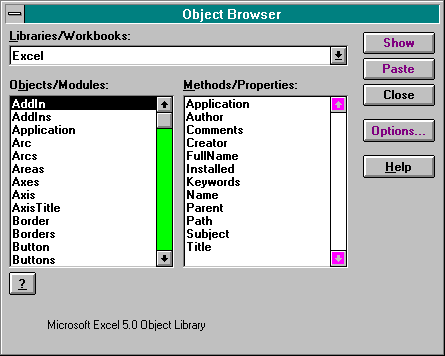
This dialog box is divided into three main sections: the Libraries/Workbooks drop-down list box, the Objects/Modules list box, and the Methods/Properties list box. You can select different libraries or workbooks from the Libraries/Workbooks drop-down list box. The following items appear in this drop-down list box: libraries that are installed on your system (including Excel and VBA); all workbooks that are currently open in Excel; any add-in files for which you have established a reference; and any applications that use VBA (such as Project 4) for which you have established a reference. (References are explained in detail in Chapter 7, beginning on page 392.)
Selecting Excel from the Libraries/Workbooks drop-down list box displays 127 Excel objects and an entry named Constants in the Objects/Modules list box. (The Excel Debug object is the only object not listed by the Object Browser.) And after you select an object in the Objects/Modules list box, you can view all the properties and methods for that object in the Methods/Properties list box. For example, select VBA from the Libraries/Workbooks drop-down list box, and then select Interaction from the Objects/Modules list box; the Properties/Methods list box displays a list of interactive VBA functions, including InputBox and MsgBox. Now try selecting Constants from the Objects/Modules list box; the Properties/Methods list box displays a list of VBA constants. Or select an Excel workbook from the Libraries/Workbook drop-down list box to view all the modules in each open workbook and all the macros available in each module.
After you select a property or method from the Methods/Properties list, the Paste button in the Object Browser dialog box becomes active. You can choose the Paste button to paste the property or method directly into your code. Also, selecting a property or method displays the name of the property or method in the lower portion of the dialog box. (For a method, the names of any arguments that must be passed to the method are also displayed.) Clicking the question mark button at the bottom of the dialog box immediately displays an online VBA Help topic for the selected property or method.
Note The Help button in the Object Browser dialog box provides help on how to use the Object Browser; it does not provide help on the selected item.
If you select an Excel workbook from the Libraries/Workbooks drop-down list box and then select a module from the Object/Modules list box, a list of all the subroutines and functions in the module is displayed in the Methods/Properties list box. If you then select a subroutine or function from the Methods/Properties list, the Show and Options buttons in the dialog box become active. Choose the Show button to see the section of the VBA module in which the selected subroutine or function resides. Or choose the Options button to specify numerous macro options for the selected subroutine or function.
The Run Macro button is the fourth button from the left on the Visual Basic toolbar, as shown on the next page.

If you select any macro in a VBA module and then click the Run Macro button, the macro is executed.
The Step Macro, Step Into, Step Over, Resume Macro, and Stop Macro buttons on the VBA toolbar are all used in conjunction with the VBA Debug window. You click the Step Macro button to execute subroutines in debug mode. If you select a macro in a VBA module and then click the Step Macro button, the VBA Debug window immediately appears, and the first line of the selected macro is highlighted:
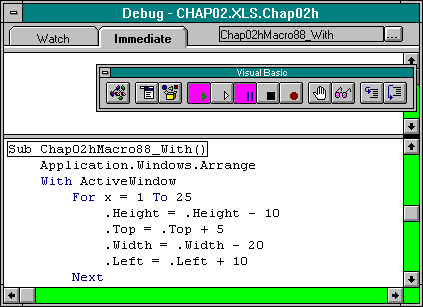
To execute a macro one statement at a time, click the Step Into button one time for each line of code. Clicking Step Into steps through a macro line by line when the Debug window is displayedStep Into even steps through other subroutines or functions that the macro calls.
Tip Pressing the F8 key on your keyboard has the same effect as does clicking the Step Into button.
If you do not want to see the line-by-line execution of macros or functions that the original macro calls, you can click the Step Over button when those calls occur. Clicking the Step Over button executes called macros or subroutines without stepping through them. If at any time while the Debug window is displayed you want to resume normal macro execution and exit debug mode, click the Resume Macro button. And if you want to stop execution while in debug mode, click the Stop Macro button. Stop Macro stops macro execution and closes the Debug window.

The Toggle Breakpoint button allows you to establish breakpoints in your code where execution will stop and the Debug window will be displayed. Breakpoints are useful for investigating problems in your code; they allow you to stop code execution at a specific point and then step through the code line by line. To establish a breakpoint in your code, select the line in the macro where you want the break to occur, and then click the Toggle Breakpoint button, which highlights in red the selected line of code. When you execute the macro, execution breaks at this point, and the Debug window is displayed. To remove a breakpoint, select the line that contains the breakpoint and then click the Toggle Breakpoint button again.
Tip You can remove all breakpoints from all VBA modules by choosing the Clear All Breakpoints command from the Run menu.

You use the Instant Watch button to establish Watch variables in your code. Watch variables are used in conjunction with the Debug window as powerful tools for debugging code. Watch variables are simply variables or expressions from your code that are added to the Debug Watch window. To specify a Watch variable, select any variable or expression in your code and then click the Instant Watch button, which displays the Instant Watch dialog box. This dialog box displays the name of the macro, the selected expression, and the current value of the selected expression:
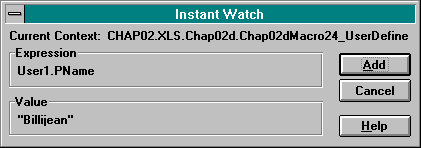
The Instant Watch dialog box includes an Add button; by choosing Add, you can add the selected expression to the Watch list, which is displayed under the Watch tab of the Debug window. Let's use the following example macro to look at how you specify a Watch variable:
Sub Chap02hMacro89_WatchVariables()
    Dim Num1 As Integer
    Dim x As Integer
    For x = 1 To 10
        Num1 = Num1 + x
    Next
End Sub
Before you execute Macro89, add the variable Num1 to the Watch list by highlighting the variable in Macro89, clicking the Instant Watch button, and then choosing the Add button in the Instant Watch dialog box:
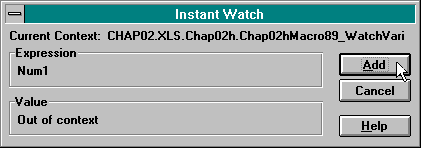
Now execute the macro in debug mode by placing the cursor in Macro89 and clicking the Step Macro button, which displays the Debug window. You will notice that the top half of the Debug window is blank and that two tabs above this blank area are displayed. One tab is labeled "Watch," and the other is labeled "Immediate," corresponding to the Watch and Immediate panes. These panes allow you to work with variable values in real time, which is of major benefit when you are debugging and diagnosing problems in your code. Click the Watch tab now to see the Watch list in the Watch pane, as shown here:
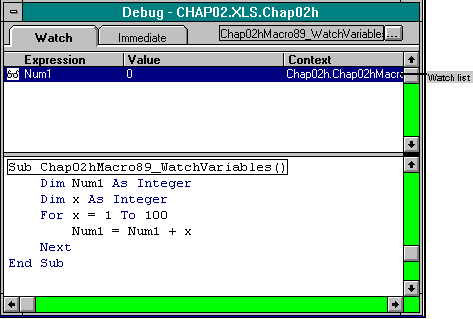
Now click the Step Into button to begin stepping through the macro. Continue to click the Step Into button to see the macro execute line by line in the lower portion of the Debug window; you see the value of the Num1 Watch variable change in the Watch list in the upper portion of the Debug window. As you loop through the code, the value of Num1 grows with increasing speed. You can add more Watch variables while the Debug window is displayed by selecting the appropriate expression, clicking the Instant Watch button, and then choosing the Add button. For example, try adding the variable x to the Watch list. You can now watch both variables change as you step through the macro. To remove a Watch variable from the Watch list, select the variable and then press the Del key on your keyboard.
The Immediate tab allows you to access the Immediate pane, in which you can type VBA statements directly so that they can be executed on a stand-alone basis in real time. For example, display the Debug window, click the Immediate tab, and enter the following statement in the Immediate pane:
MsgBox "Hello World"
The statement is executed in real time, and you see a message box that displays the message "Hello World." You can also use the Immediate pane to change the values of variables as your code executes.

Clicking the Record Macro button starts the Excel macro recorder. (You can also access the macro recorder from the Tools menu.) Using the macro recorder can help you to learn VBA and to become familiar with Excel objects, properties, and methods. If you don't know what objects are involved in performing a certain action in Excel, for example, you can turn on the macro recorder, perform the action manually, and then look at the recorded code.
When you record a macro, Excel records all of your actions and writes VBA code that corresponds to those actions. Excel continues to record your actions until you turn off the macro recorder. When you start recording a new macro, Excel by default inserts a new VBA module to hold the recorded macro. You can, however, tell Excel to place recorded macro code anywhere in any VBA module. To do so, select where you want the code to be placed, choose the Record Macro command from the Tools menu, and then select Mark Position For Recording. Next choose the Record Macro command from the Tools menu again, and then select Record At Mark. This will cause Excel to insert the recorded code at the marked position. Excel will not prompt you for a macro name, and it will not add the Sub and End Sub keywords around the recorded code. If you want Excel to record a complete macro, follow the above procedure but select Record Macro instead of Record At Mark. Excel will then add the complete macro at the bottom of the active module.
Let's experiment by recording one macro. First click the Record Macro button to start the macro recorder and display the Record New Macro dialog box. Choose the Options button to display the expanded dialog box, as shown on the facing page. Type a name for your macro in the Macro Name box. (The macro name must be one contiguous string of characters.) In the Description box, type This macro enters data in Range("A1").
In the Assign To box, you can tell VBA to add a menuitem to the Tools menu from which the macro can be called. To add the menuitem, check the Menu Item On Tools Menu check box, and then type a caption for the menuitem. You can also assign a shortcut key for the macro by checking the Shortcut Key check box. In the Store In box, you can specify where you would like the recorded macro to be placedin your Personal Macro Workbook, in the current workbook, or in a new workbook.
Note The Personal Macro Workbook is a hidden workbook that holds macros that are loaded each time you start Excel. It is saved in Excel's startup directory as PERSONAL.XLS in Windows and as PERSONAL MACRO WORKBOOK on the Macintosh.
For our example, select This Workbook. Last, in the Language box, you can tell Excel in which macro language to record the macroeither in Visual Basic for Applications or in Excel 4's macro language. For our example, select Visual Basic, and then choose OK. A Stop Macro toolbar appears at the top of the screen, and if the status bar is displayed, "Recording" appears at the bottom of the screen.
Now let's record entering data in Range("A1") of Worksheets("Sheet1"). First click the Sheet1 tab at the bottom of the screen to display Sheet1. Type the value 100 in Range("A1"), and then press Enter. After you finish recording the macro, click the Stop Macro button to turn off the macro recorder. If you now select the module in which Excel has stored the recorded macro, you see something similar to Macro90 on the next page.
'
' Chap02hMacro90 Macro
' This macro enters data in Range("A1").
'
'
Sub Chap02hMacro90_RecordedMacro()
    ActiveWindow.ScrollWorkbookTabs Position:=xlFirst
    Sheets("Sheet1").Select
    Range("A1").Select
    ActiveCell.FormulaR1C1 = "100"
    Range("A2").Select
End Sub
If you run Macro90, it performs the same actions that you performed while the macro recorder was on. You've probably noticed that the code the macro recorder generates is not necessarily the most efficient code possible. For example, the most efficient way to set the Value property of Range("A1") on Worksheets("Sheet1") to 100 is as follows:
Sub Chap02hMacro91()
    Worksheets("Sheet1").Range("A1").Value = 100
End Sub
Tip Excel's macro recorder often goes a bit overboard in recording macro code, recording every property setting for an object, for example, even if only one property setting was changed while the macro recorder was on. That being the case, you'll want to be careful about incorporating recorded macro code directly in your VBA applications. Before you do so, ensure optimal performance by first editing the code to remove any unnecessary statements.
In addition to the tools that you access from the Visual Basic toolbar, VBA provides several other editing tools and features that will help you write code efficiently. We'll take a brief look at those here.
As mentioned in Chapter 1, complete online help is available for VBA in Excel. You access VBA Help by choosing the Contents command from the Help menu and then selecting Programming With Visual Basic. Note, however, that you can jump immediately to VBA Help by pressing the F1 key while a VBA module is active. In fact, if you select any VBA keyword, function, object, method, or property in a VBA module and press F1, the help topic for the selected item is displayed immediately. From the main Contents screen of VBA Help, you can access lists of Excel objects, methods, and properties as well as information about VBA functions, statements, and keywords. To search quickly for help on a specific topic, choose the Search button in VBA Help.
Tip Help topics for all properties and methods provide code examples to demonstrate how to set each property and call each method correctly. If you want, you can copy and paste these code examples directly into a VBA module to incorporate them in your own macros.
If you are typing VBA code as you read this chapter, you might have already encountered VBA's syntax checking feature, which checks your syntax as you type keywords for variable declarations, constant declarations, control structures, and functions. If your code's syntax is not correct, VBA alerts you by displaying an error message. If you ignore the error and keep on typing, VBA colors the erroneous code red to signal that it has been entered incorrectly.
VBA also recognizes object, property, and method names as you type them. If you enter such names correctly, VBA follows a standard capitalization scheme to format these names for you. The first letter of object, property, and method names is always capitalized, and if a property or method name is formed from two words, the first letter of the second word is capitalized as well (as in ReadOnly). All other letters are lowercase. Because VBA formats your object, property, and method names as you type them, you can check the accuracy of your code as you work. For example, if you enter a property name and VBA does not capitalize the first letter, you have likely misspelled the name and will need to go back and correct it.
By choosing the Options command from the Tools menu, you can access several option settings that affect the way code in VBA modules is entered, executed, and displayed. Under the Module General tab, you can specify options for indenting code, displaying syntax errors, breaking on errors, requiring variable declarations, setting tab width, and specifying international language settings. Under the Module Format tab, you can select the font and font size for your VBA code. You can also select the foreground and background colors for various components of VBA code, including keywords, comments, erroneous code, and plain code. By default, keywords are displayed in blue, comments in green, breakpoints in white on a red background, and erroneous code in red.
VBA is built on top of Visual Basicit is a superset of Visual Basic. Although the two languages are similar, they differ in some areas. The following list briefly explains the differences between VBA and Visual Basic:
For-Each-Next control structure: VBA includes the For-Each-Next control structure (described in the section titled "Using VBA's For-Each-Next Control Structure," beginning on page 101), which you can use to access all of the elements in an array or all of the objects in a collection. Visual Basic does not have this feature. (Version 4 of Visual Basic will incorporate this control structure.)
With statement: VBA includes the With statement (described in the section titled "The With Statement," beginning on page 108), which you can use to abbreviate object references for property settings or method calls. Visual Basic does not currently have this feature. (Version 4 of Visual Basic will incorporate the With statement.)
Custom controls: VBA does not support VBX custom controls; Visual Basic does.
Creating executables: You cannot create stand-alone executable files in VBA as you can in Visual Basic. Because VBA is embedded in a host application (in this case, in Excel), you must run the host application to execute a VBA program.
Line continuation character: VBA offers a new line continuation character that allows you to extend a single statement to multiple lines. To use the character, enter a space followed by an underscore (_) at the end of the statement that you want to continue. Visual Basic does not currently have this feature. (Version 4 of Visual Basic will allow line continuation.)
Forms design: Designing forms in VBA is slightly different from designing forms in Visual Basic. Excel's VBA relies on dialog boxes and Excel worksheets and chart sheets for its user interface, instead of on the kinds of forms found in Visual Basic. Chapter 5 explains form design in detail.
Events: VBA's Event model is vastly different from Visual Basic's. Chapter 8 discusses VBA events in detail.
Editing and debugging tools: VBA's editing and debugging tools (described in the section titled "VBA Editing and Debugging Tools," beginning on page 112) differ slightly from those found in Visual Basic.
Although Visual Basic for Applications and Visual Basic differ in these areas today, the languages will converge in the future. Today, VBA is available only in Excel 5 and in Project 4, but it is Microsoft's goal to make VBA available in all Microsoft Office applications.
Visual Basic for Applications is a powerful programming language. This chapter has briefly summarized the language, introducing you to its basic components. The rest of this book builds from the material introduced here by explaining how you can use VBA to control Excel objects.
Let's quickly summarize the main aspects of the VBA language here before you move on to Chapter 3 and begin learning about using objects to create applications:
After mastering the material in this chapter, you are now ready to move on and learn more about Excel objects. VBA is often referred to as the "glue" by which Excel objects are attached to each other in creating VBA applications. You have learned most of what there is to know about the glue. Now comes the task of learning how to apply the glue to the objects.