Lesson Objectives
Upon completion of this lesson, the participant will be able to:
Some Topics to be introduced in this lesson include:
Creating and Running Macros
There are several reasons for creating a macro in Microsoft Project. You may want to automate a set of steps you repeat over and over or you may want to customize the way Microsoft Project performs some task.
In Visual Basic for Applications, a macro corresponds to a subprocedure.
Sub PrintMonthlyReport()
...
End Sub
So, the subprocedure PrintMonthlyReport can also be referred to as the macro PrintMonthlyReport.
Recording a Macro
The easiest way to automate a set of steps which you repeat over and over is to record a macro. The macro recorder records each action which is performed and places those commands in a macro.
To record a macro:
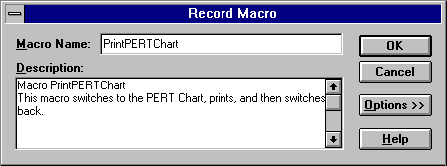
Choose Record Macro from the Tools menu.
Enter a name for the macro and a brief description. This description is displayed when the macro is selected in the Macros dialog.
Click the OK button or press ENTER.

The Record Macro dialog box
There are some advanced options which allow you to customize how Microsoft Project records certain events and where the macro is stored. By choosing the Options button in the Record Macro dialog, you can set these options.
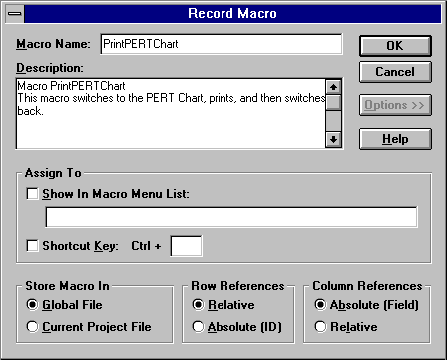
The Record Macro dialog box with advanced options
Show in Macro Menu List: If this option is selected, the macro will appear in the macro menu list, if added to a menu.
Shortcut Key: This option is used to assign a Ctrl + <key> combination for running the macro.
Store Macro in:
Global File: When selected, the macro is saved to the GLOBAL.MPT file.
Current Project File: If this option is selected, the macro is saved in the project file, and is only available when this project is open.
Row References:
Relative: All row selections are recorded relative to the current row. For example, "select 3 rows up", or "select 2 rows down".
Absolute (ID): All row selections are recorded using ID numbers. For example, "select the row containing Task ID = 13" or "select the row containing Resource ID = 4".
Column References:
Absolute (Field): All column selections are recorded using the Field names. For example, "select the Work field", or "select the Name field".
Relative: All column selections are recorded relative to the current column. For example, "select 2 columns right", or "select 1 column left".
When you are finished performing the actions for the macro, choose Stop Recorder from the Tools menu to halt macro recording.
Manually Creating a Macro
Selecting the New button in the Macros dialog allows you to specify the same options for a new macro that are allowed when recording one. Instead of recording user actions, however, selecting New simply takes you to the Module Editor view where a new procedure heading is automatically added using your macro name. Code can then be entered manually in the procedure.
Running a Macro
Once a macro has been created, the next step is to run the macro. To run a macro:
Choose the Macros command from the Tools menu.
Select the macro in the Macro Name list. Note that the description for the macro will be displayed at the bottom of the dialog.
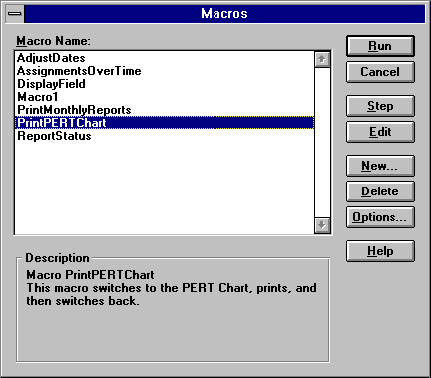
The Macros dialog box
To run the macro, choose the Run button. When testing a macro, it is sometimes helpful to step through the macro slowly. The Step button in the Macros dialog will run the macro one line at a time and display the Debug Window so that you can see the macro as it is being executed.
Editing a Macro
After running a macro, you may want to modify the macro to perform a slightly different task, enable it to loop through the same actions several times, or accept input from the user. To Edit a macro, choose the Macros command from the Tools menu. Select the macro in the Macro Name list and choose the Edit button. The macro is then displayed using the Module Editor view.
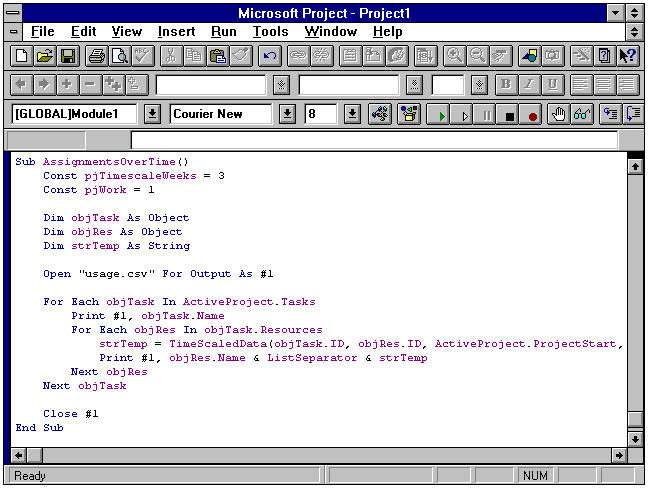
The Module Editor view in Microsoft Project
The Module Editor view gives you the same editing capabilities found in Visual Basic. Code is automatically checked for syntax as it is entered (as long as the option is turned on -- it is by default). It is formatted with different colors for keywords, identifiers, and comments. You can also set breakpoints and watch variables for debugging.
Integrating a Macro
After perfecting your macro, the next step may be to integrate it so that the macro appears to be a standard part of Microsoft Project. There are two easy ways of allowing quick access to your macro.
Toolbar
You can assign any macro or built-in command to a button on a toolbar. To customize a button, simply hold down the CTRL key and click on the button with the mouse. This will display the Customize Tool dialog.
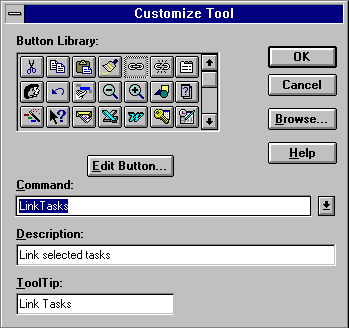
The Customize Tool dialog box in Microsoft Project
In the Command box, enter ‘Macro’ followed by the name of your macro. You can also select from a list by clicking the down arrow to the right of the Command box.
The Description and ToolTip boxes allow you to provide additional information about the toolbar button. The Description will appear in the status bar when the button is pressed. The ToolTip appears when the user "hovers" their mouse over the button.
The Button Library allows you to choose between the different buttons supplied with Microsoft Project. To create your own button or to customize a supplied button, you can choose the Edit Button and draw your own.
After you have created the toolbar button, you can run the macro by simply clicking the button.
Menu Bar
Just as you can assign any macro or built-in command to a toolbar button, you can do the same for any menu item. Simply choose Customize from the Tools menu and then choose Menu Bars. In the Menu Bars dialog, choose the menu bar you want to edit. In most cases, this will be Standard. Then choose the Edit button to display the Menu Bar Definition dialog. In this dialog, the menu bar is displayed in an outline. You can add new commands or menus, or modify existing ones.
Macro Storage and Organization
Before creating macros, it is important to understand how and where Project stores macros. Each project file (.MPP) and the Global file (GLOBAL.MPT) are "Libraries" which can store Modules. Modules contain groups of Sub Procedures and Sub Functions. The organization is shown in the illustration below:
No, make the macro non-interactive and then use a combination of FilterEdit and FilterApply or use the SendKeys statement before the FilterApply method.
No, remove the Copies:= from the statement to make it read >> FilePrint 1. Also, changing any default settings will fix it, i.e. add the parameter Color:=True