You can populate (fill in) and update the value of controls on a form while the user is using the form in one of two ways. You can either assign values to the controls in a macro or event procedure, or you can have Microsoft Access look up the values and display them automatically using AutoLookup.
You assign a value to a control when you want to give a control either the same value as another control or field, or a value derived from another control or field.
You use AutoLookup when you want a form to display related values from a table that’s on the “one” side of a one-to-many relationship with the form’s primary table. For example, the Orders form is used to add new orders to the Orders table. It also displays values from the Customers table, which is on the “one” side of a one-to-many relationship with the Orders table. When you include the fields from the Customers table in the Order form’s underlying record source or query, Microsoft Access automatically displays the correct customer information when you select the customer for the current order.
The following examples illustrate the two ways of populating controls on a form. The first example shows two event procedures that assign values to controls: one that takes values from one set of controls and assigns them to another set of controls, and another that looks up a value in a related table and assigns the value to a control. The second example shows how to set up a form that uses AutoLookup to display related data from a table underlying the form.
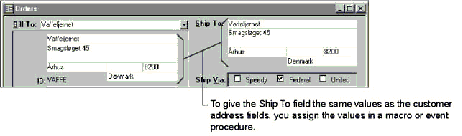
The Orders table in the Orders sample application includes fields for the shipping address, which is often (but not always) the same as the billing address. You can automatically fill in the shipping controls with a customer’s billing address by assigning them the same value as the corresponding billing controls.

Step One: Assign a control the value from another control To assign the values, you write an event procedure for the AfterUpdate event of the BillTo combo box. In the combo box’s property sheet, select the AfterUpdate property, and then click the Build button beside the property. In the Choose Builder dialog box, double-click Code Builder. Microsoft Access opens the form module and displays a template for the control’s AfterUpdate event procedure. Enter the following code in the AfterUpdate event procedure template:
Private Sub BillTo_AfterUpdate()
	ShipName = CompanyName
	ShipAddress = Address
	ShipCity = City
	ShipRegion = Region
	ShipPostalCode = PostalCode
	ShipCountry = Country
End Sub
The references on the left side of the statements are the names of shipping controls. The references on the right side of the statements are the names of billing controls, which are bound to fields in the Customers table. Each time the user selects a customer for the order from the combo box, this event procedure fills in the shipping controls with the new customer information from the billing controls.
Note In addition to setting the values in the shipping controls, the BillTo_AfterUpdate event procedure in the Orders sample application sets the Enabled property of the customer information controls to Yes, so sales representatives can update the customer’s address or other information. In the Form_Current event procedure for the Orders form, these controls are disabled if the user is in a new record; the sales representative must select a customer before editing the customer information controls.
Step Two: Assign a control a value from a table The UnitPrice control in the Orders subform is bound to the UnitPrice field in the Order Details table. Once the user selects a product, you want to fill in the UnitPrice control in the subform with the current value from the Products table.
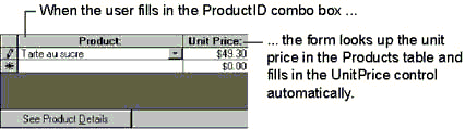
Because the UnitPrice field in the Products table isn’t on the form or in its record source, you can’t refer to it directly. Instead, you can use the DLookup function to look up the value in the Products table and assign it to the UnitPrice control in the subform. Use the following event procedure for the AfterUpdate event of the ProductID control on the subform:
Private Sub ProductID_AfterUpdate()
	.
	.
	.
	' Look up product's price and assign it to the UnitPrice control.
	strFilter = "ProductID = Forms!Orders!OrdersSubform!ProductID"
	Me!UnitPrice = DLookup("UnitPrice", "Products", strFilter)
	.
	.
	.
End Sub
The DLookup function has three arguments. The first specifies the field you’re looking up (UnitPrice); the second specifies the table (Products); and the third specifies which value to find (the value for the record where the ProductID is the same as the ProductID on the current record in the Orders subform).
Note Because each call to the DLookup function causes Microsoft Access to run a query, you may want to limit how often you use it. You can often avoid using the DLookup function by including the field you want to look up in the underlying query or record source for the form or report. In the previous example, you could include the UnitPrice field from the Products table in the record source for the subform. Because it would involve joining the two tables, this strategy would cause the subform to open more slowly; however, it would allow you to look up the UnitPrice value much more quickly and easily than with the DLookup function.
See Also For more information on the DLookup function, search the Help index for “DLookup function.”
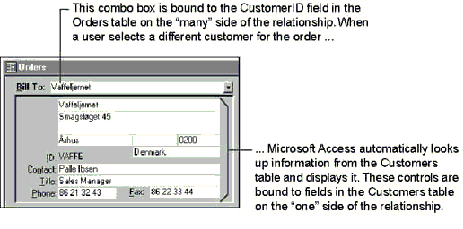
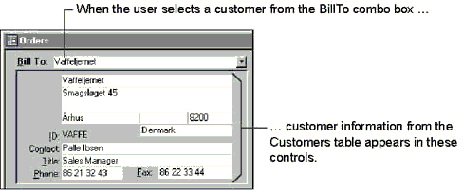
The Orders form in the Orders sample application displays the customer’s billing address and contact information, which is stored in the Customers table. By including the fields from the Customers table in the underlying record source for the Orders form, you can have the billing information fill in automatically when the user selects the customer from the BillTo combo box.
If the Orders and Customers tables are set up correctly, it’s easy to create this type of form with the Form Wizard. Because the Orders table includes a Lookup field that relates data in the two tables, the Form Wizard sets up the lookup automatically. When the wizard adds the CustomerID Lookup field to the form, it creates a combo box control that displays the customer’s name, but is bound to the CustomerID field in the Orders table.
When you create the form, just tell the Form Wizard to include all fields in both the Orders and Customers tables.
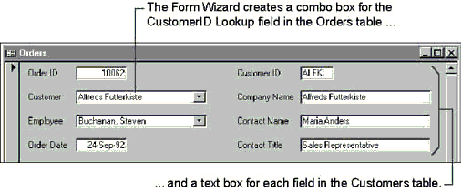
After you create the form with the Form Wizard, resize and arrange the fields as you see fit. Additionally, rename the CustomerID Lookup field (and its label) to BillTo, so you can distinguish it from the CustomerID field bound to the Customers table.
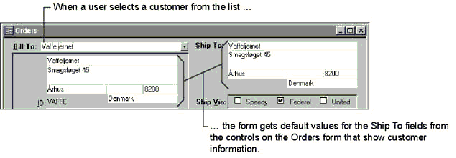
Because the Customers table is on the “one” side of the one-to-many relationship between the Customers and Orders tables, you don’t have to do anything special to make the text boxes display the information from the Customers table. When the user picks a customer from the combo box, which is bound to the CustomerID field in the Orders table, Microsoft Access uses AutoLookup to automatically look up the information in the Customers table and display it in the text boxes. If users change the data in the customer fields, their changes are saved in the Customers table when they save the order.
Because all the customer fields are included on the Orders form, users can add or modify customer information directly on the Orders form, without having to go to a separate Customers form.
See Also For information on how to enable users to add a new customer to the Customers table using the Orders form, see the example “Adding a Row to the Combo Box’s List on the Orders Form” later in this chapter.
Note To create this form without the Form Wizard, create a query that includes all the fields from the Orders and Customers tables. Then, create a form based on the query and add the fields from both tables.
Additionally, you can use AutoLookup even if you don’t have a Lookup field in the underlying table by adding a combo box bound to the CustomerID field in the Orders table, and then setting its properties so that it displays customer names.
See Also For more information on creating a Lookup field in a table, search the Help index for “Lookup fields.”