by Rick Dobson
In a recent article, "Publishing Access 97 Data on the Web" [Microsoft Office Developer's Journal, December 1997], we described how to share static views of Access data on a Web site. This technique suits any type of information that appears on a regular cycle—such as summer and winter catalogs. Other publishing or data-sharing scenarios can demand more timely updates, however. For example, an employee phone directory should instantly reflect extensions for new employees and changed extensions for existing employees. With dynamic publishing, site visitors can immediately see any changes to an underlying database.
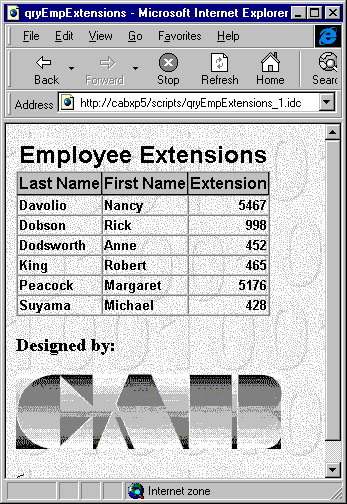
In this article, we'll look at two techniques for dynamically publishing Access data over an intranet: HTX/IDC and ASP. We'll also show you how to modify the content and appearance of the raw published tables, as Figure A shows, and illustrate ways to dynamically publish Access parameter queries.
Figure A

This Web page pulls updated information from an Access database.
As we'll see, the Publish To The Web wizard can shield you from nearly all the gory details. However, there are some significant reasons to learn the basics about these details.
The HTX/IDC technology was the first Microsoft technique for dynamic database publishing. Let's walk through the six steps to database publishing with HTX/IDC.
First, a Web browser sends a URL to a Web server. This URL must reference an IDC file that sits on the server. The IDC file, which has a text format, references an Access database through a DSN (Data Source Name). It includes SQL for extracting a subset from the database.
Second, the Web server hands off the IDC file to the Internet Database Connector (IDC) for processing. The IDC is a program named httpodbc.dll that runs on the server. The IDC passes the DSN and SQL to an ODBC driver that talks directly to the Access database.
In the third and fourth steps, the ODBC driver executes the SQL in the IDC file against the Access database and generates a return set. It then passes the results back to the IDC.
Fifth, the IDC uses an HTX file to generate an HTML file that the browser can use to view the return set. The IDC populates the HTML file with data based on placeholders in the HTX file. The HTX file contains standard HTML as well as these special placeholders.
Finally, the Web server passes the HTML generated by the IDC back to the browser. The server can be either a Microsoft Internet Information Server (version 2 or later) or a Personal Web Server, as we'll use in our example.
Active Server Pages (ASP) represents an evolution in Microsoft's Web development technology. ASP lets developers store their HTML and scripting code in a single file and supports either VBScript or JavaScript. ASP technology has its own object model, and it's this object model, plus the fact that the HTML and script reside in the same file, that makes ASP more powerful than HTX/IDC. However, ASP technology is also more complicated because it requires a working knowledge of a scripting language in addition to HTML proficiency. Also, if you're going to hand edit either HTX/IDC or ASP code, you'll need some familiarity with SQL.
With the ASP approach, the browser references an ASP file on the server. It executes its scripts, processes any special HTML placeholders, and returns HTML to the browser. The Web server must be running Active Server Pages, and the ASP file must reside in a virtual directory that has Execute Scripts permission. You can run Active Server Pages on Microsoft Internet Information Server (version 3 or later), Personal Web Server for Windows 95, or Peer Web Server for Windows NT.
If you're dedicated to mastering Internet Information Server (IIS) technology on Windows NT, you'll want to invest in mastering ASP technology. On the other hand, if you're using Windows 95 and have only occasional use for dynamic publishing, IDC/HTX may meet your needs.
The easiest way to use either approach is with the Access 97 Publish To The Web wizard. However, before invoking the wizard, you must create a DSN that points to the database that you want to publish. The wizard will prompt you for this DSN.
You can make a DSN manually from the Control Panel. Begin by double-clicking the 32bit ODBC icon to open the ODBC Data Source Administrator dialog box. Now, select the System DSN tab and click Add…. In the dialog that appears, double-click Microsoft Access ODBC. Type a name for the data source in the Data Source name text box; we called ours Northwind. Then, click Select… and browse to the Access database that you want the DSN to reference (e.g., Northwind). Click OK twice to continue.
Make sure your DSN points to an Access database on a locally connected LAN or that the Web server has an identically named DSN. This DSN is the route that browsers will use to get to the database on the Web server.
To start the wizard, open your database in Access, then choose Save As HTML from the File menu. When the first wizard dialog appears, click Next. (You shouldn't choose a publication profile until you become thoroughly familiar with the process.)
On the second wizard page, select one or more database objects that you want to publish. When you're publishing dynamically, this object will often be a select query. You can select fields and filter rows in the query until it represents just the datasheet you want to publish.
The third page lets you choose a background template. However, since you can get such superior results by using an HTML editor like FrontPage or FrontPage Express, we recommend you avoid doing any editing with the wizard.
On the wizard's fourth page, select one of the two dynamic publishing formats. The fifth page then asks for information about the DSN, as Figure B shows. When you're dynamically publishing a datasheet, you only need to complete the Data Source Name text box. Type the name of the DSN pointing at the Access database that you want to reference; this is the name you entered when you created the system DSN.
Figure B
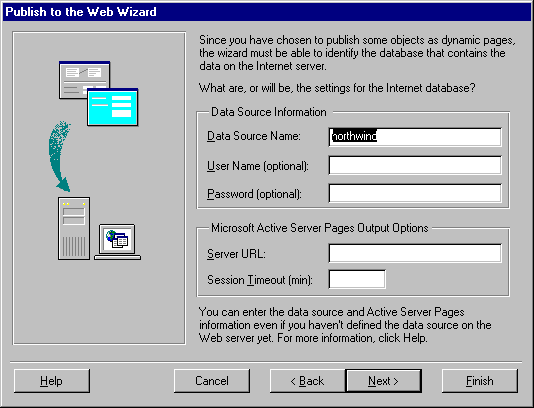
The fifth Publish To The Web wizard screen lets you enter a DSN that points to an Access database.
The sixth wizard screen lets you designate a source in which to save the dynamic publication files. Remember, there's a single ASP file for each datasheet, but both an IDC and an HTX file for each datasheet when using the HTX/IDC technology. You should deposit the IDC and HTX files in a folder that contains httpodbc.dll. This folder must have Execute Scripts permission in order for the files to work properly.
You can store the ASP file in any virtual directory of your Web server that has Execute Scripts permission. No special program needs to be in the same folder.
We recommend not selecting a home page on the seventh wizard screen. Instead, create an HTML page with a hyperlink that points to the IDC or ASP file. By placing on a single page a collection of hyperlinks that point to different IDC or ASP pages, you can offer users a menu of different datasheet publications. If you use the automatic home page generator, you'll have to recreate all your publications whenever you change—or add—even one.
The last page of the wizard lets you save your selections as a profile. You can then re-use all or some of your choices in future uses of the wizard. If you find yourself making multiple runs through the wizard, you'll want to experiment with this option.
For our example, we created a select query in the Northwind database to sort the Employees table by Last Name and show employee names and extensions; the query's name is qryEmpExtensions. Then, we published the query dynamically using both HTX/IDC and ASP formats. Finally, we created with FrontPage Express an htm file with two hyperlinks. One link points to qryEmpExtensions_1.idc, the other to qryEmpExtensions_1.asp. (The wizard automatically names the files in this manner.)
Figure C shows the htm file with the two hyperlinks in the top panel. The lower left panel shows the IDC file selection. The lower right panel shows the ASP file selection.
Figure C
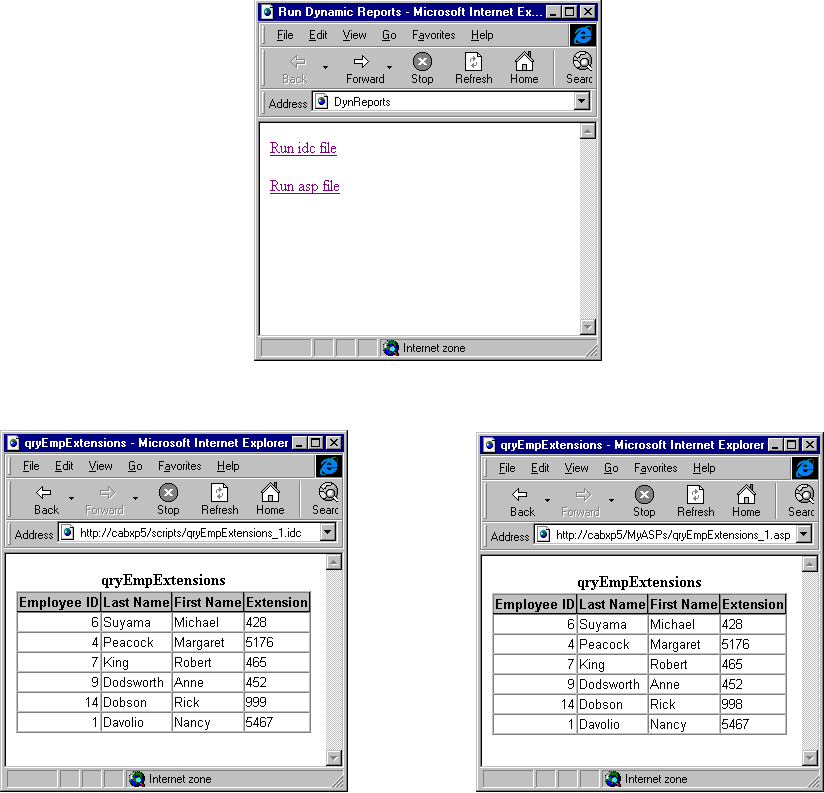
We created both IDC and ASP files to publish our data.
As you can see, the query we used includes an extra column—Employee ID—and sorts the records in descending order by last name. It filters out some employees—those whose extensions' first digit is less than 3.
We also added a new employee named Rick Dobson to the database. Notice that we changed the new employee's extension in the Access database in between taking the IDC and ASP screen shots.
Once you've successfully published a database, you may want to change the IDC, HTX, or ASP files. Editing these files by hand can be faster than re-running the wizard. Besides, you lose any extra formatting you've added to the files if you re-run the wizard.
Let's look at how to perform two basic tasks that require light editing. We'll change the sort order from descending to ascending and remove the Employee ID column from the report. We could adjust other publication features, but these two modifications illustrate basic principles that relate to just about all light editing situations.
To change the sort order for the IDC file, open qryEmpExtensions_1.idc, as shown in Figure D. Notice the simple IDC file format. It contains a field name, such as Datasource, Template, or SQLStatement, followed by a colon and the value for the field. Although the SQLStatement field looks very much like the SQL view in Access, there's a difference: Lines after the first one start with a plus sign. To change the sort order, simply highlight DESC and type ASC.
Figure D
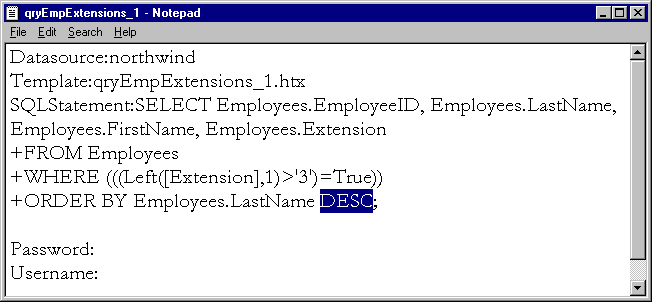
We'll change this IDC file's sort order from DESC (descending) to ASC (ascending).
Figure E shows the comparable code segment from the ASP file. Mixing the VBScript and the SQL in the ASP file makes for a more complex view of the SQL than you get with the IDC file. In all fairness, the ASP file prepares an ADO recordset based on the SQL, and the IDC file doesn't accomplish this or other tasks inherent in the ASP file. However, if you just want to change the sort order, it's easier to read and edit in the IDC file.
Figure E
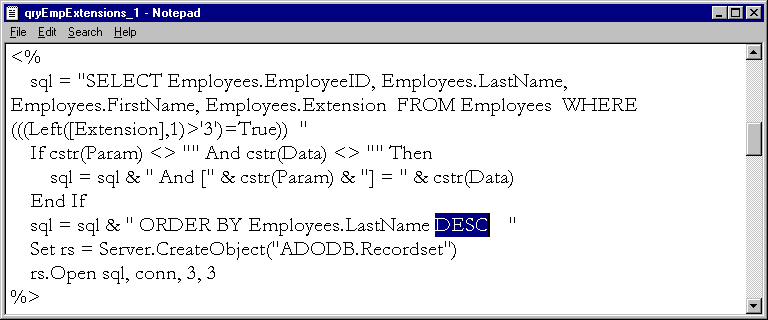
The ASP file is somewhat more complex than the IDC file.
To remove the Employee ID column from the IDC report, you must revise its corresponding HTX file. Listing A shows an excerpt from qryEmpExtensions_1.htx. Delete two cells—one from the THEAD block and the other from the TBODY block. The heading cell to delete contains Employee ID; the body cell to delete contains %EmployeeID%. (EmployeeID is the database field name, and the leading and trailing %s tell the IDC to insert the current record's field value into the HTML for viewing by the browser. The IDC automatically loops through all the records in the underlying data source.)
Listing A: Excerpts from qryEmpExtensions_1.htx
<THEAD><TR><TH BGCOLOR=#c0c0c0 BORDERCOLOR=#000000 ><FONT SIZE=2 FACE="Arial" COLOR=#000000>Employee ID</FONT></TH><TH BGCOLOR=#c0c0c0 BORDERCOLOR=#000000 ><FONT SIZE=2 FACE="Arial" COLOR=#000000>Last Name</FONT></TH><TH BGCOLOR=#c0c0c0 BORDERCOLOR=#000000 ><FONT SIZE=2 FACE="Arial" COLOR=#000000>First Name</FONT></TH><TH BGCOLOR=#c0c0c0 BORDERCOLOR=#000000 ><FONT SIZE=2 FACE="Arial" COLOR=#000000>Extension</FONT></TH></TR></THEAD><TBODY><%BeginDetail%><TR VALIGN=TOP><TD BORDERCOLOR=#c0c0c0 ALIGN=RIGHT><FONT SIZE=2 FACE="Arial" COLOR=#000000><%EmployeeID%><BR></FONT></TD><TD BORDERCOLOR=#c0c0c0 ><FONT SIZE=2 FACE="Arial" COLOR=#000000><%LastName%><BR></FONT></TD><TD BORDERCOLOR=#c0c0c0 ><FONT SIZE=2 FACE="Arial" COLOR=#000000><%FirstName%><BR></FONT></TD><TD BORDERCOLOR=#c0c0c0 ><FONT SIZE=2 FACE="Arial" COLOR=#000000><%Extension%><BR></FONT></TD></TR><%EndDetail%></TBODY>
Listing B shows the comparable code from the ASP file. Again, you just have to remove two cells, one in the table heading and another in the table body. While the ASP excerpt has the same general layout, notice that it's longer. This extra length is partly because the code includes VBScript for looping through the recordset created in Figure D. Since the ASP file does reference a recordset, its code references the recordset and its fields by name. The file also performs HTML encoding with a call to a function named HTMLEncode.
Listing B: Excerpts from qryEmpExtensions_1.asp
<THEAD><TR><TH BGCOLOR=#c0c0c0 BORDERCOLOR=#000000 ><FONT SIZE=2 FACE="Arial" COLOR=#000000>Employee ID</FONT></TH><TH BGCOLOR=#c0c0c0 BORDERCOLOR=#000000 ><FONT SIZE=2 FACE="Arial" COLOR=#000000>Last Name</FONT></TH><TH BGCOLOR=#c0c0c0 BORDERCOLOR=#000000 ><FONT SIZE=2 FACE="Arial" COLOR=#000000>First Name</FONT></TH><TH BGCOLOR=#c0c0c0 BORDERCOLOR=#000000 ><FONT SIZE=2 FACE="Arial" COLOR=#000000>Extension</FONT></TH></TR></THEAD><TBODY><%On Error Resume Nextrs.MoveFirstdo while Not rs.eof%><TR VALIGN=TOP><TD BORDERCOLOR=#c0c0c0 ALIGN=RIGHT><FONT SIZE=2 FACE="Arial" COLOR=#000000><%=Server.HTMLEncode(rs.Fields("EmployeeID").Value)%><BR></FONT></TD><TD BORDERCOLOR=#c0c0c0 ><FONT SIZE=2 FACE="Arial" COLOR=#000000><%=Server.HTMLEncode(rs.Fields("LastName").Value)%><BR></FONT></TD><TD BORDERCOLOR=#c0c0c0 ><FONT SIZE=2 FACE="Arial" COLOR=#000000><%=Server.HTMLEncode(rs.Fields("FirstName").Value)%><BR></FONT></TD><TD BORDERCOLOR=#c0c0c0 ><FONT SIZE=2 FACE="Arial" COLOR=#000000><%=Server.HTMLEncode(rs.Fields("Extension").Value)%><BR></FONT></TD></TR><%rs.MoveNextloop%></TBODY>
One reason for hand editing the files generated by the wizard is to preserve the formatting. Figure A on page 1 shows a modified version of the IDC file output that appears in the lower-left corner of Figure C. We've edited the IDC and HTX files as described above, and made formatting changes with FrontPage Express, the page editor that ships with Internet Explorer 4.0.
The FrontPage Express improvements include a more intelligible table title as well as a common background image for both the table and page. Fonts appear in larger sizes or bolder faces. The telephone extensions are right-justified. Finally, the page closes with a "designed by" credit.
Parameter queries are very popular with Access users and developers because they make it easy to look up information in a table. These database objects automatically generate a simple form, wait for the user to fill it in, and then generate a return set that matches the user's input. They're essentially dynamic reports, and the Publish To The Web wizard makes it easy to put them on the Web.
Figure F
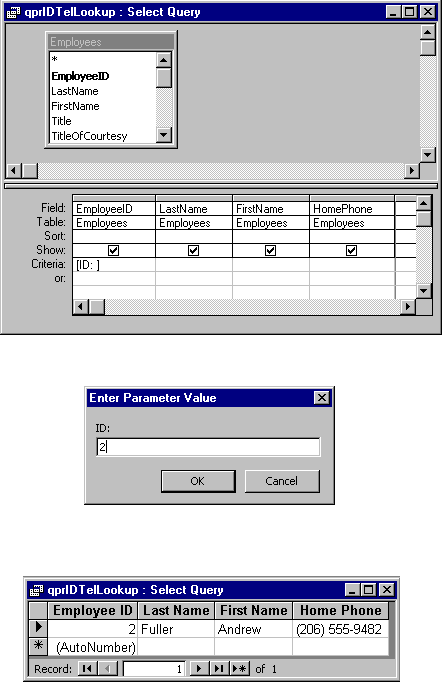
We've set up this Access query to run over the Web.
Figure F shows a simple parameter query for the Northwind database in action. In the top panel, you see our custom parameter query that returns an employee's home phone number based on the employee's ID. The second panel shows the automatic prompt that Access creates. We typed in 2 to get the home phone for Andrew Fuller, whose ID number is 2. The bottom panel shows the return set.
To publish this kind of query, just choose it on the second page of the Publish To The Web wizard. In reply, the wizard generates two Web pages. The first prompts the user to input a search criterion; the second is a datasheet with records matching the criterion entered on the first page.
Figure G presents the two screens that a user sees when he runs the parameter query over the Web. The first page simply prompts for an employee ID. When the user clicks the Run Query button, the Web server replies with the matching record(s), as the lower part of Figure G shows.
Figure G
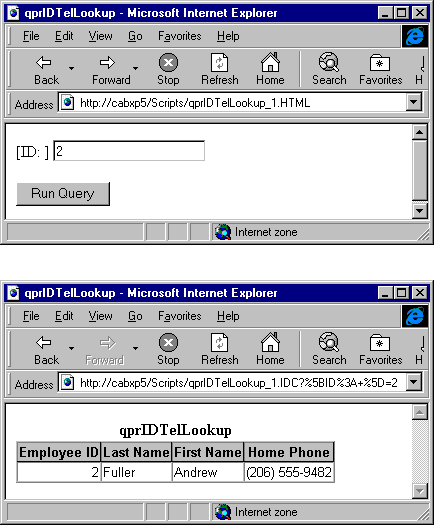
The query in Figure F generates these two Web pages.
You can make this easy query capability a little or a lot more complicated in two ways. First, you can use a text criterion instead of a numeric criterion. Second, you can allow wildcard parameters in the search.
When you use a text field as the search criterion, you must set the parameter data type, a step that's not required when you use a numeric field for setting the search criterion or when you plan to run the parameter query exclusively from within Access.
To set the parameter data type, right-click in the top of the Query-by-Example grid to bring up the Query Parameters dialog. Then, copy the text in the criteria row to the Parameter column in the Query Parameters dialog. Second, select Text as the data type. If you fail to perform these extra steps before publishing your parameter query, it will fail when you attempt to run it over the Web.
Wildcards represent another kind of challenge to the wizard, which doesn't translate wildcard parameters correctly. This situation is unfortunate since wildcards are popular with parameter queries. Although wildcard searches are beyond the scope of this article, we'll mention two separate Microsoft Knowledge Base reports describing the problem and solution: Report Q163893 gives the IDC solution; the ASP solution appears in report Q162977.
Dynamic publishing technology can be just what you need for publishing data from tables to the Web. When you need immediate display of database revisions over the Web, dynamic publishing is the only way to go!
Although dynamic publishing delivers a more timely view of an underlying database than does static publishing, this improved timeliness brings additional requirements. In this article, we've shown you how to publish dynamic Access reports using IDC/HTX and ASP.
__________________
Rick Dobson, Ph.D., is president of CAB, Inc., a consultancy offering database, Internet, and Office development services. Rick is Microsoft certified to train developers in Access and Office 97 development. He's a contributing editor to Microsoft Interactive Developer and a frequent contributor to Byte. You can reach Rick online at RickD@cabinc.win.net or by fax at (502) 426-3743.
___________________
This article is reproduced from the February 1998 issue of Microsoft Office Developer's Journal. Microsoft Office Developer's Journal is an independently produced publication of The Cobb Group. No part of this article may be used or reproduced in any fashion (except in brief quotations used in critical articles and reviews) without prior consent of The Cobb Group. To contact The Cobb Group, please call (800) 223-8720 or (502) 493-3200.
Copyright © 1998 The Cobb Group, a division of Ziff-Davis Inc. The Cobb Group and The Cobb Group logo are trademarks of Ziff-Davis Inc. All rights reserved. Reproduction in whole or in part in any form or medium without express written permission of Ziff-Davis is prohibited.