By Mark Solomon
There's no substitute for making complete backups of your Windows NT Servers, but you'll probably despise having to restore Windows NT when you need to reset only the NT registry. For example, you might consider restoring Windows NT in the following situations, when you don't have a registry backup:
Short of restoring the full Windows NT from a backup, you can restore just the Windows NT registry, provided you've backed up a good copy. In this article, we'll show you how to implement a complete strategy to back up and restore Windows NT's registry, should the need arise. You'll need the Windows NT 4.0 Resource Kit and administrative privileges to perform the steps in this article.
First, we'll show you how to automate registry backups by using the Windows NT Resource Kit's REGBACK command in combination with NT's Scheduler service. As you'll see, the Scheduler service will be responsible for running REGBACK on each NT Server with a registry you wish to back up.
Then, should you need to restore a Windows NT Registry, we'll explain how you can do so using various methods, including using the Windows NT Resource Kit's REGREST command. REGREST can take a fresh install of Windows NT and convert it into the NT system you're trying to recover.
Please note: You might think you can use the Registry Editor's Save Key… and Restore… commands to back up and restore an NT registry. However, these commands back up only portions of the registry at a time and don't back up the active portions of the registry. That's why the commands REGBACK and REGREST are very useful. They can completely and cleanly back up and restore a Windows NT registry.
We'll show you how to use the REGBACK command to back up an NT registry to a directory location. Unfortunately, REGBACK won't write over registry files it has previously written, so we'll have to create a batch file that first deletes those files and then executes the REGBACK command. You'll see how we use REGBACK to store registries from all our NT servers to a central location on the network. That way, you can use NTBACKUP or other backup software to easily restore those registries.
First, create the directory
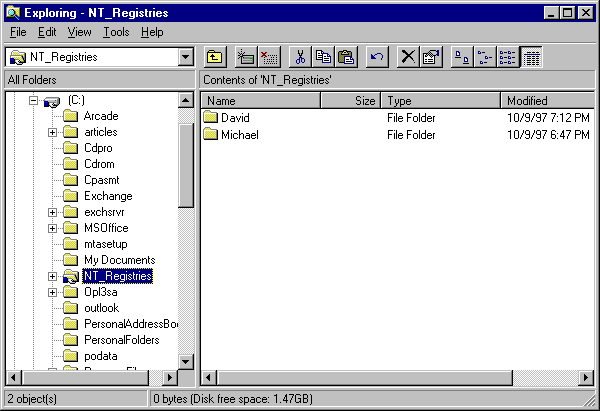
NT_Registrieson one of the NT Servers whose registry you want to back up. You'll use this location to store registry backups of all your NT Servers. Next, create subdirectories in the NT_Registries directory and give them names that match the NT servers you wish to back up. For example, we created the subdirectories MICHAEL and DAVID to represent the computers in our domain, as shown in Figure A.
Figure A

We created the NT_Registries directory to store registries for all our NT Servers.
Now, share the NT_Registries directory as NT_Registries. If the NT_Registries directory is located on an NTFS partition, give only the Domain Admins group access and leave the default share permissions of Everyone and Full Control. However, if the NT_Registries dirory is on a FAT partition, give the Domain Admins group Full Control to the share. You don't want to give everyone access to your NT Server registries; with those registries, they could duplicate the structure of your NT server.
Please note: In order to back up registries, REGBACK.EXE must be executed by a user with at least Backup Operator privileges.
Now, we'll show you how to use the REGBACK command. First, copy REGBACK.EXE from its Resource Kit location on your hard drive into the \%SYSTEMROOT%\SYSTEM32 directory so it will be in NT's default path.
Next, suppose you created the NT_Registries share on an NT Server called MICHAEL. To execute REGBACK, you'd open a command line window on MICHAEL and type a command similar to the following:
REGBACK \\MICHAEL\NT_Registries\MICHAELAs shown in Figure B, this command backs up MICHAEL's registry to the NT_Registries share's MICHAEL subdirectory. Also, if you had another NT Server on your network called DAVID that you wanted to back up, you'd copy REGBACK to its %SYSTEMROOT%\SYSTM32 directory. To do so, go to a command line prompt and type
REGBACK \\MICHAEL\NT_Registries\DAVIDwhich yields the same results.
Figure B
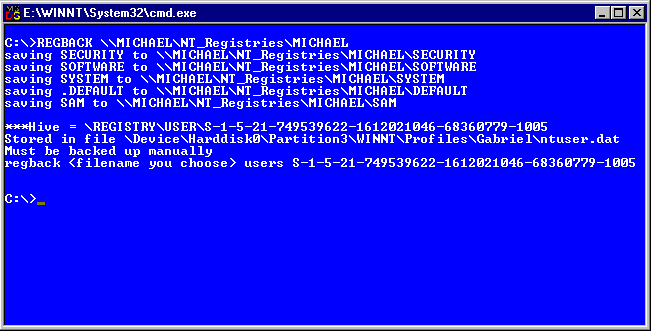
REGBACK stores the NT registry data in a location you specify.
Along these same lines, we're going to use REGBACK to back up our NT server registries from servers on our network to the share NT_Registries. However, as we mentioned, REGBACK won't write over previously written registries. To circumvent this, we created a batch file that first deletes these registry entries and then runs the REGBACK.EXE command, as shown in Figure C. Notice that we piped y into the deletion command to respond to NT's standard prompt when using wildcards to delete:
Are you sure (Y/N)?Figure C
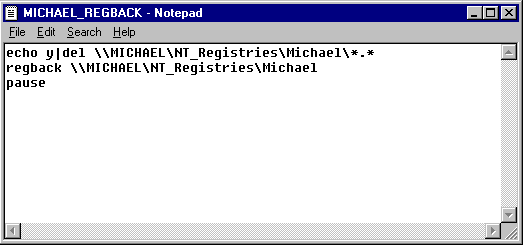
Create a batch file for each NT Server that deletes old registry files and uses REGBACK to create new registry backups.
You must create a similar batch file for each NT Server whose registry you wish to back up. After you've tailored a batch file for each of your NT Servers, save the batch file in each NT Server's \%SYSTEMROOT%\SYSTEM32 directory. We did so, and we named our batch files MICHAEL_REGBACK.CMD and DAVID_REGBACK.CMD.
Now, run the batch files to verify that they delete and back up registries properly. For example, we ran MICHAEL_REGBACK.CMD on the MICHAEL NT server, as shown in Figure D.
You might be wondering why we used a UNC name with the DEL command and with the REGBACK command. We did this to make batch files for DAVID and MICHAEL as similar as possible. That way, we can easily reproduce and modify the batch file for additional computers, should the need arise. Also, the AT job-scheduling command, which we'll use later, may have trouble connecting to resources over the network. Using the UNC name in a local batch file makes NT think it's connecting over the network, so you can test for network-connection problems on the same computer.
Figure D
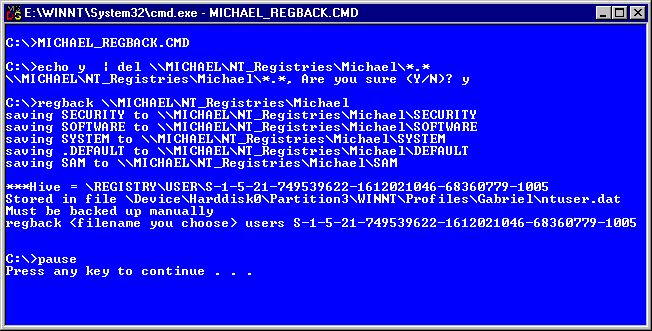
Test the REGBACK batch files you're created for each of your NT Servers to verify they work properly.
Please note: To test our batch files, we placed the pause command at the end because we want to verify the results when we execute them with the AT command. This causes the command window to remain on the screen rather than disappearing. That way, you can see the output from REGBACK to determine if it executed properly. Otherwise, backed up or not, the command window will close, and you'll be left wondering whether your registries were actually backed up—you'll have to look at the registry file dates to find out.
Now that we've created batch files that will back up our NT registries, we'll show you how to use the AT command to automate executing those batch files on a daily basis. By default, the NT's Scheduler service is set to manual startup, as shown in Figure E.
Figure E
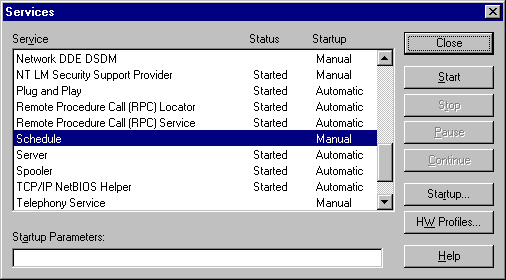
By default, when you install Windows NT, the Scheduler service isn't started and is set to manual.
So, open the Services applet and double-click the Scheduler service. Now, enable the Automatic radio button. Then, enable the This Account radio button and click the adjacent ellipsis button. Select an administrative account that you want to use for the Scheduler service. Then type the appropriate password for the administrative account and confirm it in the Password and Confirm Password text boxes, as shown in Figure F. Now, click OK to confirm your selections and close the Services dialog box. You can now restart the Scheduler service.
Please note: You may be wondering why we're adding an administrative account to the Scheduler service. If you ran some tests of your own, you'd find that the Scheduler service will run REGBACK just fine without any special permissions because it uses the local System account on NT. However, as you can see by the batch files we've created, we're copying registries over the network to the NT_Registries share. The local System account isn't authorized to do this—it has only guest privileges on remote NT systems.
You may find that Microsoft documentation recommends applying the NET USE command in conjunction with an administrative password to force the Scheduler service to connect to remote accounts. However, if you added this functionality to a batch file, the password would be visible for all to see. Adding the administrative account to the Scheduler service avoids this potential problem.
Figure F
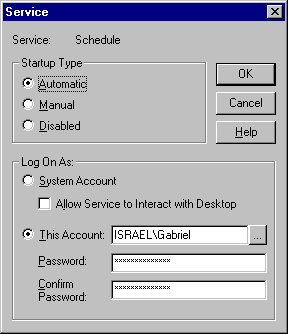
Add an administrative account to the Scheduler service and set the service to start automatically.
You'll want to follow this procedure for every computer in your NT domain whose registry you want to back up. Not to worry, you can use Server Manager to modify your NT server's services, as shown in Figure G.
Figure G
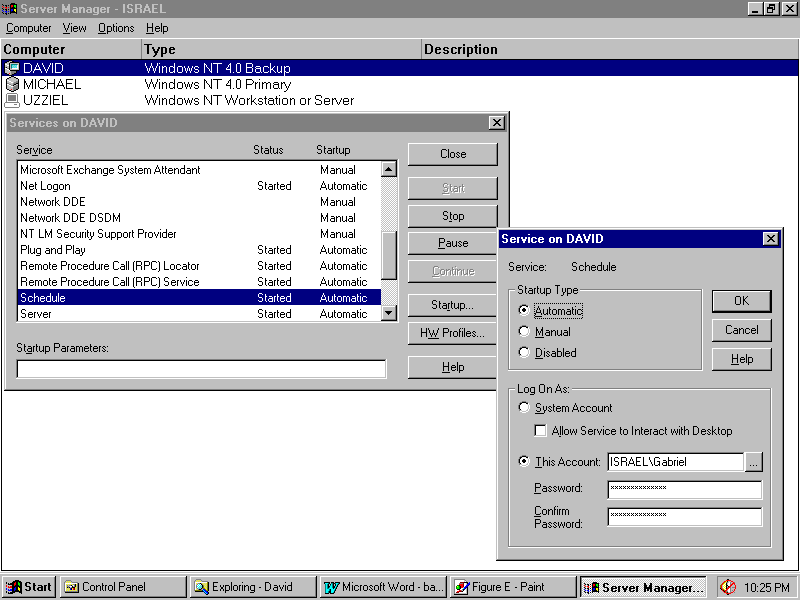
You can easily modify the Scheduler service on other computers using Server Manager.
Once you've modified the Scheduler service for all your Windows NT Servers, you'll want to schedule jobs using the AT command—you can also do this from the command line of a single networked computer. For example, we scheduled the MICHAEL_REGBACK.CMD and DAVID_REGBACK.CMD batch files on the computers MICHAEL and DAVID, as shown in Figure H. We used the commands
AT \\MICHAEL 06:00 /INTERACTIVE /EVERY:M, T, W, Th, F "MICHAEL_REGBACK.CMD"
AT \\DAVID 06:00 /INTERACTIVE /EVERY:M, T, W, Th, F "DAVID_REGBACK.CMD"
Make sure you specify the appropriate computer name for each AT command, along with the appropriate batch file name for the computer.
We used the INTERACTIVE option with the AT command so that a command window will appear when our REGBACK jobs are executed. As we mentioned, we placed the pause command in those batch files so the command windows would remain after the batch execution, allowing you to look at the REGBACK results.
Interestingly, the INTERACTIVE option also works if you're logged off your machine. When you log back on, you'll see the command window detailing the results of the batch files that AT executed. Once you're satisfied that AT is working properly with these batch files, you can remove the INTERACTIVE option. Then, the AT command will run jobs in the background—whether you're logged on or not.
Unfortunately, the AT command won't leave a trace of its execution-successful or unsuccessful-in the event log. One way to check on the AT jobs after you've deleted the INTERACTIVE option is to verify the creation times on the newly created registry files in the NT_Registries directory. If all is working properly, the creation times will correspond to the times you've scheduled their associated AT counterparts to run.
Figure H
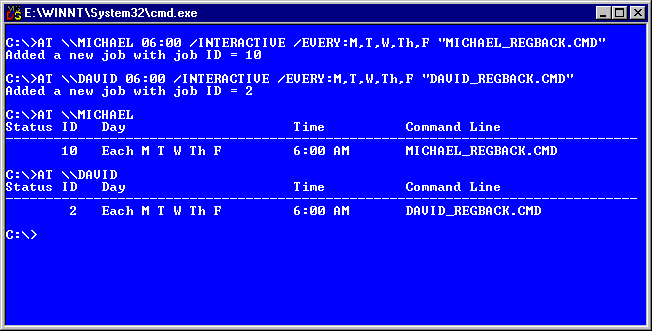
We scheduled REGBACK batch files to run at 6:00 a.m. on both MICHAEL and DAVID using the AT command in a command-line window on MICHAEL.
Please note: To learn more about the AT command, see the article "Scheduling Events with the AT Command" in the September 1996 issue of Exploring Windows NT.
Since the Scheduler service needs only backup operator privileges to run andyou don't want folks to be able to schedule jobs with AT that'll automatically be run at the administrative level, you'd think that you could add an account operator to the schedule service instead of an administrative account. But when we tried to add an account operator to the Scheduler service, the results were unacceptable.
First, when we added a Backup Operator account of any kind to the Scheduler service, we could not—even as administrator—schedule jobs. We'd get an access denied message, as shown in Figure I. So, we thought we'd be crafty and create our scheduled jobs before we added the Backup Operator account to the Scheduler service.
Figure I

We couldn't add a new AT job to the Scheduler service when we added a Backup Operator to the Scheduler service and restarted it.
Second, we stopped the Scheduler service, added the Backup Operator account, then restarted the service. We executed the AT command to list the scheduled jobs we created previously—they were still there. However, when our REGBACK job tried to run, the Scheduler service erred, giving the message box shown in Figure J.
To make a long story short, the only way to add REGBACK commands to the Scheduler service's AT command and have them access other computers on the network (short of using an embedded password in a NET USE command) is to add an administrative account to the Scheduler service. Now you're ready to restore a registry, should the need arise.
Windows NT gave us an error when we first added jobs to the Scheduler service and then added a Backup Operator account to the Scheduler service.
Depending on which file system , your Windows NT system partition uses-FAT or NTFS-restoring a sick NT system to full health could be a tricky operation. For example, consider these three scenarios:
Scenario 1 is clearly the toughest. You can't run NTBACKUP to immediately restore the system because Windows NT isn't running on the system. Windows NT doesn't have an NTFS boot floppy you can use to start your system and inspect or modify registry files.
Please note: Unsupported software does exist that will let you create an NTFS boot floppy. This software scares Microsoft to death because with it, anyone can break into an NTFS system. Subsequently, Microsoft is adding encryption to NT 5.0 to prevent break-in possibilities like this.
Here, there's only one thing you can do: Reinstall Windows NT in a separate directory, partition, or both. However, try reinstalling Windows NT in the same drive as your failing installation if you possibly can. Then, you can start the system using the new Windows NT installation and manipulate the registry of the old Windows NT installation using the following steps:
If this doesn't work, you'll probably want to restore Windows NT from a tape backup using the new Windows NT system you just installed. If you don't have a backup copy of your Windows NT, there's one more option.
Provided that you've installed the new Windows NT in the same partition as your old NT, you can use the REGREST command to restore your old NT registry on the newly installed NT system. Of course you'll want to have all the same services running—though not necessarily configured—on your new NT system so that it'll have the same executables, DLLs, and other files that your old system used.
As a final step, you'll want to rename your new NT's %SYSTEMROOT% directory to be that of your old one, which means you'll first have to rename your old NT %SYSTEMROOT% something else.
Please note: You may find that you didn't have enough disk space to create another copy of Windows NT in the same partition as your old one. You may be tempted to run REGREST on an NT system you've created in a new partition—and it may work, but beware: Programs and registry entries may expect Windows NT to be at its original drive and directory location. Unforeseen problems could arise. If you're tempted to do this because of a lack of disk space in your original NT partition, you'd be better of deleting the old NT, reinstalling a new NT in its place with the same services, and running REGREST to restore the registry.
If your Windows NT partition uses FAT, you can boot your system with a DOS floppy and perform the four steps outlined in Scenario 1 to copy your backed-up registry files to your system, restart your system, and hope for the best. If this doesn't work as outlined in Scenario 1, you'll have to reinstall a fresh copy of Windows NT and use REGREST to restore your registry on that system.
If your NT system is still functioning, albeit poorly, you can use REGREST to restore a saved registry to your sick NT system, as we'll show you next. REGREST works like a champ!
Now we'll show you how to easily restore an NT registry on a running NT system. For example, if we wanted to restore the registry on the NT server computer, MICHAEL, we'd type something like
REGREST E:\SAVEDREG E:\OLDREGwhere SAVEDREG is a directory that contains the saved registry information we want to restore and OLDREG is a directory location where REGREST places the registry data that it replaces. As shown in Figure J, REGREST successfully restored our registry data. Now we need to reboot Windows NT to let the new registry take effect. You probably know this, but don't test REGREST on a production machine. Rather, find a test NT system you can use.
Figure J
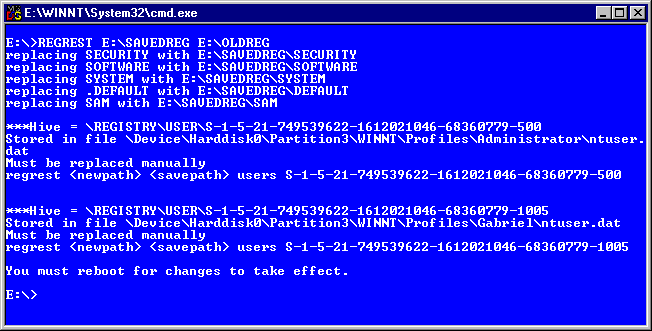
Use REGREST in the same drive location as your NT installation to successfully restore a registry.
You may be wondering why we didn't use the UNC naming convention, resulting in \\MICHAEL\NT_Registries\MICHAEL as the location of the saved registries. The reason is that REGREST only works in the drive location where your NT installation resides, and our Windows NT installation resides in E:\%SYSTEMROOT%.
Please note: To learn more about using REGBACK and REGREST, type the commands
REGBACK | moreand
REGREST |moreWe've found these command help screens to be better than the documentation in the Windows NT Resource Kit.
In this article, we've told you about the importance of registries, how to back them up on a regular basis, and how to restore them. Short of restoring Windows NT from a tape backup, restoring a Windows NT registry can be a quick and effective way to bring your Windows NT system back on line. A variety of methods exist for restoring your registry depending on the file system you're using and whether your Windows NT system is in working condition.
__________________
Mark Solomon is the former Editor-in-Chief of Exploring Windows NT. He's now a consultant for Kizan Technologies, Inc., a Microsoft Solution Provider.
__________________
This article is reproduced from the February 1998 issue of Exploring Windows NT. Exploring Windows NT is an independently produced publication of The Cobb Group. No part of this article may be used or reproduced in any fashion (except in brief quotations used in critical articles and reviews) without prior consent of The Cobb Group. To contact The Cobb Group, please call (800) 223-8720 or (502) 493-3200.
Copyright © 1998 The Cobb Group, a division of Ziff-Davis Inc. The Cobb Group and The Cobb Group logo are trademarks of Ziff-Davis Inc. All rights reserved. Reproduction in whole or in part in any form or medium without express written permission of Ziff-Davis is prohibited.