By Jeremy Broyles
Dynamic HTML is great for creating an interactive Web environment. The ability to change styles on the fly with DHTML is an important addition to the Web developer's bag of tricks. In this article, we'll show you how to use Dynamic HTML to create a menu that expands to reveal its submenus in response to a mouse click. We'll outline the technique by walking you through the code step by step. When you put it all together, you'll have a functioning expandable menu that you can customize to meet your needs.
The first step in creating our menu is to define the style of the menu items. We accomplish this by using the <STYLE> tag according to the Cascading Style Sheets (CSS) specification. As you can see in the following code, we define styles for DIV.Menu1, DIV.Menu2, and A (the anchor tag):
<HTML>
<HEAD>
<TITLE>Web Builder Expanding Menu</TITLE>

<STYLE TYPE="text/css">
<!--
DIV.Menu1 {font-size: 10pt;
        font-family: "Arial";
        font-weight: bold;
        line-height: 20pt;
        margin-left: 5pt;
        color: gray;
        background-color: black;
        cursor: hand;}
DIV.Menu2 {font-size: 9pt;
        font-family: "Arial";
        line-height: 15pt;
        margin-left: 10pt;
        color: white;}
A    {font-size: 9pt;
        font-family: "Arial";
        text-decoration: none}
-->
</STYLE>
Be sure to include the style information within the <HEAD> tags of your document. The .Menu1 and .Menu2 variations of the DIV reference are classes. We'll talk more about them later. For the A tag, we set the text-decoration style to none. This causes anchor text to be displayed without the underline.
To make our menu expand, we're going to use the display style property, which is specific to DHTML and works only with Microsoft's Internet Explorer 4.0. If you can't guarantee that people will view your site only with IE4, it's best to handle the situation gracefully, when possible. Therefore, in order to keep other browsers (including previous versions of IE) from choking on the unrecognized style, we'll use JavaScript to identify the browser and handle the situation appropriately.
The display style property has two possible values: “none” and “”. When set to none, the object that the style is applied to is hidden. Otherwise, it's displayed normally. We can make text appear and disappear on the fly by changing the value in response to an event—in this case, a mouse click. Below, we've listed JavaScript that determines if the browser is IE4 and toggles the display property.
<SCRIPT LANGUAGE="JavaScript">
<!--
ie4 = ((navigator.appName == "Microsoft Internet Explorer") && (parseInt(navigator.appVersion) >= 4 ));

function toggle( myId ){
   if (ie4){
      thisId=document.all(myId);
      if (thisId.style.display ==
      "none"){
         thisId.style.display =
         "";}
      else {
         thisId.style.display =
         "none";
      }
   }
}
//-->
</SCRIPT>
</HEAD>
Note that we pass the myId parameter into the toggle() function. This parameter is the ID that we'll assign to each object that we want to show or hide. If the browser is IE4, the function checks the current value of the display style and switches it to the other value. If the browser isn't IE4, it bypasses the rest of the function without crashing.
For formatting purposes, we're going to create our menu inside a table—actually a table centered within a table. In order to create a solid border around our menu, we'll use an outer table with the width set to 140 pixels and cellpadding set to 2. Then within that table we'll center another table to contain the menu items. Following is the code to create both tables:
<body bgcolor="white">

<!-- Page heading -->
<h1>Web Builder Expanding Menu</h1>

<!-- Table to provide background color and border -->
<table border="0" cellpadding="2" cellspacing="0" width="140" bgcolor="black">
<tr><td>

   <!-- Table to contain our menu
   -->
   <div align="center">
   <table border="0"
   cellpadding="0"
   cellspacing="0" WIDTH="100%"
   bgcolor="black">
   <tr>
Now, the moment you've been waiting for—we're going to add our first menu item. Remember when we created the styles at the beginning of the article, and we briefly mentioned classes? Well, this is where classes should begin to click.
We're going to enclose each menu item in its own <DIV> tag. The <DIV> tag simply stands for division and provides a convenient way to divide your document into pieces that you can format individually. Since we want to maintain a consistent style for each level of menu item, we created DIV style classes called Menu1 and Menu2. To apply the styles from these classes to the contents of a division, simply use the class= statement within the <DIV> tag, as shown below.
   <!-- First main menu item -->
   <td><DIV class="Menu1"
   onclick="toggle('wbmenu')">Web
   Builder</DIV>
By using the class=”Menu1” statement, we tell the browser to apply the formatting that we listed in the style section under DIV.Menu1. Since this is a top-level menu item, and we didn't set the display property to none, it will always be displayed. As you can see, we've also added an onclick event that calls the toggle function when the user clicks the first menu item, Web Builder. Notice that we passed ”wbmenu” as the function's myId parameter, which we'll discuss next.
Now it's time to add our level two menu items that fall under the Web Builder menu heading. Once again, these menu items are contained within their own <DIV> tag. This time, however, we apply the formatting from the Menu2 class, as shown below:
   <!-- submenu items 1 -->
   <div id="wbmenu" class="Menu2"
   style="display: 'none';">
   <a style="color: white;"
   href="dhtml.asp">Dynamic
   HTML</a><br>
   <a style="color: white;"
   href="scrplts.asp">Scriptlets
   </a><br>
   <a style="color: white;"
   href="ie4.asp">Internet
   Explorer</a><br>
   </div>
   </td>
   </tr>
In order to hide the submenu items when the page loads, we set the display style to none. We also included an id property with the value of “wbmenu” within the <DIV> tag. Therefore, when the Web Builder menu item passes “wbmenu” to the toggle function, the toggle function displays (or hides) the contents of the wbmenu DIV.
Each submenu item within the wbmenu DIV is a link; therefore, we enclosed them within anchor tags. In addition to the href property, we used the color style property to make the anchor text white, since the table backgrounds are black. To complete the first section of our menu, we closed our table cell and row tags, as well.
To make our menu more defined, we want to separate the main menu items. To do this easily when using tables, you can create a separator cell with a contrasting background color. Place a one pixel by one pixel transparent image within the cell to create the effect of a one pixel colored line that spans the width of your menu. The code to accomplish this is listed below:
   <!-- separator cell -->
   <<tr><td bgcolor="blue"> <img
   src="images/clear.gif"
   height="1" width="1">
   </td>
   </tr>
   <tr>
Finally, create the rest of your menu following the steps for creating main and submenu items. When you're finished, the rest of your document should look like this:
   <!-- Second main menu item -->
   <td><DIV class="Menu1"
   onclick="toggle('aspmenu')">
   Active Server</DIV>

   <!-- submenu items 2 -->
   <div id="aspmenu"
   class="Menu2" style="display:
   'none';">
   <a style="color: white;"
   href="vid.asp">Visual
   InterDev</a><br>
   <a style="color: white;"
   href="iis4.asp">IIS
   4.0</a><br>
   </div></td></tr>

   <!-- separator cell -->
   <tr><td bgcolor="blue"><img
   src="images/clear.gif"
   height="1" width="1">
   </td>
   </tr>
   <tr>

   <!-- Third main menu item -->
   <td><DIV class="Menu1"
   onclick="toggle('fpmenu')">
   FrontPage</DIV>

   <!-- submenu items 3 -->
   <div id="fpmenu" class="Menu2"
   style="display: 'none';">
   <a style="color: white;"
   href="temp.asp">Templates</a>
   <br>
   <a style="color: white;"
   href="form.asp">Easy
   Formatting</a><br>
   </div></td></tr>
   </table></div>
</td></tr>
</table>
</div>

As your menu expands, text or graphics below will make room.

</body>
</html>
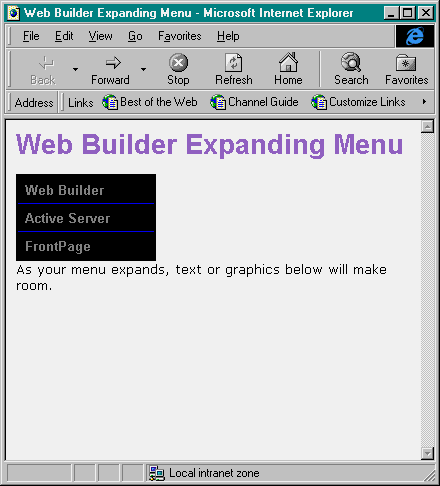
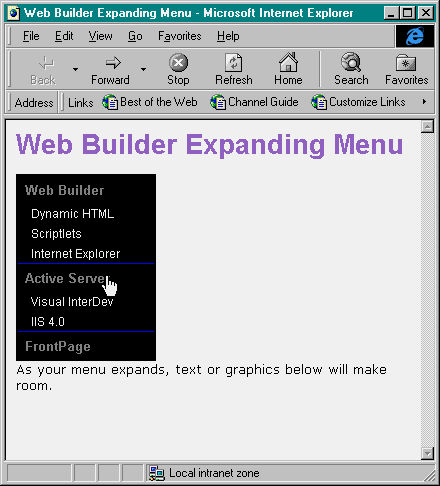
When you load the menu in IE4, you'll see the compressed version of the menu, as shown in Figure A. However, as you click each main menu topic, the submenus will expand into view, as you can see in Figure B. This technique is fairly browser-friendly, too. If you view the menu in a browser other than IE4, you'll simply see the entire expanded menu.
Figure A

When the menu loads in IE4, it only displays the main menu items.
Figure B

When the user clicks a main menu item, the menu expands to reveal its submenu.
Dynamic HTML provides Web authors with the tools to make truly interactive sites. Using these tools, we've shown you how to create a dynamic expanding menu.
_______________
Jeremy Broyles is Editor-in-Chief of Microsoft Web Builder.
_________________
This article is reproduced from the February 1998 issue of Microsoft Web Builder. Microsoft Web Builder is an independently produced publication of The Cobb Group. No part of this article may be used or reproduced in any fashion (except in brief quotations used in critical articles and reviews) without prior consent of The Cobb Group. To contact The Cobb Group, please call (800) 223-8720 or (502) 493-3200.
Copyright © 1998 The Cobb Group, a division of Ziff-Davis Inc. The Cobb Group and The Cobb Group logo are trademarks of Ziff-Davis Inc. All rights reserved. Reproduction in whole or in part in any form or medium without express written permission of Ziff-Davis is prohibited.