
By Shannon Lake
The day has finally arrived. Using Microsoft Agent, you can now literally “tell” your computer to run a report, read a letter, or play a song. This article will describe how to make use of Agent’s text-to-speech feature. You’ll learn how to extend VBA to include an ActiveX, and how to code an application that will call Agent to read your active Word document aloud.
Microsoft Agent 1.5 uses multiple characters — Genie, Merlin, and Robby, as of this writing (see FIGURE 1) — to offer a human/machine interface unlike any of its predecessors, including Microsoft Office Assistant. Each character has been three-dimensionally rendered, and has a unique set of animations.

FIGURE 1: The Microsoft Agent characters: Genie, Merlin, and Robby.
To get the most from Agent, however, you need to do a little prep work. You must download and install several components. They’re all available at http://www.microsoft.com/workshop/prog/agent. With each of these, download the compressed executable file and run it to perform the installation:
the Microsoft Agent Control
the Microsoft Command and Control speech engine
the Lernout & Hauspie TruVoice text-to-speech engine
Then download and place the following files in the \Program Files\Microsoft Agent\Characters directory:
genie.acs
merlin.acs
robby.acs
You should also download the Agent documentation. At a minimum, you’ll need Programming the Microsoft Agent Control, Programming the Microsoft Agent Server Interface, and the documentation for each character, e.g. Microsoft Agent Animations for Robby Character. You’ll also need a sound card, speakers, and a microphone to dictate commands.
In the first project, we’ll write a test procedure to verify that Agent and its components are installed correctly. We’re not asking for a lot the first time out; the Agent just needs to show up and say a few words. We’ll use Genie for the test run.
Begin by launching Microsoft Word 97 and activating the Visual Basic Editor by pressing AL! (or selecting Tools | Macro | Visual Basic Editor). Next, click on the Project Explorer, or press Cr. This will give you a list of all the projects you’ve opened. Select the Normal project. (For more on Normal, see the sidebar “The Normal Template” on page XX.)
Creating the form. Insert a form by selecting Insert | UserForm from the Project Explorer or menu. Modify the UserFform by changing the following properties in the Properties window. (It may be necessary to press 4 to display the Properties window.)
Caption: Agent Control Form
Width: 100
Height: 85
Place two CommandButtons on the form. Then change their Caption properties to Start Agent and Stop Agent so they appear as shown in FIGURE 2.
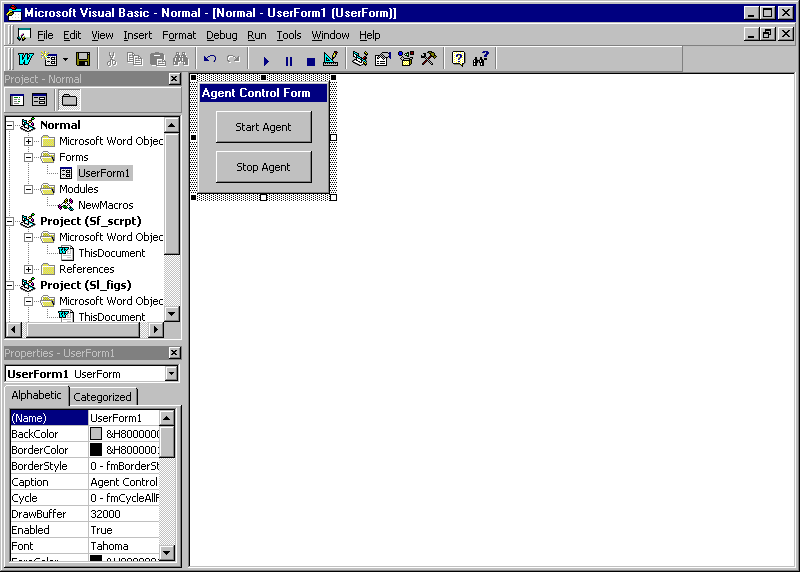
FIGURE 2: Building the first demonstration in the Visual Basic IDE: Place two buttons on a UserForm.
Controls and references. With every new project, it’s important to add references to the DLLs and OCXs that contain the procedures, methods, and other code you’re referencing. Select Tools | References to activate the References dialog box. Scroll down, and select Microsoft Agent Control 1.5.
Next, make sure the Toolbox is active by clicking it, or by choosing it from the View | Toolbox menu. Activate the Additional Controls dialog box by selecting Tools | Additional Controls; find the line that reads Microsoft Agent Control 1.5, and click its checkbox. When finished, you’ll see the Agent icon in the lower portion of the Toolbox (see FIGURE 3).
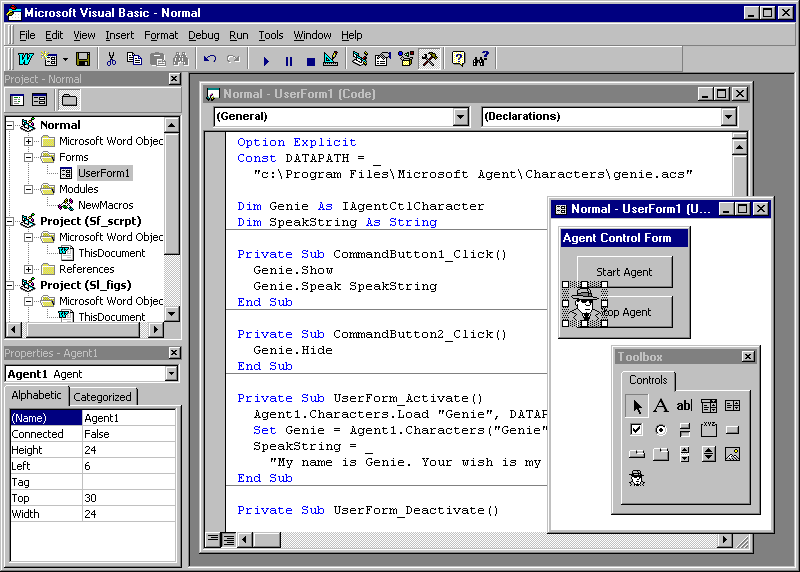
FIGURE 3: The Visual Basic IDE with the Toolbox displayed; the Agent icon has been added to the Toolbox.
Next, we’ll code the portion of the subroutine that will make the Genie appear and disappear. Start by double-clicking the top button, labeled Start Agent. You’ll see that the Visual Basic IDE has already started the CommandButton1_Click subroutine. Scroll to the top, and enter the following statements:
Const DATAPATH = _
  "C:\Program Files\Microsoft Agent\Characters\genie.acs"

Dim Genie As IAgentCtlCharacter
Dim SpeakString As String
The full code listing appears in FIGURE 4. These statements declare the necessary variables and constant. Microsoft suggests that you install the Agent character files (.ACS files) in the directory listed, but you can put them anywhere — as long as you enter the correct path for the DATAPATH constant value.
Option Explicit

Const DATAPATH = _
  "C:\Program Files\Microsoft Agent\Characters\genie.acs"

Dim Genie As IAgentCtlCharacter

Private Sub UserForm_Activate()
  Agent1.Characters.Load "Genie", DATAPATH
  Set Genie = Agent1.Characters("Genie")
End Sub

Private Sub CommandButton1_Click()
  Genie.Show
  Genie.MoveTo 100, 100
  Genie.Speak "My name is Genie. Your wish is my command."
End Sub

Private Sub CommandButton2_Click()
  Genie.MoveTo 350, 250
  Genie.Hide
End Sub

Private Sub UserForm_Deactivate()
  Set Genie = Nothing
End Sub
FIGURE 4: This code demonstrates basic Genie control.
Create the code that will be executed when the UserForm is activated:
Private Sub UserForm_Activate()Now we tell the Agent object to load the Genie character into its Characters collection, so we can access it:
Agent1.Characters.Load "Genie", DATAPATHNext, the Set statement is used, to simplify subsequent code:
Set Genie = Agent1.Characters("Genie")It’s not required, but later statements would need to be more elaborate. For example, this statement would be required to show the Agent:
Agent1.Characters("Genie").ShowRather than the more straightforward:
Genie.ShowThe next line gives the SpeakString variable a value. In this case, we’re telling Microsoft Agent to introduce itself, then prepare for speech-recognition input. (We won’t code that portion in this example.)
SpeakString = "My name is Genie. Your wish is my command."Let’s complete the code by calling the Genie and having it speak the value of SpeakString. We’ll program the CommandButton1_Click subroutine to accomplish that task. Show is the command used to make the Genie visible to the user, and Speak triggers the Microsoft text-to-speech engine to speak the text it precedes:
Private Sub CommandButton1_Click()
  Genie.Show
  Genie.Speak SpeakString
End Sub
The CommandButton2_Click subroutine will hide the Genie from the user:
Private Sub CommandButton2_Click()
  Genie.Hide
End Sub
Finally, we must destroy the Agent object when we’re done with it, by using the following statement:
Private Sub UserForm_Deactivate()
  Set Genie = Nothing
End Sub
You’re now ready to start the Agent. Test to see if your machine was set up correctly by hitting the Run button, or by pressing 5. This will activate the form. The Agent server will initialize when the form is loaded, and be destroyed when the user exits the form. When the Start Agent button is pressed, the Genie will appear and say, “My name is Genie. Your wish is my command.” (as shown in FIGURE 5). It will disappear when the Stop Agent button is pressed.
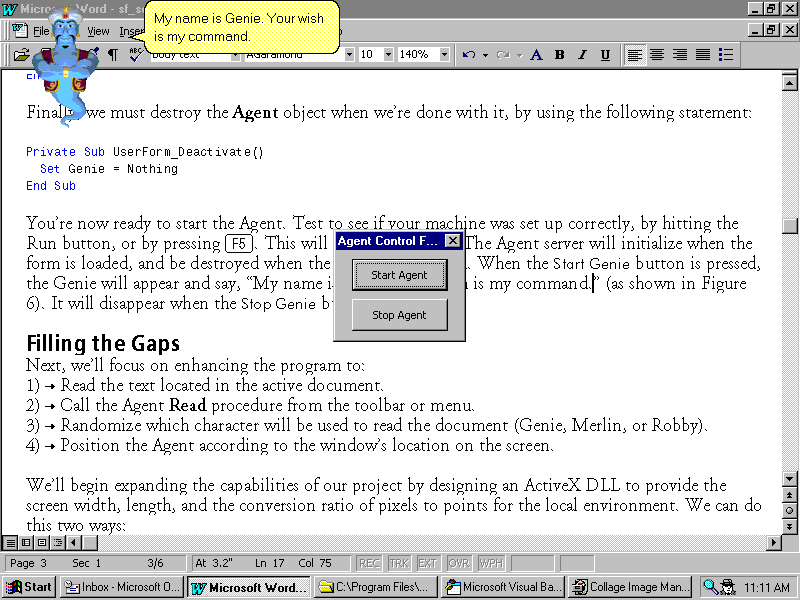
FIGURE 5: The demonstration application at run time: the Genie appears.
Because we’re operating the Agent from a modal dialog box, this implementation isn’t very practical, although it’s okay for demonstrations or development. Next, we’ll do something a lot more useful; we’ll incorporate an Agent into Word 97 and have Robby read to us.
The goal is to place a button on the Word 97 toolbar, that when pressed, invokes an Agent who will read the active document aloud — a great way to get another perspective on your writing.
Let’s start with the declarations, beginning with the character-path constant:
Const ROBBYPATH = _
  "C:\Program Files\Microsoft Agent\Characters\robby.acs"
and the variables for the Agent and character:
Dim MSAgent As Agent
Dim Char As Object
As before, we then instantiate an Agent object using the New keyword:
Set MSAgent = New AgentAfter the Agent object is created, we must start the Agent ActiveX server. To accomplish this, we set the Agent object’s Connected property to True:
MSAgent.Connected = TrueThen we load the character and assign it to the Object variable:
MSAgent.Characters.Load "Robby", ROBBYPATH
Set Char = MSAgent.Characters("Robby")
The preliminary work is done. Now it’s time for our Agent to make an appearance and do something.
Controlling an Agent’s on-screen behavior is straightforward. Most action is accomplished using the Character object’s Play function. Play takes one parameter — a string consisting of an Animation string. For example, this statement will cause Robby to wave:
Char.Play "Wave"while this will cause him to appear to be moving to the right (Robby uses a jet pack to move):
Char.Play "MoveRight"FIGURE 6 lists a small subset of Animation strings for Robby, while FIGURES 7 through 11 illustrate a few. As you can see, there’s a lot Robby can do. The available Animation strings vary from character, so you’ll need to get the documentation for each character you want to work with. Robby, for example, has 94 Animation strings described in the Microsoft Agent Animations for Robby Character document.
| Animation | Description |
| Acknowledge | Nods head |
| Alert | Straightens and raises eyebrows |
| Announce | Prints output and reads |
| Blink | Blinks eyes |
| Declines | Raises hands and shakes head |
| DontRecognise | Holds hand to ear |
| GestureLeft | Gestures to the left |
| GestureRight | Gestures to the right |
| GetAttention | Raises and shakes arms |
| GlanceLeft | Looks left briefly |
| GlanceRight | Looks right briefly |
| Hear_1 | Turns head left |
| Idle2_1 | Crosses arms |
| Idle2_2 | Removes head and makes adjustment |
| LookLeft | Looks to the left |
| MoveUp | Flies up |
| Processing | Presses buttons in looping animation |
| Reading | Reads in looping animation |
| Sad | Makes sad expression |
| Searching | Looks through toolbox in looping animation |
| Think | Tilts head and scratches |
| Wave | Waves |
| Write | Takes out clipboard, writes and looks up |
FIGURE 6: Selected subset of Animation strings for Robby character. There are 94 in all.
Using Play, however, Robby will remain in the same on-screen location. To actually move an Agent about the screen, you can use the Character object’s MoveTo procedure, which takes two arguments — the x and y screen coordinates. Here’s an example:
Char.MoveTo 200, 300If you want the character to move while on screen, use MoveTo after Show has been called; if you want the character to appear in a specific location when first invoked, use MoveTo to position the Agent before calling Show. Now that we know how to make the Agent gesture and move around, let’s make Robby speak.

FIGURE 7: Animation “Wave”: Robby says hello.

FIGURE 8: Animation “MoveRight”: Robby flies to the right.

FIGURE 9: Animation “Idle2_2”: Robby makes an internal adjustment.

FIGURE 10: Animation “Searching”: Robby rummages through his toolbox.

FIGURE 11: Animation “Reading ”: Robby reads to us.
Having Robby speak is equally straightforward; you simply use the Character object’s Speak function. Speak takes one parameter — the text to read. The text can take several forms, including a literal string, a text file, or a URL. In our case, we want the Agent to read a Word document, so we’ll use the following statement:
Char.Speak ActiveDocument.Content
If you do any Word 97 VBA programming, you’ll recognize that ActiveDocument.Content refers to the Content property of the ActiveDocument property; in other words, the body text of the currently-selected Word document. This statement will cause Robby to read the document aloud while displaying the associated text in a word balloon. Slick!
The lone Speak statement will work, but we can do better. This sequence:
Char.Play "Read"
Char.Speak ActiveDocument.Content
Char.Play "Readreturn"
will cause Robby to print some output from his chest, tear the document free when it’s completed, and begin to read before actually speaking. The “ReadReturn” Animation will cause Robby to return to his neutral, resting position after reading. Many animations have associated “...Return” animations, so smooth transitions can be made between actions.
Now, let’s put what we’ve learned together and script a short sequence of actions for Robby to perform. We’ll place them in a script so we can call it from Word 97, as shown in FIGURE 12.
Option Explicit

Const ROBBYPATH =
  "C:\Program Files\Microsoft Agent\Characters\robby.acs"

Dim MSAgent As Agent
Dim Char As Object

Sub Speak()

  Set MSAgent = New Agent
  MSAgent.Connected = True
  MSAgent.Characters.Load "Robby", ROBBYPATH

  Set Char = MSAgent.Characters("Robby")
  With Char
    .Top = 125
    .Left = 185
    .Show
    .Play "Greet"
    .Play "GreetReturn"
    .MoveTo 600, 400
    .Play "Read"
    .Speak ActiveDocument.Content
    .Play "ReadReturn"
    .Play "Idle2_2"
    .Play "Wave"
    .Play "WaveReturn"
    .Hide
  End With

End Sub
FIGURE 12: This VBA code has Robby appear at specific coordinates on the screen, wave hello, fly to the lower-right corner of the screen, read the active Word 97 document, make an adjustment, wave good-bye, and vanish.
Next, we must do a little work in Word.
To associate the new macro with a custom toolbar, select View | Toolbars | Customize to display the Customize dialog box. Click the New button. Name the new toolbar “Agent”, and make it available to Normal.dot. The toolbar is now ready to be used. In the Customize dialog box, click the Commands page and select Macros. The Normal.NewMacros.Speak macro should be available; drag it to the toolbar, then release it when the I-beam appears. Right-click the button, change its name to “Read”, and give it an icon if you like.
Call the new macro from your menu by returning to the Customize dialog box and selecting the object again. This time, drag it to the Tools menu (but don’t let go). The menu will open and scroll to the bottom. When you see the I-beam in the position you want, release the button. You can change the properties of the menu item the same way you did before — by right-clicking.
We’ve covered the basics of Microsoft Agent, and listed the software and hardware you need to exploit Agent’s potential. Then we went on to take advantage of Agent’s speech capability to implement a useful Word macro that literally reads a document aloud.
It’s also important to remember that Agent is available as an ActiveX. This means it can be used to liven up a Web site. For an example, visit Argo Technologies’ Web site at http://www.argolink.com/agent/merlinscorner/druidxicon.html (see FIGURE 13). You can link to it and other Agent-enabled sites from Microsoft’s Agent page (see FIGURE 14) — a page you’ll become familiar with as you explore Microsoft Agents.
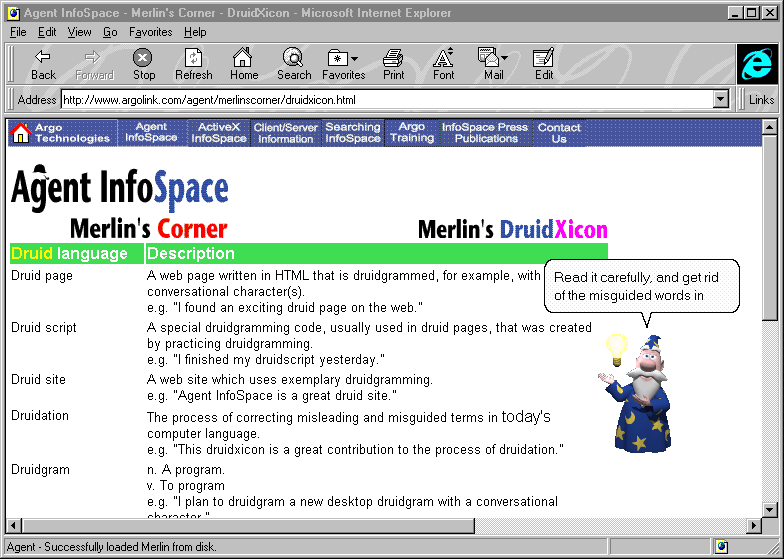
FIGURE 13: You can see Microsoft Agent in action on the Web at the Argo Technologies site.
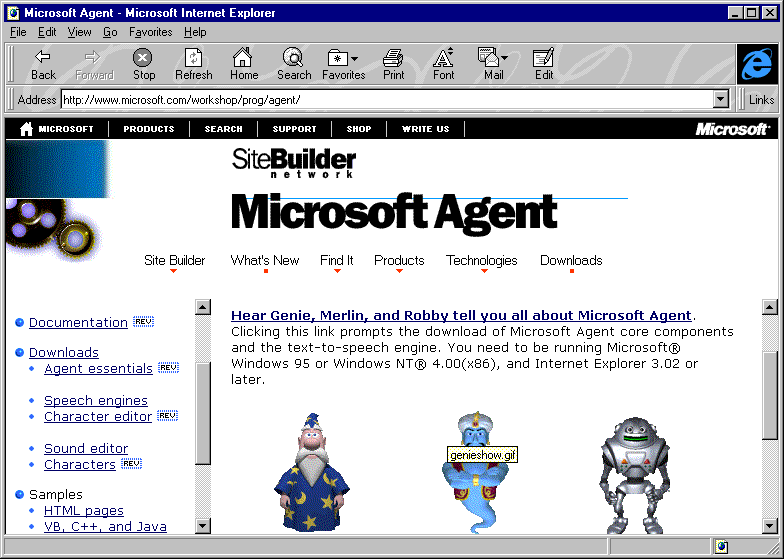
FIGURE 14: Get to know this site; it’s loaded with valuable tools and information.
This article has only scratched the surface. Microsoft Agent is a major piece of technology — the Programming the Microsoft Agent Control document alone is 75 pages! — so you’ll need to invest some time before becoming adept. The good news is that you’ll have lots of fun along the way.
The file referenced in this article is available for download from the Informant Web site at http://www.informant.com/mod/modnewupl.htm. File name: MOD9801SL.ZIP.
Shannon M. Lake, Sr., CET, NCT, and MCP, is CEO of The OMNIFORCE Group, an international telecommunications and software-engineering consultancy focused on designing and reinforcing companies’ new or existing information, software, telecommunication, and/or data-communication systems. Shannon is currently developing a new operating system. He can be reached at lake@omniforce.com, http://www.omniforce.com/lake, or (800) 367-9946.