Larry W Jordan Jr.
Derik Harris
Microsoft Corporation
Created: August 16, 1996
Revised: August 30, 1996
Larry W Jordan Jr is a Senior Microsoft Access support engineer. His main focus is VBA, wizard and add-in development and Visual SourceSafe integration.
Derik Harris is a Senior Microsoft Access content engineer. His primary responsibility is writing, editing, and publishing Microsoft Access related material for the Microsoft Knowledge Base and the Microsoft Web site.
Click to open or copy the LOCALATM project files.
This document describes how to create a custom application that allows the user to select a localized language for the user interface (UI) of a Microsoft Access database. The technique uses an in-process OLE Server dynamic link library (DLL), created using Microsoft Visual Basic version 4.0, for storing and retrieving localized strings and icons, which you can use in forms, message boxes, and other UI elements.
An OLE Server DLL is necessary because Microsoft Access, unlike other programming tools such as the Microsoft Windows SDK , Microsoft Visual C++ or Microsoft Visual Basic, doesn’t have the ability to use a resource file (*.res). Using a programming tool you can create a Resource Script File (*.rc) that is compiled into a *.res file. You can then use the *.res file to identify specific language strings and elements based on the ID value of a resource.
Note This document assumes you have a thorough knowledge of creating and compiling an OLE Server DLL in Visual Basic version 4.0. For more information about creating OLE servers, see the documentation and samples on "Creating OLE Servers" included with Visual Basic.
In this document you will learn step-by-step how to create a Microsoft Access application similar to the Automated Teller Machine (Atm.vbp) sample application included with Visual Basic version 4.0. This process involves the following steps:
The benefit of using an OLE Server DLL is that it uses a separate *.res file which is easy to share among developers and applications. Other advantages of this technique include:
An alternative technique is to declare the localized strings in your Microsoft Access database.
For example:
‘ ------------------------------------
‘ language specific strings
‘ ------------------------------------
Public Const ID_ENGLISH_WELCOME = "Welcome"
Public Const ID_FRENCH_WELCOME = "Bienvenue"
Public Const ID_GERMAN_WELCOME = "Willkommen"
Public Const ID_ITALIAN_WELCOME = "Benvenuti"
Public Const ID_SPANISH_WELCOME = "Bienvenido"
Public Const ID_JAPANESE_WELCOME = "Youkoso"
The disadvantage of this approach is that you can’t share these localized strings among multiple Microsoft Access databases; this would require copying the localized string module to each database.
An *.rc file is a text file that has a specific structure for assigning a text string or image file to a unique Resource ID. For example:
//////////////////////////////////////////////////////////////////////////////
//
// AccATM32.RC Resources file for the Microsoft Access ATM sample.
//
//

//////////////////////////////////////////////////////////////////////////////
//
// Icons
//
27                     ICON  MOVEABLE PURE   "CTRUSA.ICO"
59                     ICON  MOVEABLE PURE   "CTRFRAN.ICO"
91                     ICON  MOVEABLE PURE   "CTRGERM.ICO"
123                    ICON  MOVEABLE PURE   "CTRITALY.ICO"
155                    ICON  MOVEABLE PURE   "CTRSPAIN.ICO"
187                    ICON  MOVEABLE PURE   "CTRJAPAN.ICO"

//////////////////////////////////////////////////////////////////////////////
//
// String Table
//

STRINGTABLE DISCARDABLE
BEGIN
    16     "Welcome"
    17     "Please enter your pin number:"
    18     "Please choose an account:"
    19     "Checking account"
    20     "Savings Account"
    21     "Please enter an amount:"
    22     "OK"
    23     "Your transaction is being processed..."
    24     "Thank you for using our ATM"
    25     "The following amount will be withdrawn from your: Checking account"
    26     "US Dollars"
END

STRINGTABLE DISCARDABLE
BEGIN
    48     "Bienvenue"
    49     "Veuillez entrer votre code:"
    50     "Veuillez choisir un compte:"
    51     "Compte chèque"
    52     "Compte épargne"
    53     "Veuillez entrer le montant:"
    54     "OK"
    55     "Votre transaction est en cours de traitement..."
    56     "Merci d'avoir utilisé notre guichet automatique de banque"
    57     "Le montant suivant va être débité de votre: Compte chèque"
    58     "Francs Français"
END
Note This *.rc file example contains localized strings in multiple languages. For efficiency you may want to create separate *.rc files for each language.
To compile the *.rc file, run the Resource Compiler (Rc.exe) from Visual Basic at a command prompt. For example:
C:\VB\RC Accatm32.rc
This creates the Accatm32.res file for you to add to your Visual Basic OLE Server DLL project.
To create an OLE Server DLL in Visual Basic, follow these steps:
Note This section does not describe each step in detail because it assumes you are familiar with creating an OLE Server DLL. The discussion is limited to those steps that require specific action to create the Automated Teller Machine sample application.
Add a standard module to your project and create a Sub Main() procedure. You can leave the procedure blank since its only purpose is to meet the OLE Server DLL's requirement for a startup form.
Add a class module to your project and set its properties as follows:
Table1. Class Module Properties
| Instancing | 2-Createable - MultiUse |
| Name | OLEAccATM |
| Public | True |
The first function to add to the class module is GetLocalizedResStr(). In Microsoft Access you use this function as a method to request a string from the resource file.
Public Function GetLocalizedResStr(intResourceId As Integer) As Variant

    On Error GoTo GetLocalizedResStr_Err

    Dim strRes As Variant

    ' --------------------------------------------
    ' load resource string
    ' --------------------------------------------
    strRes = LoadResString(intResourceId)
    GetLocalizedResStr = strRes

GetLocalizedResStr_End:

    Exit Function

GetLocalizedResStr_Err:

    ' --------------------------------------------
    ' Raise the exception
    ' --------------------------------------------
    Err.Raise vbObjectError + 27, _
              "OLEAccATM.GetLocalizedResStr", _
              Err.Description
    Resume GetLocalizedResStr_End

End Function
Note This error trapping uses the Raise method of the Err object, which is the recommended technique when building OLE Servers.
In Microsoft Access, use the following code to call the method:
Sub TestLocalizedString()

   ' --------------------------------------------
   ' instantiate the OLE Interface
   ' --------------------------------------------
   Dim objAccATM As New OLEAccATM

   ' --------------------------------------------
   ' holds language constant
   ' --------------------------------------------
   Dim intLang As Integer

   intLang = 16 ' english

   MsgBox objAccATM.GetLocalizedResStr(0 + intLang)

End Sub
If you call this function from the Debug window, a message box displays the word "Welcome," which comes from the resource ID of 16 in the OLE Server DLL.
The second function to add to the class module is GetLocalizedResIcon() and is a method when called within Microsoft Access.
Since Microsoft Access has no methods to load icons or bitmaps from variant data types, you can use the OLE Server DLL to extract the icon file from the compiled resource file for the requested language and save it to a disk file. You can then set the Picture property of Microsoft Access controls to the saved icon file, as shown here:
Public Function GetLocalizedResIcon(intResourceId As Integer, _
                                    strPathFileName As String) As Integer

    On Error GoTo GetLocalizedResIcon_Err

    Dim varResPict As Variant

    ' --------------------------------------------
    ' load resource picture
    ' --------------------------------------------
    SavePicture LoadResPicture(intResourceId, vbResIcon), strPathFileName
    GetLocalizedResIcon = True

GetLocalizedResIcon_End:

    Exit Function

GetLocalizedResIcon_Err:

    ' --------------------------------------------
    ' Raise the exception
    ' --------------------------------------------
    Err.Raise vbObjectError + 27, _
              "OLEAccATM.GetLocalizedResIcon", _
              Err.Description
    Resume GetLocalizedResIcon_End


End Function
In Microsoft Access, use the following code to call the method:
Dim strPathFileNameIcon As String

' --------------------------------------------
' holds language constant
' --------------------------------------------
Dim intLang As Integer

intLang = 16 ' english

' --------------------------------------------
' load appropriate logo
' --------------------------------------------
strPathFileNameIcon = “C:\My Documents\MyIcon.ico"
If objAccATM.GetLocalizedResIcon(11 + intLang, strPathFileNameIcon) Then
   Me!frmLogo.Picture = strPathFileNameIcon
End If
In Visual Basic, use the Project tab of the Options dialog box to set the following:
Note OLELocalizedAccATM is the name to use when you create a Reference to the DLL in your database.
In Visual Basic, to compile your project into an OLE Server DLL, go to the File menu and click Make OLE DLL File.
Note The remainder of this document shows how the sample Microsoft Access AccATM.mdb uses the OLE Server DLL. The discussion does not cover all of the sample database's forms and code; it is limited to the objects necessary for using the OLE Server DLL.
Open the sample AccATM.mdb database and open any module. Go to the Tools menu and click References. In the References dialog box, select OLELocalizedAccATM.
Note Microsoft Access version 7.0 does not provide a way to create references programmatically. You must create the reference through the user interface of the full-retail version, not a run-time version.
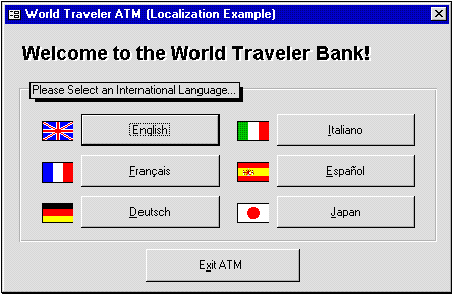
The main form in the AccATM database allows you to select a language:

Figure 1. ATM main form
Each button loads the input form and passes the desired language variable in the OpenArgs of the OpenForm method. For example, here's the code that is executed on the OnClick event of the English button:
Private Sub cmdEnglish_Click()

    ' --------------------------------------------
    ' input form
    ' --------------------------------------------
    DoCmd.OpenForm "frmInput", , , , , acDialog, "16"

End Sub
Note The number 16 is the Resource ID for English in the OLE Server DLL.
When the input form is loaded, it passes the language Resource ID (which it received from the navigation form) to the OLE Server DLL and retrieves all the necessary localized strings. The input form is populated and displayed with the appropriate localized strings.
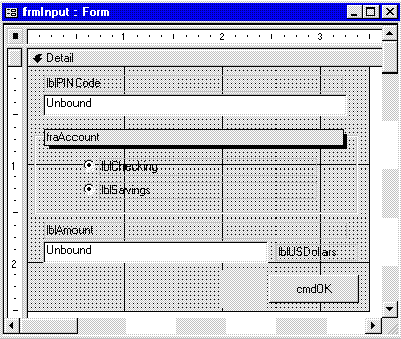
The Input form appears in Design view as follows:

Figure 2. Input form design view
The form's module contains the following code in the General Declaration Section:
Option Compare Database
Option Explicit

   ' --------------------------------------------
   ' instantiate the OLE Interface
   ' --------------------------------------------
   Dim objAccATM As New OLEAccATM

   ' --------------------------------------------
   ' holds language constant
   ' --------------------------------------------
   Dim intLang As Integer
And the following code is assigned to the form’s OnLoad event:
Private Sub Form_Load()

   On Local Error GoTo Form_Load_Err

   Dim Msg As String
   Dim strReturned As String
   Dim strPathFileNameIcon As String
   Dim boolResult As Boolean

   ' --------------------------------------------
   ' set to language constant passed in open args
   ' --------------------------------------------
   intLang = CInt(IIf(VarType(OpenArgs) = vbString, OpenArgs, "16"))

   ' --------------------------------------------
   ' load appropriate logo
   ' --------------------------------------------
   strPathFileNameIcon = GetAppPath()
   strPathFileNameIcon = strPathFileNameIcon & "MyIcon.ico"
   If objAccATM.GetLocalizedResIcon(11 + intLang, strPathFileNameIcon) Then
      Me!frmLogo.Picture = strPathFileNameIcon
      boolResult = SetCustomProps("AppIcon", strPathFileNameIcon)
   End If

   ' --------------------------------------------
   ' set application title
   ' --------------------------------------------
   strReturned = objAccATM.GetLocalizedResStr(8 + intLang)
   boolResult = SetCustomProps("AppTitle", strReturned)
   Application.RefreshTitleBar

   ' --------------------------------------------
   ' set option based upon the passed language
   ' and load from the OLE Interface
   ' --------------------------------------------
   Me.Caption = objAccATM.GetLocalizedResStr(0 + intLang)
   Me.lblPINCode.Caption = objAccATM.GetLocalizedResStr(1 + intLang)
   Me.fraAccount.Caption = objAccATM.GetLocalizedResStr(2 + intLang)
   Me.lblChecking.Caption = objAccATM.GetLocalizedResStr(3 + intLang)
   Me.lblSavings.Caption = objAccATM.GetLocalizedResStr(4 + intLang)
   Me.lblAmount.Caption = objAccATM.GetLocalizedResStr(5 + intLang)
   Me.lblUSDollars.Caption = "US Dollars"
   Me.cmdOK.Caption = objAccATM.GetLocalizedResStr(6 + intLang)

Form_Load_End:

   Exit Sub

Form_Load_Err:

   Msg = "Error #: " & Format$(Err.Number) & vbCrLf
   Msg = Msg & Err.Description
   MsgBox Msg, vbInformation, "Form_Load"
   Resume Form_Load_End

End Sub
The Form_Load() procedure calls two functions from two global modules named modMain and modProperties respectively.
Function GetAppPath() As String
   On Local Error Resume Next
   Dim strPathFileName, i As Integer
   Dim strHold As String
   strPathFileName = CurrentDb.Name
   For i = Len(strPathFileName) To 1 Step -1
      If Mid(strPathFileName, i, 1) = Chr(92) Then
         GetAppPath = Left(strPathFileName, i)
         Exit For
      End If
   Next i
End Function

Function SetCustomProps(PropName As String, PropValue As Variant) As Boolean

  ' ==============================================
  ' Function: SetCustomProps
  '
  ' Purpose:
  ' Save the specified custom property and its associated value
  ' Returns: Boolean
  ' ==============================================

   On Local Error GoTo SetCustomProps_Err

   Const conPropNotFoundError = 3270
   Dim db As DATABASE, prp As Property

   Set db = CurrentDb
   Set prp = db.Properties(PropName)
   prp = PropValue

   SetCustomProps = True

SetCustomProps_End:

   Exit Function

SetCustomProps_Err:

   If Err.Number = conPropNotFoundError Then
      Set prp = db.CreateProperty(PropName, dbText, PropValue)
      db.Properties.Append prp
      SetCustomProps = True
      Resume SetCustomProps_End
   Else
      MsgBox Err.Description, vbInformation
   End If
   Resume SetCustomProps_End

End Function
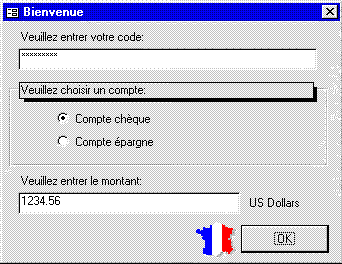
If you click the French button on the main form, the Input form appears as follows:

Figure 3. Input form in form view
First, set the picture to the correct country:
' --------------------------------------------
' load appropriate logo
' --------------------------------------------
strPathFileNameIcon = GetAppPath()
strPathFileNameIcon = strPathFileNameIcon & "MyIcon.ico"
If objAccATM.GetLocalizedResIcon(11 + intLang, strPathFileNameIcon) Then
   Me!frmLogo.Picture = strPathFileNameIcon

End If
The path and file name to save the icon to is established by using the GetAppPath() function, which returns the path of the current database. For example, if GetAppPath() returns "c:\My Documents\", then the strPathFileNameIcon variable contains "c:\My Documents\MyIcon.ico." This path and file are passed to the OLE Server DLL through the GetLocalizedResIcon() method which extracts the appropriate icon and saves it to "c:\My Documents\MyIcon.ico." You then set the imgLogo control’s Picture property to the name of the saved icon file.
Second, set the application's AppIcon property:
boolResult = SetCustomProps("AppIcon", strPathFileNameIcon)
The SetCustomProps() function is called to create, if necessary, and set the custom database property "AppIcon" to the path where the icon is saved. The Microsoft Access Application object queries the database for the existence of this property and shows the icon in the title bar of Microsoft Access.
Third, set the application's AppTitle property:
' --------------------------------------------
' set application title
' --------------------------------------------
strReturned = objAccATM.GetLocalizedResStr(8 + intLang)
boolResult = SetCustomProps("AppTitle", strReturned)
Application.RefreshTitleBar
The SetCustomProps() function is called to create, if necessary, and set the custom database property "AppTitle" to the text string returned from GetLocalizedResStr(). The Microsoft Access Application object queries the database for the existence of this property and shows the text string in the title bar of Microsoft Access.
Last, set the text on the form to the appropriate localized strings:
' --------------------------------------------
' set option based upon the passed language
' and load from the OLE Interface
' --------------------------------------------
Me.Caption = objAccATM.GetLocalizedResStr(0 + intLang)
Me.lblPINCode.Caption = objAccATM.GetLocalizedResStr(1 + intLang)
Me.fraAccount.Caption = objAccATM.GetLocalizedResStr(2 + intLang)
Me.lblChecking.Caption = objAccATM.GetLocalizedResStr(3 + intLang)
Me.lblSavings.Caption = objAccATM.GetLocalizedResStr(4 + intLang)
Me.lblAmount.Caption = objAccATM.GetLocalizedResStr(5 + intLang)
Me.lblUSDollars.Caption = "US Dollars"
Me.cmdOK.Caption = objAccATM.GetLocalizedResStr(6 + intLang)
Each text control on the form is set to a localized string returned from the GetLocalizedResStr() function based on the Resource ID.
Using an OLE Server DLL in Microsoft Access allows you to create a single database for multiple languages instead of a separate database for every language. The primary advantage of using this technique is that all of your localization strings are stored separately, which allows you to update them independently.