Ken Bergmann
Microsoft Developer Network
October 5, 1995
Ken Bergmann started at Microsoft several years ago in the Internal Technologies Group. After laboring long and hard on the bleeding edge of client/server development, he is now taking a break to write down everything he knows. We bought him a steno pad, and he is almost done. The following is an excerpt.
This article talks about the steps involved in combining a typical collection of small-business Microsoft® Access database files into a single Microsoft SQL Server database. This article assumes experience with the Microsoft Windows NT™ operating system, network administration, experience with Microsoft Access database files, and some working knowledge of relational database management systems.
I was recently "acquired" by a virtual company within Microsoft known as NADTEC. With my extensive knowledge of client/server development in a business solutions environment(!!), I was immediately promoted to Chief Information Officer. I have yet to figure out the real reason.
Immediately on becoming responsible for the company's information in general, I felt a pressing need to poke my nose around, learn all the passwords, open every database or file, run the existing programs, and basically snoop through any information I could get my greedy little hands on. I quickly came to realize that my intense misgivings about the company's environment of information storage were right on target. I'm not talking about a case of NWH (or "not written here" for the acronymically impaired), in which I was just being overly critical of an environment that I personally didn't create. This environment had serious flaws in its ability to maintain and store the company's critical information. The surface issues, which could easily have been overlooked in everyday business, became even more important for our company, simply because the majority (if not all) of our business was conducted online.
With the blood rushing to my head, I ran back to my office to furiously scribble down all the things that I could do to solve every problem. Whap! My good sense, realizing just how close I was coming to committing a random act, reached for the nearest chair and pulled it neatly in front of the path I had chosen. Nursing my bruised ankles, and with a considerably increased flow of oxygen to the brain, I holed up in my office and made a list of the symptoms of the current environment. I use the term symptoms because that's really what should be examined when looking to increase the health of a business solution. It is very easy to become overwhelmed by the number of what appear to be flaws in an environment. But if the flaws or problems are viewed as merely symptoms of the problem or flaw, it generally becomes possible to institute smaller solutions that fix a wider set of symptoms, as opposed to the "grunt boy" perspective of fixing each and every problem as it arises. This level of critical thinking is what allows architects to create truly elegant solutions, rather than a series of custom one-off applications. The architect should always strive to provide, as a sage once put it, "more bang for the buck!" Enough philosophy; let's get on with the story.
Much calmer now, I proceeded to work on an upgrade plan for the database portions of the current NADTEC online business. The general plan of attack was to upgrade the current Microsoft® Access databases to a full-fledged database management system, then update the model to allow for high-performance online transaction processing. After the business of NADTEC was modeled in a relational database, the intent was to search for a way for the entire database contents to be published dynamically using hypertext transfer protocol (HTTP) and file transfer protocol (FTP) servers. In this article, I will address the first step in the plan—upgrading our current databases to a client/server database configuration.
To upgrade the databases, we needed a real database management system—hardware that would allow us to make multiple connections without any hassle, software that would be blindingly fast, transaction-oriented, scalable, easy on the hardware, and wouldn't kill our meager budget. In short, we needed a copy of Microsoft SQL Server version 6.0. (I'm sure none of you saw this coming.)
Installing the Microsoft SQL Server software is fairly trivial—at least as far as actually getting it into the box is concerned. The harder parts are setting up the devices, security, and options. As a long time Microsoft SQL Server developer, I found it wasn't hard to "rummage" through dialogs until I located the appropriate boxes to check or clear. The Enterprise Manager setup is pretty straightforward, but is a huge departure from the standard administration tools. The main dialogs I wanted finally came up when I right-clicked the server name in the tree and selected Properties from the menu.
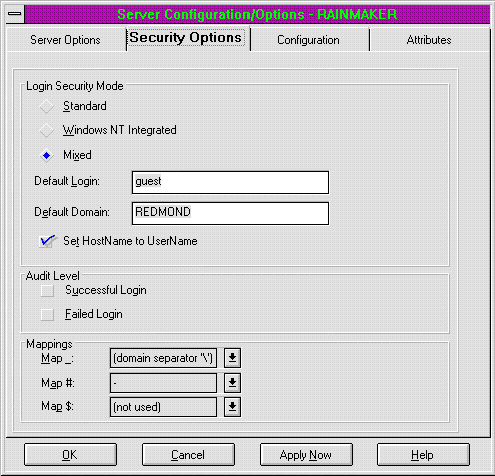
The Properties context menu for the server node is where you maintain the security settings (Figure 1). The only changes I made here were to set the security mode to Mixed, and to change the Set HostName to UserName setting. This allows our system to use Windows NT™ Domain security and group administration, as well as to create specific logins. This is helpful when you need worker applications (or non–Windows NT services) to have access to a database, but the machine cannot have a valid database user to be logged in. It also ensures that the HostName will always have the name of the currently logged-in user.

Figure 1. The Microsoft SQL Server security settings dialog
There are several other tabs that can set options for the Microsoft SQL Server. Of course, you have to be able to figure out a screen like this to do it:
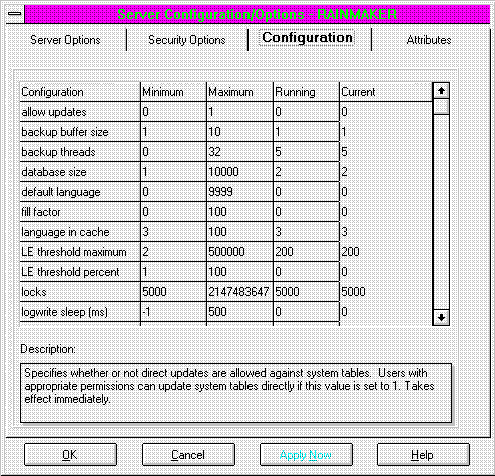
Figure 2. Microsoft SQL Server configuration panel
Most of these defaults are perfectly fine. You should start changing these only if you really know what you're doing. (In which case you don't need to be reading this article.)
Along with actually installing the Microsoft SQL Server software, I needed to set up a database on the server. For this also I used the Microsoft SQL Server Enterprise Manager. The interface here is pretty slick. I also made use of a shortcut to make the task of creating the database a little easier. By clicking on the Databases Folder and selecting New, I opened this dialog (Figure 3) and typed in the name of the database. In this case I used the name NADTECDB.
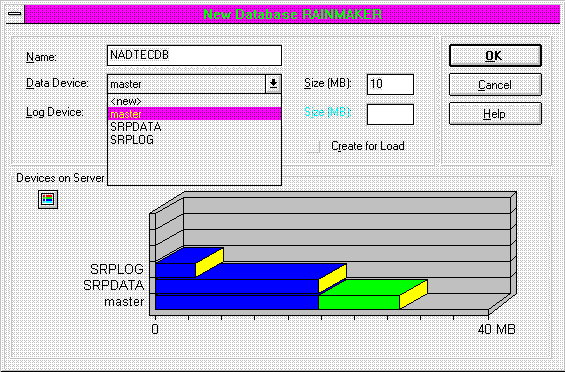
Figure 3. The New Database dialog box, used to create new databases on a Microsoft SQL Server
Here's my shortcut: In the old days of Microsoft SQL Server (like the last few versions), to create a database on separate devices, you first had to create the devices using complex statements. Once the devices were created, you then created the database. This also required you to use arcane commands. Now, however, you have this nifty interface, and if you pull down the device dialogs, they allow you to select <New>. This option will bring up the New Devices dialog box, which lets you click away and create a new device. Then when you close the New Devices dialog box, you come back to the New Database dialog box and you can just keep going. By doing this all in the same breath, you have a quick way to set up new databases. Try it; I think you will agree it's quite addictive. I made three or four my first time out, just for grins.
Once I had the Microsoft SQL Server database actually created, I wanted to set some options. Here are a few things I learned when using development databases: With all the dropping, creating, rebuilding, and so on, the transaction log can fill up at an astounding rate. Also, in a development shop, you frequently have to bulk-copy process (BCP) data into and out of the database. If you keep copies of the data around in BCP files, you can easily recreate the test or development data without a lot of hassle. This is why most shops have automated processes to perform bulk-copy processing of data.
However, when Microsoft SQL Server creates a database, it leaves unchecked two options that are very helpful for developers: Select Into / Bulk Copy (shown in Figure 4), and Truncate Log on Checkpoint.
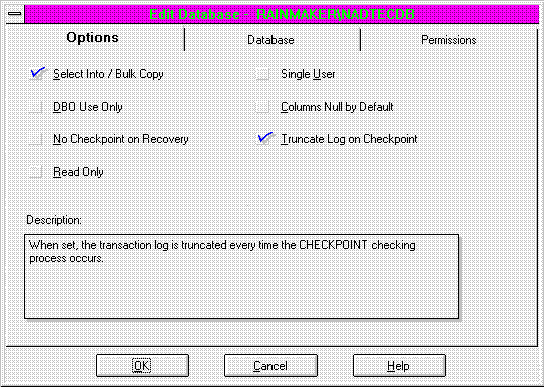
Figure 4. The Microsoft SQL Server Enterprise Manager—Edit Database, setting options
When checked, Select Into / Bulk Copy allows non-logged activities to occur in the database. What this means is that utilities that do mass inserts, such as BCP, can function. To do a high-speed bulk insert, the system needs to be able to conduct operations that are not logged. If all operations must be logged, rows must be inserted one at a time, with time being spent to make a note of each record. If you are doing this type of en masse operation, it can be quite inconvenient to keep track of every little operation. In production systems non-logged operations might not be desired at all, but in my development shop it saves a lot of time.
Truncate Log on Checkpoint, when checked, will truncate the transaction log every time a checkpoint event occurs. (I won't go into what a checkpoint is at this time. Suffice it to say that it happens fairly regularly.) What this means is that you won't fill up your transaction log while testing and developing. During a development or test cycle, it is very easy to process a large number of transactions of a meaningless nature. Allowing the transaction log to be truncated at regular intervals means you don't have to worry about getting a "transaction log full" message in the middle of a build or test script. Again, in a production system, you probably wouldn't want this option checked.
When I configured the server, I chose Mixed security for the type of security on the database. Mixed security means that security can be handled automatically by the Windows NT security model using Windows NT Groups and Users. It also gives me the flexibility to create unique user IDs and passwords that are not based on the Windows NT security model. What this means to the developers of the system is that front-end software can take advantage of integrated security, essentially allowing the front end to have a specific type of access based on the currently logged-in user. This allows the front end to focus on other issues, and not worry about implementing a login dialog, or managing passwords, and so on. However, processing applications and Microsoft SQL scripts can take advantage of custom logins and passwords to operate in environments where the currently logged-in user cannot have permissions in the database.
After I had configured the security model for the server, I used the Windows NT User Administrator to set up local groups for the members of my development and test team. I could have used an existing group in my domain, but I wanted a little more control over my group. Using the Microsoft SQL Server Security Manager, it is possible to create login IDs for all the users in a local group, and in the same step to add all those users into a specific database. Kind of one-stop shopping for user administration.
To use this handy feature, you must first be the Administrator for the server. Then simply open the Microsoft SQL Server Security Manager, select User Privilege from the View menu, and select Grant New from the Security menu (Figure 5).
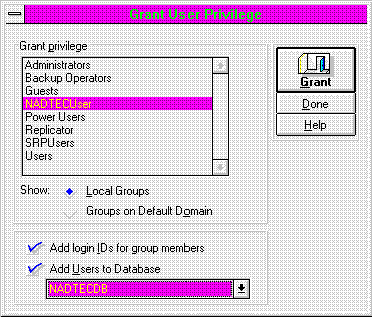
Figure 5. Granting User privileges from the Microsoft SQL Server Security Manager
Once you have the group selected, you can determine how to set up their privileges. If you don't wish to add login IDs for the group members, users will only be able to access the Microsoft SQL Server via the default account (usually guest). To actually be able to administer their permissions inside a database, you need to create login IDs for each group member. Check the box if you want this done automatically.
When you add users to the database, the default database association for each member of the group is set up. User-level permissions for each group member to use the specified database is also granted. This means that when group members log into the Microsoft SQL Server, they will automatically be put into the chosen database, and they will actually have permission to do something once they are there. These are two steps that are easy to overlook when setting up users of a Microsoft SQL Server.
Once I had a Microsoft SQL Server up and running, it was time to get all the existing data from the most current Microsoft Access databases and transfer it to the Microsoft SQL Server. For this, I use Microsoft Access 7.0. One of the great features of Microsoft Access is its ability to move data between data sources easily and safely. Before I explain how I did this, let me describe the database I am going to focus on. It is essentially a Contact Management database that contains three tables, as follows:
I have tried to keep this example simple and yet vaguely resembling the real world.
To transfer these tables to the server, I simply select the domain tables from my database one at a time and export them to an open database connectivity (ODBC) data source. (For an example of this, see the Microsoft Access documentation.) I exported the domain tables first so that the referential integrity rules will not be violated when a table is created on the server. The order in which I export these tables is as follows: Contact Types, Contacts, and Calls. I chose this order because Contact Types is a foreign key in Contacts. In other words, I need to be able to validate the values in the Contact table against the values in the Contact Types table. If the field in Contact for Contact Type ID holds a 4, I need to be able to look in the Contact Types table and translate what a four really means. The same relationship exists between the Calls and Contacts tables. The Calls table has a foreign key in it from the Contacts table. Now, this article isn't about data modeling or relational database design, so I won't go into any more detail, but if you want to understand this point better, stay tuned for a future article on transaction models.
At this point, we have all the tables and the data in the Microsoft SQL Server database, but there are a few more steps to be done. The relationships must be created, the table scripts generated and altered, indexes created, and administrative process put in place. All of this is work that should be done by the database administrator (DBA) for the system. The next thing that you, the developer, can do is to recreate the linkage between your applications and their data—data that now resides on a Microsoft SQL Server instead of in local Microsoft Access tables.
To let you recreate this linkage with the minimum of effort, I'll show you a shortcut I use frequently to get up to speed without a lot of work. Basically, you replace the existing Microsoft Access tables with "attached" tables. An "attached" table is essentially a local representation of data that is not necessarily local. In this case, we will "attach" the tables to their counterparts on the Microsoft SQL Server. The tables we will use will look and feel to our application as if they were local; the only difference is that the data will actually reside on the Microsoft SQL Server.
There are some restrictions on this. For some information on what types of operations you can and can't do on "attached" tables, see the Microsoft Access 7.0 Developers Guide. The good news is that if you are already doing things efficiently, most of the restrictions won't matter.
These are the steps to follow when creating a duplicate database containing "attached" tables.
Voilà! Your database now appears to your code to be local, but is really operating against the Microsoft SQL Server!
So why is this part of the process helpful? It allows you, the developer, to begin to understand the changes required of the application as it moves from a local system to a client/server system. Issues such as performance, query optimization, indexing of data, and so on, can now be examined within the confines of a working model. Instead of guessing or (more likely) being told what you are going to have to do to your application to get it ready for client/server development, you can actually see what needs to be done. If your performance is acceptable and the queries are efficient, why make changes? You will be doing yourself and your customers a great service by allowing them to see and feel the impact of remote data without the time and expense of (potentially) needless re-engineering of a working application.
System Administrator's Guide: Microsoft® SQL Server for Windows NT™. Redmond, WA: Microsoft Corporation, 1993.