Nigel Thompson
Microsoft Developer Network Technology Group
Created: September 27, 1994
Click to open or copy the files in the FWTEST sample application for this technical article.
This article is a follow-on to my previous article, "Using CDialogBar in 32-Bit MDI Applications." It describes a simple way to include custom controls in an application without having to create a separate dynamic-link library (DLL) for each control. Applications built using the techniques described here can be shipped as a single .EXE file without additional DLLs for the controls.
The FWTEST sample application that accompanies the article includes examples of two different Control Panel-like windows. One window uses standard Microsoft® Windows® controls and is discussed in "Using CDialogBar in 32-Bit MDI Applications." The other window uses a variety of custom controls and is discussed here. The window that uses custom controls also uses a 256-color palette.
The key points discussed are:
The standard Microsoft® Windows® controls are functional, but rather mundane. If you want controls that look more like those on a scientific instrument, for example, you need to be able to create a custom control of your own design. In the past, creating custom controls has been, shall we say, challenging? OK, let's not. Let's say "very difficult." Part of the problem is that custom controls apparently need to be in separate dynamic-link libraries (DLLs)—one DLL per control. This is not really the case unless you have a need to be able to see the controls correctly in the dialog box editor. If you can tolerate seeing a simple black rectangle in the dialog box editor, you don't need to have your custom controls in separate DLLs at all. They can be built into the application as C++ classes.
My previous article, "Using CDialogBar in 32-Bit MDI Applications," describes how a variant of the CDialogBar class can be used to create simple control panel windows. Now we'll see how to expand on that work so as to include our own custom controls in those control panels.
When you look at Figure 1, do you say "Yes, that's the kind of control I need!" or are you more of a "Ho hum, hardware stuff" kind of person? If you belong to the former category, I'm sure you'll be wondering exactly what I'm using this particular control panel for. Well, keep up the Development Library subscriptions, and you'll find out soon. (This part paid for by our marketing department.)
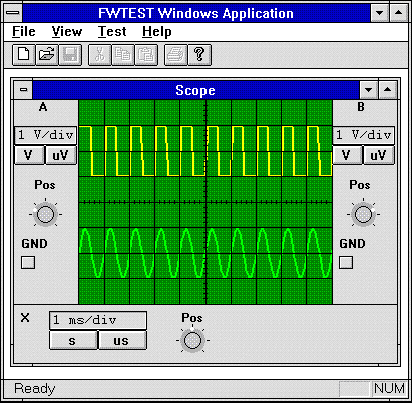
Figure 1. A control panel that uses several panels and custom controls
The control panel in Figure 1 is constructed from three separate dialog box panels and a separate window class for the screen in the center. The colors in the screen belong to a color cube palette used by the entire application. The control panels use two types of custom controls (one each for the position and scale controls) and an owner-drawn button. So you're really getting your money's worth here! Each panel uses the CDlgPanel class developed in "Using CDialogBar in 32-Bit MDI Applications."
Note, too, that the screen and custom controls make use of classes I developed for my animation library. The entire source for this library can be found in the ANIMATE sample.
Click to open or copy the files in the ANIMATE library.
The ANIMATE library includes a Help file that documents each class in the library.
Buttons are extremely useful in any dialog box, but the Windows standard button isn't quite what you might want all of the time. The Microsoft Foundation Class Library (MFC) classes include CBitmapButton, which is a little bit more flexible, but for that all-out approach, we really need to draw our own.
The oscilloscope in Figure 1 uses owner-drawn buttons for the ground (labeled GND) controls. When pushed, they stay in and light up yellow to show they are on. Users of Tektronix oscilloscopes will have little problem in guessing where I got this idea from.
The buttons are added to the dialog template using App Studio in the usual way. Check the Owner Draw check box to tell the dialog box manager code that you will be drawing it yourself. All you need to do now is add a handler for WM_DRAWITEM messages to the frame window. The frame window for the oscilloscope in Figure 4 is in the SCOPEFRA.H and SCOPEFRA.CPP files of the FWTEST sample. Here's the code that handles the WM_DRAWITEM messages:
void CScopeFrame::OnDrawItem(int nIDCtl, LPDRAWITEMSTRUCT lpDrawItemStruct)
{
    switch (nIDCtl) {
    case IDC_A_GND:
        DrawYButton(&m_A, lpDrawItemStruct);
        break;

    case IDC_B_GND:
        DrawYButton(&m_B, lpDrawItemStruct);
        break;

    default:
        return;
    }
}
The ID of the control is used to determine which control is being drawn. A generic handler then draws the control:
void CScopeFrame::DrawYButton(YCHANNEL* pCh, DRAWITEMSTRUCT* pDI)
{
    switch (pDI->itemAction) {
    case ODA_DRAWENTIRE:
    case ODA_SELECT: {
        // Create a CDC object.
        CDC dc;
        dc.Attach(pDI->hDC);
        // Draw the black rectangle around the outside
        // and fill the center with either the off or on color.
        CBrush brCenter;
        if (pCh->bGnd) {
            brCenter.CreateSolidBrush(PALETTERGB(255,255,0));
        } else {
            brCenter.CreateSolidBrush(PALETTERGB(192,192,192));
        }
        CBrush* pbrOld = dc.SelectObject(&brCenter);
        dc.Rectangle(pDI->rcItem.left,
                     pDI->rcItem.top,
                     pDI->rcItem.right,
                     pDI->rcItem.bottom);
        // Done with the brush now.
        dc.SelectObject(pbrOld);
        CPen penShadow(PS_SOLID, 1, PALETTERGB(128,128,128));
        CPen* ppenOld = dc.SelectObject(&penShadow);
        if (pDI->itemState & ODS_SELECTED) {
            dc.MoveTo(pDI->rcItem.left+1,
                      pDI->rcItem.bottom-2);
            dc.LineTo(pDI->rcItem.left+1,
                      pDI->rcItem.top+1);
            dc.LineTo(pDI->rcItem.right-2,
                      pDI->rcItem.top+1);
        } else {
            dc.MoveTo(pDI->rcItem.right-2,
                      pDI->rcItem.top+2);
            dc.LineTo(pDI->rcItem.right-2,
                      pDI->rcItem.bottom-2);
            dc.LineTo(pDI->rcItem.left+1,
                      pDI->rcItem.bottom-2);
            if (!pCh->bGnd) {
                CPen penHighlight(PS_SOLID, 1, PALETTERGB(255,255,255));
                dc.SelectObject(&penHighlight);
                dc.MoveTo(pDI->rcItem.left+1,
                          pDI->rcItem.bottom-2);
                dc.LineTo(pDI->rcItem.left+1,
                          pDI->rcItem.top+1);
                dc.LineTo(pDI->rcItem.right-2,
                          pDI->rcItem.top+1);
            }
        }
        // Done with pens.
        dc.SelectObject(ppenOld);
        } break;
    default:
        break;
    }
}
We don't have any keyboard interface to these buttons, so there is no code to draw a focus rectangle. We also don't differentiate between requests to change the selection state and requests to draw the entire control. We always draw the control in the appropriate state, the state of the control being determined by variables in the application (in the YCHANNEL structure in this case). Most of the drawing consists of single-pixel wide lines used to construct the highlights and borders of the control. A Rectangle call draws the center in either gray or yellow, depending on the button state.
What do you do when a fancy button won't cut it and a combo box is too nerdy? Time for a custom control. In the past, this has also meant that it is also time for a stress pill and a lot of digging through the literature, the best of which is Kyle Marsh's article "Developing Custom Controls for the Dialog Editor” (MSDN Library Archive, Technical Articles)
In order to have custom controls work with the Dialog Editor, they each had to be in individual DLLs. This is a nightmare if you are shipping a single application with 27 custom controls. So I thought we'd avoid that and find a way that lets you build them all into the application. (Is that cheering I hear?) The only side effect is that, when you insert one of these custom controls into a dialog box template using App Studio, you get a black rectangle instead of the control's image. Figure 2 shows how this looks for one of the oscilloscope's control panels.
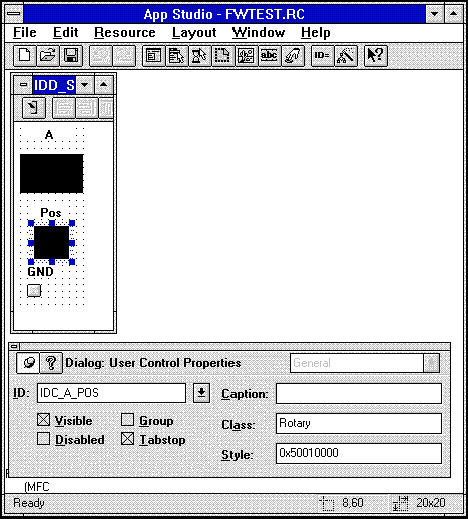
Figure 2. One of the oscilloscope's control panels in App Studio
As you can see from Figure 2, the control has an ID value (in this case, IDC_A_POS) and a specific class (in this case, Rotary). Note that Rotary is not its C++ class name but rather the name of the registered window class for this control. We'll look at how that gets registered later. You can also manually set the style bits of the control if you want something more than the standard Windows child control bits. OK, so this isn't too graceful in the editing sense, but it's not bad, given that we don't need to create a DLL. Now let's look at how the Rotary control is implemented in ROTARY.H and ROTARY.CPP.
Just before we get into how the rotary control is implemented, let me point out that, as with the legendary skinning of cats, there is more than one way to implement a rotary control. I wanted the control to be resizable, so I elected to draw the control using scalable GDI operations. You could create a much nicer looking control by using a set of bitmaps created by a paint program or even by scanning a picture of a real control knob. Bitmap images are not (in any practical sense) resizable, so I have not used them here.
The only interesting problem in creating a simple custom control is how to register the Windows class name of the control without a lot of messy code in the class that actually implements the control. The simplest way that I have found is to create a static member of the control's class that gets initialized as the application starts up. The initialization of this member variable is done by a static member function, and it is in this function that we can register the window class. Let's have a look at the parts of the class header file that define these static member items (from ROTARY.H):
class CRotaryCtl : public CWnd
{
   ...
   static BOOL Register();
   ...
   static BOOL m_bRegistered;
   ...
};

#ifdef __cplusplus
extern "C" {
#endif
LRESULT CALLBACK RotaryWndProc(HWND hWnd, UINT uiMsg, WPARAM wParam, LPARAM lParam);
#ifdef __cplusplus
}
#endif
As you can see, there is a single static member variable, m_bRegistered, and a single static member function, Register. Also defined is a regular C function, RotaryWndProc, which is the window procedure for the class we will register.
Now let's see the bits of the code in ROTARY.CPP that handle the initialization:
BOOL CRotaryCtl::m_bRegistered = Register();
The first step is to initialize the m_bRegistered variable. The variable itself serves only one purpose: to force the Register function to be called when the application is initialized. So let's see what Register does:
BOOL CRotaryCtl::Register()
{
    // Register the window class of the control.
    WNDCLASS wc;
    wc.style = CS_GLOBALCLASS
             | CS_HREDRAW | CS_VREDRAW;
    wc.lpfnWndProc = RotaryWndProc;
    wc.cbClsExtra = 0;
    wc.cbWndExtra = 0;
    wc.hInstance = NULL;
    wc.hIcon = NULL;
    wc.hCursor = ::LoadCursor(NULL, IDC_ARROW);
    wc.hbrBackground = (HBRUSH)(COLOR_WINDOW+1);
    wc.lpszMenuName = NULL;
    wc.lpszClassName = "Rotary";

    if (!::RegisterClass(&wc)) {
        ASSERT(0);
        return FALSE;
    }
    return TRUE;
}
After so much C++ code and MFC class usage, it's very nostalgic to see this code again! This is the standard procedure for registering a window class. The key points here are the class name, Rotary, and the window procedure that will be used to handle messages sent to windows of this class, RotaryWndProc.
So far, we've managed to register the window class name. (You will recall that this name is the one we put in the Class box shown in Figure 2.) Now let's see what the window procedure does and how we can manage to write the rest of the class implementation in C++:
LRESULT CALLBACK RotaryWndProc(HWND hWnd, UINT uiMsg, WPARAM wParam,
                               LPARAM lParam)
{
    switch (uiMsg) {
    case WM_NCCREATE: {
        // Create a C++ object to handle the messages.
        CRotaryCtl* pCtl = new CRotaryCtl;
        ASSERT(pCtl);
        // Attach the window handle to the new object.
        BOOL b = pCtl->SubclassWindow(hWnd);
        ASSERT(b);
        return b;
        } break;

    default:
        return ::DefWindowProc(hWnd, uiMsg, wParam, lParam);
    }
}
The object of the exercise here is to create a C++ object to handle window messages for the custom control we are creating. To do this, we must first construct a C++ object of the appropriate class and then somehow tell Windows to send all the messages for the control window to the C++ object. The first message sent to any window when it is initially created is WM_NCCREATE.
When the dialog manager is constructing a dialog box from a template we have created using App Studio (or other tool), it calls ::CreateWindow for each control with the class name for the control. Because we registered the class name of our Rotary control and told Windows to send the control's messages to RotaryWndProc, RotaryWndProc will receive the WM_NCCREATE message when the dialog manager is creating a Rotary custom control.
As you can see from the code above, the only message that RotaryWndProc handles is WM_NCCREATE. All other messages are sent to ::DefWindowProc. When RotaryWndProc receives a WM_NCCREATE message, it first creates a new CRotaryCtl object (which is derived from CWnd) and then calls the object's SubclassWindow function, passing the window handle value from the WM_NCCREATE message. The CWnd::SubclassWindow function forces all other messages for the window to be routed through the CRotaryCtl object's message map. So by calling CWnd::SubclassWindow, we have effectively transferred control of the custom control window to an instance of the CRotaryCtl class.
There are only two more things we must do to ensure that the control will function correctly (other than actually implementing its painting and so on). The first is to provide an implementation of the CWnd::GetSuperWndProcAddr function:
WNDPROC* CRotaryCtl::GetSuperWndProcAddr()
{
    // Provide a place for MFC's subclassing
    // mechanism to store the super-class pointer.
    static WNDPROC NEAR pfnSuper = NULL;
    return &pfnSuper;
}
This function is required as a part of the subclassing mechanism and is used to store the class's super window procedure address. Without this, the MFC subclassing code wouldn't be able to pass messages further up the window hierarchy. The final thing to do is to ensure that we tidy up when the class object is destroyed. This is simplest to implement in a handler for the WM_NCDESTROY message, which is the last message any window ever receives. We could do this in RotaryWndProc, but it's simpler to implement in the CRotaryCtl class:
void CRotaryCtl::OnNcDestroy()
{
    CWnd::OnNcDestroy();
    // Make sure the window was destroyed.
    ASSERT(m_hWnd == NULL);
    // Destroy this object because it won't be destroyed otherwise.
    delete this;
}
This function is called after ::DestroyWindow has been called to destroy the control window. The only thing to do is to ensure that the C++ object is deleted by simply calling delete this.
So far all our work has been for the purpose of simply creating a CRotaryCtl object. Now we need to look at how it's drawn, how it responds to the user, and how it notifies its parent of changes. In addition to all of this, you may remember that I decided that all of my custom controls would use a common palette, so we must make provision for that, too. Inasmuch as we can't draw much without some nice colors, let's look at setting the palette first. Remember that we registered a private message to provide the palette pointer. Here's the handler for the DLGPANELMSG_SETPALETTE message:
LRESULT CRotaryCtl::OnSetPalette(WPARAM wParam, LPARAM lParam)
{
    // A message from the parent telling us what palette to use.
    m_pPal = (CPalette*) lParam;
    ASSERT(m_pPal);
    ASSERT(m_pPal->IsKindOf(RUNTIME_CLASS(CPalette)));
    // Rebuild the image.
    CreateImage();
    return 0;
}
All that happens here is that the pointer to the new palette is saved, and the control is rebuilt to reflect any change that altering the palette might cause. So really we're just saving a pointer to the palette. Creating the final image of the control on the screen is a multistage process. In order to aid performance, as much of the control as possible is drawn when the control is first created, or to be a little more precise, it is drawn when the size of the control is first known. Then when we want to draw the control to the screen, we can simply copy the static parts of the control's image and draw the varying part on top. To prevent flicker of the screen image as the control is drawn, we do all the actual drawing to a buffer and then simply copy the final buffer image to the screen.
That might seem like a lot of work, and it would be if we were doing it all for the first time. But as they say in all the best cooking programs on TV: "I've got one here that I prepared earlier." And true to form, I'm going to cheat a little bit here and use some classes I have already developed for my animation work. The entire library of these classes is elsewhere in the Development Library in the ANIMATE project. Several of my other articles use this library, and I update it with each CD. The library includes a Help file that describes each class and its functions. For a more in-depth discussion of the classes, please see my book Animation Techniques for Win32: A C++ Programmer's Guide to DIBs, Palettes, and Sprites.
OK, so back to the plot. Because this control is not rectangular (what real control is?), we will need to grab the image of the background window behind the control, so we can put it back around the control when the control is drawn. Figure 3 shows the order in which all the bits of the control are rendered to update the screen image.
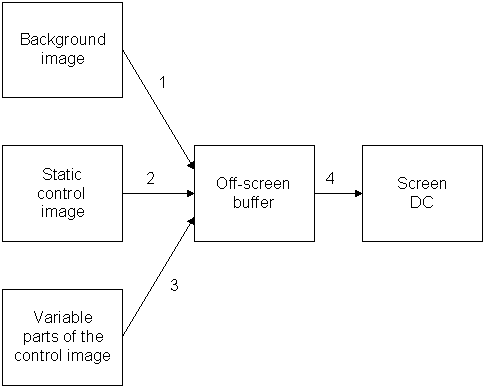
Figure 3. The steps used to render a change in the control image
Much of the drawing of the control is done with simple GDI operations. Let's take a look at these operations step by step.
Because the control is not rectangular, we need to grab the image of the window behind the control, so we can draw back the bits not obscured by the control itself. There is no general solution to do this, but for these types of controls, it's easiest to grab the background image the first time the control is drawn. When the control first gets a WM_PAINT message, only the background will have been drawn, and the control won't yet (rather obviously). So we can add a little code to the OnPaint function to grab the background image the first time around:
void CRotaryCtl::OnPaint()
{
    ...
    // See if we have grabbed the background image yet.
    if (!m_bGotBackground) {
        // Nope, so do it now.
        CDC* pdcBackground = m_dsBackground.GetDC();
        CDC* pdcParent = GetParent()->GetDC();
        CRect rc;
        GetClientRect(&rc);
        // Find the top-left corner coords in the parent window DC.
        CPoint pt(rc.left, rc.top);
        ClientToScreen(&pt); // Convert our coords to screen coords.
        GetParent()->ScreenToClient(&pt); // Convert to parent's coords.
        pdcBackground->BitBlt(0, 0,
                              rc.right - rc.left, rc.bottom - rc.top,
                              pdcParent,
                              pt.x, pt.y,
                              SRCCOPY);
        m_bGotBackground = TRUE;
        // Flush the GDI operations queue before we do the next bit.
        ::GdiFlush();

        // Now render the entire image to the buffer.
        Render();
    }
    ...
}
The background image is held in a CDIBSurface object, which is a C++ object encapsulating a Windows device-independent bitmap (DIB) structure. A CDIBSurface object has its own optimized BitBlt function that makes use of either CreateDIBSection in Windows NT™ version 3.5 or Windows 95, or uses the WinG library in Win32s™. Please see the ANIMATE library for more details of CDIBSection. Note the code that translates the coordinates of the control window to those of the parent window.
Important Note, too, the call to GdiFlush. Because the CDIBSurface object allows both GDI calls (via its DC) and direct pixel access, we must be sure to flush the GDI queue after GDI operations that precede direct pixel access operations. Some of CDIBSurface's member functions do direct pixel access, so as a rule, if you do a bunch of GDI operations, call GdiFlush right after them.
Inasmuch as we don't want to needlessly render the parts of the control that never change, we do all the one-time rendering to a static image buffer. We do this when the control changes size. Here's the CreateImage function, which draws the static image:
void CRotaryCtl::CreateImage()
{
    // Start by filling the whole area with the transparency color.
    // We use a system color that isn't used elsewhere in the control.
    CDC* pDC = m_dsImage.GetDC();
    CPalette* ppalOld = NULL;
    CBrush br;
    if (m_pPal) {
        pDC->SelectPalette(m_pPal, FALSE);
        pDC->RealizePalette();
        br.CreateSolidBrush(PALETTEINDEX(m_pPal->GetNearestPaletteIndex(TRANS_COLOR)));
    } else {
        br.CreateSolidBrush(TRANS_COLOR);
    }
    CRect rc(0, 0, m_iWidth, m_iHeight);
    pDC->FillRect(&rc, &br);

    // Compute the center and outer radius of the tick marks.
    m_ptCenter.x = m_iWidth / 2;
    m_ptCenter.y = m_iHeight / 2;
    m_iRadius = min(m_ptCenter.x, m_ptCenter.y) + 1;
    // Make radius an odd number.
    if (m_iRadius & 1 == 0) m_iRadius--;
    // cos(pi/4) = sin (pi/4) = 0.7071 = 7071/10000
    int iOffset = m_iRadius * 7071 / 10000;
    pDC->MoveTo(m_ptCenter);
    pDC->LineTo(m_ptCenter.x + iOffset, m_ptCenter.y + iOffset);
    pDC->MoveTo(m_ptCenter);
    pDC->LineTo(m_ptCenter.x + m_iRadius, m_ptCenter.y);
    pDC->MoveTo(m_ptCenter);
    pDC->LineTo(m_ptCenter.x + iOffset, m_ptCenter.y - iOffset);
    pDC->MoveTo(m_ptCenter);
    pDC->LineTo(m_ptCenter.x, m_ptCenter.y - m_iRadius);
    pDC->MoveTo(m_ptCenter);
    pDC->LineTo(m_ptCenter.x - iOffset, m_ptCenter.y - iOffset);
    pDC->MoveTo(m_ptCenter);
    pDC->LineTo(m_ptCenter.x - m_iRadius, m_ptCenter.y);
    pDC->MoveTo(m_ptCenter);
    pDC->LineTo(m_ptCenter.x - iOffset, m_ptCenter.y + iOffset);

    // Draw the knob skirt. Make the pen the transparency color, so we
    // get a slight gap between the skirt and the tick marks.
    int iSkirtRad = m_iRadius * 8 / 10;
    CBrush brBody;
    brBody.CreateSolidBrush(PALETTERGB(102,102,102));
    CPen penTrans(PS_SOLID, 1, TRANS_COLOR);
    CPen* ppenOld = pDC->SelectObject(&penTrans);
    CBrush* pbrOld = pDC->SelectObject(&brBody);
    pDC->Ellipse(m_ptCenter.x - iSkirtRad, m_ptCenter.y - iSkirtRad,
                 m_ptCenter.x + iSkirtRad + 1, m_ptCenter.y + iSkirtRad + 1);

    // Draw the center.
    CPen penTop(PS_SOLID, 1, PALETTERGB(51,51,51));
    CBrush brTop;
    brTop.CreateSolidBrush(PALETTERGB(165,165,165));
    pDC->SelectObject(&penTop);
    pDC->SelectObject(&brTop);
    int iTopRad = m_iRadius / 2;
    pDC->Ellipse(m_ptCenter.x - iTopRad, m_ptCenter.y - iTopRad,
                 m_ptCenter.x + iTopRad + 1, m_ptCenter.y + iTopRad + 1);


    // Tidy up.
    pDC->SelectObject(ppenOld);
    pDC->SelectObject(pbrOld);
    if (ppalOld) pDC->SelectPalette(ppalOld, FALSE);
}
Rather a lot of code, but a quick glance shows it's mostly lines and circles in various colors. Note that the image is held in another CDIBSurface object.
Each time the control's position changes, it needs to be redrawn using the steps shown in Figure 3. The Render function does the work:
void CRotaryCtl::Render()
{
    // Render the image of the control to the buffer.
    // Start by blting the the background image to the buffer.
    CDC* pDC = m_dsBuffer.GetDC();
    // Don't use CDIB::Draw here as DC operation caching by GDI
    // will mean this op would get done after the next one, which
    // does direct pixel manipulation.
    m_dsBackground.CopyBits(&m_dsBuffer,
                            0, 0,
                            m_dsBackground.GetWidth(),
    m_dsBackground.GetHeight(),
                            0, 0);

    // Now transparently blt the image to the buffer.
    BYTE* p = (BYTE*) m_dsImage.GetPixelAddress(0, 0);
    COLORREF clr = PALETTEINDEX(*p);
    m_dsImage.CopyBits(&m_dsBuffer,
                       0, 0,
                       m_dsImage.GetWidth(), m_dsImage.GetHeight(),
                       0, 0,
                       clr);

    // Now draw the pointer dot at the correct position.
    ASSERT(m_iMax > m_iMin);
    ASSERT((m_iPos >= m_iMin) && (m_iPos <= m_iMax));
    double a = -PI/4 + 3*PI/2 * (m_iMax - m_iPos)/(m_iMax - m_iMin);
    int iRad = m_iRadius * 65/100;
    int x = m_ptCenter.x + (int)(iRad * cos(a));
    int y = m_ptCenter.y - (int)(iRad * sin(a));
    CBrush br;
    br.CreateSolidBrush(PALETTERGB(255,255,255));
    CBrush* pbrOld = pDC->SelectObject(&br);
    CPen pen;
    pen.CreateStockObject(NULL_PEN);
    CPen* ppenOld = pDC->SelectObject(&pen);
    int iInc = max(2, m_iRadius * 1/10);
    pDC->Ellipse(x-iInc, y-iInc, x+iInc+1, y+iInc+1);
    pDC->SelectObject(pbrOld);
    pDC->SelectObject(ppenOld);
}
The main thing to note here is the use of CDIBSurface::CopyBits, which uses direct pixel access to the DIB image to copy only the nontransparent areas from the source to the destination.
Most of my controls only respond to mouse input, which is much simpler than using both keyboard and mouse input. However, should you require both, it's easy to add the extra code to what I've done here for mouse input.
Generally, my user-input handling is all done by using ClassWizard to add handlers for left-mouse-button down and up events and for mouse-move events. Left button down generally causes the mouse to be captured and starts the user interface process:
void CRotaryCtl::OnLButtonDown(UINT nFlags, CPoint point)
{
    ASSERT(!m_bCaptured);
    SetCapture();
    m_bCaptured = TRUE;
    OnMouseMove(nFlags, point);
}
Because we generally want some feedback as soon as the mouse button is clicked, I simply call the move event function directly as a part of handling the button-down event. So most of the work is in the function that handles mouse movement:
void CRotaryCtl::OnMouseMove(UINT nFlags, CPoint point)
{
    if (m_bCaptured) {
        // Calculate the new value from the mouse position.
        int x = point.x - m_ptCenter.x;
        int y = m_ptCenter.y - point.y; // make up +ve
        if ((x == 0) && (y == 0)) {
            x = 1;
        }
        double a = atan2(y, x); // -PI <= a <= PI
        if (a < -PI/2) {
            a += 2*PI;
        }
        // -PI/2 <= a <= 3PI/2

        // Correct points beyond min and max.
        if (a >= 5*PI/4) {
            m_iPos = m_iMin;
        } else if (a < -PI/4) {
            m_iPos = m_iMax;
        } else {
            m_iPos = m_iMax - (int)((a+PI/4)/(3*PI/2) * (m_iMax - m_iMin));
        }
        ASSERT((m_iPos >= m_iMin) && (m_iPos <= m_iMax));

        // Redraw the control.
        Render();
        RedrawWindow();

        // Notify parent.
        GetParent()->SendMessage(WM_HSCROLL,
                                 MAKEWPARAM(SB_THUMBTRACK, m_iPos),
                                 (LPARAM)GetSafeHwnd());
    }
}
Most of the code here is concerned with calculating where the mouse is and what angle of rotation that maps to for the control—in other words, math. Once the new position has been calculated, the control is redrawn in the new position, and the parent window is notified of the change. I have chosen to use the SB_THUMBTRACK scroll-bar notification message because this most closely corresponds to what the control does and makes it easy to use ClassWizard to add a suitable handler in the parent window.
When the mouse is released, we need to complete the operation:
void CRotaryCtl::OnLButtonUp(UINT nFlags, CPoint point)
{
    if (m_bCaptured) {
        ReleaseCapture();
        m_bCaptured = FALSE;

        // Notify parent.
        GetParent()->SendMessage(WM_HSCROLL,
                                 MAKEWPARAM(SB_THUMBPOSITION, m_iPos),
                                 (LPARAM)GetSafeHwnd());
    }
}
The mouse is released, and the parent window notified of the final position of the control. There is no need to redraw the control—its position will be whatever it was when the last WM_MOUSEMOVE message was processed.
Figure 1 also shows an up-down control used to change the scale values of the oscilloscope. This control consists of two buttons and a window area that shows the current control value. The control was implemented to work somewhat like a combo box (which it replaced) but with slightly different control functions. I have included the control here because it shows how you can create a custom control that is itself built from other controls. The source code for this control is in UPDNCTL.H and UPDNCTL.CPP.
The control is built from two standard Windows buttons and an area that the control draws itself. When the control is first created, the buttons must be created as child windows of the control:
int CUpDnCtl::OnCreate(LPCREATESTRUCT lpCreateStruct)
{
    if (CWnd::OnCreate(lpCreateStruct) == -1)
        return -1;

    // Create the two buttons.
    m_btnUp.Create("Up",
                   WS_CHILD|WS_VISIBLE,
                   CRect(0,0,0,0),
                   this,
                   IDC_UP);
    m_btnDn.Create("Dn",
                   WS_CHILD|WS_VISIBLE,
                   CRect(0,0,0,0),
                   this,
                   IDC_DN);

    return 0;
}
Note that you could just as easily use other custom controls here instead of these rather boring buttons.
When the control is resized (or sized for the first time after creation), we need to set the size and position of all the child windows:
void CUpDnCtl::OnSize(UINT nType, int cx, int cy)
{
    CWnd::OnSize(nType, cx, cy);
    if ((cx < 10) || (cy < 10)) return;

    // Resize the screen buffer to occupy the client area.
    m_dsPanel.Create(cx, cy, m_pPal);

    // Save the size.
    m_iWidth = cx;
    m_iHeight = cy;

    // Move the buttons.
    int w = cx/2;
    int h = cy - cy/2;
    m_btnUp.MoveWindow(0, cy/2, w, h);
    m_btnDn.MoveWindow(w, cy/2, cx-w, h);
    // Redraw the lot.
    Render();
    Invalidate();
}
We are using a CDIBSurface object for the drawing area, and it needs to have its buffer reset to the size of the drawing area. The buttons need to be placed in the correct part of the parent window, too. Once everything is in place, the image of the control can be rendered, and then the whole window can be redrawn to show the control in its full glory. Here's the image rendering code:
void CUpDnCtl::Render()
{
    // Render the panel image.
    CRect rc;
    m_dsPanel.GetRect(&rc);
    rc.bottom = rc.bottom/2;
    CDC* pDC = m_dsPanel.GetDC();

    // Put black rectangle around the outside, and fill the middle
    // with gray.
    CBrush brSurface;
    brSurface.CreateSolidBrush(PALETTERGB(192,192,192));
    CBrush* pbrOld = pDC->SelectObject(&brSurface);
    pDC->Rectangle(&rc);

    // Draw the highlights.
    CPen penShadow(PS_SOLID, 1, PALETTERGB(128,128,128));
    CPen* ppenOld = pDC->SelectObject(&penShadow);
    pDC->MoveTo(rc.left+1, rc.bottom-2);
    pDC->LineTo(rc.left+1, rc.top+1);
    pDC->LineTo(rc.right-1, rc.top+1);
    CPen penHighlight(PS_SOLID, 1, PALETTERGB(255,255,255));
    pDC->SelectObject(&penHighlight);
    pDC->MoveTo(rc.left+2, rc.bottom-2);
    pDC->LineTo(rc.right-2, rc.bottom-2);
    pDC->LineTo(rc.right-2, rc.top+1);

    // Now draw the text in the middle.
    rc.InflateRect(-3, -2);
    pDC->SetBkMode(TRANSPARENT);
    CFont* pfntOld = pDC->SelectObject(&m_font);
    pDC->DrawText(m_strCaption, -1, &rc, DT_LEFT|DT_VCENTER);

    // Tidy up.
    pDC->SelectObject(pfntOld);
    pDC->SelectObject(pbrOld);
    pDC->SelectObject(ppenOld);
}
Boy, don't you just love all that friendly GDI stuff? Seems like a lot of code for a few highlights and some text, but that's life in GDI-land.
Drawing the entire control image in response to a WM_PAINT message is trivial:
void CUpDnCtl::OnPaint()
{
    CPaintDC dc(this); // Device context for painting
    // Copy the panel image to the screen DC.
    m_dsPanel.Draw(&dc);
}
The CDIBSurface object's Draw function handles the chore of drawing the text part of the image. The buttons draw themselves, of course.
The user clicks the buttons to get the selection to change. The selection options are held in a text string with individual items separated by "|" characters. The string is set by calling the control's SetWindowText function. Button clicks are routed to the objects handlers through the message map generated by ClassWizard in the usual way. Here are the Up and Down button-click handlers:
void CUpDnCtl::OnUpClicked()
{
    if (m_iCurSel == 0) return;
    SetCurSel(m_iCurSel - 1);
}

void CUpDnCtl::OnDnClicked()
{
    SetCurSel(m_iCurSel + 1);
}
The SetCurSel function does the work of actually changing the displayed selection:
void CUpDnCtl::SetCurSel(int iSel)
{
    ASSERT(iSel >= 0);

    const char* pSet = (const char*) m_strTextSet;
    ASSERT(pSet);
    int i = iSel;
    while (i--) {
        // Move on to the next section.
        while (*pSet != '|') {
            pSet++;
            if (*pSet == '\0') return; // ran out of string
        }
        pSet++;
    }

    // Set the caption to where we are now.
    m_strCaption = "";
    while (*pSet && (*pSet != '|')) {
        m_strCaption += *pSet++;
    }
    m_iCurSel = iSel;
    Render();
    RedrawWindow();

    // Notify parent of the change.
    GetParent()->SendMessage(WM_COMMAND,
                             MAKEWPARAM(GetDlgCtrlID(), CBN_EDITCHANGE),
                             LPARAM(m_hWnd));

}
Rather a lot of ugly string-parsing code (BASIC for C programmers) followed by redrawing the window to show the change and notifying the parent window. I chose to send the parent a CBN_EDITCHANGE notification message because this control is a bit like a combo box.
As a finishing touch, I thought I'd pass on a few other tips that relate to using the dialog box panels and custom controls.
Watch out for CWnd::GetDlgItem, which returns a temporary CWnd object pointer, so don't store it for use later; you must get it every time you want it. Because you often want to get a pointer to a control object, you might want to add some helper functions to CDlgPanelFrame, like the GetDlgItem(UINT uiCtlID); function. This saves you from having to use m_wndPanel.GetDlgITem(id); in your frame code.
Remember that CDlgPanel sends all WM_COMMAND and WM_DRAWITEM messages to its parent. Use ClassWizard to add a handler for the WM_DRAWITEM message to the frame window. To do this, you must change the Class Info message filter type for CScopeFrame from MDI Child Frame to Window in order to see the WM_DRAWITEM message. Change Class Info back to MDI Child Frame when you're done.
Adding the handler for the BN_CLICKED notification messages is done in ClassWizard, but you must go to App Studio first and open the dialog template and then run ClassWizard. ClassWizard asks for the name of the dialog class to create. Click the Select button, and select CScopeFrame (for example). The CScopeFrame class can then see the dialog items.
More information on handling user-defined messages, such as the one I used to send palette information to the control windows, can be found in the "User Defined Windows Messages" section of "Technical Note 6: Message Maps" (MSDN Library Archive, Technical Articles, Visual C++ 1.5 (32-bit), MFC 2.5 Technical Notes).
In creating the Up-Down control, I noticed that you can't use ClassWizard to add a handler for WM_SETTEXT or WM_GETTEXT messages, and CWnd::GetWindowText and CWnd::SetWindowText are not documented as virtual. So we do this one ourselves.