Robert Coleridge
Microsoft Developer Network Technology Group
December 1997
Updated: February 2, 1998
Click to view or copy the samples for this technical article.
This article will discuss the administration application of the HelpDesk sample. The HelpDesk Explorer (HDExplr) was created using Microsoft® Visual Basic® version 5.0 (with Service Pack 2) and requires the HelpDesk components: HDAdmin.dll, HDClient.dll, HDServer.dll, and DBExec.dll. HDExplr was written to follow standard n-tier design and methodologies.
For our purposes, a HelpDesk administrator is one or more people within a business, business unit, or institution who have the responsibility and authority to make decisions that affect the performance and operation of the HelpDesk; specifically, the HelpDesk administrator maintains the various tables and domains within the HelpDesk database.
Each technician has certain properties, such as location and skill, that help determine how HelpDesk assigns requests to a particular technician's queue. The administrator can change these properties dynamically with HDExplr. These changes are effective immediately and affect what requests a technician receives the next time unclaimed requests are reassigned. (For more information on how requests are assigned and reassigned, see Steve Kirk's "Task Distribution in a Customer Service System.")
A domain is a lookup table within the database. These tables change infrequently and are generally used to populate the various client interfaces of the HelpDesk sample. For example, a table containing a set of predefined locations, priorities, or skills would be a domain. Although these tables can be deleted from, they are usually appended to. (For an explanation on how to delete from a domain, see the Appendix of the MSDN Online version of this article.)
This area covers the more esoteric functions of a HelpDesk administrator. With HDExplr, the administrator can:
Secure access to the HelpDesk database is maintained via the Microsoft SQL Enterprise Manager. We have taken a minimalist approach in that only users entered in the SQL logon database are considered administrators and are allowed to use HDExplr. For access to the user clients and the technician clients, we are simply using the standard Microsoft Windows NT® authentication security.
Although this area is critical to the security of the HelpDesk data, the actual maintenance of the security privileges is beyond the scope of this article. For further reading, see "Managing Security" in the Database and Messaging Services section of the Platform SDK documentation.
The HelpDesk Explorer (HDExplr) allows an administrator to modify the HelpDesk tables and change any system parameters. The following is a discussion of the functionality of HDExplr and the new HDAdmin.dll COM component that works with it.
The HDAdmin component's methods and properties could have been added to the HDClient component, which services all the HelpDesk client applications, but it would have increased the size of the component without a proportionate increase in functionality for the end user. So, in order to keep HDClient as thin as possible, HDAdmin was created separately.
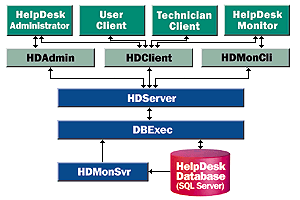
HDAdmin does not supercede HDClient, however. The two components work side by side. In fact, HDExplr uses the HDClient component more than the HDAdmin component. The HDAdmin component supplies the administrator specific functionality. Figure 1 diagrams where HDAdmin fits in with the existing HelpDesk object model.

Figure 1. HelpDesk object model
HDAdmin.dll has objects that provide access to the administrative tables and data. Table 1 lists three of these new objects.
Table 1. HDAdmin Objects
| Name | Type | Description |
| CAdmin | object | Administrator/controller for the entire DLL |
| CSysParm | data object | Encapsulates creation and manipulation of the SysParm table |
| CSysParmType | data object | Encapsulates creation and manipulation of the SysParmType domain |
And the methods in Table 2 can be found in the CAdmin object.
Table 2. CAdmin Object Methods
| Name | Type | Description |
| GetSysParms | Method | Returns a collection of CSysParm records |
| GetSysParmTypes | Method | Returns a collection of SysParmType records |
| Init | Method | Used to initialize the HDAdmin.dll |
| Refresh | Method | Used to force a refresh of the internal collections and tables |
| Term | Method | Used to release the resources acquired by HDAdmin.dll prior to termination |
HDExplr is designed in a Windows Explorer style. The skeleton of HDExplr is created through the Visual Basic VB Application Wizard:
Although the VB Application Wizard generated most of the presentation code for the HDExplr, the code to populate the main screen and respond to user requests must still be added.
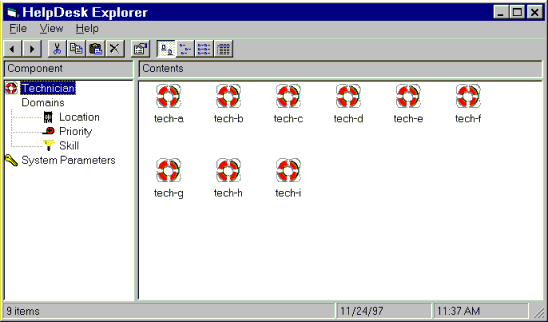
The main screen is divided into two panes. In the left pane is a tree view that will contain the various components of the HelpDesk, for example, technicians, domains, and system parameters. The right pane will provide a display of the records or contents of that component, for example, all the Location records, or all the system setup parameters. For clarity, let's call the left pane the Component pane, and the right pane the Contents pane.
Figure 2 gives an example of what the display would look like if the Technicians component were selected. The Contents pane displays the Technician records so that they can be examined or modified.

Figure 2. HDExplr panes
Let us examine how each pane is populated with data.
By examining the following code, you can see that populating the Components pane is straightforward. Simply populate an ImageList control with bitmaps from the resource data for the various images that are needed. Then add entries to the tree, specifying the node name, its relationship within the tree, and other relevant data. Note that in order to maintain a localizable application, heavy use was made of LoadResString to load data from the resource data segment of the application.
. . .
' Set the Treeview control properties.
tv_ComponentTree.LineStyle = tvwRootLines  ' Linestyle 1

'Initialize vars and values from the resource file.
m_tvPathSep = tv_ComponentTree.PathSeparator
m_Node_Domains = LoadResString(icIDS_KWTV_DOMAINS)
m_Node_Technician = LoadResString(icIDS_KWTV_TECHNICIAN)
m_Node_location = LoadResString(icIDS_KWTV_LOCATIONS)
. . .
m_Node_DomainLocations = m_Node_Domains & m_tvPathSep & m_Node_location
m_Node_DomainPriorities = m_Node_Domains & m_tvPathSep & m_Node_Priority
m_Node_DomainSkills = m_Node_Domains & m_tvPathSep & m_Node_Skill

'Build the image list of small icons.
imlIcons.ListImages.Add , "Technician", LoadPicture("Technician.bmp")
imlIcons.ListImages.Add , "Location", LoadPicture("Location.bmp")
. . .
tv_ComponentTree.ImageList = imlIcons
lv_ContentsList.SmallIcons = imlIcons

'Build the image list of icons.
imlIcons.ListImages.Add _
        Key:=m_Node_Technician, _
        Picture:=LoadResPicture(icIDB_TECHNICIAN, vbResBitmap)
imlIcons.ListImages.Add _
        Key:=m_Node_location, _
        Picture:=LoadResPicture(icIDB_LOCATION, vbResBitmap)
imlIcons.ListImages.Add _
        Key:=m_Node_Priority, _
        Picture:=LoadResPicture(icIDB_PRIORITY, vbResBitmap)
. . .
imlBigIcons.ListImages.Add _
        Key:=m_Node_Priority, _
        Picture:=LoadResPicture(icIDB_PRIORITY, vbResBitmap)

'Attach the icons to visual components.
tv_ComponentTree.ImageList = imlIcons
lv_ContentsList.SmallIcons = imlIcons
lv_ContentsList.Icons = imlBigIcons

'Add Node objects.
sNodeKey = m_Node_Technician
tv_ComponentTree.Nodes.Add _
    Key:=sNodeKey, _
    Text:=m_Node_Technician, _
    Image:=m_Node_Technician

sNodeKey = m_Node_Domains
tv_ComponentTree.Nodes.Add _
    Key:=sNodeKey, _
    Text:=m_Node_Domains
tv_ComponentTree.Nodes.Add _
    relative:=sNodeKey, _
    relationship:=tvwChild, _
    Key:=sNodeKey & m_Node_location, _
    Text:=m_Node_location, _
    Image:=m_Node_location
. . .
The code to populate the Contents pane is almost as straightforward. For the sake of brevity, I will only show how the technician information is filled into the ListView control.
Examining the following code you can see how easy it is to populate the Contents pane. For a report view, simply add the initial column and all subsequent sub-items for that row. For a nonreport view, simply add the text and the icon for the record. Repeat this for each record in the collection.
Dim oItem As ListItem
Dim oDomainTechnician As CTech
Dim oLocation As CLocation
Dim oSkill As CSkill
Dim oDomainTechnicians As Collection

'Get the collection of technicians.
Set oDomainTechnicians = m_oTechAdmin.GetTechnicians

'Process each technician.
For Each oDomainTechnician In oDomainTechnicians
   If lv_ContentsList.View = lvwReport Then
      sMisc = oDomainTechnician.Alias
      Set oItem = lv_ContentsList.ListItems.Add( _
                     Key:=sMisc, _
                     Text:=sMisc, _
                     Icon:=m_Node_Technician, _
                     SmallIcon:=m_Node_Technician)
      Set oLocation = oTechAdmin.GetLocations.Item( _
                                    oSysAdmin.FmtPKId(oDomainTechnician.LocationId))
      oItem.SubItems(1) = oLocation.Desc
      Set oSkill = oTechAdmin.GetSkills.Item( _
      oSysAdmin.FmtPKId(oDomainTechnician.SkillId))
      oItem.SubItems(2) = oSkill.Desc
   Else
      lv_ContentsList.ListItems.Add _
         Key:=oDomainTechnician.Alias, _
         Text:=oDomainTechnician.Alias, _
         Icon:=m_Node_Technician, _
         SmallIcon:=m_Node_Technician
   End If
Next oDomainTechnician

Set oDomainTechnicians = Nothing
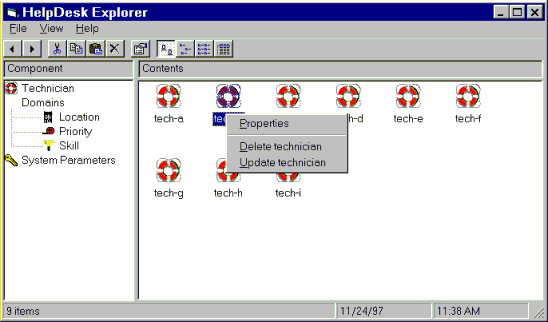
Once a component has been selected, its contents are displayed and can be manipulated. Each item in the Contents pane responds to a right mouse click that displays a relevant menu. For example, if the Technician component is selected, then right-clicking an item in the Contents pane will display a pop-up menu for changing the properties of that technician (Figure 3). Right-clicking in the Contents pane without any item selected displays a menu for adding to the selected Component.

Figure 3. The pop-up menu for items in the Contents pane
Responding to the right mouse click takes a bit more work than populating the Contents pane.
In order to display a right-click pop-up menu, the program needs to have a menu predefined. In the HDExplr application, I created a form called frmContext that only has a menu control on it. Each pop-up menu is given a unique name and it is this name that is used to differentiate the menus to be displayed on a right-click. The following code shows how to bring up a pop-up menu called mnu_lv_technician when the user right-clicks the Contents pane:
Private Sub lv_ContentsList_MouseUp(Button As Integer, Shift As Integer, X As Single, Y As Single)
. . .
'Set form context variable to nothing selected
frmContext.Selected_Context = CM_NOTHING_SELECTED

'Bring up the appropriate submenu.
Select Case tv_ComponentTree.SelectedItem.FullPath
   . . .
   Case TV_TECHNICIANS_NODE
      PopupMenu frmContext. mnu_lv_Technician
   . . .
End Select
. . .
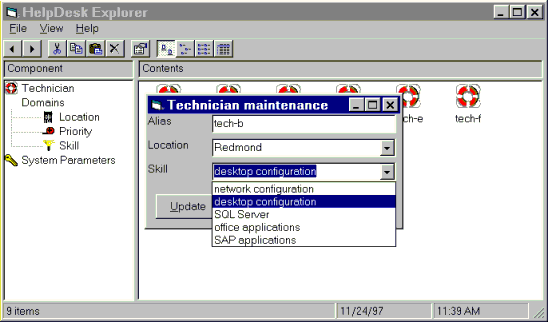
Once a menu selection is made, the relevant dialog box, showing existing properties, options, and so on, is displayed (Figure 4).

Figure 4. Clicking a command from a pop-up menu displays a modal dialog box
The following code displays a modal dialog box in response to a selection from the pop-up menu (the featured section displays the dialog box for updating the technician data):
'Respond to the user selection.
Select Case frmContext.Selected_Context
   'If adding a technician . . .
   Case CM_TECHNICIAN_ADD
      '. . . set empty parameters to force addition and show the form.
      frmTechMaint.SetParameters "", -1, -1, DM_ADD
      frmTechMaint.Show vbModal, Me

   'If modifying a technician . . .
   Case CM_TECHNICIAN_UPDATE
      '. . . get the selected technician object . . .
      Set oTech = m_oTechAdmin.GetTechByAlias(m_ItemClicked.Key)

      '. . . and set existing parameters to modify and show the form.
      frmTechMaint.SetParameters oTech.Alias, oTech.SkillId,
                                 oTech.LocationId, DM_UPDATE
      Set oTech = Nothing
      frmTechMaint.Show vbModal, Me
. . .
End Select
. . .
End Sub
Table 3 lists the various files, and their descriptions, for the HDExplr project.
Table 3. The Files for the HDExplr Project
| Name | Type | Description |
| frmAbout, frmSplsh, frmOpt, frmBrows | Form | Contains the code and form for the specific dialog |
| frmCntxt | Form | Contains the code and form for the various context menus used in the explorer panes of the main screen |
| frmDmMnt, frmSysPp, frmTchMnt | Form | Contains the code and form for the specific domain maintenance dialog |
| frmMain | Form | Contains the code and form for the explorer interface. This is the main form of the application. |
| basMain | Module | Contains the initialization code and the Sub Main for the project |
| res_h.bas | Module | Contains the constants that correspond to the IDs in the compiled .rc file (HDExplr.res) |
| HDExplr.res | Resource compiled file | Compiled resources |
| HDExplr.rc | Resource plaintext file | Contains the plaintext descriptions of the resources |
| Resource.h | Header file for HDExplr.rc | Contains constants for .rc file |
| MkHDxRes.* | Project | Microsoft Visual C++® project to be used to generate .res file from .rc file |
As you can see from the article, the HelpDesk Explorer administration application can be used in various ways to manage and optimize the HelpDesk sample. I hope that you examine the sample code and see how easy it is to extend the HDExplr for your own additions to the HelpDesk sample, and also find it a useful example of how to write a Explorer-type application.
Once a domain entry is added to the table, it is unlikely that the information would ever change. As such, HDExplr allows additions or modifications to the domain tables but not deletions. This is not to say that deletions can not be made, but the HelpDesk sample was designed with the assumption that "once entered, always entered." This philosophy extends to all of the data, including requests, and their related detail records, which are never deleted, but merely archived to history tables.
However, if a domain is accidentally deleted, or a domain entry must be deleted, the appendix at the end of this article explains the steps required either to restore the domain, or to adjust the other tables to reflect the domain entry adjustment.
When the HelpDesk sample was designed choices had to be made between storing the actual lookup keys in the request records and so on, or storing just the Primary Key Id (PKId) for a relevant record. While storing the lookup keys would have made the reverse engineering of a domain feasible should the domain be deleted, it is not localizable.
Storing the PKIds in the records made for a much more localizable application. The disadvantage of this was that the domain lookups via the PKId were now dependent on record sequencing, thus reconstructing a domain must be reproduced in the exact original record sequence.
How is this restoration accomplished? By restoring from the backup data set. (You are backing up your data, right?)
In order to delete an entry once it has been used in a request would involve the following steps.