Nigel Thompson
Microsoft Developer Network Technology Group
March 7, 1995
Click to open or copy the files in the Interp sample application for this technical article.
This article describes how a 256-color palettized image can be stretched by a fixed integral factor with excellent performance. The Interp sample application, which accompanies this article, demonstrates stretching by factors of 2, 4, and 8.
Many Video for Windows applications are designed with images that are much smaller than common display resolutions. The images are deliberately kept small by two factors: the target machine blt performance and the data transfer rate of image data from its storage medium.
Because some target machines have much better blt performance than others, but still share a limited data transfer rate (typically from CD-ROM), some attempt is often made to stretch the image at run time to better fit the display. Using a simple call to StretchBlt (or WinGStretchBlt) results in large blocky images as the individual pixels of the source image are magnified.
A better solution would be to expand the source image to the destination image, interpolating between the source image pixels in order to provide a smoother-looking destination image. This technique is simple to do on 16-, 24-, or 32-bit-per-pixel (bpp) images, but is difficult to do for a 256-color, 8-bpp palettized image, because for each new interpolated pixel value, a search must be done to find the nearest color in the image's palette. Searching for matching colors in a palette is extremely slow.
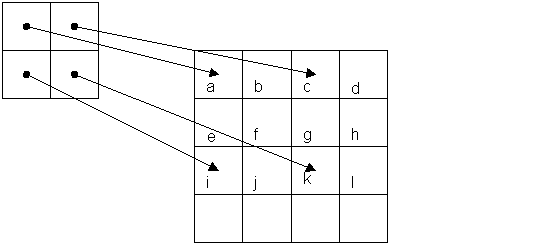
Let's consider stretching an image by a factor of 2. Figure 1 shows how the pixels from a 2 x 2 source image would be stretched to a 4 x 4 destination image.
Figure 1. Stretching a 2 x 2 image by a factor of 2
The pixels from the source image are copied sparsely to the destination (cells a, c, I and k). The remainder of the destination cells need to be constructed in some way. The simplest and fastest way to construct the missing destination cells is simply to replicate the source cells. So cell b in the destination is a copy of cell a. Cell d is a copy of cell c, and the row e through h is simply a copy of the row a through d. This simple method results in the "big pixel" rendition we are used to when we call StretchBlt in Windows®.
A better solution is to fill in the missing pixels in the destination with colors interpolated from its nearest neighbors. There are many possible algorithms for doing this, but what we are after here is speed, so I chose to simply create the new pixel based on the colors of two of its neighbors. Referring again to Figure 1, pixel b is generated by averaging the colors of pixels a and c. Pixel j is the average of pixels I and k. Pixel e is the average of pixels a and I. Because pixel d has no neighbor on the right side, it is simply a copy of pixel c. Pixel h is constructed as the average of pixels d and l. OK, so you see the idea. We sparsely copy the source lines to the destination. We walk over those lines, filling in the gaps. We then walk the destination lines, filling in the lines that are missing by averaging them from the lines above and below. The last line of the destination is simply a copy of the line above it.
So how do we average the colors of two pixels? The simplest (but probably not the best) way is to take the red, green, and blue values of the two pixels and average them. Then find a new color as close as possible in the image's palette that matches the new RGB value. Looking up palette index values with GetNearestPaletteIndex is extremely slow, so we build a lookup table of 256 x 256, which contains the results of looking up every possible pair of colors in the image. Finding the average is simply a matter of looking up the correct index value in the table.
Note that the table contains some redundancy since the average of index values 1 and 2 is the same as the average of index values 2 and 1.
The Interp sample application was built using Visual C++™ version 2.0 to be a simple multiple-document-interface (MDI) application. When an image file is opened, two things happen. First, a new lookup table is created from the image's palette. Second, a series of images stretched from the source image are draw to the screen. The image is stretched 2, 4, and 8 times into the output window. Menu items allow you to select regular StretchBlt-type stretching or interpolated stretching.
Let's look at the code that creates the interpolation table from the image's palette:
// Build a new interpolation map.
    PALETTEENTRY pe[256];
    int r1, g1, b1, r2, g2, b2;
    BYTE pixel;
    pDoc->m_pal.GetPaletteEntries(0, 256, pe);
    for (int i = 0; i < 256; i++) {
        r1 = pe[i].peRed;
        g1 = pe[i].peGreen;
        b1 = pe[i].peBlue;
        for (int j = i; j < 256; j++) {
            if (i == j) {
                m_Imap2[i][j] = i;
            } else {
                r2 = pe[j].peRed;
                g2 = pe[j].peGreen;
                b2 = pe[j].peBlue;
                pixel = pDoc->m_pal.GetNearestPaletteIndex(RGB((r1+r2)/2,
                                                                   (g1+g2)/2,
                                                                   (b1+b2)/2));
                m_Imap2[i][j] = pixel;
                m_Imap2[j][i] = pixel;
            }
        }
    }
Note that the redundant parts of the table are simply copied to save time.
To stretch an image with interpolation, this routine is used:
void CInterpView::Interp2(int xd, int yd, int wd, int hd, int xs, int ys)
{
    // Copy source to dest, stretching by 2.
    int ws = wd / 2;
    int hs = wd / 2;

    BITMAPINFO* pBMI = m_dsBuffer.GetBitmapInfoAddress();
    ASSERT(pBMI);
    ASSERT(pBMI->bmiHeader.biBitCount == 8);
    // Test for silly cases.
    if (ws == 0 || hs == 0) return;

    // Get pointers to the start points in the source and destination
    // DIBs. Note that this will be the bottom-left corner of
    // the DIB because the scan lines are reversed in memory.
    BYTE* pSrcLine = (BYTE*)m_dsBuffer.GetPixelAddress(xs, ys + hs - 1);
    ASSERT(pSrcLine);
    BYTE* pDestLine = (BYTE*)m_dsBuffer.GetPixelAddress(xd, yd + hs*2 - 1);
    ASSERT(pDestLine);

    // Get the scan line widths of each DIB.
    int iScanS = m_dsBuffer.GetStorageWidth();
    int iScanD = m_dsBuffer.GetStorageWidth();

    BYTE* pd;
    BYTE* ps;
    BYTE* ps1;
    BYTE* ps2;
    int i;
    // Process each source line.
    for (int l = 0; l < hs; l++) {

        // Copy the source pixels to every other destination pixel.
        pd = pDestLine;
        ps = pSrcLine;
        for (i = 0; i < ws; i++) {
            *pd = *ps++;
            pd += 2;
        }

        // Fill in the gaps with the average of the pixels either side.
        ps1 = pDestLine;
        ps2 = pDestLine + 2;
        pd = pDestLine + 1;
        for (i = 0; i < ws - 1; i++) {
            *pd = m_Imap2[*ps1][*ps2];
            ps1 += 2;
            ps2 += 2;
            pd += 2;
        }
        // The last pixel is a simple copy of the one before it.
        *pd = *ps1;

        pDestLine += iScanD * 2;
        pSrcLine += iScanS;
    }

    // Process the missing lines in the destination.
    pSrcLine = (BYTE*)m_dsBuffer.GetPixelAddress(xd, yd + hs*2 - 1);
    ASSERT(pSrcLine);

    for (l = 0; l < hs-1; l++) {

        ps1 = pSrcLine;
        ps2 = pSrcLine + iScanD * 2;
        pd = pSrcLine + iScanD;

        for (i = 0; i < wd; i++) {
            *pd++ = m_Imap2[*ps1++][*ps2++];
        }

        pSrcLine += iScanS * 2;
    }

    // The last line is a simple copy of the one before it.
    ps = pSrcLine;
    pd = pSrcLine + iScanD;
    for (i = 0; i < wd; i++) {
        *pd++ = *ps++;
    }
}
Note that Interp2 stretches chunks of the off-screen buffer and that its arguments would need to be modified slightly to be more like StretchBlt.
It's fairly easy to modify the sample to expand by 3 instead of 2. You will need two lookup tables instead of one. One table will look up the 1/3 distance between two pixels; the other table will look up the 2/3 value.